LinearLayout: prevent last child from getting pushed out or squeezed by large textview before it
Asked Answered
B

4

5

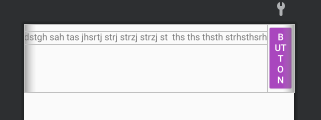
I have a LinearLayout with two children inside of it. The first is a TextView with dynamic content, the second one is a button. My problem is that the button gets pushed out of its parent or gets squeezed up to a point where it is no longer visible. I would like the TextView to recognize that there is no more space inside its parents together with the second child, and to start a new line instead of stealing the space needed for the second child. The Button should however be next to the text, and not all the way to the right side of by default.

I have tried lots of different things that didn't work, here in the following code I'm just posting the minimal example that I would like to work, without the different changes I tried already.

<?xml version="1.0" encoding="utf-8"?>
<LinearLayout
    xmlns:android="http://schemas.android.com/apk/res/android"
    android:orientation="horizontal"
    android:layout_width="match_parent"
    android:layout_height="wrap_content">
    <TextView
        android:layout_width="wrap_content"
        android:layout_height="wrap_content"
        android:text="sdrndesfntzrfndtzmufzksbnsfdn stnbhdsfbns sth st ömcfz,frznz"/>

    <Button
        android:layout_width="wrap_content"
        android:layout_height="wrap_content"
        android:text="Button" />
</LinearLayout>

So in summary: I would like the TextView to take several lines instead of taking the Button's space. The number of lines should of course be dynamic, depending on the text inside the view. The Button should be directly next to the textview and move to the right as the text gets larger.

Here is a visual representation of what i want:

what I want 1

what i want 2

and here what I get.

what i get

setting the maxwidth of the textview is an easy solution, but in more complex and dynamic layouts, you don't always know what the maximum width will be. So it would be nice to have a solution without hard-coded maxWidths.

Bridgeport answered 21/6, 2021 at 13:10 Comment(6)
use static or maxWidth for your textview like 120dpCatherincatherina
I used that as a workaround, calculating the maxWidth of the textview inside the code, but I was hoping to find a better solution. The example here is of course simplified. In the actual code it is a bit trickier to calculate the maxWidth of the TextViewBridgeport
show me the screenshot of what you want and what you get for better understandingsCatherincatherina
@UsamaAltaf I edited the question. In case you meant the actual example in my project: There are several of these cases and I will probably run into more in the future. I tried to distill the problem with my example above, a solution to this one should be applicable to all other occurences in my project.Bridgeport
set fixed width of button and that is going to be okay button width like 40dpCatherincatherina
@UsamaAltaf that makes the button leave its parent when the text gets to long. Once the button is completely out, the textview recognizes that there is no more space and does a linebreak, but unfortunately not before.Bridgeport
P
1

You can try FlexboxLayout: https://github.com/google/flexbox-layout

<com.google.android.flexbox.FlexboxLayout
    xmlns:android="http://schemas.android.com/apk/res/android"
    xmlns:app="http://schemas.android.com/apk/res-auto"
    android:orientation="horizontal"
    android:layout_width="match_parent"
    android:layout_height="wrap_content"
    app:alignItems="center"
    app:alignContent="center"
    app:flexDirection="row"
    app:flexWrap="nowrap">

    <TextView
        android:layout_width="wrap_content"
        android:layout_height="wrap_content"
        android:text="sdrndesfntzrfndtzmufzksbnsfdn stnbhdsfbns sth st ömcfz,frznz dfgsfsdfsdf"
        app:layout_flexShrink="10000"/>

    <Button
        android:layout_width="wrap_content"
        android:layout_height="wrap_content"
        android:text="Button"/>
</com.google.android.flexbox.FlexboxLayout>

app:layout_flexShrink="10000" is what does the correct resizing of the elements.

EDT build.gradle configuration:

allprojects {
  repositories {
    ...
    maven { url "https://maven.google.com" }
  }
}

dependencies {
  ...
  implementation 'com.google.android.flexbox:flexbox:3.0.0'
}
Phantasm answered 21/6, 2021 at 15:46 Comment(0)
H
5

Doing it in Layout

This can be fixed using ConstraintLayout with:

  • packed horizontal chain
  • 0 horizontal bias.
  • Enable constraintWidth
<?xml version="1.0" encoding="utf-8"?>
<androidx.constraintlayout.widget.ConstraintLayout xmlns:android="http://schemas.android.com/apk/res/android"
    xmlns:app="http://schemas.android.com/apk/res-auto"
    xmlns:tools="http://schemas.android.com/tools"
    android:layout_width="wrap_content"
    android:layout_height="wrap_content">

    <TextView
        android:id="@+id/textView"
        android:layout_width="wrap_content"
        android:layout_height="wrap_content"
        android:text="sdrndesfntzrfndtzmufzksbnsfdn stnbhdsfbns sth st ömcfz,frznz"
        app:layout_constrainedWidth="true"
        app:layout_constraintBottom_toBottomOf="parent"
        app:layout_constraintEnd_toStartOf="@id/button"
        app:layout_constraintHorizontal_bias="0"
        app:layout_constraintHorizontal_chainStyle="packed"
        app:layout_constraintStart_toStartOf="parent"
        app:layout_constraintTop_toTopOf="parent"/>

    <Button
        android:id="@+id/button"
        android:layout_width="wrap_content"
        android:layout_height="wrap_content"
        app:layout_constraintBottom_toBottomOf="parent"
        app:layout_constraintEnd_toEndOf="parent"
        app:layout_constraintStart_toEndOf="@id/textView"
        app:layout_constraintTop_toTopOf="parent" />

</androidx.constraintlayout.widget.ConstraintLayout>

Doing it dynamically

If you still need to use LinearLayout, then you can do it programmtically. As you need to wrap_content both the TextView and Button in the same width, so logically this is not achievable because when the sum of widths is greater than the screen width, some view will be greedy on the other.

Therefore you decided to do that wrap_content until the button takes wraps its width without going off the end of the screen.

But now the TextView width shouldn't be wrap_content; instead it should be some fixed size; because if it still wrap_content it'll be greedy on the Button, and kick it off the screen or being squeezed like in your case.

So, we need to do some effort programmatically to know the screen width, so we will limit the TextView to the equation:

TextView_maxWidth =  screenWidth - buttonWidth

Solution 1: Using LinearLayout

If we set the TextView text on the layout, now the button will be squeezed, and we couldn't determine the wrap_content size of the Button programmatically, so in this solution the textView text is set programmatically after we got the Button size.

layout (Nothing fancy):

<?xml version="1.0" encoding="utf-8"?>
<LinearLayout xmlns:android="http://schemas.android.com/apk/res/android"
    android:id="@+id/root"
    android:layout_width="match_parent"
    android:layout_height="wrap_content"
    android:orientation="horizontal">

    <TextView
        android:id="@+id/textView"
        android:layout_width="wrap_content"
        android:layout_height="wrap_content" />

    <Button
        android:id="@+id/button"
        android:layout_width="wrap_content"
        android:layout_height="wrap_content"
        android:text="Button" />
</LinearLayout>

Behavior:

@Override
protected void onCreate(Bundle savedInstanceState) {
    super.onCreate(savedInstanceState);
    setContentView(R.layout.activity_main);

    LinearLayout root = findViewById(R.id.root);
    
    root.getViewTreeObserver().addOnGlobalLayoutListener(new ViewTreeObserver.OnGlobalLayoutListener() {
        @Override
        public void onGlobalLayout() {
            if (Build.VERSION.SDK_INT >= Build.VERSION_CODES.JELLY_BEAN) {
                root.getViewTreeObserver()
                        .removeOnGlobalLayoutListener(this);
            }
            int width = root.getWidth();
            Button button = findViewById(R.id.button);
            int buttonWidth = button.getWidth();
            int maxTextWidth = width - buttonWidth;

            TextView textView = findViewById(R.id.textView);
            textView.setMaxWidth(maxTextWidth);
            textView.setText("drndesfntzrfndtzmufzksbnsfdn stnbhdsfbns sth st ömcfz,frznz");

        }
    });
}

Solution 2: Using ConstraintLayout

Unlike LinearLayout, ConstraintLayout can force the button size to be wrap_content without being squeezed, and therefore we can set the text of the TextView on layout.

Layout:

<?xml version="1.0" encoding="utf-8"?>
<androidx.constraintlayout.widget.ConstraintLayout xmlns:android="http://schemas.android.com/apk/res/android"
    xmlns:app="http://schemas.android.com/apk/res-auto"
    android:id="@+id/root"
    android:layout_width="match_parent"
    android:layout_height="wrap_content">

    <TextView
        android:id="@+id/textView"
        android:layout_width="wrap_content"
        android:layout_height="wrap_content"
        android:text="sdrn desf ntzrf ndtz mufzk sbnsf dn sdrnde sf ntzrfn dtz mufzks bns fdn sd rn de sfnt zrf ndtzmufzk sbnsfdnstn bhdsfbns sth st ömcfz, frznz"
        app:layout_constrainedWidth="true"
        app:layout_constraintStart_toStartOf="parent"
        app:layout_constraintTop_toTopOf="parent" />

    <Button
        android:id="@+id/button"
        android:layout_width="wrap_content"
        android:layout_height="wrap_content"
        android:text="Button"
        app:layout_constraintStart_toEndOf="@id/textView"
        app:layout_constraintTop_toTopOf="parent" />
</androidx.constraintlayout.widget.ConstraintLayout>

Behavior:

@Override
protected void onCreate(Bundle savedInstanceState) {
    super.onCreate(savedInstanceState);
    setContentView(R.layout.activity_main);

    ConstraintLayout root = findViewById(R.id.root);
    root.getViewTreeObserver().addOnGlobalLayoutListener(new ViewTreeObserver.OnGlobalLayoutListener() {
        @Override
        public void onGlobalLayout() {
            if (Build.VERSION.SDK_INT >= Build.VERSION_CODES.JELLY_BEAN) {
                root.getViewTreeObserver()
                        .removeOnGlobalLayoutListener(this);
            }
            
            int width = root.getWidth();
            Button button = findViewById(R.id.button);
            int buttonWidth = button.getWidth();
            int maxTextWidth = width - buttonWidth;
            
            TextView textView = findViewById(R.id.textView);
            textView.setMaxWidth(maxTextWidth); 

        }
    });
}

Previews:

enter image description here

enter image description here

Hook answered 21/6, 2021 at 22:39 Comment(1)
Using standard ConstraintLayout is way better than other approach. app:layout_constrainedWidth is the key to the solution. Thank youCampanulaceous
P
1

You can try FlexboxLayout: https://github.com/google/flexbox-layout

<com.google.android.flexbox.FlexboxLayout
    xmlns:android="http://schemas.android.com/apk/res/android"
    xmlns:app="http://schemas.android.com/apk/res-auto"
    android:orientation="horizontal"
    android:layout_width="match_parent"
    android:layout_height="wrap_content"
    app:alignItems="center"
    app:alignContent="center"
    app:flexDirection="row"
    app:flexWrap="nowrap">

    <TextView
        android:layout_width="wrap_content"
        android:layout_height="wrap_content"
        android:text="sdrndesfntzrfndtzmufzksbnsfdn stnbhdsfbns sth st ömcfz,frznz dfgsfsdfsdf"
        app:layout_flexShrink="10000"/>

    <Button
        android:layout_width="wrap_content"
        android:layout_height="wrap_content"
        android:text="Button"/>
</com.google.android.flexbox.FlexboxLayout>

app:layout_flexShrink="10000" is what does the correct resizing of the elements.

EDT build.gradle configuration:

allprojects {
  repositories {
    ...
    maven { url "https://maven.google.com" }
  }
}

dependencies {
  ...
  implementation 'com.google.android.flexbox:flexbox:3.0.0'
}
Phantasm answered 21/6, 2021 at 15:46 Comment(0)
J
0

You can set the width of the TextView and Button to 0dp and set weigths, like this:

<?xml version="1.0" encoding="utf-8"?>
<LinearLayout
    xmlns:android="http://schemas.android.com/apk/res/android"
    android:orientation="horizontal"
    android:layout_width="match_parent"
    android:layout_height="wrap_content">
    <TextView
        android:layout_width="0dp"
        android:layout_height="wrap_content"
        android:layout_weight="3"
        android:text="sdrndesfntzrfndtzmufzksbnsfdn stnbhdsfbns sth st ömcfz,frznz"/>
    <Button
        android:layout_width="0dp"
        android:layout_height="wrap_content"
        android:layout_weight="1"
        android:text="Button" />
</LinearLayout>

In this example the TextViews width is 3/4s and the Buttons width is 1/4 of the width of the Parent, but you can set this to whatever you want by playing with the weights.

Joellyn answered 21/6, 2021 at 13:27 Comment(1)
"The Button should be directly next to the textview and move to the right as the text gets larger" This code will not provide that. The button will always be with the right end.Tripoli
C
0

Use RelativeLayout for better results

<RelativeLayout
        xmlns:android="http://schemas.android.com/apk/res/android"
        android:layout_width="match_parent"
        android:layout_height="wrap_content">
        <TextView
            android:layout_width="wrap_content"
            android:layout_height="wrap_content"
            android:layout_toStartOf="@id/btn"
            android:layout_marginEnd="5dp"
            android:text="sdrndesfntzrfndtzmufzksbnsfdn stnbhdsfbns sth st ömcfz,frznz"/>
    
        <Button
            android:id="@+id/btn"
            android:layout_width="wrap_content"
            android:layout_height="wrap_content"
            android:layout_alignParentEnd="true"
            android:text="Button" />
    </RelativeLayout>
Catherincatherina answered 21/6, 2021 at 13:43 Comment(1)
thanks for the answer, unfortunately that one doesn't work with smaller text. It does fulfill my written conditions, but I want the TextView to start on the left side, like in the first picture I postedBridgeport

© 2022 - 2024 — McMap. All rights reserved.