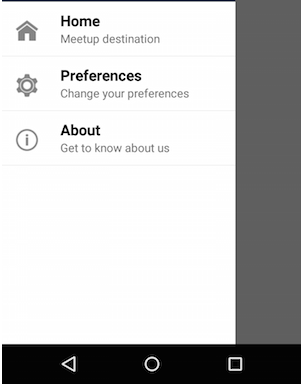
Inside in DrawerLayout create ListView using below code
 <!-- List of Actions (pages) -->
        <ListView
            android:id="@+id/navList"
            android:layout_width="280dp"
            android:layout_height="match_parent"
            android:layout_below="@+id/profileBox"
            android:choiceMode="singleChoice"
            android:background="#ffffffff" />
Now Create one Class that contain property for Title, SubTitle and Icon like below.
class NavItem {
    String mTitle;
    String mSubtitle;
    int mIcon;

    public NavItem(String title, String subtitle, int icon) {
        mTitle = title;
        mSubtitle = subtitle;
        mIcon = icon;
    }
}
Now Create Adapter for that
class DrawerListAdapter extends BaseAdapter {

    Context mContext;
    ArrayList<NavItem> mNavItems;

    public DrawerListAdapter(Context context, ArrayList<NavItem> navItems) {
        mContext = context;
        mNavItems = navItems;
    }

    @Override
    public int getCount() {
        return mNavItems.size();
    }

    @Override
    public Object getItem(int position) {
        return mNavItems.get(position);
    }

    @Override
    public long getItemId(int position) {
        return 0;
    }

    @Override
    public View getView(int position, View convertView, ViewGroup parent) {
        View view;

        if (convertView == null) {
            LayoutInflater inflater = (LayoutInflater) mContext.getSystemService(Context.LAYOUT_INFLATER_SERVICE);
            view = inflater.inflate(R.layout.drawer_item, null);
        }
        else {
            view = convertView;
        }

        TextView titleView = (TextView) view.findViewById(R.id.title);
        TextView subtitleView = (TextView) view.findViewById(R.id.subTitle);
        ImageView iconView = (ImageView) view.findViewById(R.id.icon);

        titleView.setText( mNavItems.get(position).mTitle );
        subtitleView.setText( mNavItems.get(position).mSubtitle );
        iconView.setImageResource(mNavItems.get(position).mIcon);

        return view;
    }
}
Create Listview item xml to get your format
<?xml version="1.0" encoding="utf-8"?>
<RelativeLayout xmlns:android="http://schemas.android.com/apk/res/android"
    android:layout_width="match_parent"
    android:layout_height="match_parent"
    android:paddingTop="10dp"
    android:paddingBottom="10dp">

    <ImageView
        android:id="@+id/icon"
        android:layout_width="40dp"
        android:layout_height="40dp"
        android:src="@drawable/ic_action_home"
        android:layout_alignParentLeft="true"
        android:layout_alignParentStart="true"
        android:layout_marginRight="20dp"
        android:layout_marginLeft="10dp"
        android:layout_marginTop="5dp"
         />

    <TextView
        android:id="@+id/title"
        android:layout_width="wrap_content"
        android:layout_height="wrap_content"
        android:textSize="18sp"
        android:gravity="center_vertical"
        android:textColor="#000"
        android:text="Line 1"
        android:textStyle="bold"
        android:layout_alignParentTop="true"
        android:layout_toRightOf="@+id/icon"
        android:layout_toEndOf="@+id/icon" />

    <TextView android:id="@+id/subTitle"
        android:layout_width="wrap_content"
        android:layout_height="wrap_content"
        android:text="Line 2"
        android:layout_toRightOf="@+id/icon"
        android:layout_below="@+id/title"
        android:layout_alignParentRight="true"
        android:layout_alignParentEnd="true" />

</RelativeLayout>
and Finally Add into MainActivity.java file like below way.
private static String TAG = MainActivity.class.getSimpleName();

ListView mDrawerList;
RelativeLayout mDrawerPane;
private ActionBarDrawerToggle mDrawerToggle;
private DrawerLayout mDrawerLayout;

ArrayList<NavItem> mNavItems = new ArrayList<NavItem>();

@Override
protected void onCreate(Bundle savedInstanceState) {
    super.onCreate(savedInstanceState);
    setContentView(R.layout.activity_main);

    mNavItems.add(new NavItem("Home", "Meetup destination", R.drawable.ic_action_home));
    mNavItems.add(new NavItem("Preferences", "Change your preferences", R.drawable.ic_action_settings));
    mNavItems.add(new NavItem("About", "Get to know about us", R.drawable.ic_action_about));

    // DrawerLayout
    mDrawerLayout = (DrawerLayout) findViewById(R.id.drawerLayout);

    // Populate the Navigtion Drawer with options
    mDrawerPane = (RelativeLayout) findViewById(R.id.drawerPane);
    mDrawerList = (ListView) findViewById(R.id.navList);
    DrawerListAdapter adapter = new DrawerListAdapter(this, mNavItems);
    mDrawerList.setAdapter(adapter);

    // Drawer Item click listeners
    mDrawerList.setOnItemClickListener(new AdapterView.OnItemClickListener() {
        @Override
        public void onItemClick(AdapterView<?> parent, View view, int position, long id) {
            selectItemFromDrawer(position);
        }
    });
You will get Below Output :
![enter image description here]()


