React Native how to make border to the corner of the square only like QR code marker
Asked Answered
E

4

5

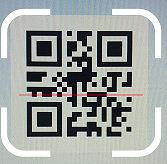
I was trying to make a QR code marker like this pic below.

enter image description here

So I'm wondering how to make those 4 corners instead of a full border marker.

I was currently using react-native-qrcode-scanner.

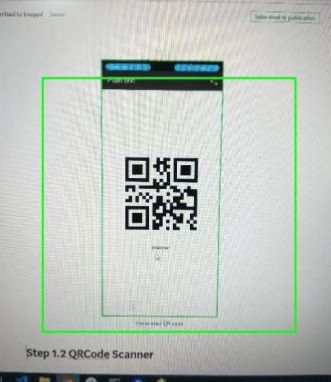
The default marker is like this:

enter image description here

and here is the code that I have:

<QRCodeScanner
        // containerStyle={{ height: '100%' }}
        // cameraStyle={{ height: '100%' }}
        onRead={handleScan}
        showMarker
        markerStyle={{ borderColor: colors.primary, borderRadius: 20 }}
        cameraProps={{
          captureAudio: false,
          flashMode: RNCamera.Constants.FlashMode.auto,
        }}

But I want to change it to the first image I gave.

Appreciate it if someone could help. Thanks

Employ answered 9/7, 2020 at 10:38 Comment(1)
hello, I am sorry bother you. I also have a problem like you. Do you solve this problem. If you ok, can you share the code. I read the doc but I am no experience React native. I hope you share the code . If you agree my suppose. can you send me the code.My email [email protected]. Thank youScholem
E
3

if it would have been a straight line, it would have been easy by putting border radius. But since its bit different , you can achieve this by using this library :

RN-svg , where you can provide the xml pattern and it will render acordingly, just you need to position beside the marker, that's it.

Hopeit helps. feel free for doubts

Eduard answered 9/7, 2020 at 11:6 Comment(1)
can your provide a working code ... will be much appreciatedMeleager
M
8

QRCodeScanner has a customMarker prop which allows you to use any JSX.Element as marker.

Here is what I am currently using myself:

function marker(color: string, size: string | number, borderLength: string | number, thickness: number = 2, borderRadius: number = 0): JSX.Element {
  return <View style={{ height: size, width: size }}>
    <View style={{ position: 'absolute', height: borderLength, width: borderLength, top: 0, left: 0, borderColor: color, borderTopWidth: thickness, borderLeftWidth: thickness, borderTopLeftRadius: borderRadius }}></View>
    <View style={{ position: 'absolute', height: borderLength, width: borderLength, top: 0, right: 0, borderColor: color, borderTopWidth: thickness, borderRightWidth: thickness, borderTopRightRadius: borderRadius }}></View>
    <View style={{ position: 'absolute', height: borderLength, width: borderLength, bottom: 0, left: 0, borderColor: color, borderBottomWidth: thickness, borderLeftWidth: thickness, borderBottomLeftRadius: borderRadius }}></View>
    <View style={{ position: 'absolute', height: borderLength, width: borderLength, bottom: 0, right: 0, borderColor: color, borderBottomWidth: thickness, borderRightWidth: thickness, borderBottomRightRadius: borderRadius }}></View>
  </View>
}

Which, in your case could be used like this:

  <QRCodeScanner
    ...
    customMarker={marker('white', '60%', '25%', 6, 20)}
  />

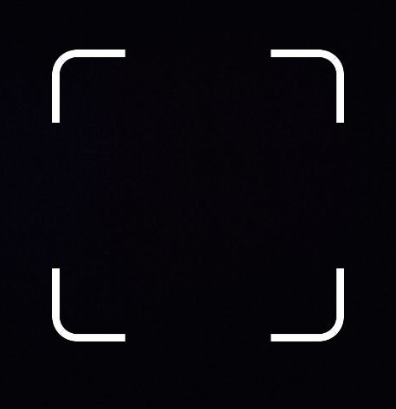
How it looks like

Marchesa answered 13/2, 2023 at 21:56 Comment(0)
E
3

if it would have been a straight line, it would have been easy by putting border radius. But since its bit different , you can achieve this by using this library :

RN-svg , where you can provide the xml pattern and it will render acordingly, just you need to position beside the marker, that's it.

Hopeit helps. feel free for doubts

Eduard answered 9/7, 2020 at 11:6 Comment(1)
can your provide a working code ... will be much appreciatedMeleager
L
1

This is what I have recently used:

<BarCodeScanner
            onBarCodeScanned={scanned ? undefined : handleBarCodeScanned}
            style={StyleSheet.absoluteFillObject}
          />
        </View>
       <View style={[styles.border,
       {
        width: qrCodeDimensions.width || 250,
        height: qrCodeDimensions.height || 250, 
      },
      ]}>
       <View style={[styles.corner, styles.topLeft]} />
        <View style={[styles.corner, styles.topRight]} />
        <View style={[styles.corner, styles.bottomLeft]} />
        <View style={[styles.corner, styles.bottomRight]} />
       </View>

       <View style={styles.tap}>
          {scanned && (
        <Button 
        title='Tap to Scan Again' onPress={() => setScanned(false)} />
      )}

//style: frameContainer: { position: 'relative', flex: 1, justifyContent: 'center', alignItems: 'center',

  },

  corner: {
    width: 30, // Adjust the width of the corner dashes
    height: 30, // Adjust the height of the corner dashes
    borderWidth: 5,
    borderColor: color.primary,
    position: 'absolute',
    borderRadius: 2
  },
  topLeft: {
    top: -1,
    left: -1,
    borderRightWidth: 0,
    borderBottomWidth: 0,
  },
  topRight: {
    top: -1,
    right: -1,
    borderLeftWidth: 0,
    borderBottomWidth: 0,
  },
  bottomLeft: {
    bottom: -1,
    left: -1,
    borderRightWidth: 0,
    borderTopWidth: 0,
  },
  bottomRight: {
    bottom: -2,
    right: -1,
    borderLeftWidth: 0,
    borderTopWidth: 0,
  },
  border: {
    width: 200,
    height: 200,
    borderWidth: 0,
    borderRadius: 10,
    borderColor: 'gray',
    position: 'relative',
  },
Localize answered 15/1 at 2:12 Comment(1)
As it’s currently written, your answer is unclear. Please edit to add additional details that will help others understand how this addresses the question asked. You can find more information on how to write good answers in the help center.Covarrubias
R
1

For anyone using expo camera (which is the recommended way of doing QRCode reading in 2024) and needing the same result. I tried some of the answers previously answered and based on those I was able to achieve the style.

It might be helpful.

This is the jsx component:

 <View style={styles.container}>
    {isCameraViewOpen ? (
      <>
        <CameraView
          mode="video"
          onBarcodeScanned={scanned ? undefined : handleBarCodeScanned}
          barcodeScannerSettings={{
            barcodeTypes: ["qr", "pdf417"],
          }}
          style={StyleSheet.absoluteFillObject}
        />

        <View style={[styles.border]}>
          <View style={[styles.corner, styles.topLeft]} />
          <View style={[styles.corner, styles.topRight]} />
          <View style={[styles.corner, styles.bottomLeft]} />
          <View style={[styles.corner, styles.bottomRight]} />
        </View>

        {scanned && (
          <Button
            title={"Tap to Scan Again"}
            onPress={() => setScanned(false)}
          />
        )}
      </>
    ) : (
      <View>
        <Text>Camera nao visível</Text>
      </View>
    )}
  </View>

and this is the stylesheet for the component above. Make the adjustments that you might need:

const styles = StyleSheet.create({
    container: {
     flex: 1,
     flexDirection: "column",
     justifyContent: "center",
     alignItems: "center",
   },
     corner: {
      width: 60, // Adjust the width of the corner dashes
      height: 60, // Adjust the height of the corner dashes
      borderWidth: 2,
      borderColor: "red",
      position: "absolute",
      borderRadius: 2,
   },
     topLeft: {
       top: -1,
       left: -1,
       borderRightWidth: 0,
       borderBottomWidth: 0,
   },
    topRight: {
      top: -1,
      right: -1,
      borderLeftWidth: 0,
      borderBottomWidth: 0,
   },
     bottomLeft: {
      bottom: -1,
      left: -1,
      borderRightWidth: 0,
      borderTopWidth: 0,
   },
    bottomRight: {
      bottom: -2,
      right: -1,
      borderLeftWidth: 0,
      borderTopWidth: 0,
   },
     border: {
       width: 300,
       height: 300,
       borderWidth: 0,
       borderRadius: 10,
       borderColor: "blue",
       position: "relative",
   },

})
Rancidity answered 9/5 at 16:34 Comment(0)

© 2022 - 2024 — McMap. All rights reserved.