How to make my WPF app to be on top of everything, even the Windows taskbar (like Windows clock app)?
Asked Answered
M

2

1

I made a little timer app using WPF and I wanted to put my app on the taskbar, but when I click anywhere on the taskbar, my app loses focus and the taskbar comes on top of my app, even though I have Topmost=True in the XAML code.

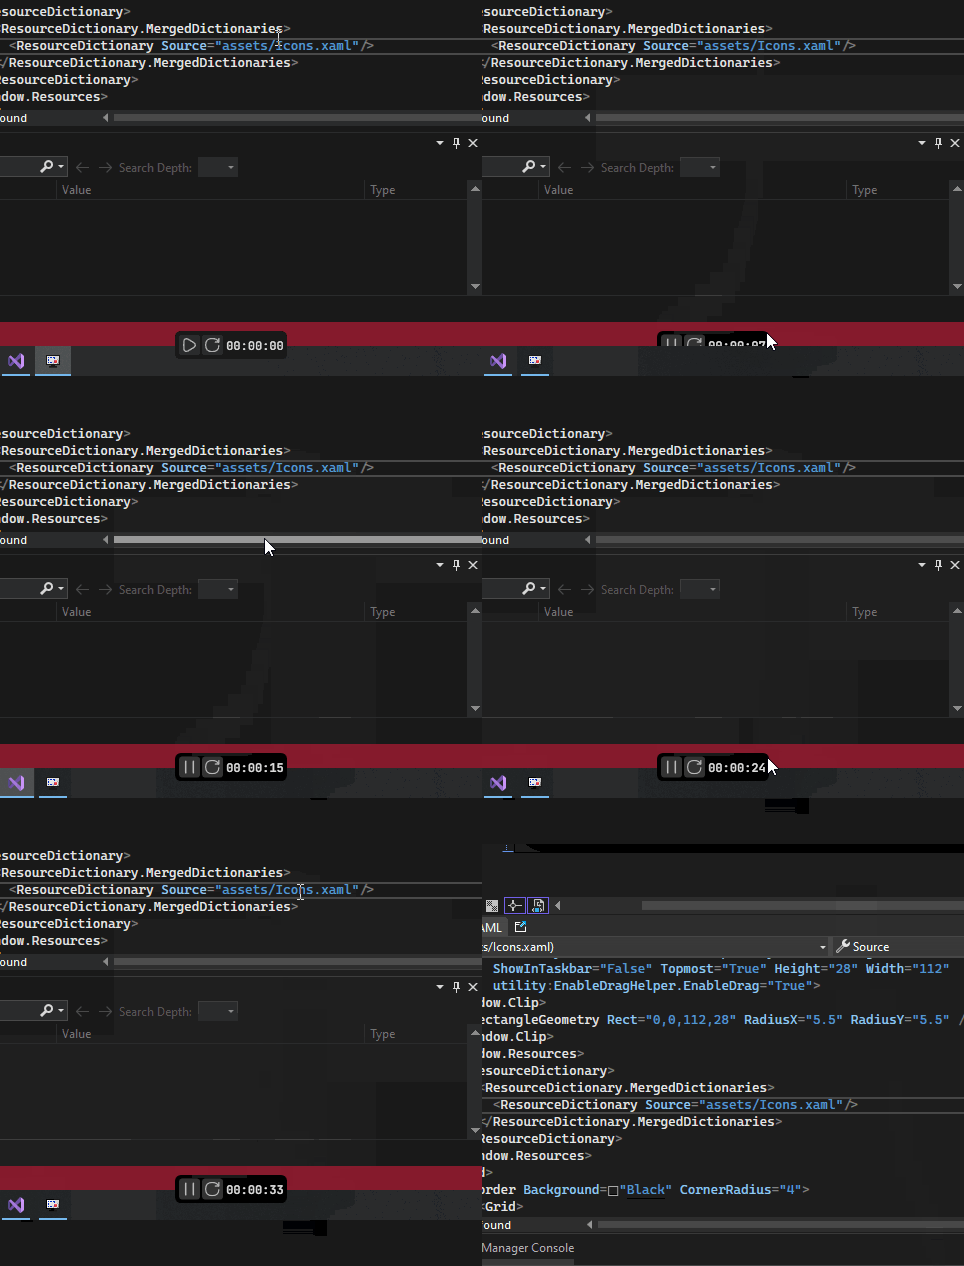
How my app behaves:

enter image description here

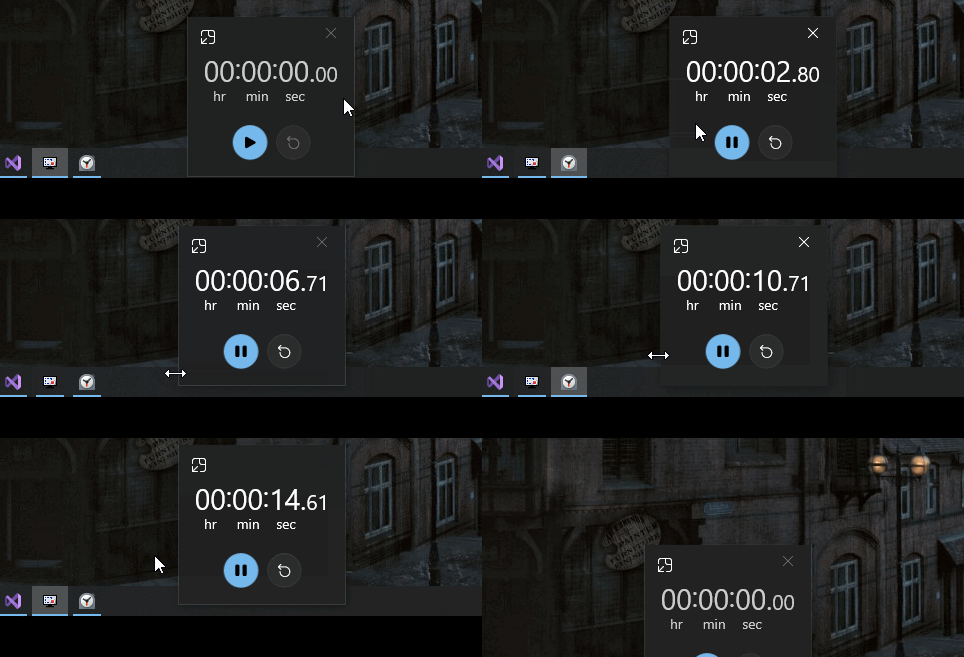
And Windows clock app which behaves exactly the way that I want 🥺:

enter image description here

Is there any way to achieve this behavior in my WPF app?

The XAML code:

<Window x:Class="MultiStopwatch.StopwatchWindow"
        xmlns="http://schemas.microsoft.com/winfx/2006/xaml/presentation"
        xmlns:x="http://schemas.microsoft.com/winfx/2006/xaml"
        xmlns:d="http://schemas.microsoft.com/expression/blend/2008"
        xmlns:mc="http://schemas.openxmlformats.org/markup-compatibility/2006"
        xmlns:utility="clr-namespace:MultiStopwatch.Utility"
        mc:Ignorable="d"
        Title="MultiStopwatchWindow"
        WindowStyle="None" AllowsTransparency="True" Background="Transparent" ResizeMode="NoResize"
        ShowInTaskbar="False" Topmost="True" Height="28" Width="112"
        utility:EnableDragHelper.EnableDrag="True">
  <Window.Clip>
    <RectangleGeometry Rect="0,0,112,28" RadiusX="5.5" RadiusY="5.5" />
  </Window.Clip>
  <Window.Resources>
    <ResourceDictionary>
      <ResourceDictionary.MergedDictionaries>
        <ResourceDictionary Source="assets/Icons.xaml"/>
      </ResourceDictionary.MergedDictionaries>
    </ResourceDictionary>
  </Window.Resources>
  <Grid>
    <Border Background="Black" CornerRadius="4">
      <Grid>
        <Button x:Name="StartBtn" Margin="0,0,83,0" Width="21" Height="21" Cursor="Hand"
                Click="StartBtn_OnClick">
          <Button.Template>
            <ControlTemplate TargetType="Button">
              <Border x:Name="StartBtnBorder" Background="#333333" CornerRadius="3" Padding="3.5"
                      RenderTransformOrigin="0.5,0.5">
                <Border.RenderTransform>
                  <ScaleTransform />
                </Border.RenderTransform>
                <ContentPresenter HorizontalAlignment="Center" VerticalAlignment="Center" />
              </Border>
              <ControlTemplate.Triggers>
                <Trigger Property="IsMouseOver" Value="True">
                  <Trigger.EnterActions>
                    <BeginStoryboard>
                      <Storyboard>
                        <ColorAnimation Storyboard.TargetName="StartBtnBorder"
                                        Storyboard.TargetProperty="(Border.Background).(SolidColorBrush.Color)"
                                        To="#454545" Duration="0:0:0.13" />
                      </Storyboard>
                    </BeginStoryboard>
                  </Trigger.EnterActions>
                  <Trigger.ExitActions>
                    <BeginStoryboard>
                      <Storyboard>
                        <ColorAnimation Storyboard.TargetName="StartBtnBorder"
                                        Storyboard.TargetProperty="(Border.Background).(SolidColorBrush.Color)"
                                        To="#333333" Duration="0:0:0.13" />
                      </Storyboard>
                    </BeginStoryboard>
                  </Trigger.ExitActions>
                </Trigger>
                <EventTrigger RoutedEvent="Button.Click">
                  <BeginStoryboard>
                    <Storyboard>
                      <DoubleAnimationUsingKeyFrames Storyboard.TargetName="StartBtnBorder"
                                                     Storyboard.TargetProperty="(Border.RenderTransform).(ScaleTransform.ScaleX)">
                        <EasingDoubleKeyFrame KeyTime="0:0:0" Value="0.9" />
                        <EasingDoubleKeyFrame KeyTime="0:0:0.09" Value="1" />
                      </DoubleAnimationUsingKeyFrames>
                      <DoubleAnimationUsingKeyFrames Storyboard.TargetName="StartBtnBorder"
                                                     Storyboard.TargetProperty="(Border.RenderTransform).(ScaleTransform.ScaleY)">
                        <EasingDoubleKeyFrame KeyTime="0:0:0" Value="0.9" />
                        <EasingDoubleKeyFrame KeyTime="0:0:0.09" Value="1" />
                      </DoubleAnimationUsingKeyFrames>
                    </Storyboard>
                  </BeginStoryboard>
                </EventTrigger>
              </ControlTemplate.Triggers>
            </ControlTemplate>
          </Button.Template>
          <Grid>
            <Image x:Name="StartBtnIcon" Source="{StaticResource StartDrawingImage}" />
          </Grid>
        </Button>
        <Button x:Name="ResetButton" Margin="0,0,37,0" Width="21" Height="21" Cursor="Hand"
                Click="ResetButton_OnClick">
          <Button.Template>
            <ControlTemplate TargetType="Button">
              <Border x:Name="ResetBtnBorder" Background="#333333" CornerRadius="3" Padding="3"
                      RenderTransformOrigin="0.5,0.5">
                <Border.RenderTransform>
                  <ScaleTransform />
                </Border.RenderTransform>
                <ContentPresenter HorizontalAlignment="Center" VerticalAlignment="Center" />
              </Border>
              <ControlTemplate.Triggers>
                <Trigger Property="IsMouseOver" Value="True">
                  <Trigger.EnterActions>
                    <BeginStoryboard>
                      <Storyboard>
                        <ColorAnimation Storyboard.TargetName="ResetBtnBorder"
                                        Storyboard.TargetProperty="(Border.Background).(SolidColorBrush.Color)"
                                        To="#454545" Duration="0:0:0.15" />
                      </Storyboard>
                    </BeginStoryboard>
                  </Trigger.EnterActions>
                  <Trigger.ExitActions>
                    <BeginStoryboard>
                      <Storyboard>
                        <ColorAnimation Storyboard.TargetName="ResetBtnBorder"
                                        Storyboard.TargetProperty="(Border.Background).(SolidColorBrush.Color)"
                                        To="#333333" Duration="0:0:0.13" />
                      </Storyboard>
                    </BeginStoryboard>
                  </Trigger.ExitActions>
                </Trigger>
                <EventTrigger RoutedEvent="Button.Click">
                  <BeginStoryboard>
                    <Storyboard>
                      <DoubleAnimationUsingKeyFrames Storyboard.TargetName="ResetBtnBorder"
                                                     Storyboard.TargetProperty="(Border.RenderTransform).(ScaleTransform.ScaleX)">
                        <EasingDoubleKeyFrame KeyTime="0:0:0" Value="0.9" />
                        <EasingDoubleKeyFrame KeyTime="0:0:0.09" Value="1" />
                      </DoubleAnimationUsingKeyFrames>
                      <DoubleAnimationUsingKeyFrames Storyboard.TargetName="ResetBtnBorder"
                                                     Storyboard.TargetProperty="(Border.RenderTransform).(ScaleTransform.ScaleY)">
                        <EasingDoubleKeyFrame KeyTime="0:0:0" Value="0.9" />
                        <EasingDoubleKeyFrame KeyTime="0:0:0.09" Value="1" />
                      </DoubleAnimationUsingKeyFrames>
                    </Storyboard>
                  </BeginStoryboard>
                </EventTrigger>
              </ControlTemplate.Triggers>
            </ControlTemplate>
          </Button.Template>
          <Grid>
            <Image Source="{StaticResource ResetDrawingImage}" />
          </Grid>
        </Button>
        <TextBox x:Name="FirstStopwatchTextBox" IsReadOnly="True" SelectionBrush="Transparent"
                 FontSize="12" BorderThickness="0" Cursor="SizeAll" TextAlignment="Center"
                 FontFamily="JetBrains Mono" FontWeight="SemiBold" Foreground="#DCDCDC"
                 Background="Transparent" Height="15" Margin="48,6,0,6" Text="00:00:00" />
      </Grid>
    </Border>
  </Grid>
</Window>

Edit:

I've tried using the Window.Activate(); but it only works for the first click on the taskbar, and on top of that, it doesn't work nicely... it forces the focus on the app and doesn't allow the focus to be transferred to another app on the first click, which is really bad. In the gif below I tried to show how it behaves. Notice that on the first click, the app is still on top, but on the second click the app goes behind the taskbar again. And notice how the focus doesn't go onto Visual Studio on the first click, but when I click one more time, the text cursor (caret) appears on my code and the focus is now fully on Visual Studio. This doesn't happen with the Windows clock app, if you click outside the app once, the focus is immediately transferred to that other app (while it is still on top of everything).

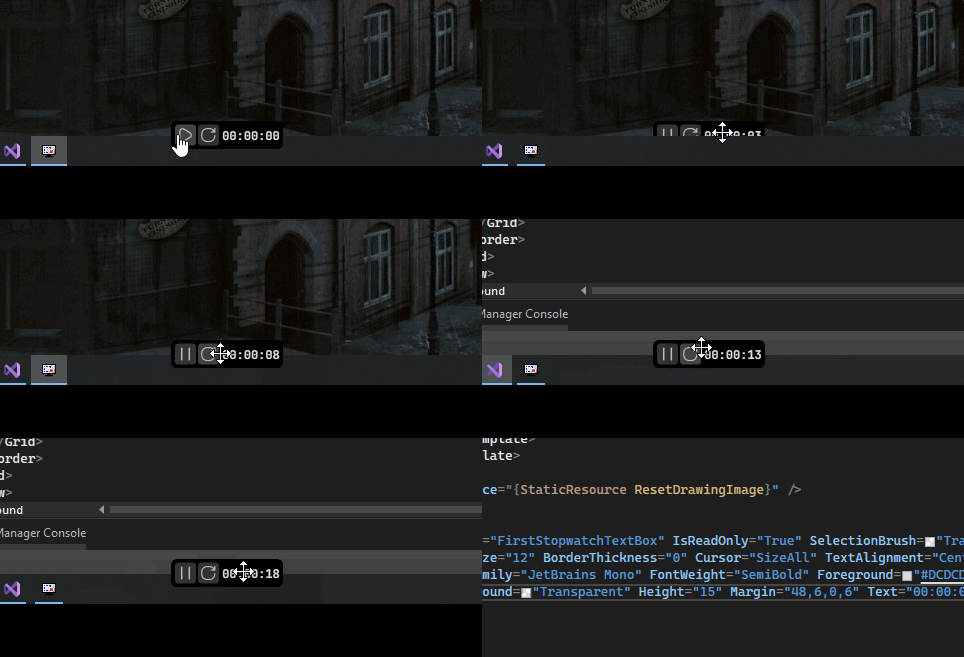
enter image description here

Milli answered 24/7, 2023 at 9:49 Comment(0)
M
0

The process is like this:

  1. Create a manifest in your project and set uiAccess to true.
  2. Buy a code signing certificate OR make a free self signed certificate by your own, using the New-SelfSignedCertificate command in PowerShell.
  3. Sign your app's .exe files using the Windows signtool and that certificate that you made.
  4. Install your app into one of these directories, or it will not work, either in C:\Windows or C:\Program Files

Step 1: Setting up the .manifest file

Right-click on your project, then Add Item, and in the search box at the top search for "manifest" and an item will pop up, choose that and create your app.manifest file.

In the app.manifest, you have to set uiAccess to true in the showed line below, so my app.manifest file looks like this:

<assembly manifestVersion="1.0" xmlns="urn:schemas-microsoft-com:asm.v1">
    <assemblyIdentity version="1.0.0.0" name="MyApplication.app"/>
    <trustInfo xmlns="urn:schemas-microsoft-com:asm.v2">
        <security>
            <requestedPrivileges xmlns="urn:schemas-microsoft-com:asm.v3">
                <!-- UAC Manifest Options
             If you want to change the Windows User Account Control level replace the 
             requestedExecutionLevel node with one of the following.

             <requestedExecutionLevel  level="asInvoker" uiAccess="false" />
             <requestedExecutionLevel  level="requireAdministrator" uiAccess="false" />
             <requestedExecutionLevel  level="highestAvailable" uiAccess="false" />

             Specifying requestedExecutionLevel element will disable file and registry virtualization. 
             Remove this element if your application requires this virtualization for backwards
             compatibility.
        -->
                <requestedExecutionLevel level="asInvoker" uiAccess="true" /> 👈 This line
            </requestedPrivileges>
        </security>
    </trustInfo>
    <compatibility xmlns="urn:schemas-microsoft-com:compatibility.v1">
        <application>
            <!-- A list of the Windows versions that this application has been tested on
           and is designed to work with. Uncomment the appropriate elements
           and Windows will automatically select the most compatible environment. -->

            <!-- Windows Vista -->
            <!--<supportedOS Id="{e2011457-1546-43c5-a5fe-008deee3d3f0}" />-->

            <!-- Windows 7 -->
            <!--<supportedOS Id="{35138b9a-5d96-4fbd-8e2d-a2440225f93a}" />-->

            <!-- Windows 8 -->
            <!--<supportedOS Id="{4a2f28e3-53b9-4441-ba9c-d69d4a4a6e38}" />-->

            <!-- Windows 8.1 -->
            <!--<supportedOS Id="{1f676c76-80e1-4239-95bb-83d0f6d0da78}" />-->

            <!-- Windows 10 -->
            <!--<supportedOS Id="{8e0f7a12-bfb3-4fe8-b9a5-48fd50a15a9a}" />-->

        </application>
    </compatibility>
    <!-- Indicates that the application is DPI-aware and will not be automatically scaled by Windows at higher
       DPIs. Windows Presentation Foundation (WPF) applications are automatically DPI-aware and do not need 
       to opt in. Windows Forms applications targeting .NET Framework 4.6 that opt into this setting, should 
       also set the 'EnableWindowsFormsHighDpiAutoResizing' setting to 'true' in their app.config. 
       
       Makes the application long-path aware. See https://docs.microsoft.com/windows/win32/fileio/maximum-file-path-limitation -->
    <!--
  <application xmlns="urn:schemas-microsoft-com:asm.v3">
    <windowsSettings>
      <dpiAware xmlns="http://schemas.microsoft.com/SMI/2005/WindowsSettings">true</dpiAware>
      <longPathAware xmlns="http://schemas.microsoft.com/SMI/2016/WindowsSettings">true</longPathAware>
    </windowsSettings>
  </application>
  -->
    <!-- Enable themes for Windows common controls and dialogs (Windows XP and later) -->
    <!--
  <dependency>
    <dependentAssembly>
      <assemblyIdentity
          type="win32"
          name="Microsoft.Windows.Common-Controls"
          version="6.0.0.0"
          processorArchitecture="*"
          publicKeyToken="6595b64144ccf1df"
          language="*"
        />
    </dependentAssembly>
  </dependency>
  -->
</assembly>

After setting this true I could no longer debug my app in Visual Studio, I think it there were some ways to debug it even with uiAccess set to true (Search for it if you really need it) but I just disabled it untill my whole app was finished and then I set it to true and publish it.

Now uiAccess requires your app to be signed by a code signing certificate (not SSL or anything, it has to be code signing, there are different types of certificates), because uiAccess is a high privilaged option, you can either buy a code signing cert (which is kinda expensive), or create a self signed certificate, which is free but it's just yours, so when you want to install this app on a different PC, it will probably throw error, because it can't find the certificate that you had on your PC, but by buying CA certificates, I think Windows will automatically recognize your app and have all the certificates and stuff ready to go for you, I don't know that much about them, or you could copy the certificate that you made into their computer and install it for them too (by installing I mean copying that certificate into the Trusted Root Certification Authorities store), or create an another self signed certificate on their system, which if you're app is a whole enterprise thing, you can't do that and you have to buy a certificate (I'm thinking that is it really immpossible? because it's just some commands that I could run after the user installs my app and I could automate the process of creating that self signed certificate on their system, import it into Trusted Root Certification Authorities store, and then finally sign my app's .exe files, I think it's possible IDK) in my case, I just made the app for myself, so I just needed to use it on my own PC that's why I made a self signed cert.

Step 2: Making the self signed certificate

Open PowerShell as admin, and use this command:

$cert = New-SelfSignedCertificate -DnsName YourCertificateName -CertStoreLocation cert:LocalMachine\My -Type CodeSigning -NotAfter (Get-Date).AddDays(HowManyDaysShouldThisCertBeValid?)

Example:

$cert = New-SelfSignedCertificate -DnsName HelloWorldCertificate -CertStoreLocation cert:LocalMachine\My -Type CodeSigning -NotAfter (Get-Date).AddDays(10000)

Now to install your self signed certificate to the Trusted Root Certificate Authorities store, you can follow these steps:

  • Open the Microsoft Management Console (MMC) by pressing Windows key + R and typing mmc.exe.
  • Click on File -> Add/Remove Snap-in and double click on the Certificates in the left pane. Choose Computer Account, hit next, Choose Local Computer, hit finish, then click OK.
  • Double click on the Certificates node and select the store where you installed the certificate, which was Personal, then click on the Certificates folder and you should see a list of Certificates.
  • Locate your self-signed certificate by the name that you set for it, and right-click on it. Choose Copy.
  • Select the Trusted Root Certification Authorities folder from the left pane, and expand it, then right click on the Certificates folder inside of it, and choose Paste.
  • Close the window and if it asked you to save, save it as the default file name which is Console1.

Now you've installed your certificate into the Trusted Root Certification Authorities on your machine. Now you have to create the .pfx file of that certificate, because we need it to sign our .exe files.

Open PowerShell as admin again and run this command:

$pwd = ConvertTo-SecureString -String "YourPassword" -Force -AsPlainText
Export-PfxCertificate -Cert $cert -FilePath "OutputPathToPutThePfxFileInto" -Password $pwd

Example:

$pwd = ConvertTo-SecureString -String "HelloWorld43506780" -Force -AsPlainText
Export-PfxCertificate -Cert $cert -FilePath "D:\Home\Self Signed Certificates\HelloWorldCertificate.pfx" -Password $pwd

Step 3: Signing the .exe files

I signed both my app's installer .exe file and also the .exe file which launches the app itself. I don't know if both are needed but do it. Download the signtool from this GitHub repo (The normal way is to download it from WindowsSDK but I tried downloading from there but my installer would throw 2230 (Not enough privilage) error that I couldn't fix at all).

Extract it and navigate to that folder (...\SignTool-10.0.22621.755\x64) my Windows is 64 bits so I used the x64 folder, if yours is 32 bit go into the x86 folder. Then open a CMD window as admin, in that same folder (it should be in the same directory, if it's not, then navigate to that folder where the signtool.exe file is located).

And run this command:

signtool sign /fdws /f "PathToThePfxFileThatYouCreatedInPreviousStep" /p "ThePasswordThatYou'veSet" /tr "TimeStampServerUrl" /td certHash /fd SHA256 /as "PathToYourApp'sInstaller.exeFile"

For the TimeStampServerUrl part, you might need to find a valid and online one by yourself, right now the http://timestamp.sectigo.com worked fine for me, you could use it too if this answer is not really old by now.

Example:

signtool sign /fdws /f "D:\Home\Self Signed Certificates\HelloWorldCertificate.pfx" /p "HelloWorld43506780" /tr "http://timestamp.sectigo.com" /td certHash /fd SHA256 /as "D:\My Projects\HelloWorld App\Output\HelloWorld-Setup.exe"

Now your installer file is signed. NOW YOU MUST INSTALL YOUR APP INTO ONE OF THESE FOLDERS OR IT WILL NOT WORK, either C:\Windows or C:\Program Files.

After you installed the app, lets sign the app's launcher .exe file too with the same command:

signtool sign /fdws /f "D:\Home\Self Signed Certificates\HelloWorldCertificate.pfx" /p "HelloWorld43506780" /tr "http://timestamp.sectigo.com" /td certHash /fd SHA256 /as "C:\Program Files\HelloWorld App\HelloWorld.exe"

Notice that this time you have to provide the path to the .exe file which launches the app. Which must be in one of those two directories that I said.

Important Notes

If you have set ShowInTaskbar="False" for your window in its .XAML file, then the uiAccess won't work. It was because of some weird advanced stuff that I couldn't understand (I'd ask all of this from Bing AI by the way (on it's "Creative Mode", it might be something different now)).

But don't worry cause I think I know how to fix it even if you have ShowInTaskbar="False". You should simply listen to your window's Loaded event in the code behind and when the window is loaded, you should set TopMost = false and then Topmost = true:

public partial class HelloWorldAppWindow : Window
{
    public HelloWorldAppWindow()
    {
        InitializeComponent();

        Loaded += (_, _) =>
        {
            Topmost = false;
            Topmost = true;
        };
    }
}

Done!

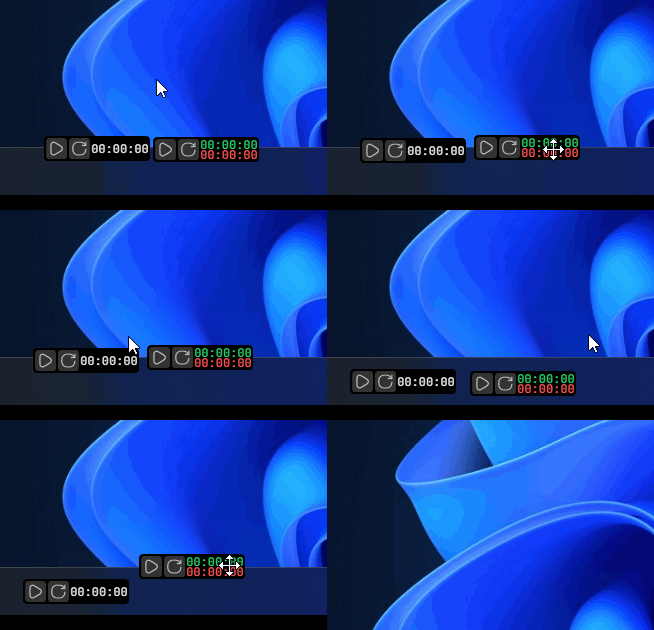
enter image description here


Helpful links: How do I create a self-signed certificate for code signing on Windows?

Milli answered 25/11, 2023 at 7:51 Comment(0)
U
0

DeActivated Event add the following code XAML:

    <Window Deactivated="Window_Deactivated" >

c#

   private void Window_Deactivated(object sender, EventArgs e) 
    {
       Window window = (Window)sender;
       window.Topmost = true;
       window.Activate();
    }

Original Source

Uncertain answered 24/7, 2023 at 10:43 Comment(2)
I've already tried this one but it doesn't work, see the edit on my question.Milli
I've posted my answer, if you're interested in.Milli
M
0

The process is like this:

  1. Create a manifest in your project and set uiAccess to true.
  2. Buy a code signing certificate OR make a free self signed certificate by your own, using the New-SelfSignedCertificate command in PowerShell.
  3. Sign your app's .exe files using the Windows signtool and that certificate that you made.
  4. Install your app into one of these directories, or it will not work, either in C:\Windows or C:\Program Files

Step 1: Setting up the .manifest file

Right-click on your project, then Add Item, and in the search box at the top search for "manifest" and an item will pop up, choose that and create your app.manifest file.

In the app.manifest, you have to set uiAccess to true in the showed line below, so my app.manifest file looks like this:

<assembly manifestVersion="1.0" xmlns="urn:schemas-microsoft-com:asm.v1">
    <assemblyIdentity version="1.0.0.0" name="MyApplication.app"/>
    <trustInfo xmlns="urn:schemas-microsoft-com:asm.v2">
        <security>
            <requestedPrivileges xmlns="urn:schemas-microsoft-com:asm.v3">
                <!-- UAC Manifest Options
             If you want to change the Windows User Account Control level replace the 
             requestedExecutionLevel node with one of the following.

             <requestedExecutionLevel  level="asInvoker" uiAccess="false" />
             <requestedExecutionLevel  level="requireAdministrator" uiAccess="false" />
             <requestedExecutionLevel  level="highestAvailable" uiAccess="false" />

             Specifying requestedExecutionLevel element will disable file and registry virtualization. 
             Remove this element if your application requires this virtualization for backwards
             compatibility.
        -->
                <requestedExecutionLevel level="asInvoker" uiAccess="true" /> 👈 This line
            </requestedPrivileges>
        </security>
    </trustInfo>
    <compatibility xmlns="urn:schemas-microsoft-com:compatibility.v1">
        <application>
            <!-- A list of the Windows versions that this application has been tested on
           and is designed to work with. Uncomment the appropriate elements
           and Windows will automatically select the most compatible environment. -->

            <!-- Windows Vista -->
            <!--<supportedOS Id="{e2011457-1546-43c5-a5fe-008deee3d3f0}" />-->

            <!-- Windows 7 -->
            <!--<supportedOS Id="{35138b9a-5d96-4fbd-8e2d-a2440225f93a}" />-->

            <!-- Windows 8 -->
            <!--<supportedOS Id="{4a2f28e3-53b9-4441-ba9c-d69d4a4a6e38}" />-->

            <!-- Windows 8.1 -->
            <!--<supportedOS Id="{1f676c76-80e1-4239-95bb-83d0f6d0da78}" />-->

            <!-- Windows 10 -->
            <!--<supportedOS Id="{8e0f7a12-bfb3-4fe8-b9a5-48fd50a15a9a}" />-->

        </application>
    </compatibility>
    <!-- Indicates that the application is DPI-aware and will not be automatically scaled by Windows at higher
       DPIs. Windows Presentation Foundation (WPF) applications are automatically DPI-aware and do not need 
       to opt in. Windows Forms applications targeting .NET Framework 4.6 that opt into this setting, should 
       also set the 'EnableWindowsFormsHighDpiAutoResizing' setting to 'true' in their app.config. 
       
       Makes the application long-path aware. See https://docs.microsoft.com/windows/win32/fileio/maximum-file-path-limitation -->
    <!--
  <application xmlns="urn:schemas-microsoft-com:asm.v3">
    <windowsSettings>
      <dpiAware xmlns="http://schemas.microsoft.com/SMI/2005/WindowsSettings">true</dpiAware>
      <longPathAware xmlns="http://schemas.microsoft.com/SMI/2016/WindowsSettings">true</longPathAware>
    </windowsSettings>
  </application>
  -->
    <!-- Enable themes for Windows common controls and dialogs (Windows XP and later) -->
    <!--
  <dependency>
    <dependentAssembly>
      <assemblyIdentity
          type="win32"
          name="Microsoft.Windows.Common-Controls"
          version="6.0.0.0"
          processorArchitecture="*"
          publicKeyToken="6595b64144ccf1df"
          language="*"
        />
    </dependentAssembly>
  </dependency>
  -->
</assembly>

After setting this true I could no longer debug my app in Visual Studio, I think it there were some ways to debug it even with uiAccess set to true (Search for it if you really need it) but I just disabled it untill my whole app was finished and then I set it to true and publish it.

Now uiAccess requires your app to be signed by a code signing certificate (not SSL or anything, it has to be code signing, there are different types of certificates), because uiAccess is a high privilaged option, you can either buy a code signing cert (which is kinda expensive), or create a self signed certificate, which is free but it's just yours, so when you want to install this app on a different PC, it will probably throw error, because it can't find the certificate that you had on your PC, but by buying CA certificates, I think Windows will automatically recognize your app and have all the certificates and stuff ready to go for you, I don't know that much about them, or you could copy the certificate that you made into their computer and install it for them too (by installing I mean copying that certificate into the Trusted Root Certification Authorities store), or create an another self signed certificate on their system, which if you're app is a whole enterprise thing, you can't do that and you have to buy a certificate (I'm thinking that is it really immpossible? because it's just some commands that I could run after the user installs my app and I could automate the process of creating that self signed certificate on their system, import it into Trusted Root Certification Authorities store, and then finally sign my app's .exe files, I think it's possible IDK) in my case, I just made the app for myself, so I just needed to use it on my own PC that's why I made a self signed cert.

Step 2: Making the self signed certificate

Open PowerShell as admin, and use this command:

$cert = New-SelfSignedCertificate -DnsName YourCertificateName -CertStoreLocation cert:LocalMachine\My -Type CodeSigning -NotAfter (Get-Date).AddDays(HowManyDaysShouldThisCertBeValid?)

Example:

$cert = New-SelfSignedCertificate -DnsName HelloWorldCertificate -CertStoreLocation cert:LocalMachine\My -Type CodeSigning -NotAfter (Get-Date).AddDays(10000)

Now to install your self signed certificate to the Trusted Root Certificate Authorities store, you can follow these steps:

  • Open the Microsoft Management Console (MMC) by pressing Windows key + R and typing mmc.exe.
  • Click on File -> Add/Remove Snap-in and double click on the Certificates in the left pane. Choose Computer Account, hit next, Choose Local Computer, hit finish, then click OK.
  • Double click on the Certificates node and select the store where you installed the certificate, which was Personal, then click on the Certificates folder and you should see a list of Certificates.
  • Locate your self-signed certificate by the name that you set for it, and right-click on it. Choose Copy.
  • Select the Trusted Root Certification Authorities folder from the left pane, and expand it, then right click on the Certificates folder inside of it, and choose Paste.
  • Close the window and if it asked you to save, save it as the default file name which is Console1.

Now you've installed your certificate into the Trusted Root Certification Authorities on your machine. Now you have to create the .pfx file of that certificate, because we need it to sign our .exe files.

Open PowerShell as admin again and run this command:

$pwd = ConvertTo-SecureString -String "YourPassword" -Force -AsPlainText
Export-PfxCertificate -Cert $cert -FilePath "OutputPathToPutThePfxFileInto" -Password $pwd

Example:

$pwd = ConvertTo-SecureString -String "HelloWorld43506780" -Force -AsPlainText
Export-PfxCertificate -Cert $cert -FilePath "D:\Home\Self Signed Certificates\HelloWorldCertificate.pfx" -Password $pwd

Step 3: Signing the .exe files

I signed both my app's installer .exe file and also the .exe file which launches the app itself. I don't know if both are needed but do it. Download the signtool from this GitHub repo (The normal way is to download it from WindowsSDK but I tried downloading from there but my installer would throw 2230 (Not enough privilage) error that I couldn't fix at all).

Extract it and navigate to that folder (...\SignTool-10.0.22621.755\x64) my Windows is 64 bits so I used the x64 folder, if yours is 32 bit go into the x86 folder. Then open a CMD window as admin, in that same folder (it should be in the same directory, if it's not, then navigate to that folder where the signtool.exe file is located).

And run this command:

signtool sign /fdws /f "PathToThePfxFileThatYouCreatedInPreviousStep" /p "ThePasswordThatYou'veSet" /tr "TimeStampServerUrl" /td certHash /fd SHA256 /as "PathToYourApp'sInstaller.exeFile"

For the TimeStampServerUrl part, you might need to find a valid and online one by yourself, right now the http://timestamp.sectigo.com worked fine for me, you could use it too if this answer is not really old by now.

Example:

signtool sign /fdws /f "D:\Home\Self Signed Certificates\HelloWorldCertificate.pfx" /p "HelloWorld43506780" /tr "http://timestamp.sectigo.com" /td certHash /fd SHA256 /as "D:\My Projects\HelloWorld App\Output\HelloWorld-Setup.exe"

Now your installer file is signed. NOW YOU MUST INSTALL YOUR APP INTO ONE OF THESE FOLDERS OR IT WILL NOT WORK, either C:\Windows or C:\Program Files.

After you installed the app, lets sign the app's launcher .exe file too with the same command:

signtool sign /fdws /f "D:\Home\Self Signed Certificates\HelloWorldCertificate.pfx" /p "HelloWorld43506780" /tr "http://timestamp.sectigo.com" /td certHash /fd SHA256 /as "C:\Program Files\HelloWorld App\HelloWorld.exe"

Notice that this time you have to provide the path to the .exe file which launches the app. Which must be in one of those two directories that I said.

Important Notes

If you have set ShowInTaskbar="False" for your window in its .XAML file, then the uiAccess won't work. It was because of some weird advanced stuff that I couldn't understand (I'd ask all of this from Bing AI by the way (on it's "Creative Mode", it might be something different now)).

But don't worry cause I think I know how to fix it even if you have ShowInTaskbar="False". You should simply listen to your window's Loaded event in the code behind and when the window is loaded, you should set TopMost = false and then Topmost = true:

public partial class HelloWorldAppWindow : Window
{
    public HelloWorldAppWindow()
    {
        InitializeComponent();

        Loaded += (_, _) =>
        {
            Topmost = false;
            Topmost = true;
        };
    }
}

Done!

enter image description here


Helpful links: How do I create a self-signed certificate for code signing on Windows?

Milli answered 25/11, 2023 at 7:51 Comment(0)

© 2022 - 2024 — McMap. All rights reserved.