Drawing class drawing straight lines instead of curved lines
Asked Answered
C

1

4

I have the below code that draws lines using UIBezierPath.

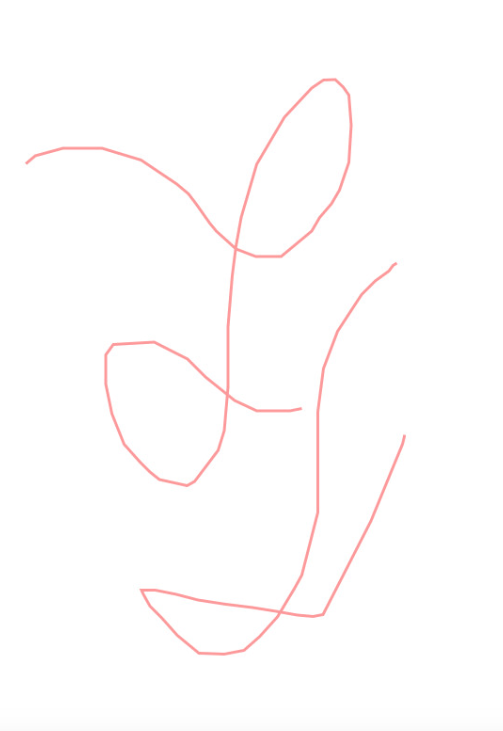
The code uses addCurveToPoint which should draw curved lines using a cubic bezier path, however the end result of the code is instead drawing connected straight lines but addLineToPoint isn't being used.

What could be going on, why isn't the code drawing curved lines?

enter image description here

import UIKit

class DrawingView: UIView, UITextFieldDelegate {

// Modifiable values within the code
let lineWidth : CGFloat = 2.0
let lineColor = UIColor.redColor()
let lineColorAlpha : CGFloat = 0.4
let shouldAllowUserChangeLineWidth = true
let maximumUndoRedoChances = 10

var path = UIBezierPath()

var previousImages : [UIImage] = [UIImage]()

// Represents current image index
var currentImageIndex = 0

// Control points for drawing curve smoothly
private var controlPoint1 : CGPoint?
private var controlPoint2 : CGPoint?

private var undoButton : UIButton!
private var redoButton : UIButton!

private var textField : UITextField!

//MARK: Init methods
override init(frame: CGRect) {
    super.init(frame: frame)
    setDefaultValues()
}

required init?(coder aDecoder: NSCoder) {
    super.init(coder: aDecoder)
    setDefaultValues()
}

// Draw the path when needed
override func drawRect(rect: CGRect) {
    if currentImageIndex > 0 {
        previousImages[currentImageIndex - 1].drawInRect(rect)
    }

    lineColor.setStroke()
    path.strokeWithBlendMode(CGBlendMode.Normal, alpha: lineColorAlpha)
}

override func layoutSubviews() {
    super.layoutSubviews()

    redoButton.frame = CGRectMake(bounds.size.width - 58, 30, 50, 44)
    if shouldAllowUserChangeLineWidth {
        textField.center = CGPointMake(center.x, 52)
    }
}

func setDefaultValues() {
    multipleTouchEnabled = false
    backgroundColor = UIColor.whiteColor()
    path.lineWidth = lineWidth

    addButtonsAndField()
}

func addButtonsAndField() {
    undoButton = UIButton(frame: CGRectMake(8, 30, 50, 44))
    undoButton.setTitle("Undo", forState: UIControlState.Normal)
    undoButton.setTitleColor(UIColor.blackColor(), forState: UIControlState.Normal)
    undoButton.backgroundColor = UIColor.lightGrayColor()
    undoButton.addTarget(self, action: "undoButtonTapped:", forControlEvents: UIControlEvents.TouchUpInside)
    addSubview(undoButton)

    redoButton = UIButton(frame: CGRectMake(bounds.size.width - 58, 30, 50, 44))
    redoButton.setTitle("Redo", forState: UIControlState.Normal)
    redoButton.setTitleColor(UIColor.blackColor(), forState: UIControlState.Normal)
    redoButton.backgroundColor = UIColor.lightGrayColor()
    redoButton.addTarget(self, action: "redoButtonTapped:", forControlEvents: UIControlEvents.TouchUpInside)
    addSubview(redoButton)

    if shouldAllowUserChangeLineWidth {
        textField = UITextField(frame: CGRectMake(0, 0, 50, 40))
        textField.backgroundColor = UIColor.lightGrayColor()
        textField.center = CGPointMake(center.x, 52)
        textField.keyboardType = UIKeyboardType.NumberPad
        textField.delegate = self
        addSubview(textField)
    }
}

//MARK: Touches methods
override func touchesBegan(touches: Set<UITouch>, withEvent event: UIEvent?) {
    // Find the start point and move the path there
    endEditing(true)

    let touchPoint = touches.first?.locationInView(self)

    path.moveToPoint(touchPoint!)
}

override func touchesMoved(touches: Set<UITouch>, withEvent event: UIEvent?) {
    let touchPoint = touches.first?.locationInView(self)
    controlPoint1 = CGPointMake((path.currentPoint.x + touchPoint!.x) / 2, (path.currentPoint.y + touchPoint!.y) / 2)
    controlPoint2 = CGPointMake((path.currentPoint.x + touchPoint!.x) / 2, (path.currentPoint.y + touchPoint!.y) / 2)

    path.addCurveToPoint(touchPoint!, controlPoint1: controlPoint1!, controlPoint2: controlPoint2!)
    setNeedsDisplay()
}

override func touchesEnded(touches: Set<UITouch>, withEvent event: UIEvent?) {
    let touchPoint = touches.first?.locationInView(self)
    controlPoint1 = CGPointMake((path.currentPoint.x + touchPoint!.x) / 2, (path.currentPoint.y + touchPoint!.y) / 2)
    controlPoint2 = CGPointMake((path.currentPoint.x + touchPoint!.x) / 2, (path.currentPoint.y + touchPoint!.y) / 2)

    path.addCurveToPoint(touchPoint!, controlPoint1: controlPoint1!, controlPoint2: controlPoint2!)

    savePreviousImage()
    setNeedsDisplay()

    // Remove all points to optimize the drawing speed
    path.removeAllPoints()
}

override func touchesCancelled(touches: Set<UITouch>?, withEvent event: UIEvent?) {
    touchesEnded(touches!, withEvent: event)
}

//MARK: Selector methods
func undoButtonTapped(sender : UIButton) {
    if currentImageIndex > 0 {

        setNeedsDisplay()

        currentImageIndex--
    }
}

func redoButtonTapped(sender : UIButton) {
    if currentImageIndex != previousImages.count {

        setNeedsDisplay()

        currentImageIndex++
    }
}

//MARK: UITextFieldDelegate
func textFieldDidEndEditing(textField: UITextField) {
    if let n = NSNumberFormatter().numberFromString(textField.text!) {
        if n.integerValue > 0 {
            path.lineWidth = CGFloat(n)
        }
    }
}

//MARK: Saving images for reloading when undo or redo called
private func savePreviousImage() {
    UIGraphicsBeginImageContextWithOptions(bounds.size, true, UIScreen.mainScreen().scale)
    lineColor.setStroke()

    // Create a image with white color
    let rectPath = UIBezierPath(rect: bounds)
    backgroundColor?.setFill()
    rectPath.fill()

    if currentImageIndex > 0 {
        previousImages[currentImageIndex - 1].drawInRect(bounds)
    }

    path.strokeWithBlendMode(CGBlendMode.Normal, alpha: lineColorAlpha)

    if previousImages.count >= currentImageIndex {
        previousImages.removeRange(currentImageIndex..<previousImages.count)
    }

    if previousImages.count >= maximumUndoRedoChances {
        previousImages.removeFirst()
    }
    else {
        currentImageIndex++
    }

    previousImages.append(UIGraphicsGetImageFromCurrentImageContext())
    UIGraphicsEndImageContext()
}
}
Cimino answered 3/1, 2016 at 18:20 Comment(2)
code.tutsplus.com/tutorials/…Aloise
You need to adjust controlPoint1 and controlPoint2 to produce a smooth-looking curve. Currently you are putting both control points halfway between the previous point and the next point, which produces a straight line. The tutorial that MrT linked to shows some ways to calculate reasonable control points.Uturn
B
34

There are a few issues:

  1. You are using control points that are midpoints between the two points, resulting in line segments. You probably want to choose control points that smooth the curve. See http://spin.atomicobject.com/2014/05/28/ios-interpolating-points/.

    Here is a Swift 3 implementation of a simple smoothing algorithm, as well as Swift renditions of the above Hermite and Catmull-Rom Spline approaches:

    extension UIBezierPath {
    
        /// Simple smoothing algorithm
        ///
        /// This iterates through the points in the array, drawing cubic bezier
        /// from the first to the fourth points, using the second and third as
        /// control points.
        ///
        /// This takes every third point and moves it so that it is exactly inbetween
        /// the points before and after it, which ensures that there is no discontinuity
        /// in the first derivative as you join these cubic beziers together.
        ///
        /// Note, if, at the end, there are not enough points for a cubic bezier, it
        /// will perform a quadratic bezier, or if not enough points for that, a line.
        ///
        /// - parameter points: The array of `CGPoint`.
    
        convenience init?(simpleSmooth points: [CGPoint]) {
            guard points.count > 1 else { return nil }
    
            self.init()
    
            move(to: points[0])
    
            var index = 0
    
            while index < (points.count - 1) {
                switch (points.count - index) {
                case 2:
                    index += 1
                    addLine(to: points[index])
                case 3:
                    index += 2
                    addQuadCurve(to: points[index], controlPoint: points[index-1])
                case 4:
                    index += 3
                    addCurve(to: points[index], controlPoint1: points[index-2], controlPoint2: points[index-1])
                default:
                    index += 3
                    let point = CGPoint(x: (points[index-1].x + points[index+1].x) / 2,
                                        y: (points[index-1].y + points[index+1].y) / 2)
                    addCurve(to: point, controlPoint1: points[index-2], controlPoint2: points[index-1])
                }
            }
        }
    
        /// Create smooth UIBezierPath using Hermite Spline
        ///
        /// This requires at least two points.
        ///
        /// Adapted from https://github.com/jnfisher/ios-curve-interpolation
        /// See http://spin.atomicobject.com/2014/05/28/ios-interpolating-points/
        ///
        /// - parameter hermiteInterpolatedPoints: The array of CGPoint values.
        /// - parameter closed:                    Whether the path should be closed or not
        ///
        /// - returns:  An initialized `UIBezierPath`, or `nil` if an object could not be created for some reason (e.g. not enough points).
    
        convenience init?(hermiteInterpolatedPoints points: [CGPoint], closed: Bool) {
            self.init()
    
            guard points.count > 1 else { return nil }
    
            let numberOfCurves = closed ? points.count : points.count - 1
    
            var previousPoint: CGPoint? = closed ? points.last : nil
            var currentPoint:  CGPoint  = points[0]
            var nextPoint:     CGPoint? = points[1]
    
            move(to: currentPoint)
    
            for index in 0 ..< numberOfCurves {
                let endPt = nextPoint!
    
                var mx: CGFloat
                var my: CGFloat
    
                if previousPoint != nil {
                    mx = (nextPoint!.x - currentPoint.x) * 0.5 + (currentPoint.x - previousPoint!.x)*0.5
                    my = (nextPoint!.y - currentPoint.y) * 0.5 + (currentPoint.y - previousPoint!.y)*0.5
                } else {
                    mx = (nextPoint!.x - currentPoint.x) * 0.5
                    my = (nextPoint!.y - currentPoint.y) * 0.5
                }
    
                let ctrlPt1 = CGPoint(x: currentPoint.x + mx / 3.0, y: currentPoint.y + my / 3.0)
    
                previousPoint = currentPoint
                currentPoint = nextPoint!
                let nextIndex = index + 2
                if closed {
                    nextPoint = points[nextIndex % points.count]
                } else {
                    nextPoint = nextIndex < points.count ? points[nextIndex % points.count] : nil
                }
    
                if nextPoint != nil {
                    mx = (nextPoint!.x - currentPoint.x) * 0.5 + (currentPoint.x - previousPoint!.x) * 0.5
                    my = (nextPoint!.y - currentPoint.y) * 0.5 + (currentPoint.y - previousPoint!.y) * 0.5
                }
                else {
                    mx = (currentPoint.x - previousPoint!.x) * 0.5
                    my = (currentPoint.y - previousPoint!.y) * 0.5
                }
    
                let ctrlPt2 = CGPoint(x: currentPoint.x - mx / 3.0, y: currentPoint.y - my / 3.0)
    
                addCurve(to: endPt, controlPoint1: ctrlPt1, controlPoint2: ctrlPt2)
            }
    
            if closed { close() }
        }
    
        /// Create smooth UIBezierPath using Catmull-Rom Splines
        ///
        /// This requires at least four points.
        ///
        /// Adapted from https://github.com/jnfisher/ios-curve-interpolation
        /// See http://spin.atomicobject.com/2014/05/28/ios-interpolating-points/
        ///
        /// - parameter catmullRomInterpolatedPoints: The array of CGPoint values.
        /// - parameter closed:                       Whether the path should be closed or not
        /// - parameter alpha:                        The alpha factor to be applied to Catmull-Rom spline.
        ///
        /// - returns:  An initialized `UIBezierPath`, or `nil` if an object could not be created for some reason (e.g. not enough points).
    
        convenience init?(catmullRomInterpolatedPoints points: [CGPoint], closed: Bool, alpha: CGFloat) {
            self.init()
    
            guard points.count > 3 else { return nil }
    
            assert(alpha >= 0 && alpha <= 1.0, "Alpha must be between 0 and 1")
    
            let endIndex = closed ? points.count : points.count - 2
    
            let startIndex = closed ? 0 : 1
    
            let kEPSILON: CGFloat = 1.0e-5
    
            move(to: points[startIndex])
    
            for index in startIndex ..< endIndex {
                let nextIndex = (index + 1) % points.count
                let nextNextIndex = (nextIndex + 1) % points.count
                let previousIndex = index < 1 ? points.count - 1 : index - 1
    
                let point0 = points[previousIndex]
                let point1 = points[index]
                let point2 = points[nextIndex]
                let point3 = points[nextNextIndex]
    
                let d1 = hypot(CGFloat(point1.x - point0.x), CGFloat(point1.y - point0.y))
                let d2 = hypot(CGFloat(point2.x - point1.x), CGFloat(point2.y - point1.y))
                let d3 = hypot(CGFloat(point3.x - point2.x), CGFloat(point3.y - point2.y))
    
                let d1a2 = pow(d1, alpha * 2)
                let d1a  = pow(d1, alpha)
                let d2a2 = pow(d2, alpha * 2)
                let d2a  = pow(d2, alpha)
                let d3a2 = pow(d3, alpha * 2)
                let d3a  = pow(d3, alpha)
    
                var controlPoint1: CGPoint, controlPoint2: CGPoint
    
                if abs(d1) < kEPSILON {
                    controlPoint1 = point2
                } else {
                    controlPoint1 = (point2 * d1a2 - point0 * d2a2 + point1 * (2 * d1a2 + 3 * d1a * d2a + d2a2)) / (3 * d1a * (d1a + d2a))
                }
    
                if abs(d3) < kEPSILON {
                    controlPoint2 = point2
                } else {
                    controlPoint2 = (point1 * d3a2 - point3 * d2a2 + point2 * (2 * d3a2 + 3 * d3a * d2a + d2a2)) / (3 * d3a * (d3a + d2a))
                }
    
                addCurve(to: point2, controlPoint1: controlPoint1, controlPoint2: controlPoint2)
            }
    
            if closed { close() }
        }
    
    }
    
    // Some functions to make the Catmull-Rom splice code a little more readable.
    // These multiply/divide a `CGPoint` by a scalar and add/subtract one `CGPoint`
    // from another.
    
    func * (lhs: CGPoint, rhs: CGFloat) -> CGPoint {
        return CGPoint(x: lhs.x * rhs, y: lhs.y * CGFloat(rhs))
    }
    
    func / (lhs: CGPoint, rhs: CGFloat) -> CGPoint {
        return CGPoint(x: lhs.x / rhs, y: lhs.y / CGFloat(rhs))
    }
    
    func + (lhs: CGPoint, rhs: CGPoint) -> CGPoint {
        return CGPoint(x: lhs.x + rhs.x, y: lhs.y + rhs.y)
    }
    
    func - (lhs: CGPoint, rhs: CGPoint) -> CGPoint {
        return CGPoint(x: lhs.x - rhs.x, y: lhs.y - rhs.y)
    }
    

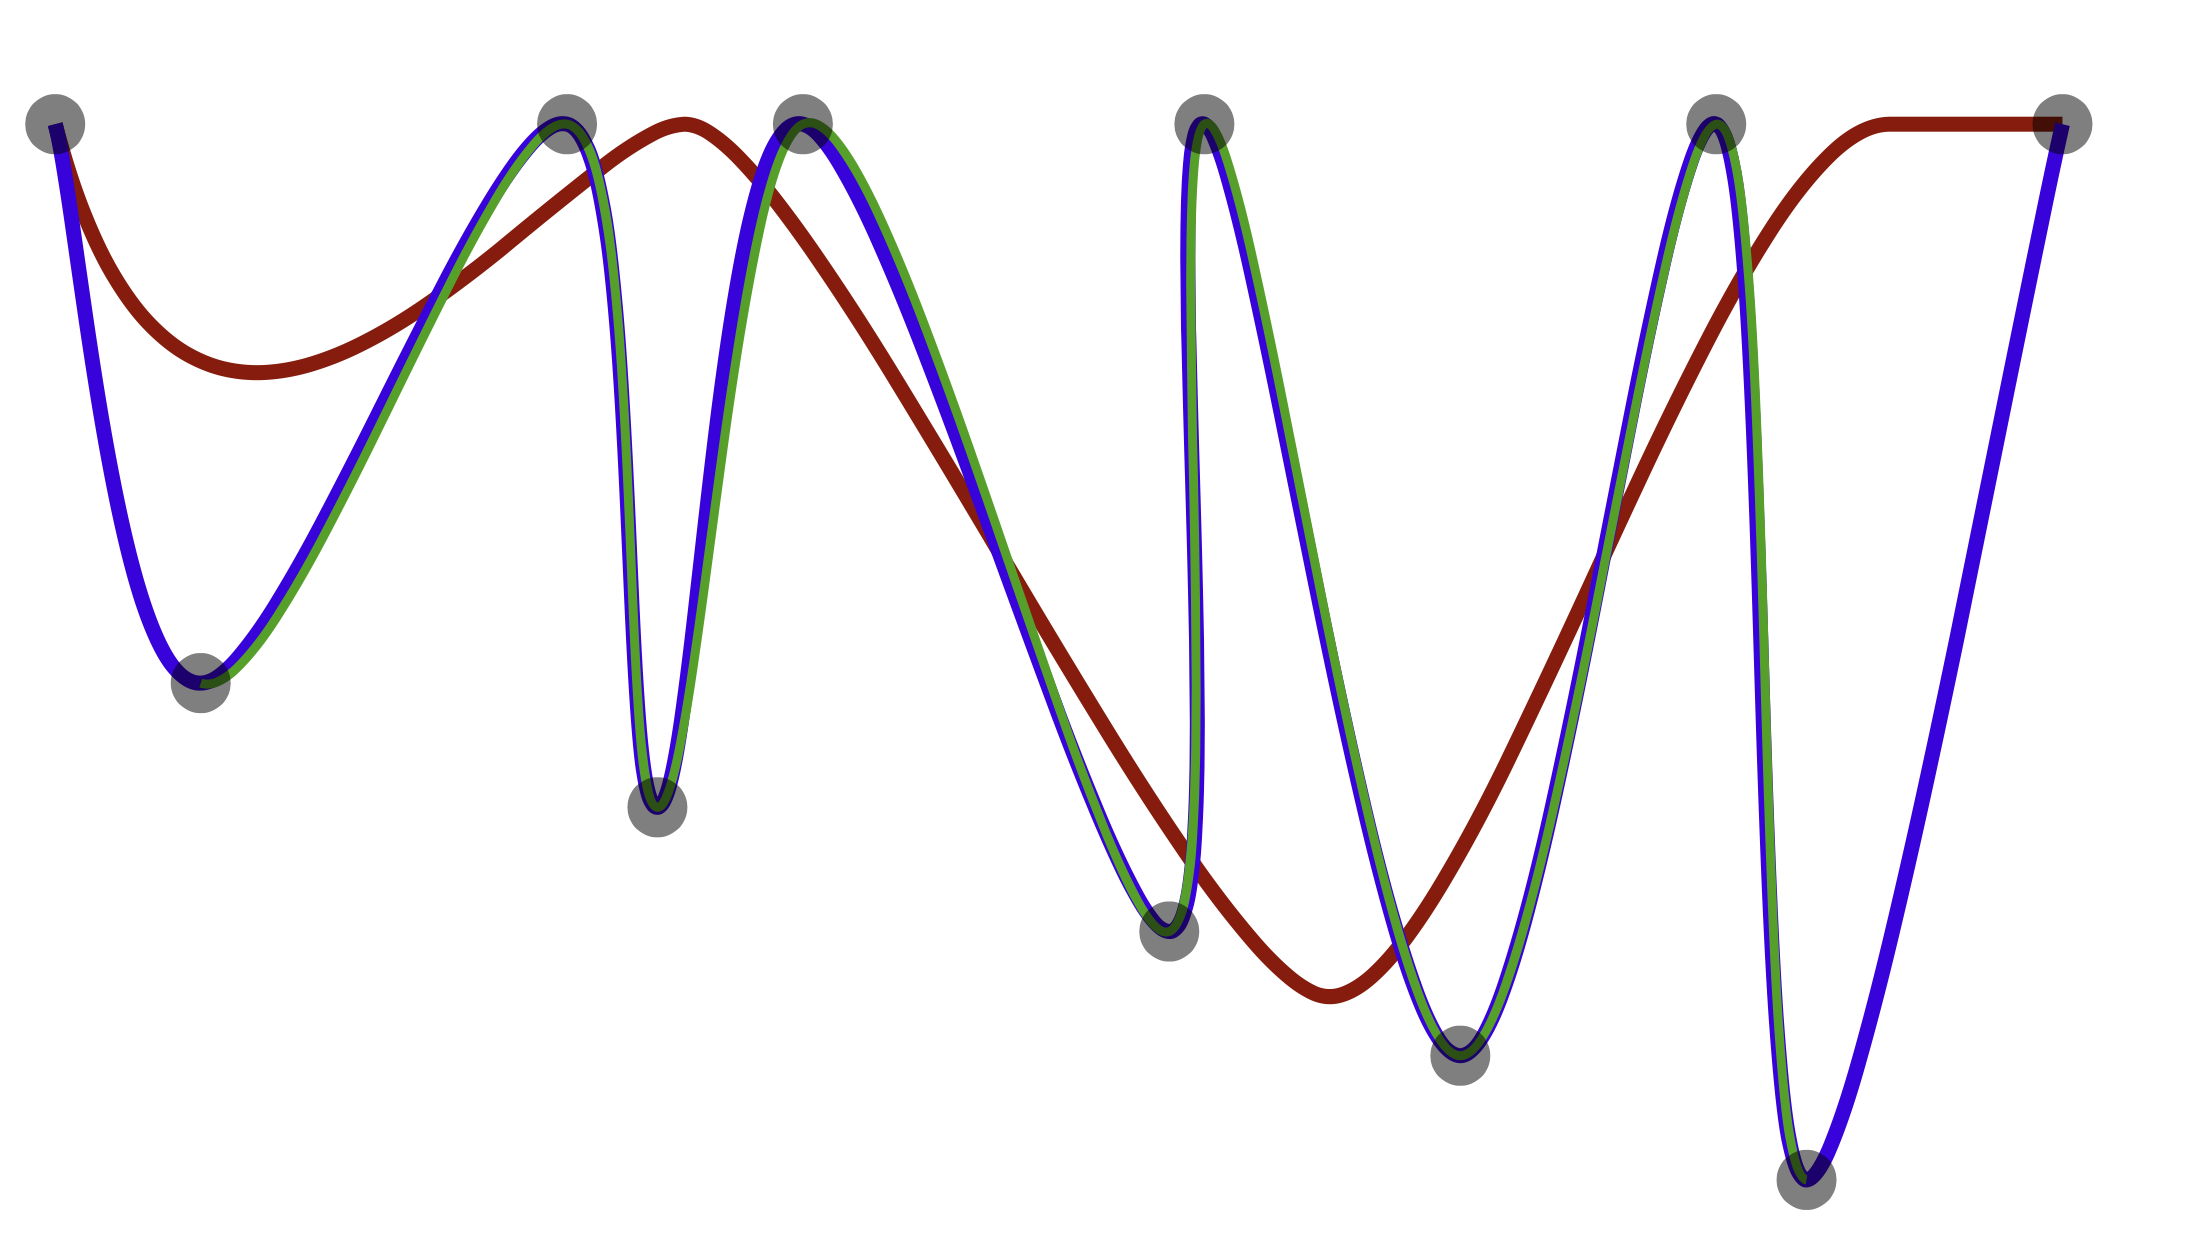
    Here are the "simple" smoothing algorithm, "Hermite" spline, and "Catmull Rom" spline curves in red, blue, and green, respectively. As you can see, the "simple" smoothing algorithm is computationally more simple, but generally doesn't pass through many of the points (but offers a more dramatic smoothing that eliminates any unsteadiness in the stroke). The points jumping around like this are exaggerating the behavior, whereas in a standard "gesture", it offers a pretty decent smoothing effect. The splines, on the other hand smooth the curve while passing through the points in the array.

    enter image description here

  2. If targeting iOS 9 and later, it introduces some nice features, notably:

    • Coalesced touches in case the user is using a device capable of such, notably the newer iPads. Bottom line, these devices (but not the simulators for them) are capable of generating more than 60 touches per second, and thus you can get multiple touches reported for each call to touchesMoved.

    • Predicted touches, where the device can show you where it anticipates the user's touches will progress (resulting in less latency in your drawing).

    Pulling those together, you might do something like:

    var points: [CGPoint]?
    var path: UIBezierPath?
    
    override func touchesBegan(_ touches: Set<UITouch>, with event: UIEvent?) {
        if let touch = touches.first {
            points = [touch.location(in: view)]
        }
    }
    
    override func touchesMoved(_ touches: Set<UITouch>, with event: UIEvent?) {
        if let touch = touches.first {
            if #available(iOS 9.0, *) {
                if let coalescedTouches = event?.coalescedTouches(for: touch) {
                    points? += coalescedTouches.map { $0.location(in: view) }
                } else {
                    points?.append(touch.location(in: view))
                }
    
                if let predictedTouches = event?.predictedTouches(for: touch) {
                    let predictedPoints = predictedTouches.map { $0.location(in: view) }
                    pathLayer.path = UIBezierPath(catmullRomInterpolatedPoints: points! + predictedPoints, closed: false, alpha: 0.5)?.cgPath
                } else {
                    pathLayer.path = UIBezierPath(catmullRomInterpolatedPoints: points!, closed: false, alpha: 0.5)?.cgPath
                }
            } else {
                points?.append(touch.location(in: view))
                pathLayer.path = UIBezierPath(catmullRomInterpolatedPoints: points!, closed: false, alpha: 0.5)?.cgPath
            }
        }
    }
    
    override func touchesEnded(_ touches: Set<UITouch>, with event: UIEvent?) {
        path = UIBezierPath(catmullRomInterpolatedPoints: points!, closed: false, alpha: 0.5)
        pathLayer.path = path?.cgPath
    }
    

    In this code snippet, I'm rendering the path by updating a CAShapeLayer, but if you want to render it some other way, feel free. For example, using your drawRect approach, you'd update path, and then call setNeedsDisplay().

    And, the above illustrates the if #available(iOS 9, *) { ... } else { ... } syntax if you need to support iOS versions prior to 9.0, but obviously, if you are only supporting iOS 9 and later, you can remove that check and lose the else clause.

    For more information, see WWDC 2015 video Advanced Touch Input on iOS.

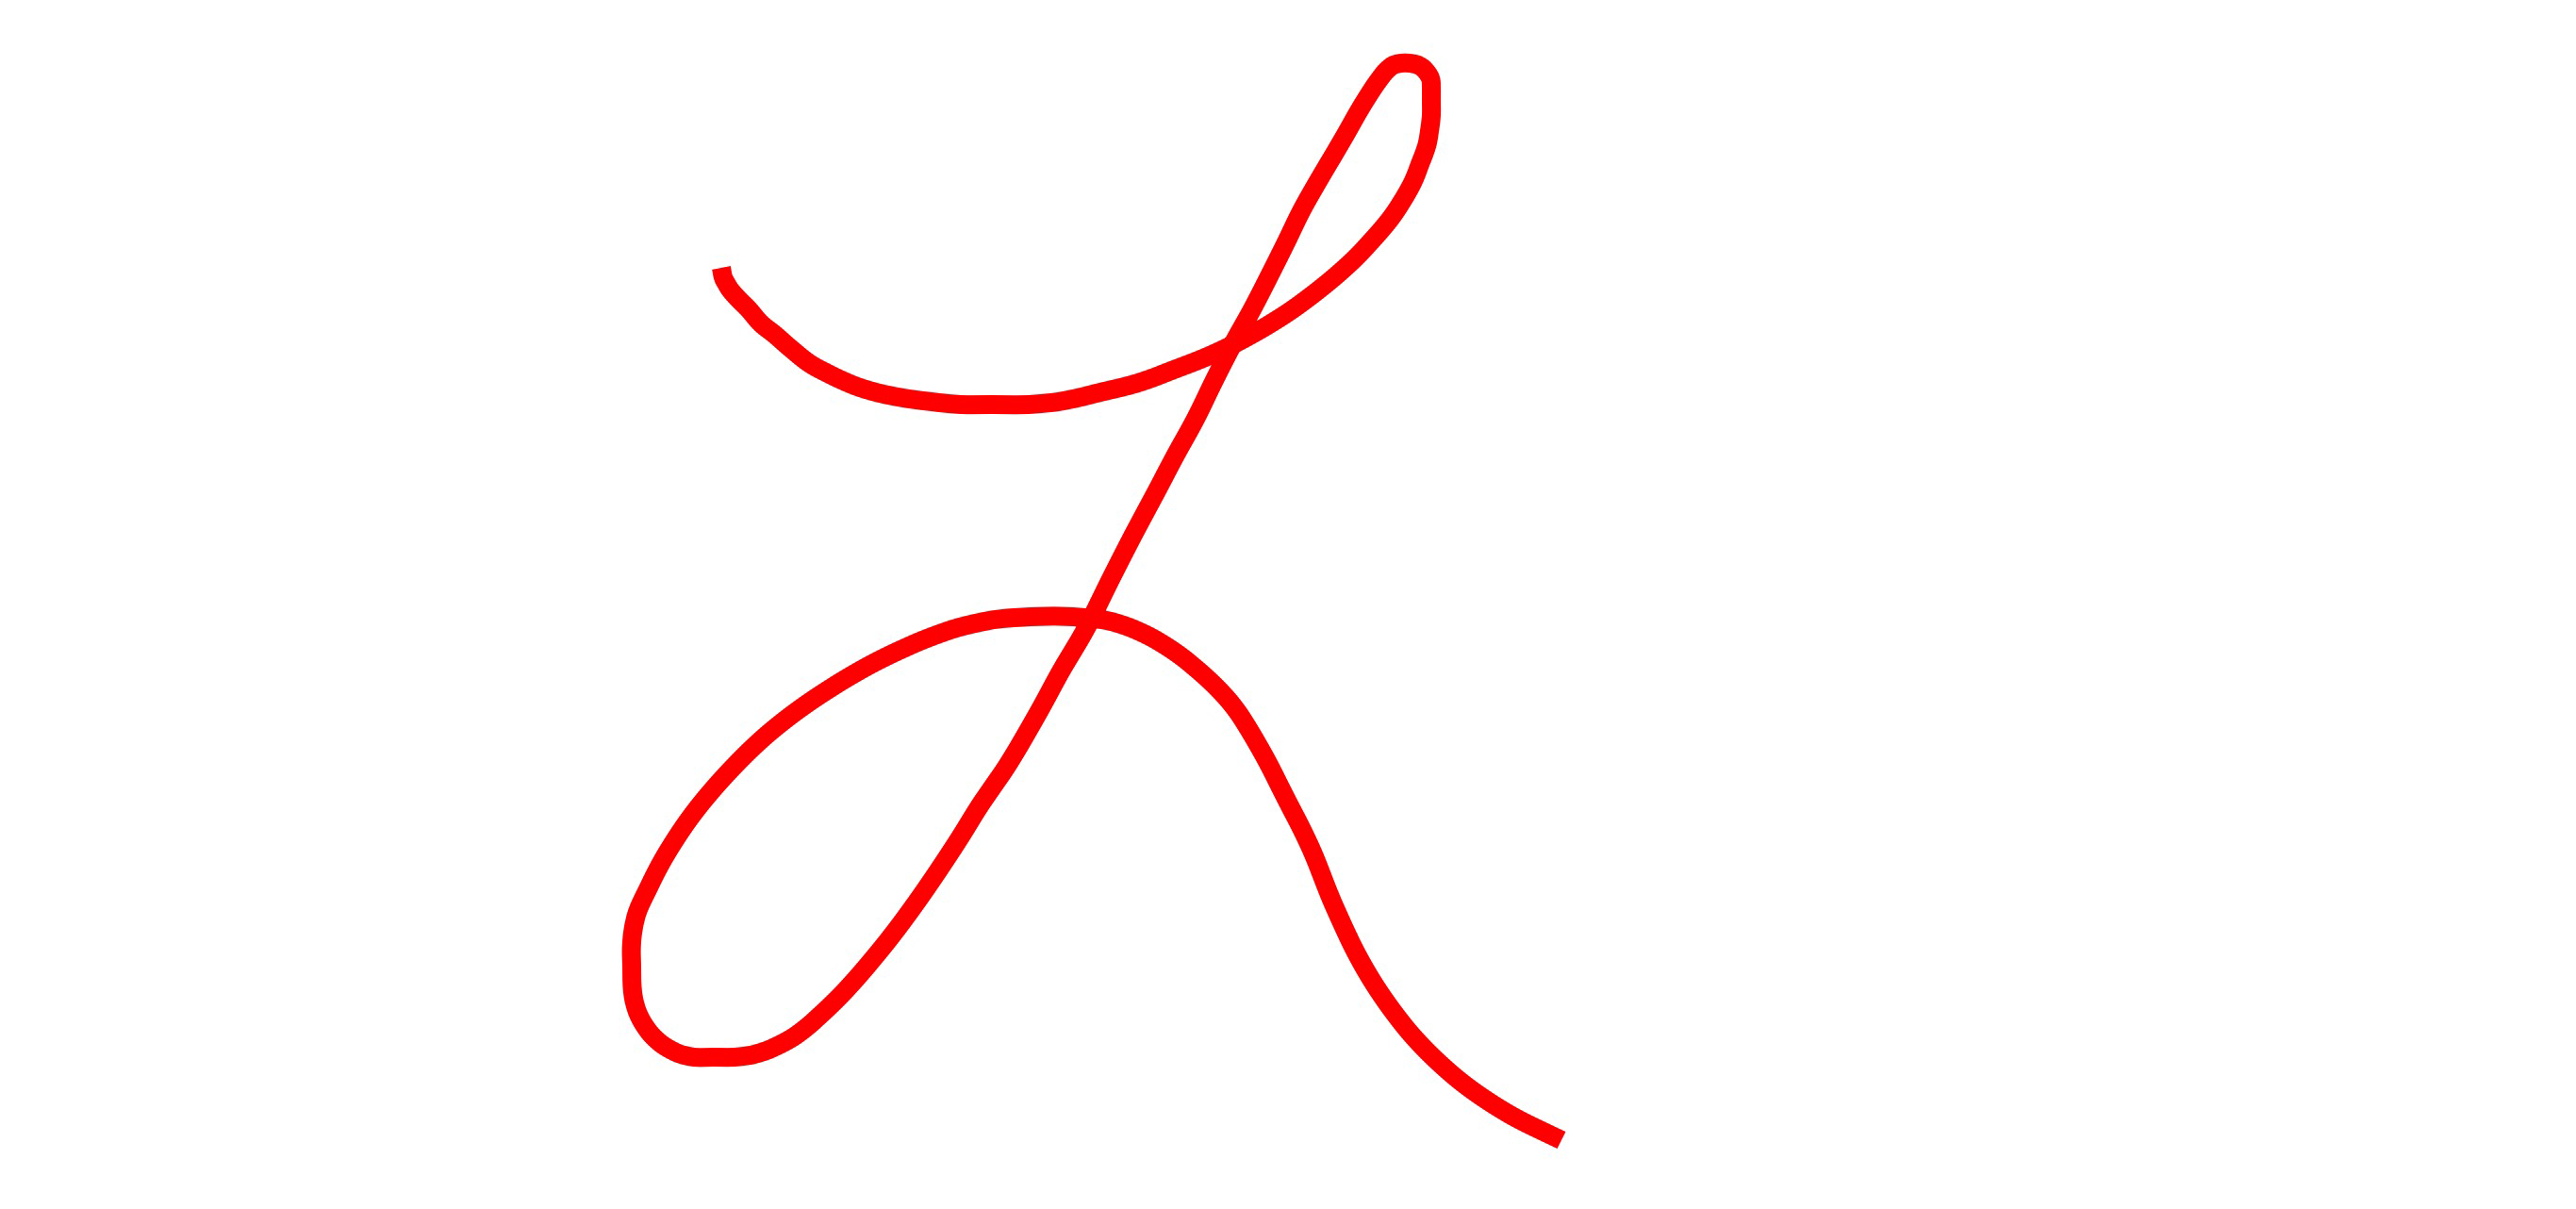
Anyway, that yields something like:

enter image description here

(For Swift 2.3 rendition of the above, please see the previous version of this answer.)

Bare answered 4/1, 2016 at 1:49 Comment(13)
Thanks for the great detail, @Rob. A couple of questions. Could you explain how I work the extension and snippet into a project to get it all to work as you have with the red line drawing? I was intending to target iOS7/8 also, how do I account for that? Finally, pathLayer.path is throwing an error in Xcode 7 "Use of unresolved identifier 'pathLayer'"Cimino
In terms of how to add that extension, I'd suggest just creating a new UIBezier+HermiteSpline.swift file (or call it whatever you want) and add this extension in that. Then you can use the UIBezierPath(hermiteInterpolatedPoints:, closed:) initializer to create a smoothed path. Re iOS 7/8, I've added a if #available() syntax to the code snippet, to show how to enjoy coalesced and predicted points in iOS 9, but enjoy backward compatibility with earlier versions. Re pathLayer, I think using CAShapeLayer is easier, but I show example of the method using drawRect approach, too.Bare
Thanks for this extension, but I think I found a bug. Please see: #34844831Mellie
Thanks, @Rob. hermiteInterpolatedPoints smoothed things out, but I'd like to try catmullRomInterpolatedPoints but received the error: fatal error: unexpectedly found nil while unwrapping an Optional value (lldb). I replaced pathLayer = UIBezierPath(hermiteInterpolatedPoints: points! + predictedPoints, closed: false)! with pathLayer = UIBezierPath(catmullRomInterpolatedPoints: points!, closed: false, alpha: 1)! Is there a difference in quality/performance with updating a CAShapeLayer instead of the drawRect approach?Cimino
@Bare I have one other drawing problem that your expertise might be able to help solve - stackoverflow.com/questions/34995799Cimino
@Cimino - You should remove that final ! because that initializer will return nil if there aren't enough points (and CatmullRom requires at least four points). Re performance/quality of drawRect vs CAShapeLayer, I don't think you'll observe much of any difference. Having said that, the former gives you more control (e.g. you can control nature of anti-aliasing) but the latter is simpler.Bare
@Bare Thanks for that, still no luck. I removed the final !, but Xcode 7.1.1 seems to be suggesting using ! or ? with the error "...DrawingView.swift:160:126: Value of optional type 'UIBezierPath?' not unwrapped; did you mean to use '!' or '?'?". I tried both with no luck again. Image of the error: i.imgur.com/RUCBPnf.pngCimino
Given that path can be nil, then "forced unwrapping" (the ! at the end of the expression) is not the right solution. Instead, that variable, itself, should be an optional (e.g. var path: UIBezierPath?). And then, when you use that variable, you'd unwrap it there (e.g. path?.stroke()), which makes it clear that you're stroking the path only if it is not nil.Bare
It would be interesting to see how one could incorporate pressure data into this. I believe that means moving away from the UIBezierPath and towards straight Core Graphics.Curry
@BobSpryn - See code.tutsplus.com/tutorials/…. Clearly, that's not using pressure, but rather using a proxy, speed, but it could be easily adapted for pressure information.Bare
I had seen that, but didn't realize it was actually varying the width of the line as it drew incrementally. Thanks for the tip!Curry
Actually I hadn't seen that tutorial. Good stuff there. Thanks again.Curry
@Bare since I've used your code, could you - if you have any time - help me with my problem? #49597091 Thank youAntitoxic

© 2022 - 2024 — McMap. All rights reserved.