how to include multiple code coverage's in the pipeline
Asked Answered
V

3

6

I have an entity framework .net core application as a backend and .net core react app for the front-end.

I am trying to setup azure pipelines for this project.

While I am setting the pipeline for .net core react app I am running the library tests (code coverage is generated) also as it is the referenced project to my UI project.

The Issue here is when I run the JEST tests for the .net core react app, it is also generating test coverage but in the summary of build pipeline test coverage tab is not showing the code coverage when I enable the code coverage of library.

I am able to see both coverages in the artifacts published.

How can I see both coverages in my build summary?

Volding answered 21/5, 2019 at 10:59 Comment(3)
JEST code coverage is not supported by Azure Pipelines Build yet.Surbeck
Sorry @EriawanKusumawardhono Jest code coverage works in azure build. Not displaying in the Test coverage Tab when I have another code coverage by VSTEST but it is in the artifacts but links to navigate to the files wont work. :(Volding
I have the same problem. Having a 'PublishTestResults@2" task for my .net core tests and "PublishCodeCoverageResults@1" for Cobertura is only displaying the .NET Core results in the "Code coverage" taband the Cobertura results are only visible in the build artifacts.Childbed
B
4

To combine multiple coverage reports into one, you can use the reportgenerator task. The reportgenerator takes multiple coverage files and combines them into one single coverage file. This new coverage file can then be published using the

Example:

steps:
- task: Palmmedia.reportgenerator.reportgenerator-build-release-task.reportgenerator@4
  displayName: ReportGenerator
  inputs:
    reports: '*\TestResults\*\coverage.cobertura.xml'
- task: PublishCodeCoverageResults@1
  displayName: 'Publish code coverage'
  inputs:
    codeCoverageTool: Cobertura
    summaryFileLocation: 'coveragereport\Cobertura.xml'
    failIfCoverageEmpty: true

Here's an article that describes this in greater detail: https://www.jamescroft.co.uk/combining-multiple-code-coverage-results-in-azure-devops/

Butz answered 21/6, 2021 at 7:59 Comment(0)
S
1

how to include multiple code coverage's in the pipeline

It seems you are using the Publish Code Coverage Results task, it's unlike to use Publish test results task. But you could not be able to publish multiple coverage test results in a single task.

When you have two coverage.xml files, Azure Devops Build definition will only use one of them.

To resolve this issue, try to add another Publish Code Coverage Results task in build pipeline for each package.

If it not helps you, please share your build definition in your question.

Hope this helps.

Subversive answered 22/5, 2019 at 5:20 Comment(2)
Thanks for the response. In my pipeline I already have a build step to publish test(jest) coverage, and VS Test by default creating a test coverage (checkbox selected) and published in to the artifacts. If I stop the code coverage of VS Test the jest coverage is working fine.Volding
I don't think you can publish more than one set of code coverage results, per this Q&A on the Publish Code Coverage Results task documentation. Specifically, "If you use multiple publish code coverage tasks in the pipeline, the summary and report is shown for the last task. Any previously uploaded data is ignored."Brooder
L
1

Using the PublishCodeCoverageResults@2 task, you can publish multiple code coverage reports. According to its documentation, multiple summary files are merged into a single report.

For instance, consider this project setup:

|- backend
   |- requirements.txt
   |- ...
|- frontend
   |- package.json
   |- ...
|- azure-pipelines.yaml
|- docker-compose.yaml
|- README.md

The backend folder contains a FastAPI application that serves API to the frontend service. The frontend folder contains a Vue.js application (generated by Vite) that visualizes the data, retrieved from the backend service.

The content of the azure-pipelines.yaml file is the following:

stages:
- stage: Test
  displayName: Test and Lint Stage
  jobs:
  - job: Backend
    displayName: Test and Lint Backend Service
    pool:
      vmImage: $(vmImageName)
    steps:
    - task: UsePythonVersion@0
      inputs:
        versionSpec: '3.10'
    - script: python -m pip install --upgrade pip setuptools
      displayName: Upgrade pip and setuptools
    - script: python -m pip install -r $(backendDirName)/requirements.txt -r $(backendDirName)/requirements-dev.txt
      displayName: Install all dependencies
    - script: pre-commit run --all-files
      workingDirectory: $(backendDirName)
      displayName: Check code quality
    - script: |
        coverage run -m pytest
        coverage xml -o coverage.xml
      workingDirectory: $(backendDirName)
      displayName: Generate coverage report
    - task: PublishCodeCoverageResults@2
      inputs:
        summaryFileLocation: '**/coverage.xml'
  - job: Frontend
    displayName: Test and Lint Frontend Service
    pool:
      vmImage: $(vmImageName)
    steps:
    - task: NodeTool@0
      inputs:
        versionSpec: '18.x'
        checkLatest: true
    - script: npm install
      workingDirectory: $(frontendDirName)
      displayName: Install all dependencies
    - script: npm run lint
      workingDirectory: $(frontendDirName)
      displayName: Check code quality
    - script: npm run coverage
      workingDirectory: $(frontendDirName)
      displayName: Generate coverage report
    - task: PublishCodeCoverageResults@2
      inputs:
        summaryFileLocation: '**/clover.xml'

There are five major steps for the backend and the frontend service.

  • Configuring the environment: Python 3.10 version is used for the backend. Node 18 version is used for the frontend service.
  • Installing dependencies: Dependencies are installed by using pip and npm tools. Make sure that you include coverage + pytest and the @vitest/coverage-v8 packages (or similar) in your dependencies.
  • Linting source code (optional): Checking code quality using pre-commit and eslint tools. Install them before execution.
  • Generating code coverage: The Coverage.py for the backend and the Vitest for the fronted were used to create the coverage report.
  • Publishing coverage report: At the end, the reports were published by PublishCodeCoverageResults@2 tasks. It collects the coverage.xml report for the backend and the clover.xml for the frontend.

Note that, the workingDirectory parameter ensures to start of the scripts in different directories.

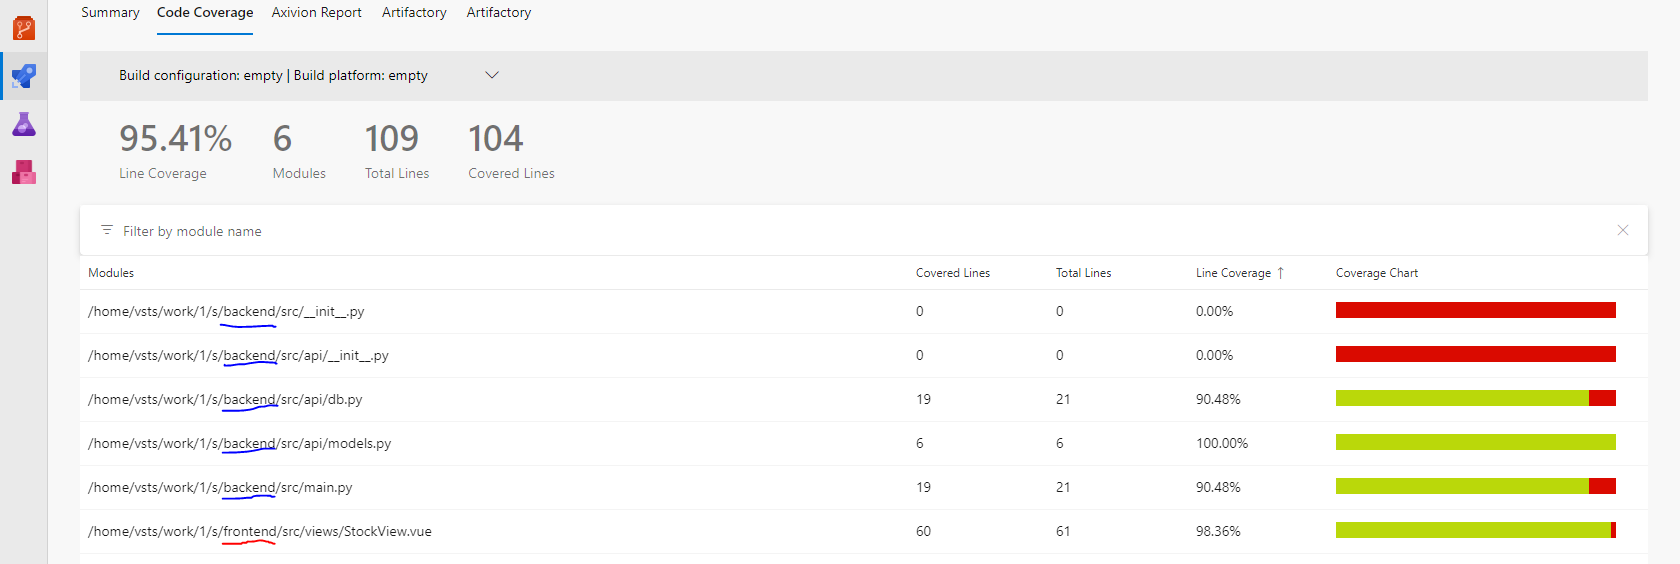
When the pipeline is finished, it merges the two reports together. Navigate to the Code Coverage tab under the Pipelines page.

enter image description here

As you can see, the code coverage reports are present. It also calculates the average code coverage across the services.

Larocca answered 4/10, 2023 at 8:14 Comment(0)

© 2022 - 2024 — McMap. All rights reserved.