How to use BottomNavigationBar with Navigator?
Asked Answered
A

7

47

The Flutter Gallery example of BottomNavigationBar uses a Stack of FadeTransitions in the body of the Scaffold.

I feel it would be cleaner (and easier to animate) if we could switch pages by using a Navigator.

Are there any examples of this?

Anchylose answered 21/7, 2017 at 10:40 Comment(0)
O
59
int index = 0;

@override
Widget build(BuildContext context) {
  return new Scaffold(
    body: new Stack(
      children: <Widget>[
        new Offstage(
          offstage: index != 0,
          child: new TickerMode(
            enabled: index == 0,
            child: new MaterialApp(home: new YourLeftPage()),
          ),
        ),
        new Offstage(
          offstage: index != 1,
          child: new TickerMode(
            enabled: index == 1,
            child: new MaterialApp(home: new YourRightPage()),
          ),
        ),
      ],
    ),
    bottomNavigationBar: new BottomNavigationBar(
      currentIndex: index,
      onTap: (int index) { setState((){ this.index = index; }); },
      items: <BottomNavigationBarItem>[
        new BottomNavigationBarItem(
          icon: new Icon(Icons.home),
          title: new Text("Left"),
        ),
        new BottomNavigationBarItem(
          icon: new Icon(Icons.search),
          title: new Text("Right"),
        ),
      ],
    ),
  );
}

You should keep each page by Stack to keep their state. Offstage stops painting, TickerMode stops animation. MaterialApp includes Navigator.

Onstage answered 1/9, 2017 at 2:37 Comment(13)
can you please elaborate on the purpose of the TickerMode widgets? This code seems to work fine also: new Offstage( offstage: _tabIndex != 1, child: new YourRightPage(), ),Psychophysics
With this implementation, the back button doesn't work for accessing the previous Offstage widget. Is there any way to support this?Misdeal
@Misdeal You can handle back button using docs.flutter.io/flutter/widgets/WidgetsBindingObserver/…Onstage
@Psychophysics I use TickerMode to stop the animation of the widgets which are not displayed.Onstage
@Onstage Yeah, that's what I ended up doing. Too bad I have to keep my own "navigation" history. Thanks anyway!Misdeal
@Onstage it seems that the code above only support 2 BottomNavigationBarItem, if I add one more item, it give an error in the simulator: RangeError(index) invalid value:Not in range 0..1, do you know why?Comyns
@Comyns You should to add both BottomNavigationBarItem and a child of Stack.Onstage
You can have multiple nested MaterialApp widgets? (assuming this example is itself inside a parent MaterialApp)Psychophysics
@Psychophysics Yes, you can.Onstage
I'm using this method with flutter_bloc it's GREAT, But when the app begins it loads the whole stacked-widgets data from the API, How can I make it load only the viewed stack widget when the user view it for the first time?Adscription
An alternative may be IndexedStack, which provides a simpler API to Stack combined with Offstage. You may still need TickerMode though!Outdated
@Outdated Are IndexedStack and Stack+Offstage equivalent in terms of performance?Bloodfin
nice.. it helps me a lotEmogene
R
21

Output:

enter image description here

Code:

int _index = 0;

@override
Widget build(BuildContext context) {
  Widget child;
  switch (_index) {
    case 0:
      child = FlutterLogo();
      break;
    case 1:
      child = FlutterLogo(colors: Colors.orange);
      break;
    case 2:
      child = FlutterLogo(colors: Colors.red);
      break;
  }

  return Scaffold(
    body: SizedBox.expand(child: child),
    bottomNavigationBar: BottomNavigationBar(
      onTap: (newIndex) => setState(() => _index = newIndex),
      currentIndex: _index,
      items: [
        BottomNavigationBarItem(icon: Icon(Icons.looks_one), title: Text("Blue")),
        BottomNavigationBarItem(icon: Icon(Icons.looks_two), title: Text("Orange")),
        BottomNavigationBarItem(icon: Icon(Icons.looks_3), title: Text("Red")),
      ],
    ),
  );
}
Reitman answered 27/7, 2019 at 10:28 Comment(5)
Unfortunately, as I understand, your solution works only if the Scaffold body is the same widget but with different properties, which is not a regular case.Quarters
this helped me a lot with simple implementation. thanks a lotCharmine
This is simple and great it would be great if you can help me with handing backpressed in thisAmmonium
@AmanpreetKaur For that you can use Set. On press of a new item, simply add its index to the set, wrap your widget in WillPopScope and inside onWillPop you can check the value of last index, if it's empty, simply exit the app else set the current index to that value.Reitman
great answer, I used ideas here to create a container page that I just filled the child with whatever page I grabbed from the switch statement,Megalomania
R
16

Here is an example how you can use Navigator with BottomNavigationBar to navigate different screen.

import 'package:flutter/material.dart';

void main() => runApp(MyApp());

class MyApp extends StatelessWidget {
  @override
  Widget build(BuildContext context) {
    return MaterialApp(
      title: 'Flutter Demo',
      theme: ThemeData(
        primarySwatch: Colors.blue,
      ),
      home: MyHomePage(title: 'Flutter Demo Home Page'),
    );
  }
}

class MyHomePage extends StatefulWidget {
  MyHomePage({Key key, this.title}) : super(key: key);
  final String title;

  @override
  _MyHomePageState createState() => _MyHomePageState();
}

class _MyHomePageState extends State<MyHomePage> {
  // This navigator state will be used to navigate different pages
  final GlobalKey<NavigatorState> _navigatorKey = GlobalKey<NavigatorState>();
  int _currentTabIndex = 0;

  @override
  Widget build(BuildContext context) {
    return SafeArea(
      child: Scaffold(
        body: Navigator(key: _navigatorKey, onGenerateRoute: generateRoute),
        bottomNavigationBar: _bottomNavigationBar(),
      ),
    );
  }

  Widget _bottomNavigationBar() {
    return BottomNavigationBar(
      type: BottomNavigationBarType.fixed,
      items: [
        BottomNavigationBarItem(
          icon: Icon(Icons.home),
          title: Text("Home"),
        ),
        BottomNavigationBarItem(
            icon: Icon(Icons.account_circle), title: Text("Account")),
        BottomNavigationBarItem(
          icon: Icon(Icons.settings),
          title: Text("Settings"),
        )
      ],
      onTap: _onTap,
      currentIndex: _currentTabIndex,
    );
  }

  _onTap(int tabIndex) {
    switch (tabIndex) {
      case 0:
        _navigatorKey.currentState.pushReplacementNamed("Home");
        break;
      case 1:
        _navigatorKey.currentState.pushReplacementNamed("Account");
        break;
      case 2:
        _navigatorKey.currentState.pushReplacementNamed("Settings");
        break;
    }
    setState(() {
      _currentTabIndex = tabIndex;
    });
  }

  Route<dynamic> generateRoute(RouteSettings settings) {
    switch (settings.name) {
      case "Account":
        return MaterialPageRoute(builder: (context) => Container(color: Colors.blue,child: Center(child: Text("Account"))));
      case "Settings":
        return MaterialPageRoute(builder: (context) => Container(color: Colors.green,child: Center(child: Text("Settings"))));
      default:
        return MaterialPageRoute(builder: (context) => Container(color: Colors.white,child: Center(child: Text("Home"))));
    }
  }
}
Rileyrilievo answered 20/9, 2019 at 12:38 Comment(5)
could you please elaborate more on this line: body: Navigator(key: _navigatorKey, onGenerateRoute: generateRoute), is it ok to set a Navigator widget as a body of your app? Looks strange. How does it work?Vortumnus
There are one or two highly complicated tutorials on this topic, containing flaws which render them basically useless. This short snippet was the only one that works. The catch is that you need to pass the pushNamed to the navigator key. Thank you, great work.Spiv
@KirillKarmazin If you want to navigate between different widgets. You have to put them under a navigator in widget tree. Since in this example we only want to change the body of the screen during navigation. So I add the navigator as the top widget in body and put other widget under it.Rileyrilievo
Very well explained. only extra I did to use ChangeNotifier Provider for selected tab index. This way even if I route to page(bottom bar pages) from within the page, it activate the selected index.Idelson
PushReplacementNamed is Going to purge the last screen in the stack. You need all the sections in your navigation to exist simultaneously with their own navigators intact. The only way I’ve found to do this is with an IndexedStack but I don’t use a Navigator. Still looking for a good solution.Antoninaantonino
F
3

Here is example:

  int _currentIndex = 0;


  Route<Null> _getRoute(RouteSettings settings) {
    final initialSettings = new RouteSettings(
        name: settings.name,
        isInitialRoute: true);

    return new MaterialPageRoute<Null>(
        settings: initialSettings,
        builder: (context) =>
        new Scaffold(
          body: new Center(
              child: new Container(
                  height: 200.0,
                  width: 200.0,
                  child: new Column(children: <Widget>[
                    new Text(settings.name),
                    new FlatButton(onPressed: () =>
                        Navigator.of(context).pushNamed(
                            "${settings.name}/next"), child: new Text("push")),
                  ],
                  ))
          ),
          bottomNavigationBar: new BottomNavigationBar(
              currentIndex: _currentIndex,
              onTap: (value) {
                final routes = ["/list", "/map"];
                _currentIndex = value;
                Navigator.of(context).pushNamedAndRemoveUntil(
                    routes[value], (route) => false);
              },
              items: [
                new BottomNavigationBarItem(
                    icon: new Icon(Icons.list), title: new Text("List")),
                new BottomNavigationBarItem(
                    icon: new Icon(Icons.map), title: new Text("Map")),
              ]),
        ));
  }

  @override
  Widget build(BuildContext context) =>
      new MaterialApp(
        initialRoute: "/list",
        onGenerateRoute: _getRoute,
        theme: new ThemeData(
          primarySwatch: Colors.blue,
        ),
      );

You can set isInitialRoute to true and pass it to MaterialPageRoute. It will remove pop animation.

And to remove old routes you can use pushNamedAndRemoveUntil

Navigator.of(context).pushNamedAndRemoveUntil(routes[value], (route) => false);

To set current page you can have a variable in your state _currentIndex and assign it to BottomNavigationBar:

Fpc answered 21/7, 2017 at 11:50 Comment(3)
Interesting. Is the BottomNavigationBar sticking around throughout navigation changes? I'll need it to also reflect the current page.Anchylose
BottomNavigationBar is not sticking, roughly we create every time new one, but with right state.Fpc
Updated example with current indexFpc
O
2

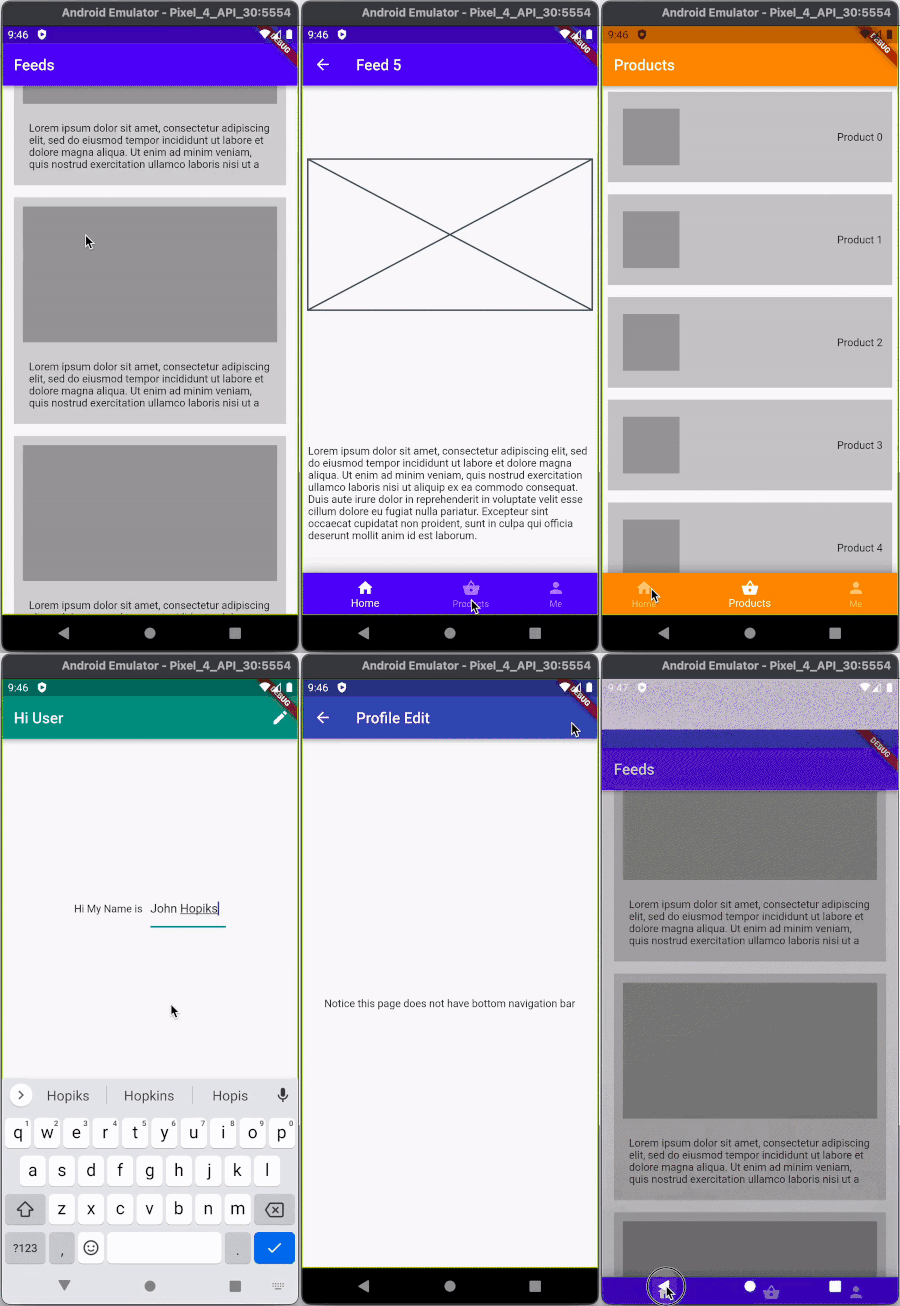
Glad You asked, I experimented with this a couple of months back and tried to simplify this through a blog post. I won't be able to post the complete code here since it is pretty long, But I can certainly link all the resources to clarify it.

  1. Everything about the BottomNavigationBar in flutter
  2. complete sample code
  3. Dartpad demo
  4. If you prefer you can also depend on this package https://pub.dev/packages/navbar_router

Here's the resulting output of what the article helps you build

enter image description here

Ottar answered 11/8, 2022 at 3:11 Comment(0)
O
0
Navigator.of(context).pushNamedAndRemoveUntil(
                routes[value], (route) => true);

I had to use true to enable back button.

NB: I was using Navigator.pushNamed() for navigation.

Outfall answered 26/7, 2019 at 4:11 Comment(0)
W
-1

This is the code I am using in my project. If you try to avoid page viewer so you can try this

import 'package:flutter/material.dart';

class Dashboard extends StatefulWidget {
  const Dashboard({Key? key}) : super(key: key);

  @override
  State<Dashboard> createState() => _DashboardState();
}

class _DashboardState extends State<Dashboard> {
  int _selectedIndex = 0;

  void _onItemTapped(int index) {
    setState(() {
      _selectedIndex = index;
    });
  }

  @override
  Widget build(BuildContext context) {
    return Scaffold(
      appBar: AppBar(
        title: const Text('Sample'),
      ),
      body: SingleChildScrollView(
       child: Column(
        children: [
          if (_selectedIndex == 0)
            // you can call custom widget here
            Column(
              children: const [
                Text("0"),
              ],
            )
          else if (_selectedIndex == 1)
             Column(
                children: const [
                  Text("1"),
                ],                 
            )
          else             
               Column(
                children: const [
                  Text("2"),
                ],               
            ),
        ],
      ),
     ),

      bottomNavigationBar: BottomNavigationBar(
        items: const <BottomNavigationBarItem>[
          BottomNavigationBarItem(
            icon: Icon(Icons.headphones),
            label: 'Home',
          ),
          BottomNavigationBarItem(
            icon: Icon(Icons.business),
            label: 'Business',
          ),
          BottomNavigationBarItem(
            icon: Icon(Icons.school),
            label: 'School',
          ),              
        ],
        currentIndex: _selectedIndex,
        selectedItemColor: Colors.amber[800],
        unselectedItemColor: Colors.grey,
        onTap: _onItemTapped,
      ),
    );
  }
}

Happy Coding

Wilmington answered 18/2, 2022 at 17:34 Comment(0)

© 2022 - 2024 — McMap. All rights reserved.