How to extend a XAML control with new properties properly?
Asked Answered
P

3

6

I have a new philosophic question, which aims at underline differences between old WPF patterns and the new UWP ones.

I would like to extend a standard control (e.g. a Button) with new properties, in UWP environment, not WPF.

In WPF, I noticed that it was possible to create a Custom Control with two files: a Themes/Generics.xaml and a MyCustomControl.cs.

In UWP, it creates only the .cs file... does it mean that if I want to modify even the XAML content of a Button (let's say that I would like to create an IconButton: A Button whose content is a SymbolIcon and a Textblock), it would be impossible?

I know that I could use a "User Control", but it is a generic control and I would loose all the properties of the control that I want to customize (e.g. in my case, the Click event, etc.)... I could even extend a User Control to include all the properties of the wanted control... but it would take too long.

To the point: what is the best and proper way to customize and extend a standard XAML control by code AND Xaml, in UWP environment?

As an example, think at a classic task: creating an IconButton, as I said above... a Button with it's Content beeing a Grid with a SymbolIcon and a Textblock as children.

Thank you.

Psalmist answered 14/12, 2017 at 0:22 Comment(2)
Are you want a button with a symbol and text on it ?Cookshop
That was only an example. I woul dlike to be able to extend a standard control, inheriting from that control itself.Psalmist
E
4

what is the best and proper way to customize and extend a standard XAML control by code AND Xaml, in UWP environment?

Simplely answer: You can use templated Control template.

There is a video about this, you can start from 30mins from this video.

Generally speaking, there are two kind of ways for us to customize a control:

  1. UserControl
  2. Templated Control

For UserControl, it is used for light customization and you just need to use it in your own project. For Templated Control, it's a basic way for us to customize our controls. For your scenario, actually it won't have too many differences here, You can just inherit the control you want and then customize it with your code from code level and also Xaml level.

Exocrine answered 14/12, 2017 at 9:55 Comment(3)
In the video they say they create a copy of the ListView XAML template, but where are these templates located?Barnette
@Barnette a quick way: right click your ListView control on your VS UI then create a copy of it. Or you can search on MSDN directly. There are specific pages for those templates.Exocrine
Link is no longer active. However, there is a web archive snapshot of itCud
C
6

Are you want something look like this---

XAML

If you have single button---

<Button>
    <Grid>
        <Grid.RowDefinitions>
            <RowDefinition Height="Auto"/>
            <RowDefinition Height="*"/>
        </Grid.RowDefinitions>
        <TextBlock Grid.Row="0" FontFamily="Segoe MDL2 Assets" Text="&#xECAD;" HorizontalAlignment="Center"/> <!-- alternately use your icon image -->
        <TextBlock Grid.Row="1" Text="Click me!"/>
    </Grid>            
</Button>

Output

Output

If you have multiple button use that template--

Steps-

1) Create a class "ButtonWithIcon.cs" or xyz.cs.

public class AdvancedButton : Button
{
    public static readonly DependencyProperty IconContentProperty =
      DependencyProperty.Register("Icon", typeof(string), typeof(AdvancedButton), new PropertyMetadata(default(FontIcon)));

    public string Icon
    {
        get { return (string)GetValue(IconContentProperty); }
        set { SetValue(IconContentProperty, value); }
    }
}

2) Then in you Page.xaml (for only one page) or app.xaml (for use in whole app) add that template

<Style x:Key="AdvancedButtonTemplate" TargetType="local:AdvancedButton">
    <Setter Property="Background" Value="{ThemeResource SystemControlBackgroundBaseLowBrush}"/>
    <Setter Property="Foreground" Value="{ThemeResource SystemControlForegroundBaseHighBrush}"/>
    <Setter Property="BorderBrush" Value="{ThemeResource SystemControlForegroundTransparentBrush}"/>
    <Setter Property="BorderThickness" Value="{ThemeResource ButtonBorderThemeThickness}"/>
    <Setter Property="Padding" Value="8,4,8,4"/>
    <Setter Property="HorizontalAlignment" Value="Left"/>
    <Setter Property="VerticalAlignment" Value="Center"/>
    <Setter Property="FontFamily" Value="{ThemeResource ContentControlThemeFontFamily}"/>
    <Setter Property="FontWeight" Value="Normal"/>
    <Setter Property="FontSize" Value="{ThemeResource ControlContentThemeFontSize}"/>
    <Setter Property="UseSystemFocusVisuals" Value="True"/>
    <Setter Property="Template">
        <Setter.Value>
            <ControlTemplate TargetType="local:AdvancedButton">
                <Grid x:Name="RootGrid" Background="{TemplateBinding Background}">
                    <Grid.RowDefinitions>
                        <RowDefinition Height="Auto"/>
                        <RowDefinition Height="*"/>
                    </Grid.RowDefinitions>
                    <VisualStateManager.VisualStateGroups>
                        <VisualStateGroup x:Name="CommonStates">
                            <VisualState x:Name="Normal">
                                <Storyboard>
                                    <PointerUpThemeAnimation Storyboard.TargetName="RootGrid"/>
                                </Storyboard>
                            </VisualState>
                            <VisualState x:Name="PointerOver">
                                <Storyboard>
                                    <ObjectAnimationUsingKeyFrames Storyboard.TargetProperty="BorderBrush" Storyboard.TargetName="ContentPresenter">
                                        <DiscreteObjectKeyFrame KeyTime="0" Value="{ThemeResource SystemControlHighlightBaseMediumLowBrush}"/>
                                    </ObjectAnimationUsingKeyFrames>
                                    <ObjectAnimationUsingKeyFrames Storyboard.TargetProperty="Foreground" Storyboard.TargetName="ContentPresenter">
                                    <DiscreteObjectKeyFrame KeyTime="0" Value="{ThemeResource SystemControlHighlightBaseHighBrush}"/>
                                    </ObjectAnimationUsingKeyFrames>
                                    <PointerUpThemeAnimation Storyboard.TargetName="RootGrid"/>
                                </Storyboard>
                            </VisualState>
                            <VisualState x:Name="Pressed">
                                <Storyboard>
                                    <ObjectAnimationUsingKeyFrames Storyboard.TargetProperty="Background" Storyboard.TargetName="RootGrid">
                                        <DiscreteObjectKeyFrame KeyTime="0" Value="{ThemeResource SystemControlBackgroundBaseMediumLowBrush}"/>
                                    </ObjectAnimationUsingKeyFrames>
                                    <ObjectAnimationUsingKeyFrames Storyboard.TargetProperty="BorderBrush" Storyboard.TargetName="ContentPresenter">
                                        <DiscreteObjectKeyFrame KeyTime="0" Value="{ThemeResource SystemControlHighlightTransparentBrush}"/>
                                    </ObjectAnimationUsingKeyFrames>
                                    <ObjectAnimationUsingKeyFrames Storyboard.TargetProperty="Foreground" Storyboard.TargetName="ContentPresenter">
                                        <DiscreteObjectKeyFrame KeyTime="0" Value="{ThemeResource SystemControlHighlightBaseHighBrush}"/>
                                    </ObjectAnimationUsingKeyFrames>
                                    <PointerDownThemeAnimation Storyboard.TargetName="RootGrid"/>
                                </Storyboard>
                            </VisualState>
                            <VisualState x:Name="Disabled">
                                <Storyboard>
                                    <ObjectAnimationUsingKeyFrames Storyboard.TargetProperty="Background" Storyboard.TargetName="RootGrid">
                                        <DiscreteObjectKeyFrame KeyTime="0" Value="{ThemeResource SystemControlBackgroundBaseLowBrush}"/>
                                    </ObjectAnimationUsingKeyFrames>
                                    <ObjectAnimationUsingKeyFrames Storyboard.TargetProperty="Foreground" Storyboard.TargetName="ContentPresenter">
                                        <DiscreteObjectKeyFrame KeyTime="0" Value="{ThemeResource SystemControlDisabledBaseLowBrush}"/>
                                    </ObjectAnimationUsingKeyFrames>
                                    <ObjectAnimationUsingKeyFrames Storyboard.TargetProperty="BorderBrush" Storyboard.TargetName="ContentPresenter">
                                        <DiscreteObjectKeyFrame KeyTime="0" Value="{ThemeResource SystemControlDisabledTransparentBrush}"/>
                                    </ObjectAnimationUsingKeyFrames>
                                </Storyboard>
                            </VisualState>
                        </VisualStateGroup>
                    </VisualStateManager.VisualStateGroups>                            
                        <TextBlock x:Name="FontIcon" Grid.Row="0" Text="{Binding Icon, RelativeSource={RelativeSource TemplatedParent}}" Width="40" Foreground="{TemplateBinding Foreground}" FontSize="32" VerticalAlignment="Center" RenderTransformOrigin="0.5,0.5" FontFamily="Segoe MDL2 Assets"/>
                    <TextBlock x:Name="Text" Grid.Row="1" Text="{TemplateBinding Content}" VerticalAlignment="Center" Foreground="{TemplateBinding Foreground}" TextAlignment="Center" RenderTransformOrigin="0.5,0.5"/>
                    <ContentPresenter x:Name="ContentPresenter" Grid.Row="0" Grid.RowSpan="2" ContentTemplate="{TemplateBinding ContentTemplate}" ContentTransitions="{TemplateBinding ContentTransitions}" Content="" AutomationProperties.AccessibilityView="Raw" BorderBrush="{TemplateBinding BorderBrush}" BorderThickness="{TemplateBinding BorderThickness}" HorizontalContentAlignment="{TemplateBinding HorizontalContentAlignment}" Padding="{TemplateBinding Padding}" VerticalContentAlignment="{TemplateBinding VerticalContentAlignment}"/>
                </Grid>
            </ControlTemplate>
        </Setter.Value>
    </Setter>
</Style>

3) Then Use That custom button in your page where you want

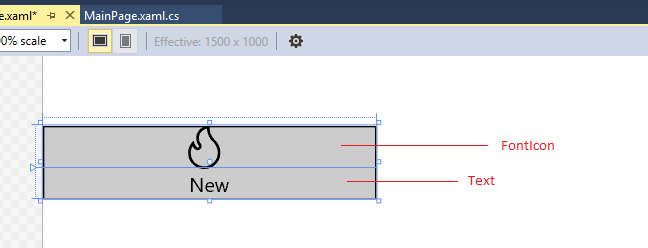
<local:AdvancedButton Height="55" Width="250" Style="{StaticResource AdvancedButtonTemplate}" Content="New" Icon="&#xECAD;" BorderThickness="1" BorderBrush="Black" />

4) Build Solution else it will show blue error underline.

Output

Note: here i customize template according to my normal understanding you need to customize some font size and style in template according to your need and also add margin if you need in textblocks in template- look into last 3 element "textblocks","content presenter".

Output

Cookshop answered 14/12, 2017 at 10:48 Comment(2)
I already knew about this, but in this way I would have to repeat it every time I need it. I don’t want inline solutions... I would like to have a customized control that I could port in every app and include even in a Nuget package.Psalmist
Okay you want to customise whole template, it is good idea only when you want to apply customised template in multiple button if you have single button , you can use above method, or wait i will try to update answerCookshop
E
4

what is the best and proper way to customize and extend a standard XAML control by code AND Xaml, in UWP environment?

Simplely answer: You can use templated Control template.

There is a video about this, you can start from 30mins from this video.

Generally speaking, there are two kind of ways for us to customize a control:

  1. UserControl
  2. Templated Control

For UserControl, it is used for light customization and you just need to use it in your own project. For Templated Control, it's a basic way for us to customize our controls. For your scenario, actually it won't have too many differences here, You can just inherit the control you want and then customize it with your code from code level and also Xaml level.

Exocrine answered 14/12, 2017 at 9:55 Comment(3)
In the video they say they create a copy of the ListView XAML template, but where are these templates located?Barnette
@Barnette a quick way: right click your ListView control on your VS UI then create a copy of it. Or you can search on MSDN directly. There are specific pages for those templates.Exocrine
Link is no longer active. However, there is a web archive snapshot of itCud
A
0

I learned today that I can extend a control natively (without wrapping in a UserControl) by first creating a UserControl and then swapping out the "UserControl" part for the control I want. I did a RibbonTab.

First in the MyRibbonTab.xaml.cs:

public partial class MyRibbonTab: RibbonTab

Then I went into MyRibbonTab.xaml and deleted everything and replaced it with:

<RibbonTab x:Class="MyNamespace.MyRibbonTab"
    xmlns="http://schemas.microsoft.com/winfx/2006/xaml/presentation"
    xmlns:x="http://schemas.microsoft.com/winfx/2006/xaml"
    Header="MyTabHeader">
  <RibbonGroup>
    ...
  </RibbonGroup>
</RibbonTab>

I did not expect this to work but it flippin' did. Instead of an insane Ribbon with thousands of lines of xml for all the buttons and controls in the ribbon and all its tabs, I could simply do this (after specifying xmlns:rib):

<Ribbon x:Name="MyCustom_rbn" VerticalAlignment="Top">
  <rib:MyRibbonTab x:Name="MyRibbon_tab"></rib:MyRibbonTab>
</Ribbon>

So clean and simple. Of course this is WPF - I assume for UWP you'd have to change the xmlns and xmlns:x to the UWP ones. Funny there's no tutorials or information on stuff like this - I just guessed my way to this solution.

Alvinaalvine answered 10/7 at 22:30 Comment(0)

© 2022 - 2024 — McMap. All rights reserved.