TestCase class not found by Android Studio
Asked Answered
M

7

18

I have written a simple test case class and placed it in the default test directory for Android Studio: "src/androidTest". I've created an Android Tests build configuration that looks for all Tests in the module. When I run the build configuration, my test does not execute and I get the following message in logcat: W/TestGrouping﹕ Invalid Package: '' could not be found or has no tests. If I specify the test package or even the specific test class, I get similar class not found messages.

My test class is as follows:

public class FirstTest extends InstrumentationTestCase {

public void testSample() {
        final int expected = 1;
        final int reality = 5;
        assertEquals(expected, reality);
    }
}

My build.gradle file looks like this:

apply plugin: 'android'

android {
    compileSdkVersion 19
    buildToolsVersion "19.0.1"

    defaultConfig {
        minSdkVersion 8
        targetSdkVersion 19
        versionCode 1
        versionName "1.0"
    }
    buildTypes {
        release {
            runProguard false
            proguardFiles getDefaultProguardFile('proguard-android.txt'), 'proguard-rules.txt'
        }
    }
}

dependencies {
    compile 'com.android.support:gridlayout-v7:19.0.1'
    compile 'com.android.support:support-v4:19.0.1'
    compile 'com.android.support:appcompat-v7:19.0.1'
    compile fileTree(dir: 'libs', include: ['*.jar'])
}

I'm running version 0.9 of the android gradle plugin. My top level build.gradle (a peer to the app directory) looks like this.

// Top-level build file where you can add configuration options common to all sub-projects/modules.

buildscript {
    repositories {
        mavenCentral()
    }
    dependencies {
        classpath 'com.android.tools.build:gradle:0.9.+'
    }
}

allprojects {
    repositories {
        mavenCentral()
    }
}

My project directory structure is as follows:

app src androidTest java main java res

Megasporangium answered 7/3, 2014 at 4:22 Comment(1)
include your project directory structure for tests.Harbison
M
16

The package structure under the androidTest/java directory needs to exactly parallel the structure under the main/java directory.

My problem above was that the package structure under main was com.mydomain.myapp.subpackage and the directory structure under androidTest was com.mydomain.myapp.subpackage.somethingelse.

Once the package structures matched, the tests were discovered and executed flawlessly.

Megasporangium answered 8/3, 2014 at 5:21 Comment(4)
Interesting. I wouldn't have that to be a requirement. You should be able to put your code in "com.mydomain.myapp.subpackage" and tests in "com.mydomain.myapp.subpackage.test", although if you do that you need to be aware of protected/package scope.Smythe
I wouldn't have thought so either. I haven't seen that documented anywhere and it may just be a bug in the Canary version of Android Studio. The directory structure was the only change I had made, though, when it started working.Megasporangium
Also, make sure the test class has the exact same name as the class you're testing, + "Test". Including capitalization.Balalaika
it was painful until I understood the truth, thanks!Atchley
L
26

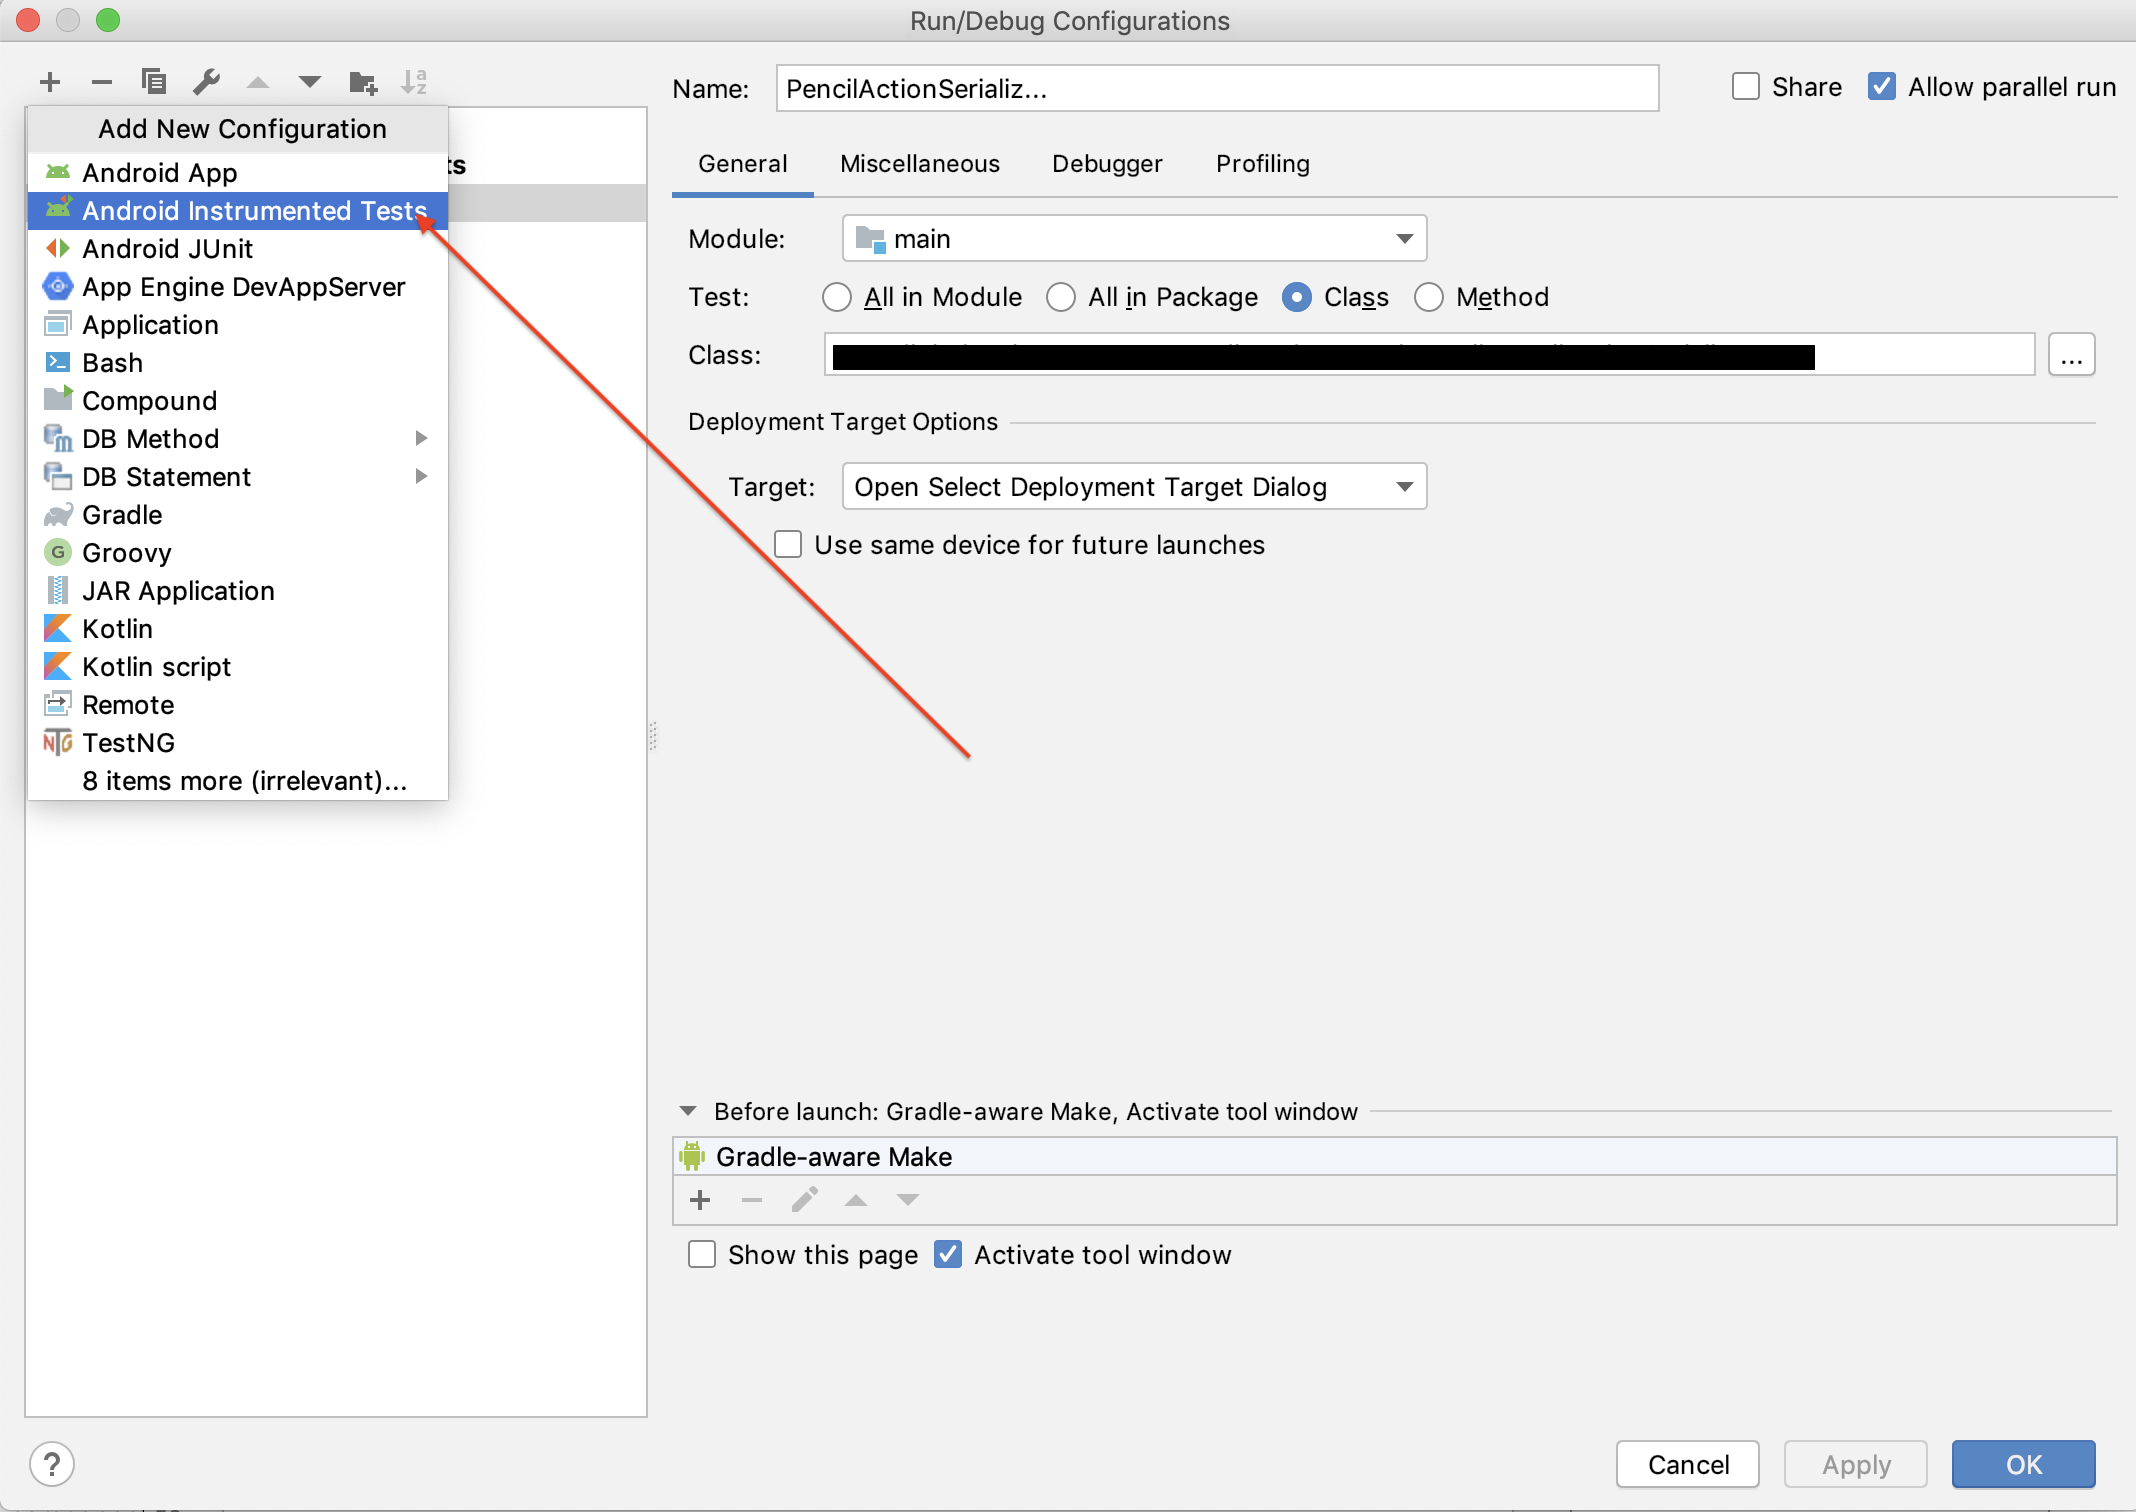
You need to check "run" configuration.

If you are going to run tests from androidTest folder, you should choose configuration under Android Instrumented Test, and not the junit.

Run(Top tool window) / Edit configurations...

enter image description here

Lamonicalamont answered 23/6, 2019 at 13:9 Comment(1)
You can right-click on the test class file and select "Create 'ClassName'..." option that has the Android Instrumented Test icon.Titfer
M
16

The package structure under the androidTest/java directory needs to exactly parallel the structure under the main/java directory.

My problem above was that the package structure under main was com.mydomain.myapp.subpackage and the directory structure under androidTest was com.mydomain.myapp.subpackage.somethingelse.

Once the package structures matched, the tests were discovered and executed flawlessly.

Megasporangium answered 8/3, 2014 at 5:21 Comment(4)
Interesting. I wouldn't have that to be a requirement. You should be able to put your code in "com.mydomain.myapp.subpackage" and tests in "com.mydomain.myapp.subpackage.test", although if you do that you need to be aware of protected/package scope.Smythe
I wouldn't have thought so either. I haven't seen that documented anywhere and it may just be a bug in the Canary version of Android Studio. The directory structure was the only change I had made, though, when it started working.Megasporangium
Also, make sure the test class has the exact same name as the class you're testing, + "Test". Including capitalization.Balalaika
it was painful until I understood the truth, thanks!Atchley
A
8

You needn't really to rebuild structure of src directories to create appropriate tests.

The tested and the testing class should be in the same package.

But as for folders, they should be separated. So, for tests and normal sources we use different roots.

The problem is, how to set these roots. In the AS 1.5 (maybe earlier versions can do it, too), it can be done easily:

  1. Make practically any structure of directories. Somewhere in it there is the root dir of tested sources. Right click it and Mark Directory As ... Sources Root.
  2. Make another arbitrary structure of directories for tests. Somewhere in it there is the root dir of test sources. Right click it and Mark Directory As ... Test Sources Root.

Under these roots the path to a test class must be the same as the path to the tested class from its root, for dir names along these paths define the packages and they should be the same. But you needn't worry about the structures above the roots.

Using this method you can add tests to any existing structure of sources. If you are creating the structure yourself, make it rather traditional.

Edit. Notice, that folders structure for modules of Java 9 is something ABSOLUTELY different.

Abbieabbot answered 17/3, 2016 at 9:57 Comment(2)
I would never have spotted that, I came to intellij from STS and am so used to convention over configuration. ThanksSnuffbox
Forget convention :-) Now I am playing with Java9 modular system, and the folders structure there is absolutely special and different.Abbieabbot
C
6

Maybe I can save time for somebody: I had the same kind of error "Class not found:" when I had "release" buildVariant selected in Android Studio, so before you run AndroidTests(Espresso) double check your build variant and try to set it to "Debug"

Commanding answered 30/1, 2020 at 21:5 Comment(2)
this was a good pointer because I was not running it and not debugging itUbangi
Fixed my issue, thanks!Predict
S
0

Please post your entire build.gradle file.
What version of 'com.android.tools.build:gradle' are you using?
In 0.8, the default test path is "instrumentTest/java/...'.
In 0.9, the default test path changed to "androidTest/java/...".

To use androidTest, you should have:

buildscript {
    repositories {
        mavenCentral()
    }
    dependencies {
        classpath 'com.android.tools.build:gradle:0.9.+'
    }
}
Smythe answered 7/3, 2014 at 20:11 Comment(1)
Yes, good thought, this information is in the top level build.gradle as noted in my edit above. Still no dice.Megasporangium
C
0

In addition to all of that written before my note (so check those please before this suggestion of mine), I've sometimes solved moving the test file outside the custom directory (as example, I've created dir like db_test or similar under /test or androidTest) to the root of test or androidTest, drag&dropping it outside dir in AndroidStudio explorer and waiting for the refactor android studio dialog for moving confirmation.

After running it successfully, I've put again in the original directory, run again and it works.

In another case I've solved renaming the custom dir.

In another, because the test was in the root, I've create custom dir, move it inside, and then ran successfully.

These worked for me, hope it could save time for someone else.

Colorfast answered 3/11, 2019 at 11:28 Comment(0)
T
0

This issue is crazy, it just is. Don't overthink it.

How I've fixed it (Win10) :

  1. Reboot (maybe not necessary)
  2. Try to Run test
  3. Try to Run with coverage

It fixed it for me on Android Studio 3.6.3

These two ways of running tests are different and this approach could fix the issue for you too.

Thoer answered 9/6, 2020 at 21:44 Comment(0)

© 2022 - 2024 — McMap. All rights reserved.