Shiny widgets in DT Table
Asked Answered
C

1

6

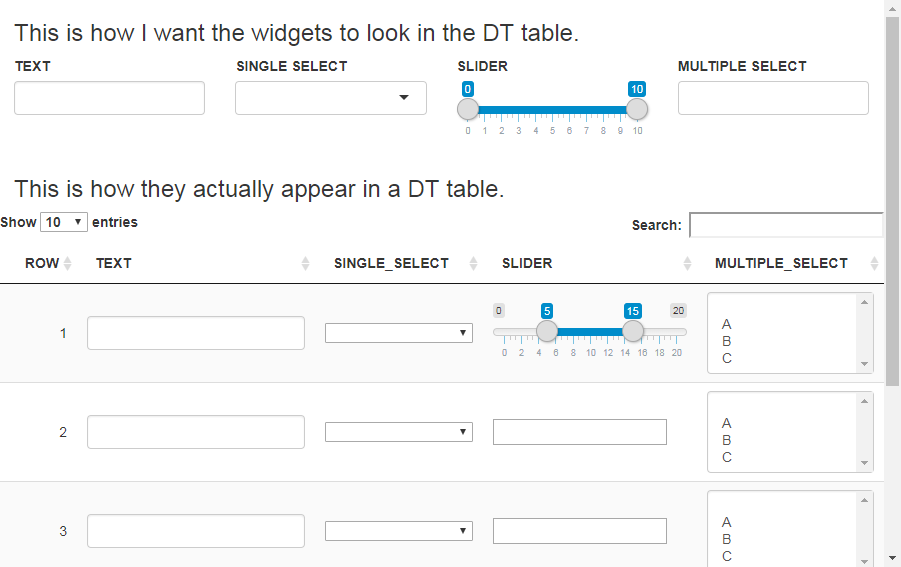
I'm trying to include shiny widgets such as textInput, selectInput (single), sliderInput, and selectInput (multiple) in the rows of a DT table. When the widgets are directly on the page, they display correctly, however, when they are put in the table, some of them do not display correctly.

The textInput is fine and the selectInput (single) is mostly fine save for some css differences, but the selectInput (multiple) isn't displaying correctly and the sliderInput definitely isn't displaying correctly. It seems the widgets that rely on javascript are the ones that have issues. Is there a way to make these widgets work correctly in the DT table?

Here is my reproducible example. I used the raw HTML for the widgets when putting them in the table, but I took that directly from the HTML generated by the shiny functions for each widget.

library(shiny)
library(DT)

ui <- fluidPage(
  h3("This is how I want the widgets to look in the DT table."),
  fluidRow(column(3, textInput(inputId = "text",
                               label = "TEXT")),
           column(3, selectInput(inputId = "single_select",
                                 label = "SINGLE SELECT",
                                 choices = c("", "A", "B", "C"))),
           column(3, sliderInput(inputId = "slider",
                                 label = "SLIDER",
                                 min = 0,
                                 max = 10,
                                 value = c(0, 10))),
           column(3, selectizeInput(inputId = "multiple_select",
                                    label = "MULTIPLE SELECT",
                                    choices = c("", "A", "B", "C"),
                                    multiple = TRUE))),
  h3("This is how they actually appear in a DT table."),
  fluidRow(DTOutput(outputId = "table"))
)

server <- function(input, output, session) {

  output$table <- renderDT({
    data <- data.frame(ROW = 1:5,
                       TEXT = '<input id="text" type="text" class="form-control" value=""/>',
                       SINGLE_SELECT = '<select id="single_select" style="width: 100%;">
                                          <option value="" selected></option>
                                          <option value="A">A</option>
                                          <option value="B">B</option>
                                          <option value="C">C</option>
                                        </select>',
                       SLIDER = '<input class="js-range-slider" id="slider" data-type="double" data-min="0" data-max="10" data-from="0" data-to="10" data-step="1" data-grid="true" data-grid-num="10" data-grid-snap="false" data-prettify-separator="," data-prettify-enabled="true" data-keyboard="true" data-drag-interval="true" data-data-type="number"/>',
                       MULTIPLE_SELECT = '<select id="multiple_select" class="form-control" multiple="multiple">
                                            <option value=""></option>
                                            <option value="A">A</option>
                                            <option value="B">B</option>
                                            <option value="C">C</option>
                                          </select>',
                       stringsAsFactors = FALSE)

    datatable(data = data,
              selection = "none",
              escape = FALSE,
              rownames = FALSE)
  })

}

shinyApp(ui = ui, server = server)
Chequerboard answered 7/3, 2019 at 0:58 Comment(0)
T
16

Sliders

For the sliders, you have to start with a text input:

SLIDER = '<input type="text" id="s" name="slider" value="" />'

and then turn it into a slider with JavaScript:

js <- c(
  "function(settings){",
  "  $('#s').ionRangeSlider({",
  "    type: 'double',",
  "    grid: true,",
  "    grid_num: 10,",
  "    min: 0,",
  "    max: 20,",
  "    from: 5,",
  "    to: 15",
  "  });",
  "}"
)

See ionRangeSlider for the options.

You can pass the JavaScript code with the initComplete option:

server <- function(input, output, session) {

  output$table <- renderDT({
    data <- data.frame(ROW = 1:5,
                       TEXT = '<input id="text" type="text" class="form-control" value=""/>',
                       SINGLE_SELECT = '<select id="single_select" style="width: 100%;">
                       <option value="" selected></option>
                       <option value="A">A</option>
                       <option value="B">B</option>
                       <option value="C">C</option>
                       </select>',
                       SLIDER = '<input type="text" id="s" name="slider" value="" />',
                       MULTIPLE_SELECT = '<select id="multiple_select" class="form-control" multiple="multiple">
                       <option value=""></option>
                       <option value="A">A</option>
                       <option value="B">B</option>
                       <option value="C">C</option>
                       </select>',
                       stringsAsFactors = FALSE)

    datatable(data = data,
              selection = "none",
              escape = FALSE,
              rownames = FALSE, 
              options = 
                list(
                  initComplete = JS(js)
                ))
  })

}

Then you get the slider for the first row only:

enter image description here

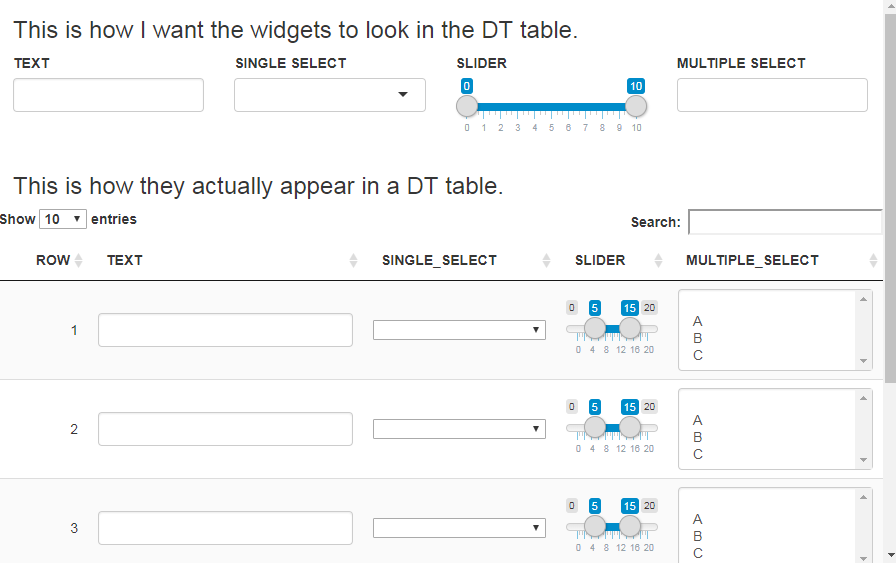
That's because the five text inputs have the same id. You have to set a different id for the five text inputs:

SLIDER = sapply(1:5, function(i) {
  sprintf('<input type="text" id="Slider%d" name="slider" value="" />', i)
}),

Then use this JavaScript code to turn them into sliders:

js <- c(
  "function(settings){",
  "  $('[id^=Slider]').ionRangeSlider({",
  "    type: 'double',",
  "    grid: true,",
  "    grid_num: 10,",
  "    min: 0,",
  "    max: 20,",
  "    from: 5,",
  "    to: 15",
  "  });",
  "}"
)

enter image description here

To set the initial values of from and to, it's better to give them in the value argument of the input text like this:

SLIDER = sapply(1:5, function(i) {
  sprintf('<input type="text" id="Slider%d" name="slider" value="5;15" />', i)
})

js <- c(
  "function(settings){",
  "  $('[id^=Slider]').ionRangeSlider({",
  "    type: 'double',",
  "    grid: true,",
  "    grid_num: 10,",
  "    min: 0,",
  "    max: 20",
  "  });",
  "}"
)

Multiple selects

To get the desired display of a multiple select, you have to call selectize():

MULTIPLE_SELECT = '<select id="mselect" class="form-control" multiple="multiple">
                       <option value=""></option>
                       <option value="A">A</option>
                       <option value="B">B</option>
                       <option value="C">C</option>
                    </select>'
js <- c(
  "function(settings){",
  "  $('[id^=Slider]').ionRangeSlider({",
  "    type: 'double',",
  "    grid: true,",
  "    grid_num: 10,",
  "    min: 0,",
  "    max: 20",
  "  });",
  "  $('#mselect').selectize()",
  "}"
)

Similarly, this applies to the first multiple select only. Use individual id's to apply to the five ones.

Binding

Finally, you have to bind the inputs to get their value available in Shiny:

datatable(data = data,
          selection = "none",
          escape = FALSE,
          rownames = FALSE, 
          options = 
            list(
              initComplete = JS(js),
              preDrawCallback = JS('function() { Shiny.unbindAll(this.api().table().node()); }'),
              drawCallback = JS('function() { Shiny.bindAll(this.api().table().node()); } ')
            )
)

Now you can get the values in input$Slider1, input$Slider2, ..., and input$mselect. Note that input$Slider[1/2/3/4/5] returns the values of the slider in this format: "3;15".

Tuantuareg answered 7/3, 2019 at 10:21 Comment(6)
Thanks! This is exactly what I needed. I think I'm going to want to have a date range input as well but I think I can figure out how to do that based on how you did these.Chequerboard
@Chequerboard See here for the date input.Homage
I have one follow up question if you don't mind. How hard would it be to make the slider appear in a dropdown, similar to the way it appears in a column filter for a numeric column where you see a text box and then the slider drops down below the box when you click in it?Chequerboard
@StéphaneLaurent how do you do a single select? I think I asked a similar question here -> #74269642Peeling
This last part Binding was exactly what I was looking for. It transfers very well to storing buttons in a Data Table.Filch
Super helpful answer! Interested though in how you would edit the Single Select if you needed the choices to be dynamic and looked up from a table based on some other input.Salomie

© 2022 - 2024 — McMap. All rights reserved.