Turn off windows update service & auto updates windows 10 using powershell
Asked Answered
L

9

6

I want to use a powershell script to turn off windows update service & auto updates windows 10 using powershell. I've searched around but the commands didn't turn either one off completely.

I'm manually doing this now on devices that aren't on the network, so no group policy will be able to be deployed:

services> windows update> disable Windows Update > Change Settings > Never Check for Updates

Likker answered 14/6, 2017 at 21:44 Comment(0)
E
9

EDIT 2024-10-07:

Solution from 2020-07-30 works now only for a limited time, because Microsoft enables the Windows Updates by multiple other automatic services, updaters and installers, e.g. by the TrustedInstaller.exe.

WORKING WORKAROUND

Currently working workaround (tested on Windows 11) is to overwrite Windows Update Server URL to a non-existent IP (or to your own WU server on which you would not permit any updates).

Steps:

  • Open Local Group Policy Editor (press WIN+R and run: gpedit.msc)
  • Go to path: Computer Configuration\Administrative Templates\Windows Components\Windows Update\Manage updates offered from Windows Server Update Service
  • In the right pane: open (double-click) Specify Intranet Microsoft update service location and set:
    • Enabled
    • Set the intranet update service for detecting updates: 192.168.0.2 (or other non-existent IP)
    • Set the intranet statistics server: 192.168.0.2 (or other non-existent IP) enter image description here
  • Go to path: Computer Configuration\Administrative Templates\Windows Components\Windows Update\Manage end user experience
  • In the right pane: open Configure Automatic Updates and set:
    • Enabled (according to documentation this is needed to make own WU update server uri working)

EDIT 2020-07-30:

The former solution, which is bellow, works only partially: it does not disable the WindowsUpdate/sihpostreboot service, because Microsoft is fighting against guides like this.

WHAT WORKS FULLY: (how to disable the rest)

  • follow the steps of the original solution bellow (will finish with few errors)
  • download and unzip Microsoft PSTools
  • start the command line as Administrator in location with psexec.exe
  • start the Task Scheduler with the SYSTEM permissions: psexec -i -d -s mmc taskschd.msc
  • disable the rest of not disabled update tasks manually

enter image description here


THE ORIGINAL ANSWER:

This script is based on Kemal's answer.

The improvement is that it disables also tasks in WindowsUpdate and UpdateOrchestrator folders that cannot be disabled manually in Task Scheduler. Furthermore, it disables the Windows Update service.

Recommended execution:

  1. Install all pending updates so that you are in "Your device is up to date" state.
  2. Run the following PowerShell script as an Administrator:
    Clear-Host

    $WindowsUpdatePath = "HKLM:SOFTWARE\Policies\Microsoft\Windows\WindowsUpdate\"
    $AutoUpdatePath = "HKLM:SOFTWARE\Policies\Microsoft\Windows\WindowsUpdate\AU"

    If(Test-Path -Path $WindowsUpdatePath) {
        Remove-Item -Path $WindowsUpdatePath -Recurse
    }

    New-Item $WindowsUpdatePath -Force
    New-Item $AutoUpdatePath -Force

    Set-ItemProperty -Path $AutoUpdatePath -Name NoAutoUpdate -Value 1

    Get-ScheduledTask -TaskPath "\Microsoft\Windows\WindowsUpdate\" | Disable-ScheduledTask

    takeown /F C:\Windows\System32\Tasks\Microsoft\Windows\UpdateOrchestrator /A /R
    icacls C:\Windows\System32\Tasks\Microsoft\Windows\UpdateOrchestrator /grant Administrators:F /T

    Get-ScheduledTask -TaskPath "\Microsoft\Windows\UpdateOrchestrator\" | Disable-ScheduledTask

    Stop-Service wuauserv
    Set-Service wuauserv -StartupType Disabled

    # We disable WindowsUpdate folder again, because wuauserv service could have enabled it meanwhile
    Get-ScheduledTask -TaskPath "\Microsoft\Windows\WindowsUpdate\" | Disable-ScheduledTask

    Write-Output "All Windows Updates were disabled"

Note: the script may display execution errors if WindowsUpdate folder or UpdateOrchestrator folder does not exist.

Note 2: you may need to run the script again after some Microsoft installer runs (like .Net Framework installer, Visual Studio installer, ...), because they enable updates again.

Ellary answered 12/4, 2018 at 7:50 Comment(0)
J
6

I found this information you can try it

Powershell

 Clear-Host

Write-Host "0 -> Change setting in Windows Update app (default)"
Write-Host "1 -> Never check for updates (not recommended)"
Write-Host "2 -> Notify for download and notify for install"
Write-Host "3 -> Auto download and notify for install"
Write-Host "4 -> Auto download and schedule the install"

Write-Host "Enter any character to exit"
Write-Host
switch(Read-Host "Choose Window Update Settings"){
       0 {$UpdateValue = 0}
       1 {$UpdateValue = 1}
       2 {$UpdateValue = 2}
       3 {$UpdateValue = 3}
       4 {$UpdateValue = 4}
       Default{Exit}
}

$WindowsUpdatePath = "HKLM:SOFTWARE\Policies\Microsoft\Windows\WindowsUpdate\"
$AutoUpdatePath = "HKLM:SOFTWARE\Policies\Microsoft\Windows\WindowsUpdate\AU"

If(Test-Path -Path $WindowsUpdatePath) {
    Remove-Item -Path $WindowsUpdatePath -Recurse
}


If ($UpdateValue -gt 0) {
    New-Item -Path $WindowsUpdatePath
    New-Item -Path $AutoUpdatePath
}

If ($UpdateValue -eq 1) {
    Set-ItemProperty -Path $AutoUpdatePath -Name NoAutoUpdate -Value 1
}

If ($UpdateValue -eq 2) {
    Set-ItemProperty -Path $AutoUpdatePath -Name NoAutoUpdate -Value 0
    Set-ItemProperty -Path $AutoUpdatePath -Name AUOptions -Value 2
    Set-ItemProperty -Path $AutoUpdatePath -Name ScheduledInstallDay -Value 0
    Set-ItemProperty -Path $AutoUpdatePath -Name ScheduledInstallTime -Value 3
}

If ($UpdateValue -eq 3) {
    Set-ItemProperty -Path $AutoUpdatePath -Name NoAutoUpdate -Value 0
    Set-ItemProperty -Path $AutoUpdatePath -Name AUOptions -Value 3
    Set-ItemProperty -Path $AutoUpdatePath -Name ScheduledInstallDay -Value 0
    Set-ItemProperty -Path $AutoUpdatePath -Name ScheduledInstallTime -Value 3
}

If ($UpdateValue -eq 4) {
    Set-ItemProperty -Path $AutoUpdatePath -Name NoAutoUpdate -Value 0
    Set-ItemProperty -Path $AutoUpdatePath -Name AUOptions -Value 4
    Set-ItemProperty -Path $AutoUpdatePath -Name ScheduledInstallDay -Value 0
    Set-ItemProperty -Path $AutoUpdatePath -Name ScheduledInstallTime -Value 3
}
Jehu answered 14/6, 2017 at 22:12 Comment(1)
Thanks. I was working with tablets & tried to use another script in which it didnt work. But this one did. I've successfully applied 300 tablets =)Likker
B
3

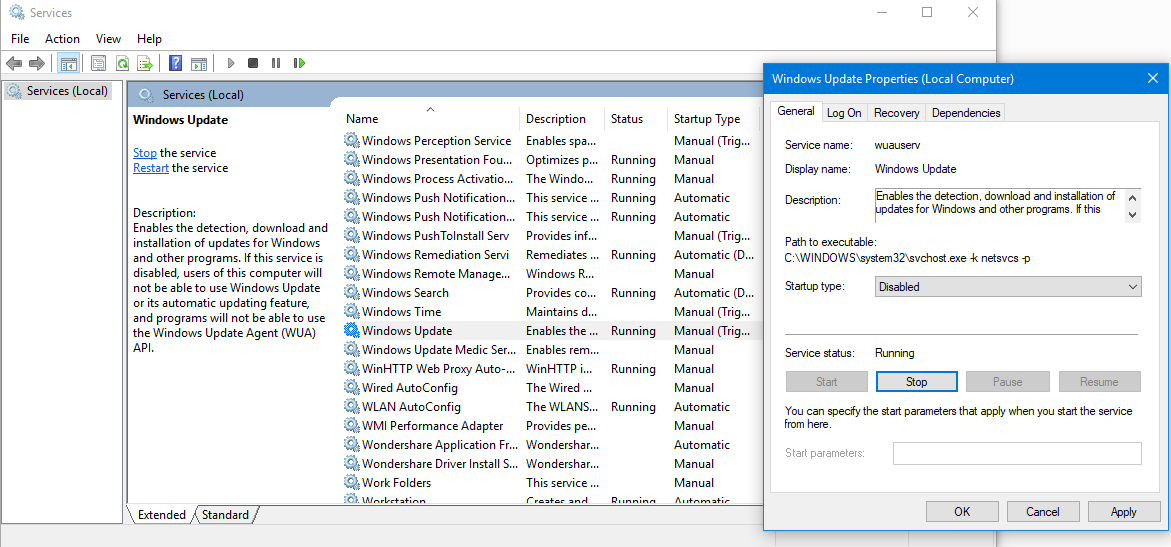
For disable auto update of Windows 10 Run --> services.msc --> Windows Update --> properties --> Startup type --> Disabled

http://optimistpower.blogspot.in/2017/12/how-to-disable-windows-auto-update-in.html

Bashemath answered 30/12, 2017 at 18:18 Comment(3)
What about set it to manual instead of Disable ?Croton
@GoodPen will not work reliably, I tried – Windows decided to stop my data processing script this night because apparently WINDOWS UPDATES ARE MORE IMPORTANT THAN ANYTHING ELSE IN THE UNIVERSEPlumber
Setting it to Disabled doesn't work either: it goes back in mere minutes, on a computer not connected to any domain or anything.Relative
D
1

If anyone stumbles upon this question simply trying to temporarily disable updates in Windows 10, look for the setting: "Set as metered connection" and turn it on. I know this doesn't address the OP's question but this question comes up as one of the first hits when searching for how to turn off updates.

Disappoint answered 10/8, 2017 at 12:2 Comment(0)
S
0

There is much easier way to get rid all network hog application's nasty activities at once : Using local machine's sock proxy.

Most of windows applications now-day built-in their own cloud. They all go their own server when you start windows. It is not easy to block them one by one manually.

So I come up this way, block them all at once, and I only allow certain apps to go internet whenever I need.

Strategy : Block the Windows box internet access, then use SSH dynamic port forward to establish a tunnel, forwards all internet requests to a Linux SSH server on local network. Since I do not give the internet proxy setting in system level, Windows box like a little ant has no way to find its giant queen on Microsoft, cause it is blocked.

Step 1 : block all internet accessing for a windows box. Many way to implemented this: I modify the router to block the Windows box to access internet.

Step 2 : Install ssh client on your windows box. I installed open-ssh client in my windows box. You need a Linux box to have ssh server running in same network. I use synology diskstaion NAS system. It runs all day, so all my local network use it as proxy server. You can also simply install a vertual linux box in your windows box, use it for many things.

Step 3: Open a local port and tunnel all traffics sent to it linux box. We use port 1080. Execute ssh command:

ssh -D 1080 <ssh-username>@<linuxbox_address>

There are much more things you can do to simplify the ssh login, such as use ssh key etc.

Step 4: Now your windows box's port 1080 is opened to internet, through the linux box. You just need tell each app how to use this port. For example, you want Chrome browser in your windows box to surf internet, no problem. change the chrome startup command line option (right click the chrome icon, change the command line, make it looks like this :

.../chrome.exe --proxy-server=SOCKS4://127.0.0.1:1080

You are good to go. Note : do not change system's internet proxy setting. cause the system proxy setting is shared by all programs. You do not want all apps can access internet. That is the reason we walk all the way here.

Now I feel like the Windows box is usable again.

Simoneaux answered 3/6, 2018 at 7:22 Comment(1)
This is very interesting answer! But just to note: this does not solve the issue of CPU utilization by Windows Update services even with no Internet connection. I cannot imagine what those services try to do but they really slowdown the slow PC.Chindwin
D
0

There are several methods to stop windows update.

  1. According to my experience this is the best way. Stop The Windows Update Service

As central as it is to the core of Windows 10, Windows Update is actually just another Windows process so it can be stopped with these simple steps:

  1. Open the Run command (Win + R), in it type: services.msc and press enter
  2. From the Services list which appears find the Windows Update service and open it and stop it.
  3. In ‘Startup Type’ (under the ‘General’ tab) change it to ‘Disabled’
  4. Restart To re-enable Windows Update simply repeat these four steps, but change the Startup Type to ‘Automatic’.

Here attached image how this done.enter image description here

  1. Go to services> windows update> disable Windows Update > Change Settings > Never Check for Updates.
Dulcle answered 28/4, 2019 at 4:8 Comment(0)
P
0

Not sure if it will work reliably*, but I will give this a try:

  1. Create a new batch script with the following content (i.e., copy & paste it into a text editor and save it as kill_windows_updates.bat or so:
@echo off
:endless_loop
    if 0 leq 1 (
        @Echo Disabling the Windows Update Service ...
        Net stop wuauserv
        sc config "wuauserv" start=disabled
        timeout 10
        goto :endless_loop
    )
  1. create a shortcut of the .bat file in the autostart folder:
    C:\Users\<username>\AppData\Roaming\Microsoft\Windows\Start Menu\Programs\Startup

  2. Right-click this shortcut and go to the Properties, then in the tab "shortcut" go click "advanced" and enable "run as administrator. You can also execute the batch file minimized. run batch shortcut as administrator, minimized

  3. The script should run automatically after the next boot. You can also run it immediately to shut down windows updates in the current session.

*EDIT, 12 days after: previously my computer rebooted every night because Windows 10 desperately tried to re-install a failed update and I couldn't stop it with any other method. Since I ran the script in background, it never happened again, no matter if turned on or in hibernation, so it solved the problem in my case.

Plumber answered 12/4, 2024 at 8:23 Comment(0)
R
0

or just add the "no reboot when logged in users" to the AO configs in the registry forget exactly the syntax but google is your friend my server has been up for 76 days now, and it is running windows 10 with automatic updates enabled

Rovner answered 17/6, 2024 at 18:34 Comment(1)
Your answer could be improved with additional supporting information. Please edit to add further details, such as citations or documentation, so that others can confirm that your answer is correct. You can find more information on how to write good answers in the help center.Phippen
H
0

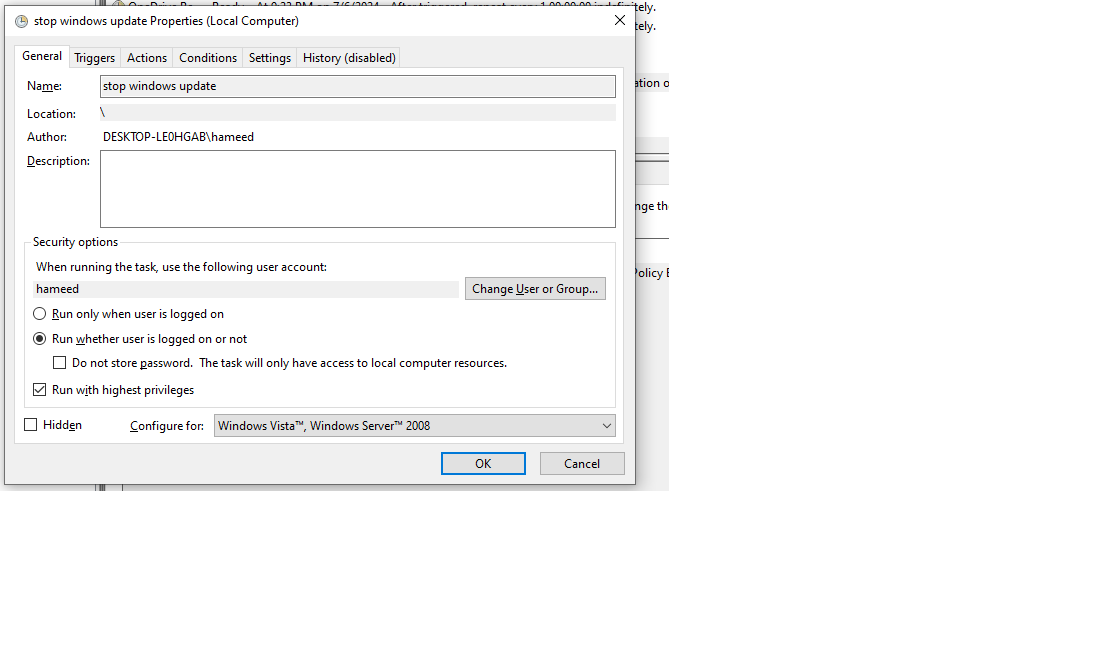
I wanted to stop windows update ,tried configuring registry ,disabling scheduler and nothing worked,so I wrote a powershell script to stop windows update and scheduled using windows task scheduler with below configuration

stopwinupdates.ps1

$status= get-service "wuauserv"
#echo $status
if($status.Status -eq "Running")
{
 $status =get-service "wuauserv" | Where {$status.Status -eq 'Running'} | stop-service
}
#echo $status
exit
#| stop-service

Create a basic task scheduler with below configuration

Goto actions and then set Program/script as your system path of powershell

%SystemRoot%\syswow64\WindowsPowerShell\v1.0\powershell.exe

Then Arguments are

-NoLogo -NonInteractive -ExecutionPolicy Bypass -noexit -File "G:\stopwinupdates.ps1"

G:/ is the path of my script to stop windows update

A snapshot the process

enter image description here

But the problem was that powershell console would open and wait for an user action to complete the task . Just closing powershell console would do the job but it was annoying ,so we need to check the attribute in the general Run whether user is logged in or not

enter image description here

Hence job runs every 15 minutes to check the status of the windows update service ,if its running then powershell script will be eecuted and windows update service would be stopped.

Hate answered 13/7, 2024 at 15:30 Comment(0)

© 2022 - 2025 — McMap. All rights reserved.