Compile standalone binaries with NDK 13
Asked Answered
A

2

7

With NDK 10 releases, I used to use ndk-build to compile standalone binaries for many different ABIs and multiple API levels. These binaries were to be included in an app. However, I installed the NDK on a new development machine as described in this article. This resulted in a folder ndk-bundle within my Android SDK directory. I used to compile the code from a command line and then copy the binaries to the resources of my Android Studio project, but I could not figure out how to do this with NDK 13 so I tried to follow the tutorial to include my native code in the Android Studio project. However, almost all recent instructions assume that one wants to build a library, not a standalone binary, so I did not get far.

I would switch to CMake if I figured out how to get it to work. My native project has the following (simplified) structure:

  • native

    • Android.mk

      LOCAL_PATH := $(call my-dir)/my_tool/src
      include $(CLEAR_VARS)
      LOCAL_MODULE    := my_tool
      LOCAL_SRC_FILES := main.c
      include $(BUILD_EXECUTABLE)
      
    • Application.mk

      APP_ABI := all
      APP_PLATFORM := android-21
      
    • my_tool

      • src
        • main.c

How can I compile this using either Android Studio or the NDK from the command line on our Windows 10 development machines?

Edit:

I am using this in build.gradle:

externalNativeBuild {
    ndkBuild {
        path "../native/Android.mk"
    }
}

Gradle creates a directory .externalNativeBuild which contains build configurations, but I cannot find out how to actually build the native code. No binaries are created when I run gradle.

I cannot find any information about gradle configuration for ndk-build.

Angelenaangeleno answered 10/12, 2016 at 11:38 Comment(1)
Building executables for Android shell (including ndk-build and CMake).Redvers
M
5

I tried to follow your simplified structure as closely as possible.

Here is the file app/build.gradle:

apply plugin: 'com.android.library'

android {
    compileSdkVersion 24
    buildToolsVersion "25.0.1"
    defaultConfig {
        minSdkVersion 21
        targetSdkVersion 24
        externalNativeBuild {
            ndkBuild {
                targets "my_tool"
                abiFilters "armeabi-v7a"
            }
        }
    }
    externalNativeBuild {
        ndkBuild {
            path "../native/Android.mk"
        }
    }
}

The file native/Android.mk is identical to yours:

LOCAL_PATH := $(call my-dir)/my_tool/src
include $(CLEAR_VARS)
LOCAL_MODULE    := my_tool
LOCAL_SRC_FILES := main.c
include $(BUILD_EXECUTABLE)

I also have the files native/main.c and a minimal app/src/main/AndroidManifest.xml:

<manifest xmlns:android="http://schemas.android.com/apk/res/android"
  package="my.tool" />

I did not touch the root build.gradle script generated by Android Studio wizard:

// Top-level build file where you can add configuration options common to all sub-projects/modules.

buildscript {
    repositories {
        jcenter()
    }
    dependencies {
        classpath 'com.android.tools.build:gradle:2.3.0-alpha3'

        // NOTE: Do not place your application dependencies here; they belong
        // in the individual module build.gradle files
    }
}

allprojects {
    repositories {
        jcenter()
    }
}

task clean(type: Delete) {
    delete rootProject.buildDir
}

Now I can build the project and here is what I get:

$> file ./app/build/intermediates/ndkBuild/debug/obj/local/armeabi-v7a/my_tool
ELF 32-bit LSB shared object, ARM, version 1 (SYSV), dynamically linked (uses shared libs), not stripped

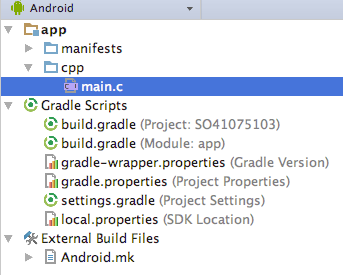
Android Studio shows my main.c in the cpp folder in default view:

enter image description here

Update: to have the executable stripped and packaged in the APK, native/Android.mk must be changed:

LOCAL_PATH := $(call my-dir)/my_tool/src

install: LIB_PATH := $(call my-dir)/libs

include $(CLEAR_VARS)
LOCAL_MODULE    := my_tool
LOCAL_SRC_FILES := main.c
include $(BUILD_EXECUTABLE)

install: $(LOCAL_INSTALLED)
    -mkdir $(LIB_PATH)
    -rm -r $(LIB_PATH)
    mv $< $(<:my_tool=lib-my_tool-.so)
    mv $(realpath $(dir $<)..) $(LIB_PATH)

.PHONY: install

Also, app/build.gradle needs some tweaking:

apply plugin: 'com.android.application'

android {
    compileSdkVersion 24
    buildToolsVersion "25.0.1"
    defaultConfig {
        minSdkVersion 21
        targetSdkVersion 24
        externalNativeBuild {
            ndkBuild {
                targets "my_tool"
                abiFilters "armeabi-v7a"
                arguments 'V=1', 'install'
            }
        }
    }
    externalNativeBuild {
        ndkBuild {
            path "../native/Android.mk"
        }
    }
    sourceSets {
        main {
            jniLibs.srcDirs = ['../native/libs']
        }
    }
}

This relies on the old hack which depends on undocumented behavior of NDK, and may break without notice on a future NDK upgrade.

Martinelli answered 13/12, 2016 at 17:29 Comment(6)
Great! Will the generated binaries automatically be included in the APK?Angelenaangeleno
I don't think they will be added to APK automatically. Actually, the binaries will not be extracted from the APK automatically. I have once proposed a hack for that, but I have never tested it on Android 5 or 6.Martinelli
Extracting is no problem, we already got code for that. It just means that we need to manually add a step to add the binaries to the APK, but that was the same before, so no change.Angelenaangeleno
Yes, the easiest way to add the binaries to APK is by hijacking the jniLibs, but Gradle provides infinite alternatives. Please note that the executable in ndkBuild/debug/obj is not stripped, so you need an extra step before packing.Martinelli
Thank you for your answer, I accepted it and awarded you the bounty. Is the strip tool part of the NDK bundle? Can you provide me with an example of stripping and packaging the executables for all architectures so I can extract them later?Angelenaangeleno
I have updated the answer to enforce strip. To enforce packaging, the old hack seems to be inevitable.Martinelli
H
2

If all you're doing is changing NDK versions, then I believe this is pretty straightforward and that we're missing something simple. I think that you need to update your PATH environment variable to point to the new ndk-bundle path and try running ndk-build again.

From my experience, I couldn't get Cmake for Android to produce an executable (standalone binary) or a static library as the final output. Because I wanted the final output to be an executable, I had to switch back to using the NDK instead and forget about Cmake.

Update

This is how to build a C++ executable using Android Studio and the NDK. This is without using CMake, and this is even if you don't have JNI code.

app/build.gradle

sourceSets.main {
    // Do not run default ndkbuild
    jni.srcDirs = []
    // Place where .so libs are available
    jniLibs.srcDir 'src/main/libs'
}

task buildNative(type: Exec, description: 'Compile JNI source via NDK') {
    def ndkDir = android.ndkDirectory
    commandLine "$ndkDir/ndk-build.cmd", 'V=1',
            '-C', file('src/main/jni').absolutePath,
            '-j', Runtime.runtime.availableProcessors(),
            'all',
            'NDK_DEBUG=1'
}

task cleanNative(type: Exec, description: 'Clean JNI object files') {
    def ndkDir = android.ndkDirectory
    commandLine "$ndkDir/ndk-build.cmd",
            '-C', file('src/main/jni').absolutePath,
            'clean'
}

Directory structure

You need to have a folder named app/src/main/jni. As you can see, the above gradle code simply calls ndk-build against that directory. Here's how I recommend you setup your directories:

  • jni

    • Android.mk

      LOCAL_PATH := $(call my-dir)
      include $(call all-subdir-makefiles)
      
    • Application.mk

      APP_ABI := all
      APP_PLATFORM := android-21
      
    • native

      • my_tool
        • src
          • main.c
      • Android.mk

        include $(CLEAR_VARS)
        LOCAL_C_INCLUDES := my_tool/src
        LOCAL_PATH := $(call my-dir)
        LOCAL_MODULE := my_tool
        LOCAL_SRC_FILES := my_tool/src/main.c
        include $(BUILD_EXECUTABLE)
        

Building

To build, you can either run ndk-build from the app/src/main/jni directory, or you can run gradle buildNative from the project's root directory. You can see that in the gradle code I showed above, there's a task named buildNative, so that's the gradle code that will get executed.

The top-level Android.mk file helps in the event that you ever add more modules to be built under app/src/main/jni, it traverses all subdirectories in that directory and calls any other Android.mk files that it finds.

Heyward answered 12/12, 2016 at 15:56 Comment(8)
We do not have access to the old toolchains, we only got the code on our new setup. That's why I am looking for specific instructions on how to compile the code, preferably via Android Studio, but a command-line solution is acceptable as well. We did not just change NDK versions, we installed completely new machines.Angelenaangeleno
I really think I can help. I've done this only a few days ago, with NDK 13. When I said switch back to using the NDK, I meant you can use any version, even 13. What kind of error messages are you getting? The Android Studio Run button is just a wrapper which eventually calls ndk-build from within your jni folder. Do you have an app/src/main/jni folder?Heyward
No, I don't have such a folder, as I am not working with JNI. JNI only supports native library code, and I am not compiling a library. Or is the jni folder supposed to hold other native code as well? I will edit my question to answer the other part.Angelenaangeleno
Right. I think what I did is similar to what you're trying to do. Even though I wasn't trying to build an Android app with JNI and native code, I still had a jni folder so that I can let Android Studio build my project for me. But I still built a pure C++ project so that I could run it on the Android emulator. I will add another answer with more details.Heyward
I updated my answer instead of adding another answer. Let me know if this helps.Heyward
I will try this. Can this also be achieved with the more up-to-date externalNativeBuild task?Angelenaangeleno
Can this also be achieved with the more up-to-date externalNativeBuild task? - yes, and then you can browse your c++ code in AS.Martinelli
@AlexCohn Can you explain how to do it?Angelenaangeleno

© 2022 - 2024 — McMap. All rights reserved.