How do I get Azure Active Directory App Roles to show in Claims?
Asked Answered
I

2

7

I'm using Azure Active Directory to provide authentication to the Backoffice on my website running Umbraco version 11.0.

This is working nicely and I can log in but I want to improve the experience by using app roles within Azure to manage the user's group within Umbraco.

My Azure setup

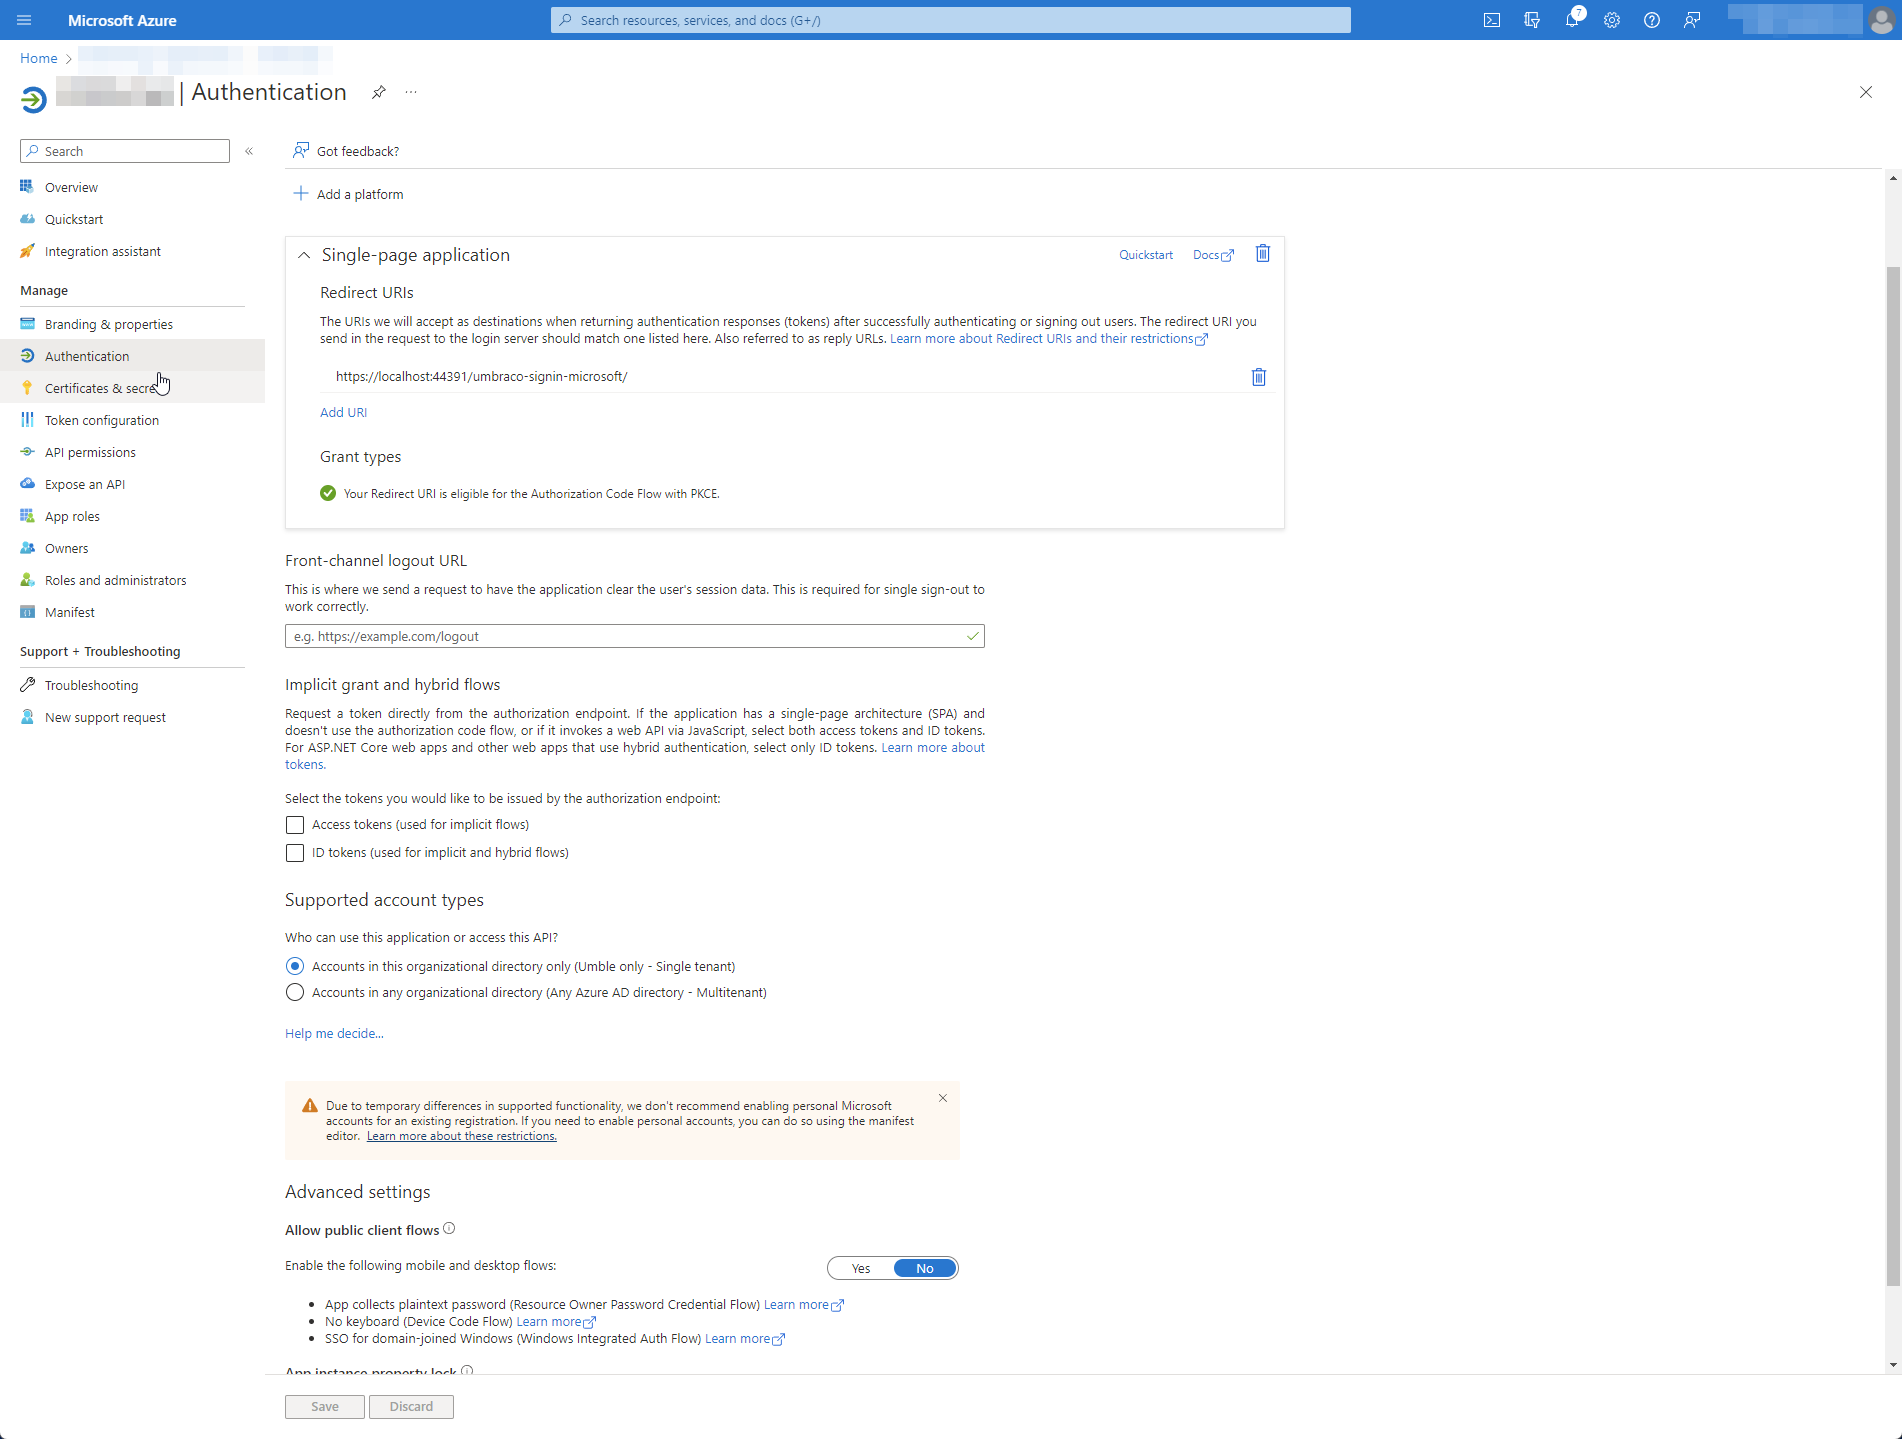
I've created an App Registration within Azure with the following configuration:

  • Added a Redirection URI:
  • URI: https://localhost:44391/umbraco-signin-microsoft/
  • Enabled Access tokens (used for implicit flows)
  • Enabled ID tokens (used for implicit and hybrid flows)
  • Supported account types: Accounts in this organizational directory only (Example only - Single tenant)
  • Added App Roles
    • Administrator
    • Editor

enter image description here

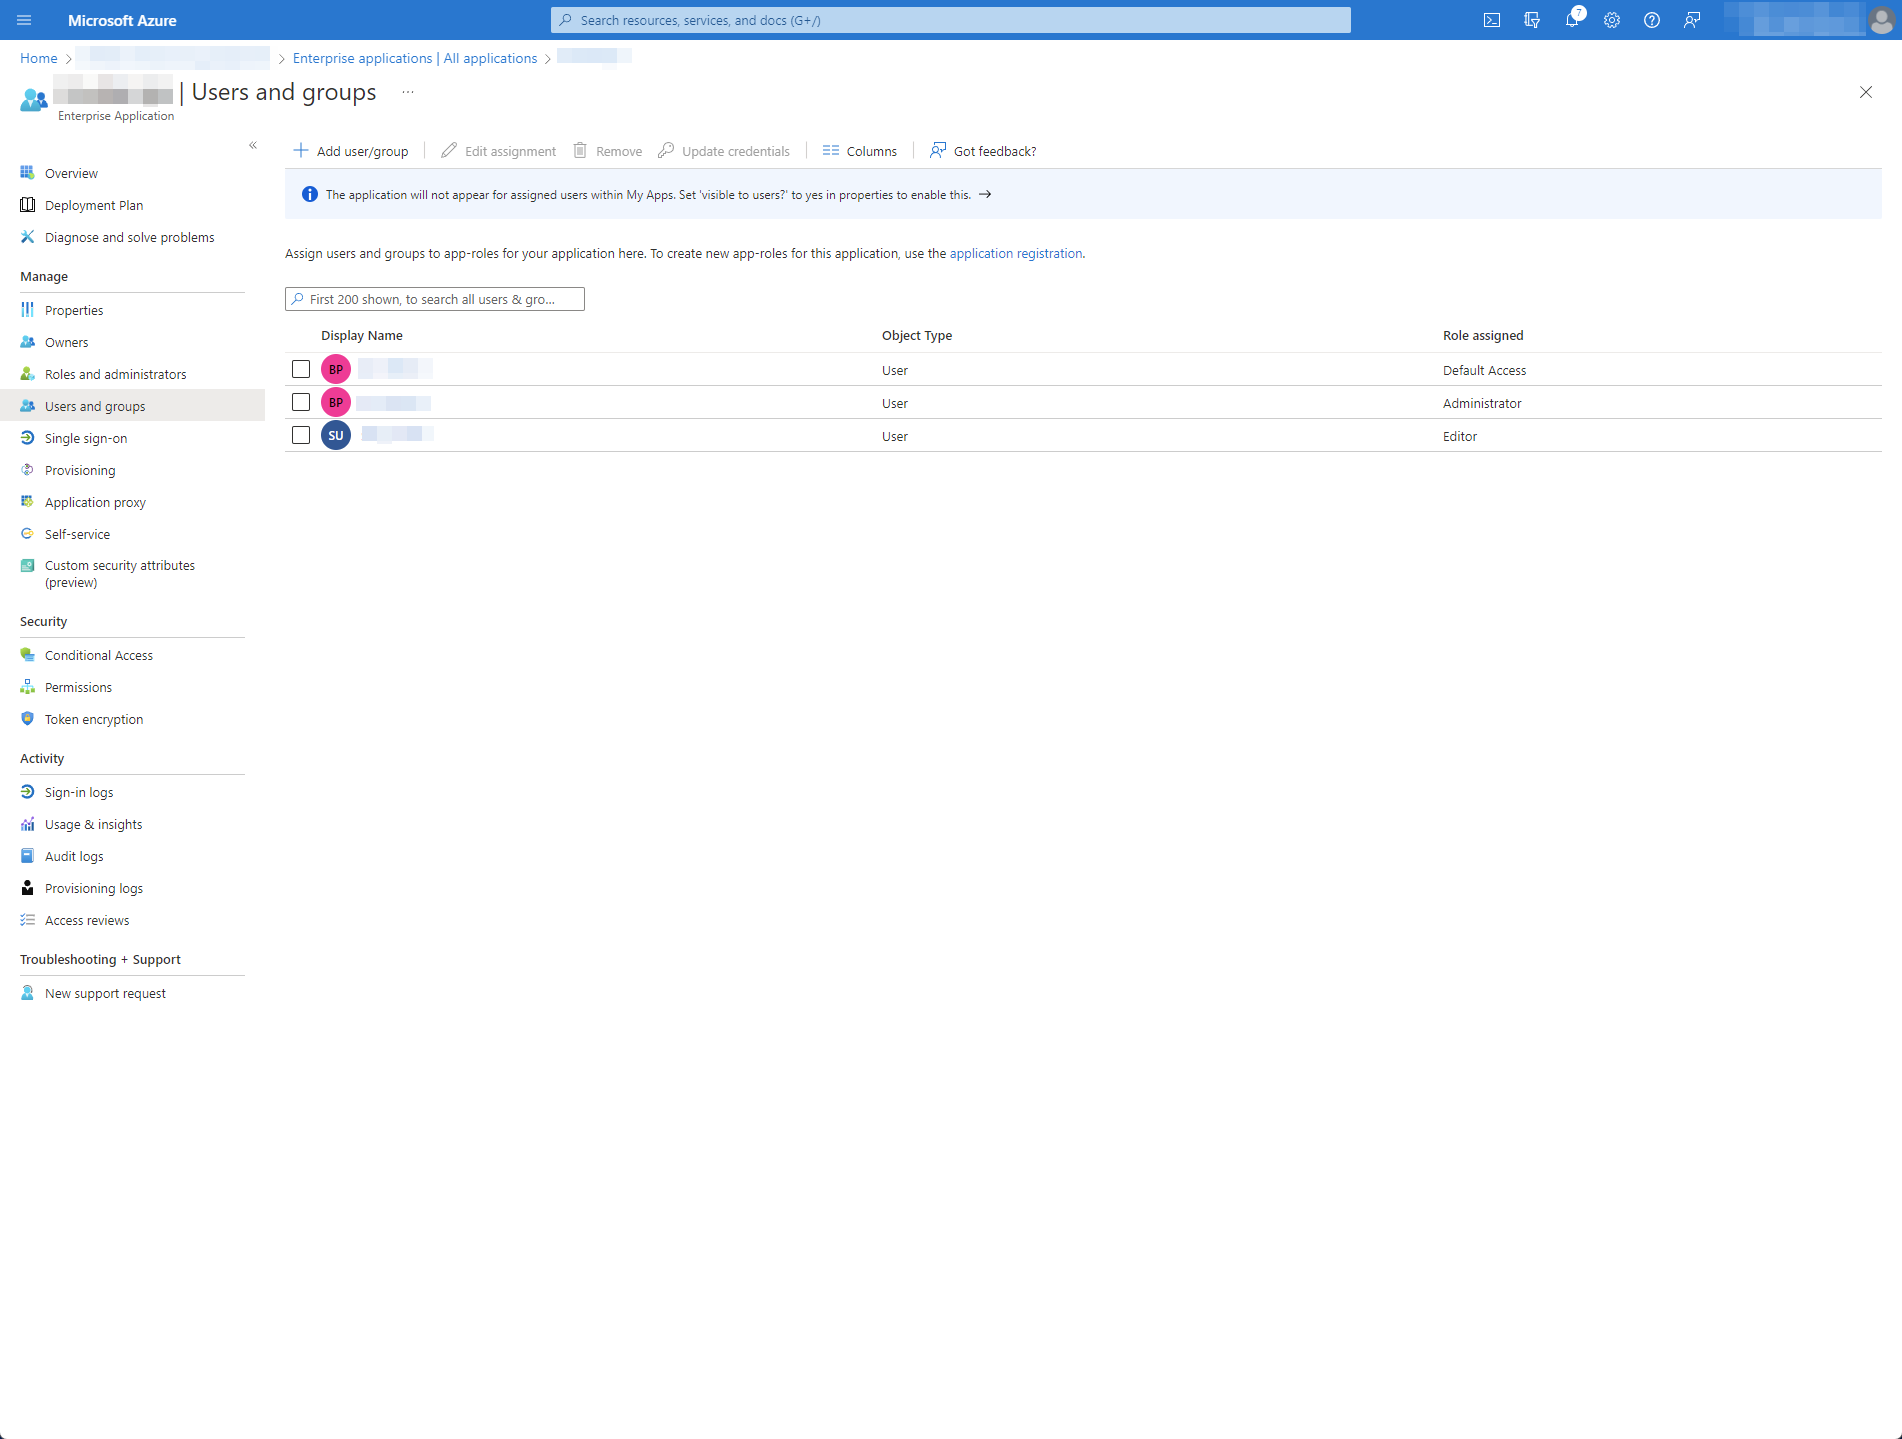
In Enterprise Applications, I've also added the App Roles above to my users:

enter image description here

My code

Login Provider

namespace Example.Api.Features.Authentication.Extensions;

public static class UmbracoBuilderExtensions
{
    public static IUmbracoBuilder ConfigureAuthentication(this IUmbracoBuilder builder)
    {
        builder.Services.ConfigureOptions<OpenIdConnectBackOfficeExternalLoginProviderOptions>();

        builder.AddBackOfficeExternalLogins(logins =>
        {
            const string schema = MicrosoftAccountDefaults.AuthenticationScheme;
                
            logins.AddBackOfficeLogin(
                backOfficeAuthenticationBuilder =>
                {
                    backOfficeAuthenticationBuilder.AddMicrosoftAccount(
                        // the scheme must be set with this method to work for the back office
                        backOfficeAuthenticationBuilder.SchemeForBackOffice(OpenIdConnectBackOfficeExternalLoginProviderOptions.SchemeName) ?? string.Empty,
                        options =>
                        {
                            //By default this is '/signin-microsoft' but it needs to be changed to this
                            options.CallbackPath = "/umbraco-signin-microsoft/";
                            //Obtained from the AZURE AD B2C WEB APP
                            options.ClientId = "CLIENT_ID";
                            //Obtained from the AZURE AD B2C WEB APP
                            options.ClientSecret = "CLIENT_SECRET";
                            options.TokenEndpoint = $"https://login.microsoftonline.com/TENANT/oauth2/v2.0/token";
                            options.AuthorizationEndpoint = $"https://login.microsoftonline.com/TENANT/oauth2/v2.0/authorize";
                        });
                });
        });

        return builder;
    }
}

Auto-linking accounts

namespace Example.Api.Features.Configuration;

public class OpenIdConnectBackOfficeExternalLoginProviderOptions : IConfigureNamedOptions<BackOfficeExternalLoginProviderOptions>
{
    public const string SchemeName = "OpenIdConnect";

    public void Configure(string name, BackOfficeExternalLoginProviderOptions options)
    {
        if (name != "Umbraco." + SchemeName)
        {
            return;
        }

        Configure(options);
    }

    public void Configure(BackOfficeExternalLoginProviderOptions options)
    {
        options.AutoLinkOptions = new ExternalSignInAutoLinkOptions(
            // must be true for auto-linking to be enabled
            autoLinkExternalAccount: true,

            // Optionally specify default user group, else
            // assign in the OnAutoLinking callback
            // (default is editor)
            defaultUserGroups: new[] { Constants.Security.EditorGroupAlias },

            // Optionally you can disable the ability to link/unlink
            // manually from within the back office. Set this to false
            // if you don't want the user to unlink from this external
            // provider.
            allowManualLinking: false
        )
        {
            // Optional callback
            OnAutoLinking = (autoLinkUser, loginInfo) =>
            {
                // You can customize the user before it's linked.
                // i.e. Modify the user's groups based on the Claims returned
                // in the externalLogin info

                autoLinkUser.IsApproved = true;
            },
            OnExternalLogin = (user, loginInfo) =>
            {
                // You can customize the user before it's saved whenever they have
                // logged in with the external provider.
                // i.e. Sync the user's name based on the Claims returned
                // in the externalLogin info

                return true; //returns a boolean indicating if sign in should continue or not.
            }
        };

        // Optionally you can disable the ability for users
        // to login with a username/password. If this is set
        // to true, it will disable username/password login
        // even if there are other external login providers installed.
        options.DenyLocalLogin = true;

        // Optionally choose to automatically redirect to the
        // external login provider so the user doesn't have
        // to click the login button. This is
        options.AutoRedirectLoginToExternalProvider = true;
    }
}

In this file, I'd ideally do as the comment says and i.e. Modify the user's groups based on the Claims returned in the externalLogin info.

Also registered in my Startup file

services.AddUmbraco(_env, _config)
            .AddBackOffice()
            .AddWebsite()
            .AddComposers()
            .ConfigureAuthentication()
            .Build();

I've attempted to give the following permissions to the application, with no luck:

enter image description here

Current state of play is that I can login just fine but if I debug externalInfo, there's nothing in there about the users having either the Administrator or Editor App Role as configured above.

My gut feeling is that I'm missing something with the Azure Active Directory setup but I've tried a few different configurations and can't seem to get the App Roles to come back.

Thanks,

Ben

EDIT - 15.02.2023:

I can see that the roles come back when I hit the https://login.microsoftonline.com/{tenantId}/oauth2/v2.0/token endpoint using client_credentials as the grant_type. It looks like the .NET application using authorization_code instead. I've decoded the token retrieved from this and it doesn't contain the roles.

I wonder if there's some kind of configuration on the .NET application that allows me to add the roles.

Intima answered 10/2, 2023 at 16:36 Comment(5)
Have you granted admin consent to the App roles in your Azure AD application?Garrido
I think so though I couldn't find anything specifically lablelled App roles. I've updated my question.Intima
When you created the app roles, is the member type Users/Groups or Both?Ferruginous
Did you extract the received token from the network tab of the interactive web logon and checked its content on jwt.ms or jwt.io if it contains the roles?Ferruginous
@Ferruginous The member type for the roles is set to User/Group + Applications. I checked the token coming back and it doesn't contain roles. Though if I hit the token endpoint manually using the client_credentials grant_type, it does contain the roles. The code uses authorisation_code instead which doesn't contain the roles.Intima
I
2

To solve this, I ended up swapping out the AddMicrosoftAccount AuthenticationBuilder in favour of AddOpenIdConnect. This appears to respect the claims in the tokens.

This is the code I am now using in the ConfigureAuthentication method.

public static IUmbracoBuilder ConfigureAuthentication(this IUmbracoBuilder builder)
{
    // Register OpenIdConnectBackOfficeExternalLoginProviderOptions here rather than require it in startup
    builder.Services.ConfigureOptions<OpenIdConnectBackOfficeExternalLoginProviderOptions>();

    builder.AddBackOfficeExternalLogins(logins =>
    {
        logins.AddBackOfficeLogin(
            backOfficeAuthenticationBuilder =>
            {
                backOfficeAuthenticationBuilder.AddOpenIdConnect(
                    // The scheme must be set with this method to work for the back office
                    backOfficeAuthenticationBuilder.SchemeForBackOffice(OpenIdConnectBackOfficeExternalLoginProviderOptions.SchemeName),
                    options =>
                    {
                        options.CallbackPath = "/umbraco-signin-microsoft/";
                        // use cookies
                        options.SignInScheme = CookieAuthenticationDefaults.AuthenticationScheme;
                        // pass configured options along
                        options.Authority = "https://login.microsoftonline.com/{tenantId}/v2.0";
                        options.ClientId = "{clientId}";
                        options.ClientSecret = "{clientSecret}";
                        // Use the authorization code flow
                        options.ResponseType = OpenIdConnectResponseType.Code;
                        options.AuthenticationMethod = OpenIdConnectRedirectBehavior.RedirectGet;
                        // map claims
                        options.TokenValidationParameters.NameClaimType = "name";
                        options.TokenValidationParameters.RoleClaimType = "role";

                        options.RequireHttpsMetadata = true;
                        options.GetClaimsFromUserInfoEndpoint = true;
                        options.SaveTokens = true;
                        options.UsePkce = true;
                        
                        options.Scope.Add("email");
                    });
            });
    });
    return builder;
}
Intima answered 16/2, 2023 at 16:55 Comment(1)
Just to confirm - you were able to get the roles using your original setup? And didn't have to use client credentials?Unstrained
G
5

To get App Roles in token claims, you can use client credentials flow to generate access tokens by granting admin consent.

I tried to reproduce the same in my environment via Postman and got the below results:

I registered one Azure AD web application and created App roles like below:

enter image description here

Now I assigned these App roles to users under it's Enterprise application like below:

enter image description here

Add these App roles in API permissions of application like below:

enter image description here

You can see App roles under Application permissions like below:

enter image description here

Make sure to grant admin consent to above permissions like this:

enter image description here

While generating access token, scope should be your Application ID URI ending with /.default

enter image description here

Now, I generated access token using client credentials flow via Postman with below parameters:

POST https://login.microsoftonline.com/<tenantID>/oauth2/v2.0/token

client_id: <appID>
grant_type:client_credentials
scope: api://<appID>/.default
client_secret: secret

Response:

enter image description here

When I decoded the above token in jwt.ms, I got App roles in roles claim successfully like below:

enter image description here

Note that App roles are Application permissions that will work only with flows like client credentials which do not involve user interaction.

So, if you use delegated flows like authorization code flow, username password flow, etc..., you won't get App roles in token claims.

UPDATE:

You can use below c# code in getting access token from client credentials flow like this:

using Microsoft.Identity.Client;

var clientID = "bbb739ad-98a4-4566-8408-dxxxxxxxx3b";
var clientSecret = "K.k8Q~hwtxxxxxxxxxxxxxxxU";
var tenantID = "fb134080-e4d2-45f4-9562-xxxxxx";
var authority = $"https://login.microsoftonline.com/{tenantID}";
var clientApplication = ConfidentialClientApplicationBuilder.Create(clientID)
  .WithClientSecret(clientSecret)
  .WithAuthority(authority)
  .Build();
var scopes = new string[] { "api://bbb739ad-98a4-4566-8408-xxxxxx/.default" };
var authenticationResult = await clientApplication.AcquireTokenForClient(scopes)
  .ExecuteAsync()
  .ConfigureAwait(false);
var accesstoken = authenticationResult.AccessToken;
Console.WriteLine(accesstoken);

Response:

enter image description here

When I decoded the above token, it has roles claim with App roles like below:

enter image description here

Garrido answered 14/2, 2023 at 9:32 Comment(3)
Thank you for the answer! Unfortunately, while this works and is great to see that roles are coming back - the token retrieved by ASP.NET doesn't contain them. This despite using the same TokenEndpoint as works in Postman. I'm guessing the problem is with the ASP implementation, rather than Azure, at this point.Intima
Have you changed the grant_type to client_credentials and scope parameters while generating the token in ASP.NET?Garrido
It still uses authorization_code as the grant_type. I'm not sure how/if I can change these with the current ASP.NET setup.Intima
I
2

To solve this, I ended up swapping out the AddMicrosoftAccount AuthenticationBuilder in favour of AddOpenIdConnect. This appears to respect the claims in the tokens.

This is the code I am now using in the ConfigureAuthentication method.

public static IUmbracoBuilder ConfigureAuthentication(this IUmbracoBuilder builder)
{
    // Register OpenIdConnectBackOfficeExternalLoginProviderOptions here rather than require it in startup
    builder.Services.ConfigureOptions<OpenIdConnectBackOfficeExternalLoginProviderOptions>();

    builder.AddBackOfficeExternalLogins(logins =>
    {
        logins.AddBackOfficeLogin(
            backOfficeAuthenticationBuilder =>
            {
                backOfficeAuthenticationBuilder.AddOpenIdConnect(
                    // The scheme must be set with this method to work for the back office
                    backOfficeAuthenticationBuilder.SchemeForBackOffice(OpenIdConnectBackOfficeExternalLoginProviderOptions.SchemeName),
                    options =>
                    {
                        options.CallbackPath = "/umbraco-signin-microsoft/";
                        // use cookies
                        options.SignInScheme = CookieAuthenticationDefaults.AuthenticationScheme;
                        // pass configured options along
                        options.Authority = "https://login.microsoftonline.com/{tenantId}/v2.0";
                        options.ClientId = "{clientId}";
                        options.ClientSecret = "{clientSecret}";
                        // Use the authorization code flow
                        options.ResponseType = OpenIdConnectResponseType.Code;
                        options.AuthenticationMethod = OpenIdConnectRedirectBehavior.RedirectGet;
                        // map claims
                        options.TokenValidationParameters.NameClaimType = "name";
                        options.TokenValidationParameters.RoleClaimType = "role";

                        options.RequireHttpsMetadata = true;
                        options.GetClaimsFromUserInfoEndpoint = true;
                        options.SaveTokens = true;
                        options.UsePkce = true;
                        
                        options.Scope.Add("email");
                    });
            });
    });
    return builder;
}
Intima answered 16/2, 2023 at 16:55 Comment(1)
Just to confirm - you were able to get the roles using your original setup? And didn't have to use client credentials?Unstrained

© 2022 - 2024 — McMap. All rights reserved.