Android with Gradle (Java finished with non-zero exit value 2)
Asked Answered
S

5

7

This is my .gradle file:

apply plugin: 'com.android.application'

android {
    compileSdkVersion 21
    buildToolsVersion "21.1.2"

    defaultConfig {
        applicationId "com.test.test"
        minSdkVersion 15
        targetSdkVersion 21
        versionCode 1
        versionName "1.0"
    }
    buildTypes {
        release {
            minifyEnabled false
            proguardFiles getDefaultProguardFile('proguard-android.txt'), 'proguard-rules.pro'
        }
    }

    packagingOptions {
        exclude 'META-INF/license.txt'
        exclude 'META-INF/LICENSE'
        exclude 'META-INF/notice.txt'
        exclude 'META-INF/NOTICE'
    }
}

dependencies {
    compile fileTree(dir: 'libs', include: ['*.jar'])
    compile 'com.android.support:appcompat-v7:21.0.3'

    compile 'com.mcxiaoke.volley:library:1.0.15'
    compile 'org.glassfish.jersey.media:jersey-media-json-jackson:2.17'
}

When I try to run my Android app, I get the next error:

Error:Execution failed for task ':app:dexDebug'.

com.android.ide.common.process.ProcessException: org.gradle.process.internal.ExecException: Process 'command '/usr/lib/jvm/java-8-oracle/bin/java'' finished with non-zero exit value 2

I get this error when I add to gradle file the jackson library. Googling some time, I've found that jackson library is compatible with android apps, and It's faster than other libraries as gson.

How I can solve it? I'm an Android beginner.

Sfumato answered 27/3, 2015 at 8:56 Comment(0)
H
3

I think you should change your java JDK change jvm v8 for jdk7. This link can help you: Is it possible to use Java 8 for Android development?

Other possible issue its dependency error, clean gradle before build. And change your jackson library for this:

compile 'com.fasterxml.jackson.core:jackson-databind:2.2.+'
compile 'com.fasterxml.jackson.core:jackson-core:2.2.+'
compile 'com.fasterxml.jackson.core:jackson-annotations:2.2.+'
Hadhramaut answered 27/3, 2015 at 9:16 Comment(3)
Okay, now it works. Regardless which java version 8 is not supported, what caused the error was the library. Substituting 3 libraries that you posted works well both version 7 and 8. Thank you very much.Sfumato
Seems that the problem is caused by how the gradle dependencies are specified. In my case I was using compile 'com.google.android.gms:play-services:7.5.+' which was causing the error, however, I changed it to compile 'com.google.android.gms:play-services:7.5.0' and the problem was solvedMagda
It was also google play services for me. I had 7.3. I really wish there was a way for android studio to check for updates on dependenciesKitts
A
3

Uncomfortably this issue may have several reasons. In my case, it was because of the max line number is exceeded. It is so annoying that the message Android Studio shows does not mean anything, but somehow i found the solution as below:

https://developer.android.com/tools/building/multidex.html

You have to create a class that extends MultiDexApplication, and override the following method:

    @Override
    protected void attachBaseContext(Context base) {
        super.attachBaseContext(base);
        MultiDex.install(this);
    }

Do not forget to add "name" inside tag in your AndroidManifest file as described in the above link.

Aleenaleetha answered 4/5, 2015 at 15:39 Comment(1)
And after that override the method in startup class: @Override protected void attachBaseContext(Context base) { super.attachBaseContext(base); MultiDex.install(this); }Maisel
C
1

I had copied the required library inside my_project/app/libs and also added the dependency in build.gradle. So, in my case I removed the library that I had copied in my_project/app/libs. As gradle maintains all the dependency I don't have to put the library in /libs. This fixed my problem.

Cadwell answered 13/8, 2015 at 21:14 Comment(0)
P
1

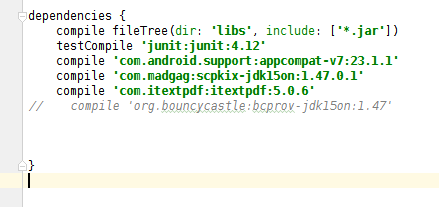
Maybe you have a dependency that causes incompatibility

for example:

Plimsoll answered 24/11, 2015 at 10:35 Comment(0)
M
1

Fixing JDK path solves the problem.

Right click on Project > Open Module settings > SDK Location > Under JDK location give path to JDK folder.

Manes answered 9/11, 2016 at 21:54 Comment(1)
This solution was already provided by the accepted answer. Changing Java8 to Java7Shelf

© 2022 - 2024 — McMap. All rights reserved.