How to have icons be to the left of Text in Tab Layout?
Asked Answered
L

3

1

I am trying to figure out how to have the icons not be on top of the text but rather to the side of it, but I am not sure how to do it with my code specifically. I am quite new to Android Studio so I would be grateful for any help.

XML Code

<?xml version="1.0" encoding="utf-8"?>
<LinearLayout xmlns:android="http://schemas.android.com/apk/res/android"
    xmlns:tools="http://schemas.android.com/tools"
    android:layout_width="match_parent"
    android:orientation="vertical"
    android:layout_height="match_parent"
    xmlns:app="http://schemas.android.com/apk/res-auto"
    tools:context=".MyCabinet">

    <android.support.v7.widget.Toolbar
        android:id="@+id/toolbarMyCabinet"
        android:layout_height="wrap_content"
        android:layout_width="match_parent"
        android:background="@color/colorPrimary">

        <TextView
            android:layout_width="match_parent"
            android:layout_height="match_parent"
            android:text="@string/teacher_files_title"
            android:gravity = "center"
            android:id="@+id/toolbar_title"
            app:fontFamily="@font/capriola"
            android:textSize="20sp"
            />

    </android.support.v7.widget.Toolbar>

    <android.support.design.widget.TabLayout
        android:id="@+id/tabLayout"
        android:layout_width="match_parent"
        android:layout_height="wrap_content"
        app:tabMode="fixed"
        app:tabGravity="fill"
        app:tabIndicatorColor="@color/colorAccent"
        app:elevation="4dp">
    </android.support.design.widget.TabLayout>

    <android.support.v4.view.ViewPager
        android:layout_width="match_parent"
        android:id="@+id/viewPagerMyCabinet"
        android:layout_height="match_parent">

    </android.support.v4.view.ViewPager>

</LinearLayout>

The Activity Code

private TabLayout tabLayout;
private ViewPager viewPager;
private ViewPagerAdapter adapter;


@Override
protected void onCreate(Bundle savedInstanceState) {
    super.onCreate(savedInstanceState);
    setContentView(R.layout.activity_my_cabinet);

    tabLayout = (TabLayout) findViewById(R.id.tabLayout);
    viewPager = (ViewPager) findViewById(R.id.viewPagerMyCabinet);
    adapter = new ViewPagerAdapter(getSupportFragmentManager());

    //add fragment here

    adapter.AddFragment(new FragmentMyCabinet(), "My Cabinet");
    adapter.AddFragment(new FragmentUpload(), "Upload");
    adapter.AddFragment(new FragmentRecent(), "Recent");
    viewPager.setAdapter(adapter);
    tabLayout.setupWithViewPager(viewPager);
    tabLayout.getTabAt(0).setIcon(R.drawable.ic_folder);
    tabLayout.getTabAt(1).setIcon(R.drawable.ic_camera);
    tabLayout.getTabAt(2).setIcon(R.drawable.ic_clock);

    android.support.v7.widget.Toolbar toolbar = findViewById(R.id.toolbarMyCabinet);
    setSupportActionBar(toolbar);
}

@Override
public boolean onCreateOptionsMenu(Menu menu) {
    getMenuInflater().inflate(R.menu.menu, menu);
    return true;
}

ViewPagerAdapter

import android.support.annotation.Nullable;
import android.support.v4.app.FragmentPagerAdapter;

import java.util.ArrayList;
import java.util.List;

public class ViewPagerAdapter extends FragmentPagerAdapter {

    private final List<android.support.v4.app.Fragment> lstFragment = new ArrayList<>();

    private final List<String> lstTitles = new ArrayList<>();

    public ViewPagerAdapter(android.support.v4.app.FragmentManager fm) {
        super(fm);
    }

    @Override
    public android.support.v4.app.Fragment getItem(int position) {
        return lstFragment.get(position);
    }

    @Override
    public int getCount() {
        return lstTitles.size();
    }

    @Nullable
    @Override
    public CharSequence getPageTitle(int position) {
        return lstTitles.get(position);
    }


    public void AddFragment(android.support.v4.app.Fragment fragment, String title) {

        lstFragment.add(fragment);
        lstTitles.add(title);

    }
}

Here's what the UI looks like now: ui for app

I am not sure if I would have to create a custom xml or not, and if I did I am not too sure how to implement it smoothly into the code I have now.

Longlimbed answered 9/6, 2018 at 14:52 Comment(5)
Can you share your ViewPagerAdapter class as well?Ballard
@RedM I just added it. Sorry and thank you.Longlimbed
What are you seeing in your UI whenever you run the app? Are icons showing, is text showing, or none of them is showing?Ballard
@RedM Everything is showing. It's just that the icons are above the text for the tabs and I would like to have them to the left of the text. I'll edit the question and show the imageLonglimbed
The answer that I posted should work for you.Ballard
F
8

Adding app:tabInlineLabel="true" actually worked for me.

<com.google.android.material.tabs.TabLayout
            android:id="@+id/tabs"
            android:layout_width="match_parent"
            android:layout_height="match_parent"
            app:tabMode="fixed"
            app:tabGravity="fill"
            app:tabInlineLabel="true"
            app:tabIndicatorHeight="0dp"/>
Feign answered 31/8, 2019 at 4:8 Comment(0)
B
1

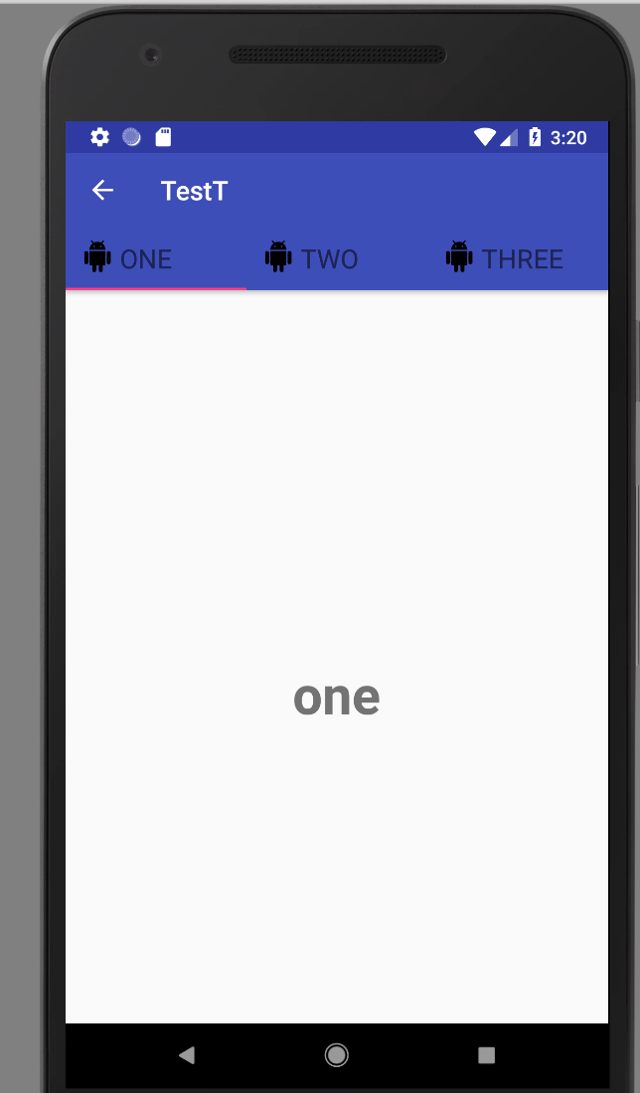
You should go ahead and create a custom view within your ViewPagerAdapter. This is an example that I quickly wrote:

MainActivity.Class

public class MainActivity extends AppCompatActivity {
private Toolbar toolbar;
private TabLayout tabLayout;
private ViewPager viewPager;

@Override
protected void onCreate(Bundle savedInstanceState) {
    super.onCreate(savedInstanceState);
    setContentView(R.layout.activity_main);

    toolbar = (Toolbar) findViewById(R.id.toolbar);
    setSupportActionBar(toolbar);

    getSupportActionBar().setDisplayHomeAsUpEnabled(true);

    viewPager = (ViewPager) findViewById(R.id.viewpager);
    ViewPagerAdapter pagerAdapter = new ViewPagerAdapter(getSupportFragmentManager(), this);
    pagerAdapter.addFragment(new OneFragment(), "ONE");
    pagerAdapter.addFragment(new TwoFragment(), "TWO");
    pagerAdapter.addFragment(new ThreeFragment(), "THREE");
    viewPager.setAdapter(pagerAdapter);

    tabLayout = (TabLayout) findViewById(R.id.tabs);
    tabLayout.setupWithViewPager(viewPager);
    setupTabIcons(pagerAdapter);
}

private void setupTabIcons(ViewPagerAdapter pagerAdapter) {
    for (int i=0;i<tabLayout.getTabCount();i++) {
        TabLayout.Tab tab = tabLayout.getTabAt(i);
        if (tab != null) tab.setCustomView(pagerAdapter.getTabView(i));
    }
}

class ViewPagerAdapter extends FragmentPagerAdapter {

    private Context context;
    private final List<Fragment> mFragmentList = new ArrayList<>();
    private final List<String> mFragmentTitleList = new ArrayList<>();
    private int[] tabIcons = {
            R.drawable.ic_android_black_24dp,
            R.drawable.ic_android_black_24dp,
            R.drawable.ic_android_black_24dp
    };

    ViewPagerAdapter(FragmentManager manager, Context context) {
        super(manager);
        this.context = context;
    }

    public View getTabView(int position) {
        View v = LayoutInflater.from(context).inflate(R.layout.custom_tab, null);
        TextView textView = v.findViewById(R.id.textView);
        textView.setText(mFragmentTitleList.get(position));
        ImageView imageView = v.findViewById(R.id.imageView);
        imageView.setImageResource(tabIcons[position]);
        return v;
    }

    @Override
    public Fragment getItem(int position) {
        return mFragmentList.get(position);
    }

    @Override
    public int getCount() {
        return mFragmentList.size();
    }

    public void addFragment(Fragment fragment, String title) {
        mFragmentList.add(fragment);
        mFragmentTitleList.add(title);
    }

    @Override
    public CharSequence getPageTitle(int position) {
        return mFragmentTitleList.get(position);
    }
}

}

Your activity_main.xml: should remain the same.

This is your custom_tab.xml:

<ImageView
    android:id="@+id/imageView"
    android:layout_width="wrap_content"
    android:layout_height="wrap_content"
    android:src="@drawable/ic_android_black_24dp"/>

<TextView
    android:id="@+id/textView"
    android:layout_width="wrap_content"
    android:layout_height="wrap_content"
    android:layout_toRightOf="@+id/imageView"
    android:layout_toEndOf="@+id/imageView"
    android:text="test"
    android:textSize="20sp"
    android:layout_marginStart="5dp"
    android:layout_marginLeft="5dp"/>

You can modify your custom_tab as much as you want to. The code above is just an example.

This is the result on the emulator:

This is the result on the emulator:

Ballard answered 9/6, 2018 at 20:21 Comment(0)
J
0

First create a custom_tab_layout.xml and put a Textview inside it:

<?xml version="1.0" encoding="utf-8"?>
<TextView xmlns:android="http://schemas.android.com/apk/res/android"
android:layout_width="wrap_content"
android:layout_height="wrap_content"
android:gravity="center_horizontal"
android:id="@+id/tab"
android:text="Tab1"
android:textColor="@color/colorAccent"
android:drawableLeft="@mipmap/ic_launcher"
android:textSize="@dimen/tab_label"
android:fontFamily="@string/font_fontFamily_medium"/>

here the trick is android:drawableLeft="@mipmap/ic_launcher"

and in activity:

TextView tabOne = (TextView) LayoutInflater.from(this).inflate(R.layout.custom_tab_layout, null);
    tabLayout.getTabAt(0).setCustomView(tabOne);
Jezebel answered 9/6, 2018 at 19:59 Comment(0)

© 2022 - 2024 — McMap. All rights reserved.