There are multiple question regarding this on SO but none was able to solve my problem. There is a project called NVM for Windows https://github.com/coreybutler/nvm-windows which solves this issue by switching between multiple node js. In order to use it we need to have an elevated command prompt (admin rights), but I have a corporate issued laptop and I don't have admin rights neither they will give me admin rights in cmd because then a user can do anything. I have to work on three different angular projects with different angular cli version and different nodes.
So I came up with my own solution to solve this problem because none of the existing blog post and SO questions helped me. I think this solution is even better then any existing third party package because you are not depending on any third party installer or script and it is extremely easy to implement.
First go to https://nodejs.org/en/download/package-manager and download prebuilt binaries of the desired node version.
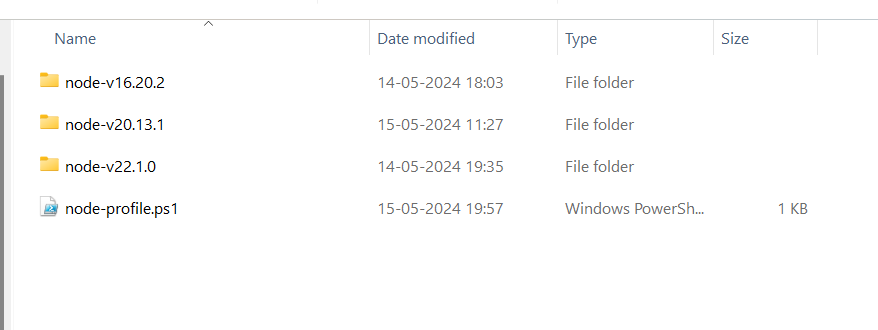
After that go to C:\Users<user-name>\Documents\ and create a folder nvm(any name). Extract the contents of the downloaded zip file to this folder, it will create a folder "node-v20.13.1-win-x64"(version name of downloaded node). In this folder you will have all the files you need to run node.
After that create a powershell script file named "node-profile.ps1" and paste the following command in it
#$env:PATH = 'C:\Users\<user-name>\Documents\nvm\node-v22.1.0'
$env:PATH = 'C:\Users\<user-name>\Documents\nvm\node-v20.13.1'
the path starting with a # sign is commented code. You can enter as many paths you want granted you have downloaded many node versions int the same location. It will look something like this.
After that open you project in visual studio code(or your preferred editor) and in the terminal run this node-profile.ps1 file like this
C:\Users\<user-name>\Documents\nvm\node-profile.ps1
Now for this terminal temporarily (as long as you don't close it) your node version will be the one you have set in node-profile.ps1 file i.e version 20.13.1 for this example. You can check the version by typing node -v command and it will give you the one you have just set.
For a second project open it in another code editor and set the desired node version in that terminal and by uncommenting the desired path in node-profile.ps1 file and commenting the others, and for that terminal you will have a different node version.
Now you can run any angular project that this version supports. You can even run legacy angular projects by this method.
The beauty of this method is that with this method you can use multiple node versions simultaneously I mean truly simultaneously.
In NVM for Windows when you switch between version it is set globally i.e in every terminal you will get the same node version so running multiple projects withs different node version dependency is a pain.
Hope this helps.
You can download and unzip the different node versions in your home directory (%USERPROFILE%). Then you just have to update your PATH variable to point to the correct directory. To make it easier in Windows, add files at the root of each project:
- start.bat
    set PATH=%USERPROFILE%\you-nodejs-path;%PATH%
    npm run start
- install.bat
    set PATH=%USERPROFILE%\you-nodejs-path;%PATH%
    npm install
And so on. I will install dependencies in the correct directories, this is somehow what nvm does.
So I came up with my own solution to solve this problem because none of the existing blog post and SO questions helped me. I think this solution is even better then any existing third party package because you are not depending on any third party installer or script and it is extremely easy to implement.
First go to https://nodejs.org/en/download/package-manager and download prebuilt binaries of the desired node version.
After that go to C:\Users<user-name>\Documents\ and create a folder nvm(any name). Extract the contents of the downloaded zip file to this folder, it will create a folder "node-v20.13.1-win-x64"(version name of downloaded node). In this folder you will have all the files you need to run node.
After that create a powershell script file named "node-profile.ps1" and paste the following command in it
#$env:PATH = 'C:\Users\<user-name>\Documents\nvm\node-v22.1.0'
$env:PATH = 'C:\Users\<user-name>\Documents\nvm\node-v20.13.1'
the path starting with a # sign is commented code. You can enter as many paths you want granted you have downloaded many node versions int the same location. It will look something like this.
After that open you project in visual studio code(or your preferred editor) and in the terminal run this node-profile.ps1 file like this
C:\Users\<user-name>\Documents\nvm\node-profile.ps1
Now for this terminal temporarily (as long as you don't close it) your node version will be the one you have set in node-profile.ps1 file i.e version 20.13.1 for this example. You can check the version by typing node -v command and it will give you the one you have just set.
For a second project open it in another code editor and set the desired node version in that terminal and by uncommenting the desired path in node-profile.ps1 file and commenting the others, and for that terminal you will have a different node version.
Now you can run any angular project that this version supports. You can even run legacy angular projects by this method.
The beauty of this method is that with this method you can use multiple node versions simultaneously I mean truly simultaneously.
In NVM for Windows when you switch between version it is set globally i.e in every terminal you will get the same node version so running multiple projects withs different node version dependency is a pain.
Hope this helps.
Volta and fnm are your other options here. They both support Windows. And some other tool suggestions here.
Out of the above mentioned tools, I have only tried Volta, so I could only share some good features of Volta only:
It supports Windows and Linux
Installing each Node.js version does not admin rights in Windows. Installing Volta without admin right is a bit tricky but do-able (see guide below).
In case we have a shared dev VM with multiple users, each user can install different version of Node.js without interfering with each other
You can pin a specific Node.js version in each project in package.json, i.e. supporting the scenario where project A runs Node 20 and project B runs Node 22. Just run the
nodeandnpmcommands as usual, and it will choose the correct version to run (download if needed) according to package.json, or the default node version if no package.json.
Some difference between Volta, nvm (Linux) and fnm:
- Volta uses a "shims" approach. The
nodeandnpmcommands invoke Volta's executables first, which then route them to the actual underlying binaries. nvm and fnm use a PATH approach, so you’re always getting directly to the underlying binaries. (Reference: https://github.com/Schniz/fnm/issues/270)
Installation cautions:
If you had installed Node.js previously in other methods, please remove the related environment variables or values in variables such as PATH. It is because Volta will need to set your PATH to point to Volta's node, nvm executables. (e.g. in Windows, it points to "C:\Program Files\Volta\node.exe"
If you had installed coreybutler/nvm-windows: A node.js version management utility for Windows. Ironically written in Go. previously, please uninstall it entirely.
Installing Volta without admin right (working as of 10 Sep 2024):
If your machine have winget installed, then try it as the official doc says.
If not, try to obtain the product files that the installer will extract by one of the following methods:
(a) Get a machine that you do have admin rights (in the worst case, your PC in your home). Then download and run the installer (
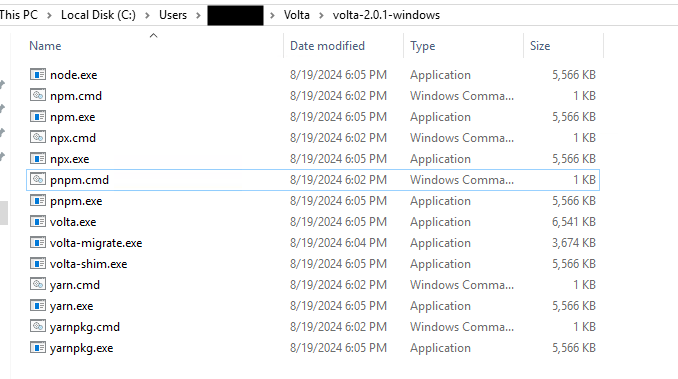
volta-2.0.1-windows-x86_64.msias of time of writing). Copy the product files under the installation folder to your target machine (that you don't have admin right) using any legitimate means (e.g. using a USB flash drive):![Copy these files under installation folder]() Or:
Or:(b) If (a) is not an option, then download the installer (
volta-2.0.1-windows-x86_64.msias of time of writing), and use a MSI extractor tool (such as lessmsi --> download theZip of lessmsi application binaries, which I hope is accurate and trustworthy according to VirusTotal) to extract the product files. 7-Zip won't extract them the way you want. And copy/move them to your wanted location in the target machine.![Extract installer using MSI extractor tool]() Or:
Or:(c) Study the source code wix/main.wxs to understand how the files inside the installer msi could be used to create those product files)
At the target machine, put the product files you obtained in step 2 to
C:\Users\<your username>\Volta\volta-2.0.1-windows(the version was 2.0.1 at the time of writing)![enter image description here]()
Set your environment path, add the folder in step 3.
Reopen your shell to reflect the environment path changes.
© 2022 - 2025 — McMap. All rights reserved.


