How to place a ToolbarItem at the trailing edge?
Asked Answered
S

5

7

I'm trying to place a toolbarItem on the trailing edge of the Toolbar (MacOS). I've gone thru the documentation, and found the following:

.automatic: item is placed in the center

.bottomBar: N/A for MacOS

.cancellationAction: relevant for sheets

.confirmationAction: relevant for sheets

.destructiveAction: relevant for sheets

.keyboard: item placed in the Touch Bar

.navigation: items placed in the leading edge of the toolbar ahead of the inline title if that is present in the toolbar.

.navigationBarLeading: N/A

.navigationBarTrailing: N/A

.primaryAction: placed at the leading edge of toolbar

.principal: placed in the center of the toolbar

.status: placed in the center of the toolbar

In essence, none of these places my item in the trailing edge of the toolbar. You guys have any ideas of how to overcome this?

Sneaker answered 16/9, 2021 at 9:33 Comment(3)
I also have the same doubt. Using macOS dev app with SwiftUI.Skewness
There is now an option .topBarTrailingWalcoff
.topBarTrailing is for iOS only, not for MacOS.Sneaker
S
6

It worked for me using macOS with the right-aligned ToolBar.

I simply used a Spacer before defining the ToolBar elements. In the example below with the "plus" button.

enter image description here

.toolbar(content: {
    
    Spacer() // the Spacer pushes to the right side of the toolbar area.

    Button {
        showingSheet = true
    } label: {
        Image(systemName: "plus")
    }
    .sheet(isPresented: $showingSheet, onDismiss: callbackOption, content: {
        // any code view                
    })            
})
Skewness answered 18/1, 2022 at 19:6 Comment(1)
This doesn't work. Spacer should be added inside a ToolbatItem { }Amundsen
M
3

Cannot add comment, this works:

ToolbarItem {
    Spacer()
}

demo

Matta answered 30/6, 2023 at 10:8 Comment(1)
To be clear, you add this before the next ToolbarItem that you want right-aligned.Damsel
I
2

Here is a working solution for modern (iOS 14+) SwiftUI:

.toolbar {
  ToolbarItemGroup(placement: .keyboard) {
    Spacer()
    Button("Action") {} 
  }
}
Indore answered 20/1, 2024 at 12:54 Comment(0)
S
0

For me, I had to add two Spacers to get it to stay all the way at the trailing edge.

.toolbar 
    ToolbarItem(placement: .principal) {
        titleView
    }
    ToolbarItemGroup(placement: .primaryAction) {
        Spacer()
        Spacer()
        someButton
    }
}
Snout answered 29/8, 2024 at 19:37 Comment(0)
B
0

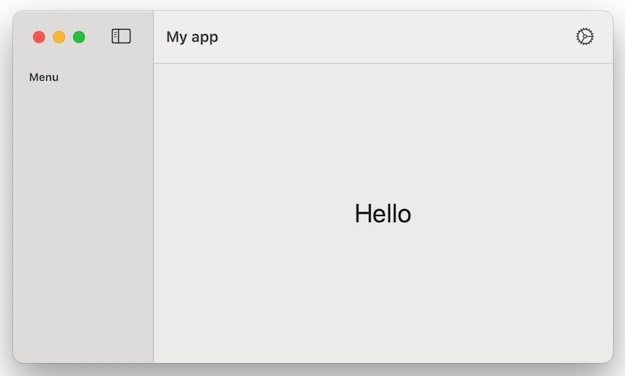
The toolbar items placements might depend on the view on which you add the .toolbar so for example this code:

struct ContentView: View {
    var body: some View {
        NavigationView {
            List() {
                Text("Menu")
                    .font(.subheadline.bold())
            }
            .toolbar {
                ToolbarItem() {
                    Button {
                        print("Hello...")
                    } label: {
                        Image(systemName: "sidebar.leading")
                    }
                }
            }
            Text("Hello")
                .font(.largeTitle)
        }
        .toolbar {
            ToolbarItem() {
                Button {
                    print("...World!")
                } label: {
                    Image(systemName: "gear")
                }
            }
        }
        .frame(minWidth: 600, minHeight: 300)
        .navigationTitle("My app")
    }
}

Gives me a following result with one button at the trailing edge:

macOS toolbar

Boycott answered 14/9, 2024 at 13:41 Comment(0)

© 2022 - 2025 — McMap. All rights reserved.