Docker Image Taking up Space After Deletion
Asked Answered
I

10

91

I committed an existing Docker container to create a new image but the committed image was way too large (the original image was 3+ GB, and with just a few additional things installed in the container, the committed image was 8+GB).

I'm low on space, so I decided to delete the committed image, but even after deleting the committed image, my disk space hasn't gone up. Yet, when I run docker system df it's showing only the space that should be used original image and the container (I only have one image and one container).

Any way for me to free up the space that I'm sure is somehow still being occupied by that image I deleted? (For reference, I created the image, then deleted it, all within an hour, and was constantly monitoring my free space, so I'm pretty sure it's this and not something else that's taking up space.)

Also, I'm using Docker Desktop for Windows with WSL2 integration so it's not as easy to check Docker's disk use by just going to /var/lib/docker and checking disk usage.

Ianthe answered 25/9, 2020 at 16:41 Comment(1)
Same scenario than this question, you can try these commands https://mcmap.net/q/145706/-free-up-space-after-removing-all-images-amp-containers-closedAgenesis
B
138

I have used these commands to shrink desktop image from 35GB to 1GB

(in windows 10, docker version 19.03.13)

Remove unused images and other resources

docker system prune -a

Remove more resources

docker volume rm $(docker volume ls -q -f dangling=true)

Stop docker desktop, optimize image

Make sure HyperV turned on

%windir%\System32\mmc.exe "%windir%\System32\virtmgmt.msc" or type Hyper-V in win search

Optimize disk in GUI > Go to VM, and check disk

Optimize-VHD -Path "C:\ProgramData\DockerDesktop\vm-data\DockerDesktop.vhdx" -Mode Full

Start docker desktop

Now I have 34+GB free disk space

Cleanup using docker desktop app

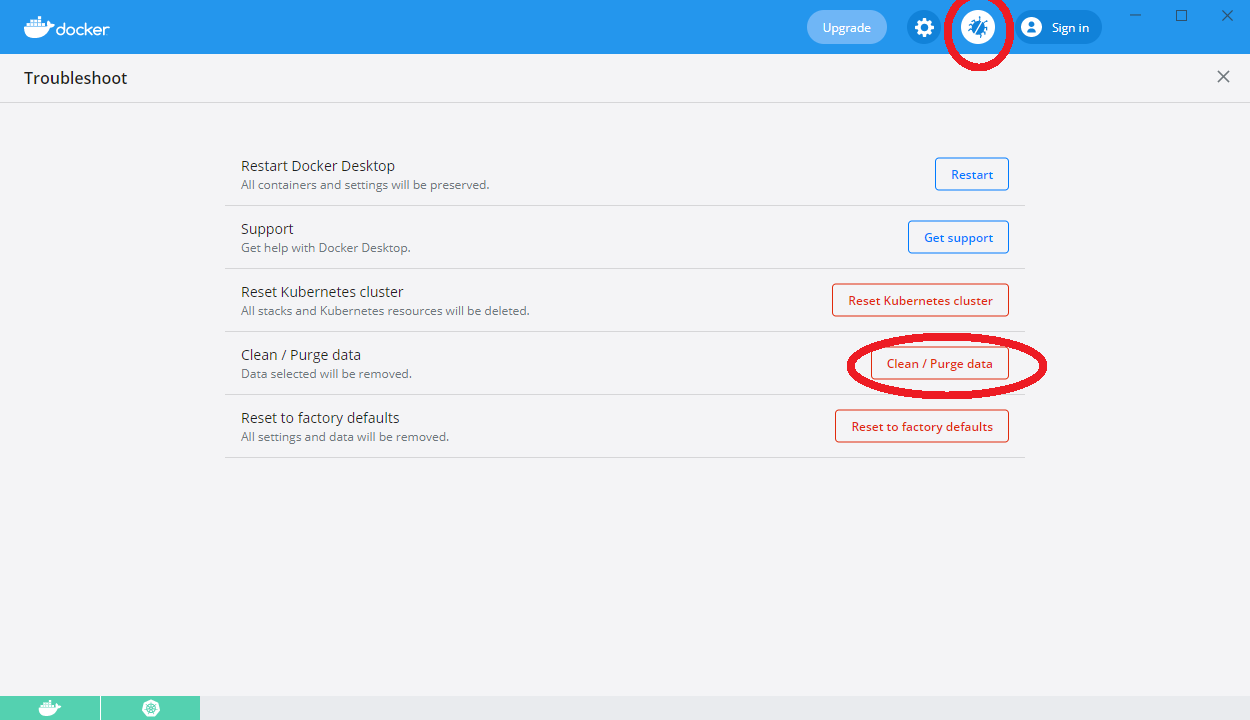
You can purge data when you click on bug icon in header and then click clean / purge data..

enter image description here

Clean / purge data option does not remove wsl integration.

Bait answered 21/11, 2020 at 10:55 Comment(4)
The Optimize-VHD command is exactly what I needed. Thanks a lot. Was annoyed that even though I freed space in the container, it was still being taken up.Botts
Thanks for these steps, i recovered 260Gb space in my 465Gb ssd :)Plethora
Saved my day. 140 GB recovered and my workdayErect
clean/purge data option is what finally worked on my mac system. 50GB recovered.Herzog
I
45

If you get an error when trying to execute Optimize-VHD:

Optimize-VHD : The term 'optimize-vhd' is not recognized as the name of a cmdlet

You can use diskpart instead:

wsl --shutdown
diskpart
select vdisk file="C:\Users\{YourUser}\AppData\Local\Docker\wsl\data\ext4.vhdx"
attach vdisk readonly
compact vdisk
detach vdisk
exit
Ianiana answered 19/8, 2021 at 14:55 Comment(3)
Access denied. How can I still delete the vhdx file?Metallize
Just make sure @Metallize that you are running the terminal you use for theses command as an administrator.Praenomen
DiskPart has encountered an error: Incorrect function.Wart
G
21

This code can be used as a quick fix from the elevated PowerShell session. I have to use pwsh as it can properly work with diskpart without a temporary file.

docker system prune -a --volumes
net stop com.docker.service
taskkill /IM "docker.exe" /F
taskkill /IM "Docker Desktop.exe" /F
wsl --shutdown
((@"
select vdisk file="%LOCALAPPDATA%\Docker\wsl\data\ext4.vhdx"
attach vdisk readonly
compact vdisk
detach vdisk
exit
"@
)|diskpart)
net start com.docker.service
. "C:\Program Files\Docker\Docker\Docker Desktop.exe"
Gorged answered 15/9, 2021 at 11:55 Comment(1)
Executed exactly the same snippet, file went from 56.9 GBs to 145.4 GBs lol. Anyways thanks a lot.Simarouba
E
11

Since you are on windows and running in docker for desktop your actually running docker in a VM. Then it depends what the disk image size is set to, usually virtual disks will expand to fill that space.

you can shrink a disk image though:

  • stop docker desktop

  • open an admin powershell terminal

  • run Optimize-VHD -Path "C:\ProgramData\DockerDesktop\vm-data\DockerDesktop.vhdx" -Mode Full where the path is the path as documented in the docker desktop settings > Resources > Advanced > Disk image location.

  • start docker desktop

This should shrink the docker virtual machine.

Earthworm answered 29/9, 2020 at 20:13 Comment(2)
I do not have "docker desktop settings > Resources > Advanced > Disk image location" menu, which docker desktop are you using? I have Docker Engine 19.03.13.Goer
If Optimize-VHD fails with "access denied" even when run as administrator, open the file properties of DockerDesktop.vhdx > Security > Advanced and grant your specific user Full Control, then try again.Unbridle
P
7

I used following steps to clean the docker space.

  1. Executed "docker system prune -f" on windows command prompt (it said free up 45GB. However, I was able to see 6GB).

  2. Opened Docker Desktop app.

  3. Navigated to the Troubleshoot menu and clicked on 'Clean/ Purge data' button.

Please note that this will clean all the data in Docker.

Polygenesis answered 31/5, 2021 at 23:6 Comment(0)
P
2

if you are using Docker Desktop on windows with backend Hyper-V and NOT wsl2 (Run in PowerShell as Admin):

docker system prune -a -f
net stop com.docker.service
taskkill /F /IM "Docker Desktop.exe"
taskkill /F /IM "docker.exe"
Stop-VM -VMName "DockerDesktopVM" -Force # or -TurnOff but process may be stuck
Optimize-VHD -Path "C:\ProgramData\DockerDesktop\vm-data\DockerDesktop.vhdx" -Mode Full
net start com.docker.service
Start-Process -FilePath "C:\Program Files\Docker\Docker\Docker Desktop.exe" -Verb RunAs

My PowerShell script DockerDesktopVM_cleanup.ps1 runs every 3 days with Windows Task Scheduler on local server (windows 10 x64 ltsc 1809).

# Run powershell with Admin privileges 
param([switch]$Elevated)

function RunAsAdmin {
    $currentUser = New-Object Security.Principal.WindowsPrincipal $([Security.Principal.WindowsIdentity]::GetCurrent())
    $currentUser.IsInRole([Security.Principal.WindowsBuiltinRole]::Administrator)
}
function Get-VM-PID-By-GUID($GUID){
    return (Get-CimInstance Win32_Process -Filter "name ='vmwp.exe'" | Where-Object {$_.CommandLine  -Like "*"+$GUID+"*"} | select-object ProcessId -ErrorAction Stop).ProcessId
}

if ((RunAsAdmin) -eq $false)  {
    if ($elevated) {
        # tried to elevate, did not work, aborting
    } else {
        Start-Process powershell.exe -Verb RunAs -ArgumentList ('-noprofile -noexit -file "{0}" -elevated' -f ($myinvocation.MyCommand.Definition))
    }
    exit
}
'running with full privileges'

docker system prune -a -f
net stop com.docker.service
taskkill /F /IM "docker.exe"
taskkill /F /IM "Docker Desktop.exe"
# update Access Control List for vm file  
$ACL = Get-ACL -Path "C:\Docker\DockerDesktop\DockerDesktop.vhdx"
$AccessRule = New-Object System.Security.AccessControl.FileSystemAccessRule("<PUT-YOUR-ROLE>","FullControl","Allow")
$ACL.SetAccessRule($AccessRule)
$ACL | Set-Acl -Path "C:\Docker\DockerDesktop\DockerDesktop.vhdx"
(Get-ACL -Path "C:\Docker\DockerDesktop\DockerDesktop.vhdx").Access | Format-Table IdentityReference,FileSystemRights,AccessControlType,IsInherited,InheritanceFlags -AutoSize

# WARNING process may be stuck with this command: Stop-VM -VMName "DockerDesktopVM" -Force/-TurnOff 
$VMGUID = (Get-VM "DockerDesktopVM").VMId.Guid
$VMPID = Get-VM-PID-By-GUID -GUID $VMGUID
Stop-Process ($VMPID) –Force
Optimize-VHD -Path "C:\Docker\DockerDesktop\DockerDesktop.vhdx" -Mode Full
#Start-VM -VMName "DockerDesktopVM" is not needed Docker will be able to start itself
# resume docker
net start com.docker.service
Start-Process -FilePath "C:\Program Files\Docker\Docker\Docker Desktop.exe" -Verb RunAs
Pepper answered 6/11, 2022 at 16:29 Comment(0)
A
0

I ran into this using very large docker buildx caches, and I didn't want to prune all of them since the filter argument is currently broken

PS> docker run -it --rm ubuntu:18.04 df -h
Filesystem      Size  Used Avail Use% Mounted on
overlay         252G  249G    0G 100% /
tmpfs            64M     0   64M   0% /dev
tmpfs           7.9G     0  7.9G   0% /sys/fs/cgroup
shm              64M     0   64M   0% /dev/shm
/dev/sdd        252G  249G    0G 100% /etc/hosts < this is the device we have to expand

Take note of which device is full. This is the disk you must resize later.

Expand virtual disk using diskpart

Under WSL2 and following the instructions from Microsoft on expanding the size of your vdisk, this should allow you to expand the data/isocache mount.

If you're like me and moved your Docker vhdx from AppData/Packages and it is not listed in the Docker Desktop GUI, you may be able to find it in the settings:

PS> cat $env:APPDATA\Docker\settings.json | Select-String dataFolder
  
    "dataFolder": "D:\\DockerDesktop",

Find the ext4.vhdx file under the wsl/data directory (not the DockerDesktop.vhdx!) Use diskpart to expand the disk.

DISKPART> select vdisk file="D:\DockerDesktop\wsl\data\ext4.vhdx"

DiskPart successfully selected the virtual disk file.

DISKPART> detail vdisk

Device type ID: 0 (Unknown)
Vendor ID: {00000000-0000-0000-0000-000000000000} (Unknown)
State: Added
Virtual size:  256 GB
Physical size:  252 GB
Filename: D:\DockerDesktop\wsl\data\ext4.vhdx
Is Child: No
Parent Filename:
Associated disk#: Not found.

To expand to 512 GB, enter the size in MB (512000) and exit diskpart

DISKPART> expand vdisk maximum=512000
DISKPART> exit

Expand in WSL

To allow Docker to use the extra space, launch your WSL2 distribution. You don't need to use docker for this (which is where I personally got a bit confused)

PS> wsl
user@WSL2:/mnt/c/Users/user$ sudo mount -t devtmpfs none /dev
user@WSL2:/mnt/c/Users/user$ mount | grep ext4

/dev/sdb on / type ext4 (rw,relatime,discard,errors=remount-ro,data=ordered)
/dev/sdd on /mnt/wsl/docker-desktop-data/isocache type ext4 (rw,relatime,discard,errors=remount-ro,data=ordered)

isocache is on /dev/sdd (which matches the full disk from earlier). Run resize2fs with the new size postfixed with the sizetype

sudo resize2fs /dev/<DEVICE> 512000M

Check that you have more room!

docker run -it --rm ubuntu:18.04 df -h


Filesystem      Size  Used Avail Use% Mounted on
overlay         492G  249G  220G  54% /
tmpfs            64M     0   64M   0% /dev
tmpfs           7.9G     0  7.9G   0% /sys/fs/cgroup
shm              64M     0   64M   0% /dev/shm
/dev/sdd        492G  249G  220G  54% /etc/hosts
Asbury answered 14/4, 2021 at 21:49 Comment(0)
U
0

If you see 'access denied' even when you started powershell in 'Administrator' permission. It maybe means that your current user is not an Administrator. For instance if you use Microsoft Account, so your local Administrator is a different user. So, you need to add your current session user into vhdx file permissions - 'Full Control'. Also, you can find ways how to fix related issues with vhdx access here: https://mcmap.net/q/145707/-docker-won-39-t-start-on-windows-not-enough-memory-to-start-docker

Then you able to start the sommand without issues (but firstly back up your vhdx):

Optimize-VHD -Path C:\ProgramData\DockerDesktop\vm-data\DockerDesktop.vhdx -Mode Full

Also, before you need to stop gracefully "Docker Descktop" (i.e. no VMs should run or hang in Taskmanager, like vmwp.exe)

See origin here: Docker Image Taking up Space After Deletion

If Optimze-VHD or compact command does not work for you. And your virgual disk contains linux filesystem and you see a free space into this disk via df (available space). So, probably you need to zeroing the empty space before compaction (Optimize-VHD or compact). To make zeroing, you can use different ways. For instance, use this command (on your own risk) inside any container of your docker (because, by default, containers dynamically share size of disks with docker host system):

dd if=/dev/zero of=zerofillfile bs=1M

And, after some error message, run this command:

rm zerofilefile

http://www.netreliant.com/news/8/17/Compacting-VirtualBox-Disk-Images-Linux-Guests.html

Or some ways from here: https://www.altaro.com/hyper-v/compact-vhdx-linux-filesystem/ Or also works for me from here: https://mcmap.net/q/145708/-linux-vhdx-size-on-hyper-v

After zeroing you can repeat the 'exercise' with Optimize-VHD or diskpart utility https://mcmap.net/q/145708/-linux-vhdx-size-on-hyper-v

Underbred answered 19/8, 2022 at 10:51 Comment(0)
G
0

If on windows, you may want to check your C:\Users\Username\AppData\Local\temp directory for something called "docker-scout". Even upon uninstalling docker, this directory remains and often occupies a lot of space on the disk.

Ginger answered 4/9, 2023 at 1:16 Comment(0)
S
0

Running on centOS.

The problem was with docker instances building up log files (nginx). docker system prune -a -f did not work, Total reclaimed space: 0B

The following

systemctl stop docker.service
rm -rf /var/lib/docker
systemctl start docker.service
reboot

finally freed 1.8 GB (!)

Swearword answered 20/12, 2023 at 23:3 Comment(0)

© 2022 - 2024 — McMap. All rights reserved.