Tabbar middle button utility function in SwiftUI
Asked Answered
P

5

7

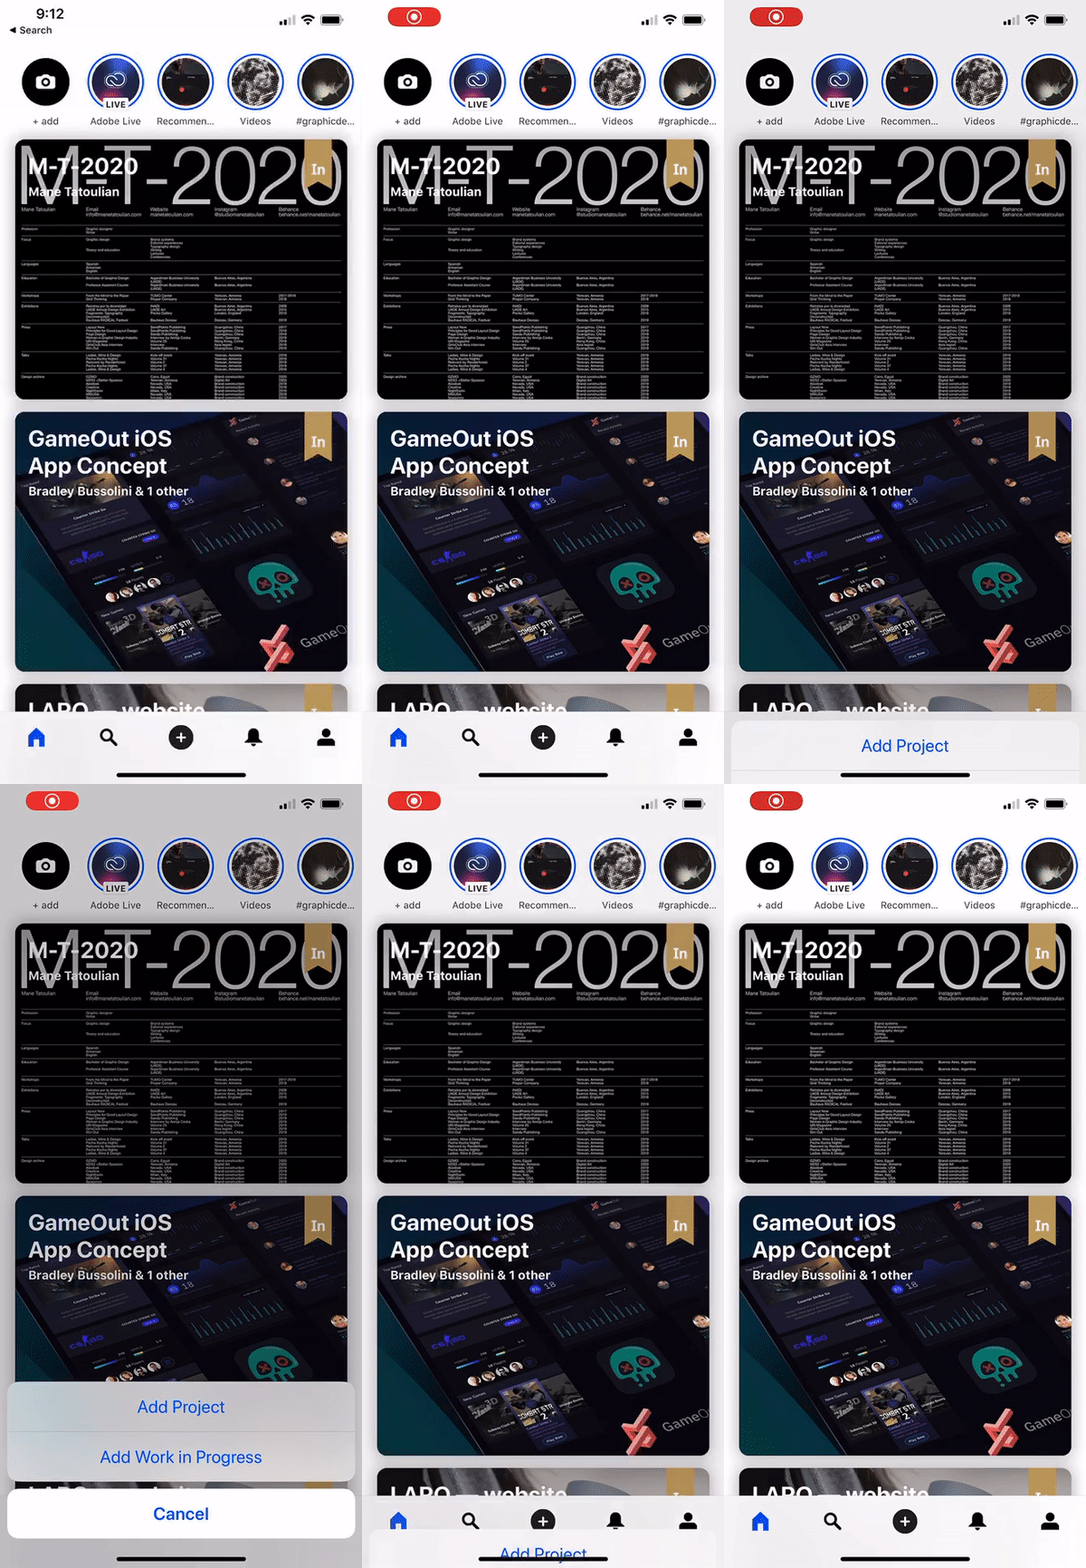
I'm trying to reproduce a "Instagram" like tabBar which has a "Utility" button in the middle which doesn't necessarily belong to the tabBar eco system.

I have attached this gif to show the behaviour I am after. To describe the issue. The tab bar in the middle (Black plus) is click a ActionSheet is presented INSTEAD of switching the view.

enter image description here

How I would do this in UIKit is simply use the

override func tabBar(tabBar: UITabBar, didSelectItem item: UITabBarItem) {
    print("Selected item")
}

Function from the UITabBarDelegate. But obviously we can't do this in SwiftUI so was looking to see if there was any ideas people have tried. My last thought would be to simply wrap it in a UIView and use it with SwiftUI but would like to avoid this and keep it native.

I have seen a write up in a custom TabBar but would like to use the TabBar provided by Apple to avoid any future discrepancies.

Thanks!

Edit: Make the question clearer.

Pilkington answered 25/2, 2020 at 12:2 Comment(2)
From your question it is hard to understand, what problem are your trying to solve.Ordinal
Updated questing to show an example.Pilkington
O
6

You could introduce new @State property for storing old tag of presented tab. And perform the next method for each of your tabs .onAppear { self.oldSelectedItem = self.selectedItem } except the middle tab. The middle tab will be responsible for showing the action sheet and its method will look the following:

.onAppear { 
self.shouldShowActionSheet.toggle() 
self.selectedItem = self.oldSelectedItem
}

Working example:

import SwiftUI

struct ContentView: View {
    @State private var selectedItem = 1
    @State private var shouldShowActionSheet = false
    @State private var oldSelectedItem = 1

    var body: some View {
        TabView (selection: $selectedItem) {
            Text("Home")
                .tabItem { Image(systemName: "house") }
                .tag(1)
                .onAppear { self.oldSelectedItem = self.selectedItem }
            Text("Search")
                .tabItem { Image(systemName: "magnifyingglass") }
                .tag(2)
                .onAppear { self.oldSelectedItem = self.selectedItem }
            Text("Add")
                .tabItem { Image(systemName: "plus.circle") }
                .tag(3)
                .onAppear {
                    self.shouldShowActionSheet.toggle()
                    self.selectedItem = self.oldSelectedItem
                }
            Text("Heart")
                .tabItem { Image(systemName: "heart") }
                .tag(4)
                .onAppear { self.oldSelectedItem = self.selectedItem }
            Text("Profile")
                .tabItem { Image(systemName: "person.crop.circle") }
                .tag(5)
                .onAppear { self.oldSelectedItem = self.selectedItem }
        }
        .actionSheet(isPresented: $shouldShowActionSheet) { ActionSheet(title: Text("Title"), message: Text("Message"), buttons: [.default(Text("Option 1"), action: option1), .default(Text("Option 2"), action: option2) , .cancel()]) }
    }

    func option1() {
        // do logic 1
    }

    func option2() {
        // do logic 2
    }
}

struct ContentView_Previews: PreviewProvider {
    static var previews: some View {
        ContentView()
    }
}
Ordinal answered 25/2, 2020 at 13:9 Comment(1)
Very cool. I like the concept! The key for me was adding the action sheet to the TabView.Pilkington
P
8

Thanks to Aleskey for the great answer (Marked as correct). I evolved it a little bit in addition to a medium article that was written around a Modal. I found it to be a little different

Here's the jist.

A MainTabBarData which is an Observable Object

final class MainTabBarData: ObservableObject {

    /// This is the index of the item that fires a custom action
    let customActiontemindex: Int

    let objectWillChange = PassthroughSubject<MainTabBarData, Never>()

    var previousItem: Int

    var itemSelected: Int {
        didSet {
            if itemSelected == customActiontemindex {
                previousItem = oldValue
                itemSelected = oldValue
                isCustomItemSelected = true
            }
            objectWillChange.send(self)
        }
    }

    func reset() {
        itemSelected = previousItem
        objectWillChange.send(self)
    }

    /// This is true when the user has selected the Item with the custom action
    var isCustomItemSelected: Bool = false

    init(initialIndex: Int = 1, customItemIndex: Int) {
        self.customActiontemindex = customItemIndex
        self.itemSelected = initialIndex
        self.previousItem = initialIndex
    }
}

And this is the TabbedView

struct TabbedView: View {

    @ObservedObject private var tabData = MainTabBarData(initialIndex: 1, customItemIndex: 2)


    var body: some View {

        TabView(selection: $tabData.itemSelected) {
            Text("First Screen")
                .tabItem {
                    VStack {
                        Image(systemName: "globe")
                            .font(.system(size: 22))
                        Text("Profile")
                    }

                }.tag(1)

            Text("Second Screen")
                .tabItem {
                    VStack {
                        Image(systemName: "plus.circle")
                            .font(.system(size: 22))
                        Text("Profile")
                    }
            }.tag(2)

            Text("Third Screen")
                .tabItem {
                    VStack {
                        Image(systemName: "number")
                            .font(.system(size: 22))
                        Text("Profile")
                    }
            }.tag(3)

        }.actionSheet(isPresented: $tabData.isCustomItemSelected) {
            ActionSheet(title: Text("SwiftUI ActionSheet"), message: Text("Action Sheet Example"),
                        buttons: [
                            .default(Text("Option 1"), action: option1),
                            .default(Text("Option 2"), action: option2),
                            .cancel(cancel)
                        ]
            )
        }


    }

    func option1() {
        tabData.reset()
        // ...
    }

    func option2() {
        tabData.reset()
        // ...
    }

    func cancel() {
        tabData.reset()
    }
}

struct TabbedView_Previews: PreviewProvider {
    static var previews: some View {
        TabbedView()
    }
}

Similar concept, just uses the power of SwiftUI and Combine.

Pilkington answered 27/2, 2020 at 11:9 Comment(1)
Seems like a very neat solution! Gotta improve my Combine skills to understand its magic.Ordinal
S
8

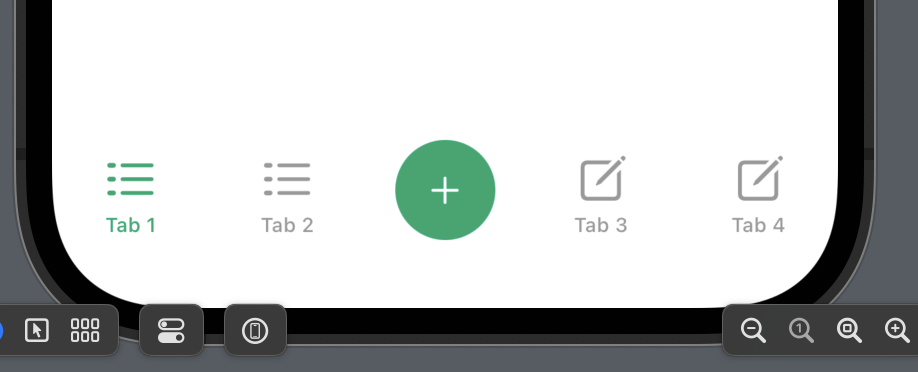
just do a ZStack with a Button or any view you want...

enter image description here

struct MainTabView: View {

    @State private var selection = 0

    var body: some View {
        ZStack(alignment: .bottom) {
            TabView(selection: $selection) {
                ContentView()
                    .tabItem {
                        Label("Tab 1", systemImage: "list.dash")
                    }
                    .tag(0)

                ContentView()
                    .tabItem {
                        Label("Tab 2", systemImage: "list.dash")
                    }
                    .tag(1)
                
                Spacer()
                    .tabItem {
                        EmptyView()
                    }
                    .tag(2)
                
                ContentView()
                    .tabItem {
                        Label("Tab 3", systemImage: "square.and.pencil")
                    }
                    .tag(3)
                
                ContentView()
                    .tabItem {
                        Label("Tab 4", systemImage: "square.and.pencil")
                    }
                    .tag(4)
                
            }
            Button {
                
            } label: {
                Image(systemName: "plus")
                    .tint(Color.white)
            }
            .frame(width: 50, height: 50)
            .background(Color.green)
            .clipShape(Circle())
            
        }
        .ignoresSafeArea(.keyboard) // usefull so the button doesn't move around on keyboard show
        .onChange(of: selection) { [selection] newValue in
           if newValue == 2 { // replace 2 with your index
               self.selection = selection // reset the selection in case we somehow press the middle tab
           }
        }
    }
}
Surrebutter answered 10/5, 2023 at 12:35 Comment(6)
This works thanks. The only issue I have with this is, when I go to one of my tabs which has a Search Bar at the top, tapping on the search bar brings up the keyboard and when that happens, the middle button shown here floats up and is displayed on top of the keyboard. It's weird, looking for a way to fix it.Princeling
I found a solution to that problem. I'm not sure if this solution will create problems in other places but basically putting .ignoresSafeArea(.keyboard) around the ZStack which wraps the TabView will stop our custom Middle Tab button from moving up when the keyboard is shown as I described in my previous comment.Princeling
@Princeling thanks for your input, updated the answer and also added the selection resetSurrebutter
that selection reset is key. Without that, what I noticed is, if you tap on an area that's close to the middle button but not quite on it, the tabBar would show the EmptyView() we're creating with the Spacer().tabItem { .. } block. Your onChange(of: selection) code at the end handles that thank you. One minor thing I wanted to add is, if you're using .tag(x) for each tab item, make sure to also add a tag to the Spacer() we create otherwise the onChange logic doesn't work as expected.Princeling
thx updated the answer... should be complete nowSurrebutter
Does anyone know if there is a way to hide the custom middle button when we hide the tabbar? Because I'm using .toolbar(.hidden, for: .tabBar) but the custom middle button we set does NOT hide and I couldn't get it done when I tried with zIndex modifierPrinceling
O
6

You could introduce new @State property for storing old tag of presented tab. And perform the next method for each of your tabs .onAppear { self.oldSelectedItem = self.selectedItem } except the middle tab. The middle tab will be responsible for showing the action sheet and its method will look the following:

.onAppear { 
self.shouldShowActionSheet.toggle() 
self.selectedItem = self.oldSelectedItem
}

Working example:

import SwiftUI

struct ContentView: View {
    @State private var selectedItem = 1
    @State private var shouldShowActionSheet = false
    @State private var oldSelectedItem = 1

    var body: some View {
        TabView (selection: $selectedItem) {
            Text("Home")
                .tabItem { Image(systemName: "house") }
                .tag(1)
                .onAppear { self.oldSelectedItem = self.selectedItem }
            Text("Search")
                .tabItem { Image(systemName: "magnifyingglass") }
                .tag(2)
                .onAppear { self.oldSelectedItem = self.selectedItem }
            Text("Add")
                .tabItem { Image(systemName: "plus.circle") }
                .tag(3)
                .onAppear {
                    self.shouldShowActionSheet.toggle()
                    self.selectedItem = self.oldSelectedItem
                }
            Text("Heart")
                .tabItem { Image(systemName: "heart") }
                .tag(4)
                .onAppear { self.oldSelectedItem = self.selectedItem }
            Text("Profile")
                .tabItem { Image(systemName: "person.crop.circle") }
                .tag(5)
                .onAppear { self.oldSelectedItem = self.selectedItem }
        }
        .actionSheet(isPresented: $shouldShowActionSheet) { ActionSheet(title: Text("Title"), message: Text("Message"), buttons: [.default(Text("Option 1"), action: option1), .default(Text("Option 2"), action: option2) , .cancel()]) }
    }

    func option1() {
        // do logic 1
    }

    func option2() {
        // do logic 2
    }
}

struct ContentView_Previews: PreviewProvider {
    static var previews: some View {
        ContentView()
    }
}
Ordinal answered 25/2, 2020 at 13:9 Comment(1)
Very cool. I like the concept! The key for me was adding the action sheet to the TabView.Pilkington
C
0

Previous answers did not help me so I'm pasting my complete solution.


import SwiftUI
import UIKit

enum Tab {
    case map
    case recorded
}


@main
struct MyApp: App {

    @State private var selectedTab: Tab = .map
    @Environment(\.scenePhase) private var phase
    var body: some Scene {
        WindowGroup {
            VStack {
                switch selectedTab {
                case .map:
                    NavigationView {
                        FirstView()
                    }
                case .recorded:
                    NavigationView {
                        SecondView()
                    }
                }
                CustomTabView(selectedTab: $selectedTab)
                    .frame(height: 50)
            }
        }
    }
}


struct FirstView: View {
    var body: some View {
        Color(.systemGray6)
            .ignoresSafeArea()
            .navigationTitle("First view")
    }
}

struct SecondView: View {
    var body: some View {
        Color(.systemGray6)
            .ignoresSafeArea()
            .navigationTitle("second view")
    }
}

struct CustomTabView: View {
    @Binding var selectedTab: Tab
    var body: some View {
        HStack {
            Spacer()
            Button {
                selectedTab = .map
            } label: {
                VStack {
                    Image(systemName: "map")
                        .resizable()
                        .scaledToFit()
                        .frame(width: 25, height: 25)
                    Text("Map")
                        .font(.caption2)
                }
                .foregroundColor(selectedTab == .map ? .blue : .primary)
            }
            .frame(width: 60, height: 50)
            Spacer()
            Button {
                
            } label: {
                ZStack {
                    Circle()
                        .foregroundColor(.secondary)
                        .frame(width: 80, height: 80)
                        .shadow(radius: 2)
                    Image(systemName: "plus.circle.fill")
                        .resizable()
                        .foregroundColor(.primary)
                        .frame(width: 72, height: 72)
                }
                .offset(y: -2)
            }
            Spacer()
            
            Button {
                selectedTab = .recorded
            } label: {
                VStack {
                    Image(systemName: "chart.bar")
                        .resizable()
                        .scaledToFit()
                        .frame(width: 25, height: 25)
                    Text("Recorded")
                        .font(.caption2)
                }
                .foregroundColor(selectedTab == .recorded ? .blue : .primary)
            }
            .frame(width: 60, height: 50)
            Spacer()
        }
    }
}

Crayton answered 22/3, 2022 at 12:27 Comment(0)
S
0

Thanks to @Peter Lapisu for his nice answer. I have improvised his answer a little bit, which helps not holding the oldSelectedItem. If you just simply use some other type in the selectedItem other than the middle item tag then tapping the '+'(middle item) does not change the tab.

import SwiftUI

enum TabItem {
    case tab1
    case tab2
    case tab3
    case tab4
    
    var title: String {
        switch self {
        case .tab1: return "Tab 1"
        case .tab2: return "Tab 2"
        case .tab3: return "Tab 3"
        case .tab4: return "Tab 4"
        }
    }
}

struct ContentView: View {
    @State private var selection: TabItem = .tab1
    @State private var showAddButtonSheet: Bool = false

    var body: some View {
        ZStack(alignment: .bottom) {
            TabView(selection: $selection) {
                Text("TabItem 1 Content")
                    .tabItem {
                        Label(TabItem.tab1.title, systemImage: "list.dash")
                    }
                    .tag(TabItem.tab1)

                Text("TabItem 2 Content")
                    .tabItem {
                        Label(TabItem.tab2.title, systemImage: "list.dash")
                    }
                    .tag(TabItem.tab2)
                
                Spacer()
                    .tabItem {
                        EmptyView()
                    }
                    .tag(2)
                
                Text("TabItem 3 Content")
                    .tabItem {
                        Label(TabItem.tab3.title, systemImage: "list.dash")
                    }
                    .tag(TabItem.tab3)
                
                Text("TabItem 4 Content")
                    .tabItem {
                        Label(TabItem.tab4.title, systemImage: "list.dash")
                    }
                    .tag(TabItem.tab4)
                
            }
            Button {
                showAddButtonSheet.toggle()
            } label: {
                Image(systemName: "plus")
                    .tint(Color.white)
            }
            .frame(width: 50, height: 50)
            .background(Color.green)
            .clipShape(Circle())
            
        }
        .ignoresSafeArea(.keyboard) // To avoid the button interruption with keyboard
        .sheet(isPresented: $showAddButtonSheet) {
            Text("Add Button Sheet View")
        }
    }
}

Output simulation:

MiddleAddButtonDemo

Slemmer answered 6/10, 2024 at 15:20 Comment(0)

© 2022 - 2025 — McMap. All rights reserved.