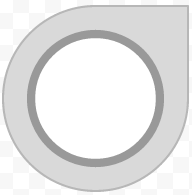
How can I draw a shape like a tear? I need to draw without using more than one shape (an ellipse and a polygon) because QPen will draw for each shape. I need to join shapes to create a new one, or tell QT to join the border across both shapes, something like this:
If the shape you want to draw can be represented as a layering of other shapes, as with the image you've linked to, it's pretty easy to do:
First we need to build a QPainterPath to represent the outer edge of the shape. We build it by layering up simpler shapes; in the case of your example we need a circle and a square. Note the use of QPainterPath::setFillRule(Qt::WindingFill): this will later affect the way that the path is painted (try removing it to see the difference!).
QPainterPath OuterPath;
OuterPath.setFillRule(Qt::WindingFill);
OuterPath.addEllipse(QPointF(60, 60), 50, 50);
OuterPath.addRect(60, 10, 50, 50);
With the example you've given we'll also need to remove a circular area from the centre of our filled shape. Let's represent that inner 'border' as a QPainterPath and then use QPainterPath::subtracted() to subtract InnerPath from OuterPath and produce our final shape:
QPainterPath InnerPath;
InnerPath.addEllipse(QPointF(60, 60), 20, 20);

QPainterPath FillPath = OuterPath.subtracted(InnerPath);
Once we've built the shape paths, we need to use them to fill/outline the shape. Let's first create a QPainter and set it to use antialiasing:
QPainter Painter(this);
Painter.setRenderHint(QPainter::Antialiasing);
We then need to fill the shape that we've built:
Painter.fillPath(FillPath, Qt::blue);
Finally, let's paint the outlines. Note that, because we have separate paths for the inner and outer borders, we are able to stroke each border with different line thicknesses. Note also the use of QPainterPath::simplified(): this converts the set of layered shapes into one QPainterPath which has no intersections:
Painter.strokePath(OuterPath.simplified(), QPen(Qt::black, 1));
Painter.strokePath(InnerPath, QPen(Qt::black, 3));
If we put all of that together, it looks like this:
void Shape::paintEvent(QPaintEvent *)
{
  QPainterPath OuterPath;
  OuterPath.setFillRule(Qt::WindingFill);
  OuterPath.addEllipse(QPointF(60, 60), 50, 50);
  OuterPath.addRect(60, 10, 50, 50);

  QPainterPath InnerPath;
  InnerPath.addEllipse(QPointF(60, 60), 20, 20);

  QPainterPath FillPath = OuterPath.subtracted(InnerPath);

  QPainter Painter(this);
  Painter.setRenderHint(QPainter::Antialiasing);

  Painter.fillPath(FillPath, Qt::blue);
  Painter.strokePath(OuterPath.simplified(), QPen(Qt::black, 1));
  Painter.strokePath(InnerPath, QPen(Qt::black, 3));
}
This is actually quite difficult to do without a good math background. If you knew the formula to create that shape, you could just put it into your QGraphicsItem::paint() function. But there are some alternatives:
Make the image in a vector editing program like Inkscape (free), save it as a .svg file, and then load it into a QGraphicsSvgItem. (This is what I would do.)
Have a look at QPainterPath::cubicTo(), which allows you to make a Bezier curve
QPainterPath to build your complex shape. See my answer for details. –
Topple © 2022 - 2024 — McMap. All rights reserved.

