You won't get your desired results by doing a UIView "image capture."
When you zoom a UIScrollView it does not perform a vector scaling... it performs a rasterized scaling.
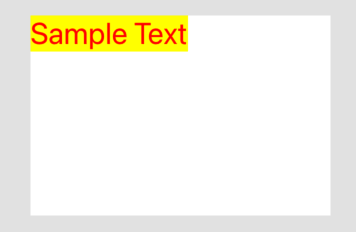
You can easily confirm this by using a UILabel as the viewForZooming. Here is a label with 30-point system font...
at 1x zoom:
![enter image description here]()
at 10x zoom:
![enter image description here]()
Code for that example:
class ViewController: UIViewController, UIScrollViewDelegate {

    let zoomLabel: UILabel = UILabel()
    let scrollView: UIScrollView = UIScrollView()

    override func viewDidLoad() {
        super.viewDidLoad()

        [zoomLabel, scrollView].forEach {
            $0.translatesAutoresizingMaskIntoConstraints = false
        }

        scrollView.addSubview(zoomLabel)
        view.addSubview(scrollView)

        let g = view.safeAreaLayoutGuide

        NSLayoutConstraint.activate([

            scrollView.centerXAnchor.constraint(equalTo: g.centerXAnchor),
            scrollView.centerYAnchor.constraint(equalTo: g.centerYAnchor),
            scrollView.widthAnchor.constraint(equalToConstant: 300.0),
            scrollView.heightAnchor.constraint(equalToConstant: 200.0),

            zoomLabel.topAnchor.constraint(equalTo: scrollView.contentLayoutGuide.topAnchor),
            zoomLabel.leadingAnchor.constraint(equalTo: scrollView.contentLayoutGuide.leadingAnchor),
            zoomLabel.trailingAnchor.constraint(equalTo: scrollView.contentLayoutGuide.trailingAnchor),
            zoomLabel.bottomAnchor.constraint(equalTo: scrollView.contentLayoutGuide.bottomAnchor),

        ])

        zoomLabel.textColor = .red
        zoomLabel.backgroundColor = .yellow
        zoomLabel.font = UIFont.systemFont(ofSize: 30.0, weight: .regular)
        zoomLabel.text = "Sample Text"

        scrollView.delegate = self
        scrollView.minimumZoomScale = 1
        scrollView.maximumZoomScale = 10

        view.backgroundColor = UIColor(white: 0.9, alpha: 1.0)
        scrollView.backgroundColor = .white
    }


    func viewForZooming(in scrollView: UIScrollView) -> UIView? {
        return zoomLabel
    }

}
When you "capture the view content" as a UIImage, you get a bitmap that is the size of the view in points x the screen scale.
So, on an iPhone 8, for example, with @2x screen scale, at 300 x 200 view will be "captured" as a UIImage with 600 x 400 pixels.
Whether you zoom the view itself, or a bitmap-capture of the view, you'll get the same result -- blurry edges when zoomed.
Your comments include: "... while editing image ..." -- this is a common issue, where we want to allow the user to add text (labels), Bezier Path shapes, addition images, etc. What the user sees on the screen, for example, may be an original image of 3000 x 2000 pixels, displayed at 300 x 200 points. Adding a 30-point label might look good on the screen, but then grabbing that as a UIImage (either for zooming or for saving to disk), ends up as a 600 x 400 pixel image which, of course, will not look good at a larger size.
Frequently, the approach to resolve this is along these lines:
Allow the user to edit at screen dimensions, e.g.
- show a
3000 x 2000 pixel image scaled down in a 300 x 200 view
- add a Bezier Path, oval-in-rect (20, 20, 200, 200)
- add a 30-point label at origin
(32, 32)
Then, when "capturing" that for output / zooming
- take the original
3000 x 2000 pixel image
- add a Bezier Path, oval-in-rect (20 * 10, 20 * 10, 200 * 10, 200 * 10)
- add a (30 * 10)-point label at origin
(32 * 10, 32 * 10)
Another option is to do the on-screen editing scaled-down.
So, you might use a 300 x 200 image view, with your 3000 x 2000 pixel image (scale to fit). When the user says "I want to add an oval Bezier Path in rect (20, 20, 200, 200), your code would draw that oval at rect (20 * 10, 20 * 10, 200 * 10, 200 * 10) on the image itself and then refresh the .image property of the image view.
Here's a little more detailed example to help make things clear:
class ViewController: UIViewController, UIScrollViewDelegate {

    let topView: UIView = UIView()
    let topLabel: UILabel = UILabel()

    let botView: UIView = UIView()
    let botLabel: UILabel = UILabel()

    let topScrollView: UIScrollView = UIScrollView()
    let botScrollView: UIScrollView = UIScrollView()

    let topStatLabel: UILabel = UILabel()
    let botStatLabel: UILabel = UILabel()

    override func viewDidLoad() {
        super.viewDidLoad()

        [topView, topLabel, botView, botLabel, topScrollView, botScrollView, topStatLabel, botStatLabel].forEach {
            $0.translatesAutoresizingMaskIntoConstraints = false
        }

        topView.addSubview(topLabel)
        botView.addSubview(botLabel)

        topScrollView.addSubview(topView)
        botScrollView.addSubview(botView)

        view.addSubview(topStatLabel)
        view.addSubview(botStatLabel)

        view.addSubview(topScrollView)
        view.addSubview(botScrollView)

        let g = view.safeAreaLayoutGuide

        NSLayoutConstraint.activate([

            topStatLabel.topAnchor.constraint(equalTo: g.topAnchor, constant: 20.0),
            topStatLabel.leadingAnchor.constraint(equalTo: topScrollView.leadingAnchor),

            topScrollView.topAnchor.constraint(equalTo: topStatLabel.bottomAnchor, constant: 4.0),
            topScrollView.centerXAnchor.constraint(equalTo: g.centerXAnchor),
            topScrollView.widthAnchor.constraint(equalToConstant: 300.0),
            topScrollView.heightAnchor.constraint(equalToConstant: 200.0),

            botScrollView.topAnchor.constraint(equalTo: topScrollView.bottomAnchor, constant: 12.0),
            botScrollView.centerXAnchor.constraint(equalTo: g.centerXAnchor),
            botScrollView.widthAnchor.constraint(equalToConstant: 300.0),
            botScrollView.heightAnchor.constraint(equalToConstant: 200.0),

            botStatLabel.topAnchor.constraint(equalTo: botScrollView.bottomAnchor, constant: 4.0),
            botStatLabel.leadingAnchor.constraint(equalTo: botScrollView.leadingAnchor),

            topView.widthAnchor.constraint(equalToConstant: 300.0),
            topView.heightAnchor.constraint(equalToConstant: 200.0),

            botView.widthAnchor.constraint(equalToConstant: 300.0 * 10.0),
            botView.heightAnchor.constraint(equalToConstant: 200.0 * 10.0),

            topLabel.topAnchor.constraint(equalTo: topView.topAnchor, constant: 8.0),
            topLabel.leadingAnchor.constraint(equalTo: topView.leadingAnchor, constant: 8.0),

            botLabel.topAnchor.constraint(equalTo: botView.topAnchor, constant: 8.0 * 10.0),
            botLabel.leadingAnchor.constraint(equalTo: botView.leadingAnchor, constant: 8.0 * 10.0),

            topView.topAnchor.constraint(equalTo: topScrollView.contentLayoutGuide.topAnchor),
            topView.leadingAnchor.constraint(equalTo: topScrollView.contentLayoutGuide.leadingAnchor),
            topView.trailingAnchor.constraint(equalTo: topScrollView.contentLayoutGuide.trailingAnchor),
            topView.bottomAnchor.constraint(equalTo: topScrollView.contentLayoutGuide.bottomAnchor),

            botView.topAnchor.constraint(equalTo: botScrollView.contentLayoutGuide.topAnchor),
            botView.leadingAnchor.constraint(equalTo: botScrollView.contentLayoutGuide.leadingAnchor),
            botView.trailingAnchor.constraint(equalTo: botScrollView.contentLayoutGuide.trailingAnchor),
            botView.bottomAnchor.constraint(equalTo: botScrollView.contentLayoutGuide.bottomAnchor),

        ])

        topLabel.textColor = .red
        topLabel.backgroundColor = .yellow
        topLabel.font = UIFont.systemFont(ofSize: 30.0, weight: .regular)
        topLabel.text = "Sample Text"

        botLabel.textColor = .red
        botLabel.backgroundColor = .yellow
        botLabel.font = UIFont.systemFont(ofSize: 30.0 * 10.0, weight: .regular)
        botLabel.text = "Sample Text"

        topScrollView.delegate = self
        topScrollView.minimumZoomScale = 1
        topScrollView.maximumZoomScale = 10

        botScrollView.delegate = self
        botScrollView.minimumZoomScale = 0.1
        botScrollView.maximumZoomScale = 1

        topScrollView.zoomScale = topScrollView.minimumZoomScale
        botScrollView.zoomScale = botScrollView.minimumZoomScale

        view.backgroundColor = UIColor(white: 0.9, alpha: 1.0)
        topScrollView.backgroundColor = .white
        botScrollView.backgroundColor = .white

        topStatLabel.font = UIFont.systemFont(ofSize: 14, weight: .light)
        topStatLabel.numberOfLines = 0
        botStatLabel.font = UIFont.systemFont(ofSize: 14, weight: .light)
        botStatLabel.numberOfLines = 0

        let t = UITapGestureRecognizer(target: self, action: #selector(self.tapped(_:)))
        view.addGestureRecognizer(t)
    }

    override func viewDidAppear(_ animated: Bool) {
        super.viewDidAppear(animated)
        updateStatLabels()
    }

    func updateStatLabels() -> Void {
        var sTop = ""
        sTop += "Label Point Size: \(topLabel.font.pointSize)"
        sTop += "\n"
        sTop += "Label Frame: \(topLabel.frame)"
        sTop += "\n"
        sTop += "View Size: \(topView.bounds.size)"
        sTop += "\n"
        sTop += "Zoom Scale: \(String(format: "%0.1f", topScrollView.zoomScale))"

        var sBot = ""
        sBot += "Zoom Scale: \(String(format: "%0.1f", botScrollView.zoomScale))"
        sBot += "\n"
        sBot += "View Size: \(botView.bounds.size)"
        sBot += "\n"
        sBot += "Label Frame: \(botLabel.frame)"
        sBot += "\n"
        sBot += "Label Point Size: \(botLabel.font.pointSize)"

        topStatLabel.text = sTop
        botStatLabel.text = sBot
    }

    func viewForZooming(in scrollView: UIScrollView) -> UIView? {
        if scrollView == topScrollView {
            return topView
        }
        return botView
    }

    @objc func tapped(_ g: UITapGestureRecognizer) -> Void {

        if Int(topScrollView.zoomScale) == Int(topScrollView.maximumZoomScale) {
            topScrollView.zoomScale = topScrollView.minimumZoomScale
        } else {
            topScrollView.zoomScale += 1
        }
        topScrollView.contentOffset = .zero

        // comparing floating point directly will fail, so round the values
        if round(botScrollView.zoomScale * 10) == round(botScrollView.maximumZoomScale * 10) {
            botScrollView.zoomScale = botScrollView.minimumZoomScale
        } else {
            botScrollView.zoomScale += 0.1
        }

        botScrollView.contentOffset = .zero

        updateStatLabels()
    }

}
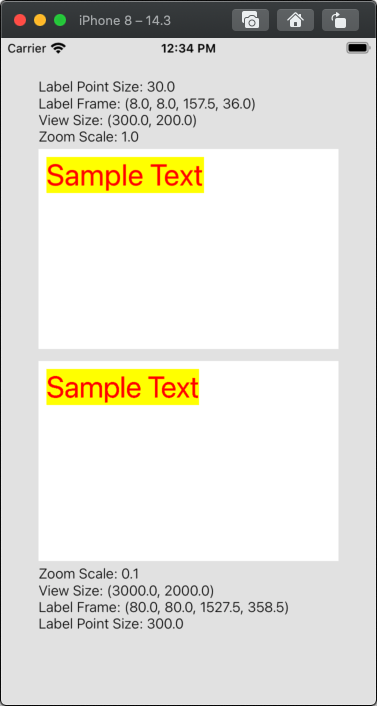
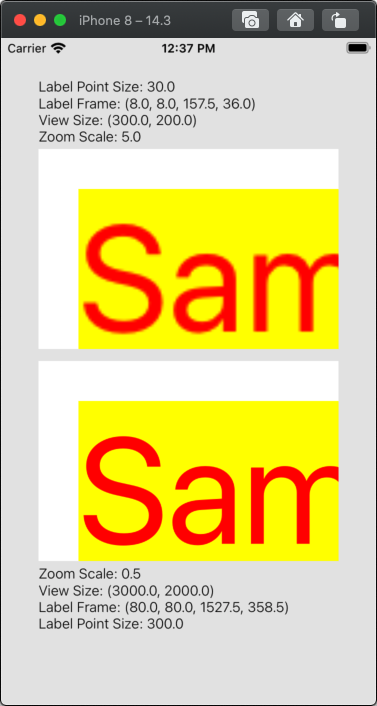
The top scroll view has a 300 x 200 view with a 30-point label, allowing zoomScale from 1 to 10.
The bottom scroll view has a 3000 x 2000 view with a 300-point label, allowing zoomScale from 0.1 to 1.0.
Each time you tap the screen, the scrollViews increase zoomScale by 1 and 0.1 respectively.
And it looks like this at min-scale:
![enter image description here]()
at 5 and 0.5 scale:
![enter image description here]()
and at 10 and 1.0 scale:
![enter image description here]()


UIGraphicsGetCurrentContext.interpolationQualitytohigh. – Utopian