Drawing outside of column area in listview column header
Asked Answered
T

2

8

Is it possible to ownerdraw the entire column header section of a listview? (including the region to the right of the column headers)? ListView is in Details View.

An answer here indicates that the remaining space can be drawn along with the last column header: http://www.devnewsgroups.net/group/microsoft.public.dotnet.framework.windowsforms/topic32927.aspx

But it does not seem to work at all - nothing is drawn outside header area.

The proposed solution is based on drawing outside of the passed Bounds:

if (e.ColumnIndex == 3) //last column index
{
    Rectangle rc = new Rectangle(e.Bounds.Right, //Right instead of Left - offsets the rectangle
            e.Bounds.Top, 
            e.Bounds.Width, 
            e.Bounds.Height);

    e.Graphics.FillRectangle(Brushes.Red, rc);
}

The ClipBounds property of the available Graphics instance indicates an unbound area (from large negative numbers to large positive). But nothing is drawn outside the columnheader area of the last column.

Does anybody have a solution for this?

Teacake answered 16/9, 2009 at 14:22 Comment(0)
H
7

I'm surprised by Jeffery Tan's answer in that post. His solution cannot work, since the code tries to draw outside of the header control client area. The hDC used within custom drawing (and hence owner drawing) is for the client area of the control, and so cannot be used to paint in the non-client area. The area to the right of the right most column in a header control is in non-client area. So you need a different solution.

Possible Solutions

  1. Hi tech and partially effective

You can enable drawing outside the client area by using the GetDC() WinAPI call:

[System.Runtime.InteropServices.DllImport("user32")]
private static extern IntPtr GetDC(IntPtr hwnd);
[System.Runtime.InteropServices.DllImport("user32")]
private static extern IntPtr ReleaseDC(IntPtr hwnd, IntPtr hdc);

public static IntPtr GetHeaderControl(ListView list) {
    const int LVM_GETHEADER = 0x1000 + 31;
    return SendMessage(list.Handle, LVM_GETHEADER, 0, 0);
}

In your column draw event handler, you will need something like this:

if (e.ColumnIndex == 3) //last column index
{
  ListView lv = e.Header.ListView;
  IntPtr headerControl = NativeMethods.GetHeaderControl(lv);
  IntPtr hdc = GetDC(headerControl);
  Graphics g = Graphics.FromHdc(hdc);

  // Do your extra drawing here
  Rectangle rc = new Rectangle(e.Bounds.Right, //Right instead of Left - offsets the rectangle
            e.Bounds.Top, 
            e.Bounds.Width, 
            e.Bounds.Height);

    e.Graphics.FillRectangle(Brushes.Red, rc);

  g.Dispose();
  ReleaseDC(headerControl, hdc);
}

But the problem with this is that since your drawing is outside the client area, Windows doesn't always know when it should be drawn. So it will disappear sometimes, and then be redrawn when Windows thinks the header needs repainting.

  1. Low tech but ugly

Add an extra empty column to your control, owner draw it do look however you want, make it very wide, and turn off horizontal scrolling (optional).

I know this is horrible, but you're looking for suggestions :)

  1. Most effective, but still not perfect

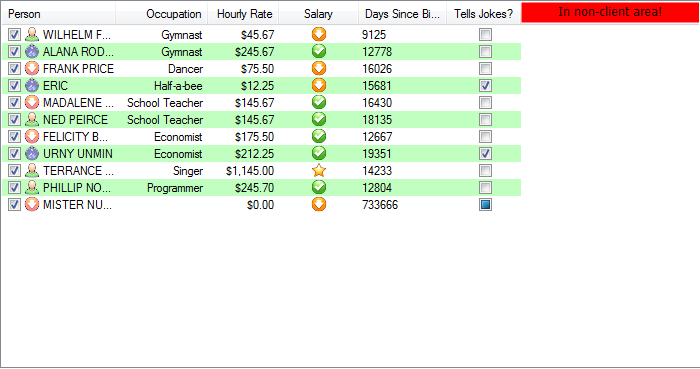
Use ObjectListView. This wrapper around a .NET ListView allows you to add overlays to your list -- an overlay can draw anywhere within the ListView, including the header. [Declaration: I'm the author of ObjectListView, but I still think it is best solution]

public class HeaderOverlay : AbstractOverlay
{
    public override void Draw(ObjectListView olv, Graphics g, Rectangle r) {
        if (olv.View != System.Windows.Forms.View.Details)
            return;

        Point sides = NativeMethods.GetColumnSides(olv, olv.Columns.Count-1);
        if (sides.X == -1)
            return;

        RectangleF headerBounds = new RectangleF(sides.Y, 0, r.Right - sides.Y, 20);
        g.FillRectangle(Brushes.Red, headerBounds);
        StringFormat sf = new StringFormat();
        sf.Alignment = StringAlignment.Center;
        sf.LineAlignment = StringAlignment.Center;
        g.DrawString("In non-client area!", new Font("Tahoma", 9), Brushes.Black, headerBounds, sf);
    }
}

This gives this: alt text

[Reading over this answer, I think this is an example of trying too hard :) Hope you find something here helpful.]

Hyetograph answered 16/9, 2009 at 22:11 Comment(4)
Thanks for the great answer. In our case, ObjectListView would be an overkill. Your first solution is sufficient and works well enough in our scenario. You have a small error in code - one should naturally draw onto the g instance, not onto the original e.Graphics: e.Graphics.FillRectangle(Brushes.Red, rc); //should be g.FillRectangle The SendMessage method import is also missing: [DllImport("user32.dll", CharSet = CharSet.Auto)] public static extern IntPtr SendMessage(IntPtr handle, int messg, int wparam, int lparam);Teacake
OLV is great, but I believe you need to handle WM_PAINT and WM_ERASEBKGND in HeaderControl to be able to fully custom draw the header. Something like this: codeproject.com/Articles/4243/…Malacology
On .NET Framework 4.5 and Windows 10, it does not work at all. It only works when you are resizing the last column. As soon as you lift your mouse button to end resize the column header, Windows paints his own background style to (Rectangle) rc area. I think the proper way (and a perfect solution) to this question is to use WndProc methods. I will post an update to this question when I have a decent working one.Malynda
Another easy solution is to add code to automatically resize the last column to fill the remaining spaceAche
A
0

I went with @grammarian's number 2 as didn't want want to mess around with InteropServices. This solution just uses standard .net. As above, put a spare column at the end with nothing in the Text property (in the vid below, I use "{filler}" just to help with seeing what's going on). Then use various event handlers to work their magic. The result has a few rough edges, but I think it's very passable. Vid of it in action:

https://youtu.be/987FtPE13KE

And relevant code:

Dim ResizingFillerColumn As Boolean = False
Private Sub ListView_Resize(sender As Object, e As EventArgs) Handles ListView.Resize
    ResizeFillerColumn()
End Sub

Private Sub ResizeFillerColumn()
    Dim columnsWidth = 0
    For i = 0 To ListView.Columns.Count - 2
        columnsWidth += ListView.Columns(i).Width
    Next
    ResizingFillerColumn = True
    ListView.Columns(ListView.Columns.Count - 1).Width = ListView.Width - columnsWidth
    ResizingFillerColumn = False
End Sub

Private Sub ListView_ColumnReordered(sender As Object, e As ColumnReorderedEventArgs) Handles ListView.ColumnReordered
    Dim FillerColumnIndex = ListView.Columns.Count - 1
    If e.OldDisplayIndex = FillerColumnIndex Then e.Cancel = True
    If e.NewDisplayIndex = FillerColumnIndex Then e.Cancel = True
End Sub

Private Sub ListView_ColumnWidthChanged(sender As Object, e As ColumnWidthChangedEventArgs) Handles ListView.ColumnWidthChanged
    If ResizingFillerColumn Then Return
    ResizeFillerColumn()
End Sub

Private Sub ListView_ColumnWidthChanging(sender As Object, e As ColumnWidthChangingEventArgs) Handles ListView.ColumnWidthChanging
    If ResizingFillerColumn Then Return
    ResizeFillerColumn()
End Sub
Apocalypse answered 12/1, 2021 at 19:20 Comment(0)

© 2022 - 2024 — McMap. All rights reserved.