How to fix .pch file missing on build?
Asked Answered
M

14

193

When I build my c++ solution in Visual Studio it complains that the xxxxx.pch file is missing. Is there a setting I am missing to get the pre-compiled headers back?

here is the exact error for completeness:

Error   1   fatal error C1083: Cannot open precompiled header file: 'Debug\xxxxx.pch': No such file or directory
Mccarron answered 23/5, 2011 at 11:10 Comment(2)
you have to provide more info. what error exactly are you getting? how is your project currently configured?Secessionist
Just a simple rebuild all fixed my problem.Liability
O
516

NOTE: Later versions of the IDE may use "pch" rather than "stdafx" in the default names for related files. It may be necessary to substitute pch for stdafx in the instructions below. I apologize. It's not my fault.

  1. Right-click on your project in the Solution Explorer.
  2. Click Properties at the bottom of the drop-down menu.
  3. At the top left of the Properties Pages, select All Configurations from the drop-down menu.
  4. Open the C/C++ tree and select Precompiled Headers
  5. Precompiled Header: Select Use (/Yu)
  6. Fill in the Precompiled Header File field. Standard is stdafx.h
  7. Click Okay

  8. If you do not have stdafx.h in your Header Files put it there. Edit it to #include all the headers you want precompiled.

  9. Put a file named stdafx.cpp into your project. Put #include "stdafx.h" at the top of it, and nothing else.
  10. Right-click on stdafx.cpp in Solution Explorer. Select Properties and All configurations again as in step 4 ...
  11. ... but this time select Precompiled Header Create (/Yc). This will only bind to the one file stdafx.cpp.
  12. Put #include "stdafx.h" at the very top of all your source files.

Lucky 13. Cross your fingers and hit Build.

Orten answered 7/9, 2012 at 21:49 Comment(4)
I didn't know stdafx.cpp should have different setting. Great answer.Metamorphism
This is a more basic answer than mine. Step 1-7 are necessary to get PCH working, but the error message from the question indicates those steps have already been done. OTOH, it assumes a single stdafx.pch file, while the xxxxx.pch from the question hints at a more complex problem (multi-PCH setup).Deberadeberry
1st impression: this is quite simple process for very confusing error. being C# developer I am struggling for this from very long. but this seems worked for large group of people. I am in progress to implementing the solution for my project, will update if this worked for me as well.Sacellum
can I leave it on create or should I set it back to use later?Chios
D
62

Precompiled Header (pch) use is a two-step process.

In step one, you compile a stub file (In VS200x it's usually called stdafx.cpp. Newer versions use pch.cpp.). This stub file indirectly includes only the headers you want precompiled. Typically, one small header (usually stdafx.h or pch.hpp) lists standard headers such as <iostream> and <string>, and this is then included in the stub file. Compiling this creates the .pch file.

In step 2, your actual source code includes the same small header from step 1 as the first header. The compiler, when it encounters this special header, reads the corresponding .pch file instead. That means it doesn't have to (re)compile those standard headers every time.

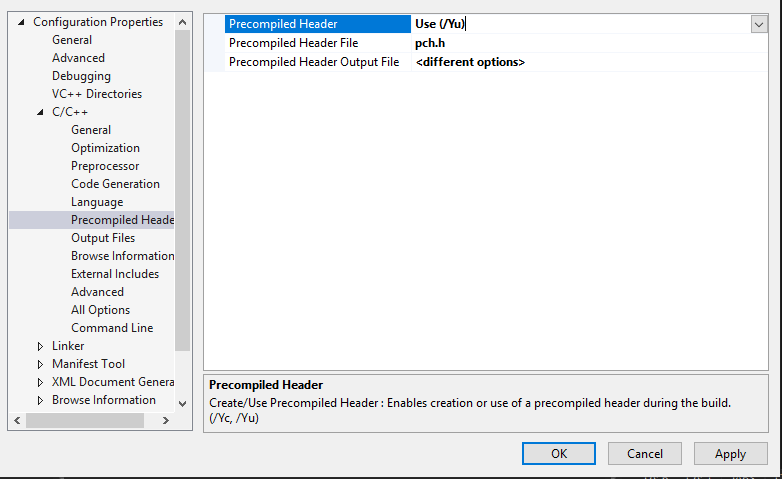
In your case, it seems step 1 fails. Is the stub file still present? In your case, that would probably be xxxxx.cpp. It must be a file that's compiled with /Yc:xxxxx.pch, since that's the compiler flag to indicate it's step 1 of the PCH process. If xxxxx.cpp is present, and is such a stub file, then it's probably missing its /Yc: compiler option.

Deberadeberry answered 23/5, 2011 at 11:47 Comment(1)
then it's probably missing its /Yc: compiler option. By the way the option is located in Project Property Pages / Configuration Properties / C-C++ / Precompiled HeadersLoudmouthed
R
26

Fix:

  1. Make sure you have xxxxx.cpp in your project

  2. Compile xxxxx.cpp with /Yc flag (Create Precompiled Header)
    (right click on xxxxx.cpp -> properties -> Precompiled Headers -> create)

  3. Compile all other files with /Yu flag (Use Precompiled Header)
    (right click on project -> properties -> Precompiled Headers -> use)

Roethke answered 20/11, 2012 at 18:55 Comment(1)
This fixed me up. Thank you very much!Solus
S
8
  1. Right click to the project and select the property menu item
  2. goto C/C++ -> Precompiled Headers
  3. Select Not Using Precompiled Headers
Strode answered 8/8, 2012 at 11:54 Comment(2)
This worked for me. I had deleted "stdafx.cpp", then when I added it back, this error would not go away until I switch off precompiled headers. The project is tiny anyway, so its not as if it makes much difference to the speed.Potentiality
4. Select Create (/Yc) (to restore and then use it again)Breathed
O
2

Yes it can be eliminated with the /Yc options like others have pointed out but most likely you wouldn't need to touch it to fix it. Why are you getting this error in the first place without changing any settings? You might have 'cleaned' the project and than try to compile a single cpp file. You would get this error in that case because the precompiler header is now missing. Just build the whole project (even if unsuccessful) and than build any single cpp file and you won't get this error.

Ostium answered 21/11, 2013 at 16:37 Comment(0)
E
2

In case this is happening to you on a server build (AppCenter) and yo uaer using CocoaPods ensure that your Podfile is checked in.

AppCenter only runs the "pod install" command if it finds a Pofile and it DOES NOT find the PODS folder on the files.

I had the folder checked-in, but because git automatically ignores .pch files (check you .gitignore to veryfy this), my .pch weren'nt being checked in.

I sorted my issue by forcing the .pch files to check it, but Deleting the PODS folder should work too, since Appcenter will run the pod install command in that case.

Hoppefully this helps somebody.

Eyeglass answered 8/10, 2018 at 15:51 Comment(0)
F
2

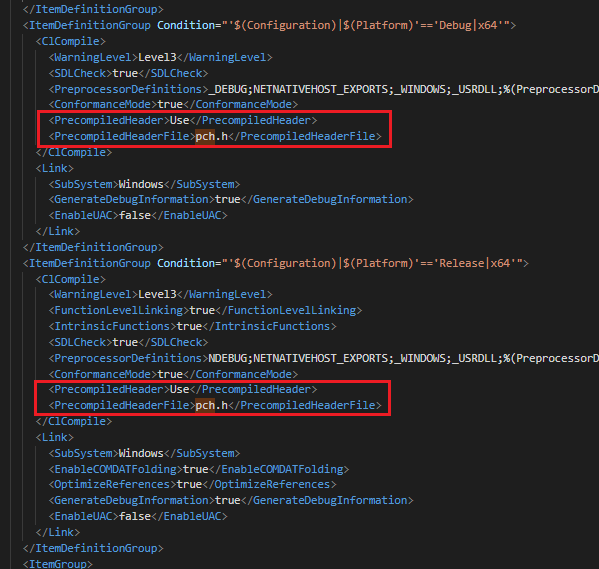
VS screwed (mine is 2019 ;( ). Go ahead and choose "not using precompiled headers" as other guys are pointing out then open the project file (vcxproj) with any text editor, and delete the outlined two entries in two places. Enjoy cleaning up the mess! As a matter of fact, the 'pch.h' entry in the vcxproj file you see it below, you will ever find it in VS properties' interfaces.

snapshot from nnn.vcxproj file

Fullblooded answered 2/6, 2021 at 2:49 Comment(0)
A
1

Try Build > Clean Solution, then Build > Build Solution. This works for me.

Aubervilliers answered 5/3, 2014 at 4:47 Comment(0)
R
1

I know this topic is very old, but I was dealing with this in VS2015 recently and what helped was to deleted the build folders and re-build it. This may have happen due to trying to close the program or a program halting/freezing VS while building.

Rendon answered 25/12, 2016 at 23:16 Comment(2)
Yes, but the original question had to do with VS2008, not VS2015. Do you have any certainty that this would solve the OP's problem?Dichotomous
Regardless of what VS version it is, the problem still occurs across different builds. Just try that and see if it works for whatever one you'd be dealing with.Rendon
I
1

I was searching for the iOS PCH file having the same problem, if you got here like me too, the solution that I've found is by clearing derived data; Close Simulator(s), go to xCode prefs -> locations -> go to the derived data file path, close xCode, delete the files in the derived data folder, re launch and cheers :)

Iona answered 13/9, 2017 at 9:33 Comment(0)
E
1

I managed to create this problem for myself because I wanted to use a pch.h and pch.cpp file from different directories. So, I deleted the two files from my project and then added them as existing files from somewhere else. Big mistake as precompiled header files can no longer be found.

There is no way that I can find to fix the problem from the Visual Studio 2019 UI. You must edit the project file and make sure the following look like this:

 <ClCompile Include="pch.cpp">
      <PrecompiledHeader Condition="'$(Configuration)|$(Platform)'=='Debug|Win32'">Create</PrecompiledHeader>
      <PrecompiledHeader Condition="'$(Configuration)|$(Platform)'=='Debug|x64'">Create</PrecompiledHeader>
      <PrecompiledHeader Condition="'$(Configuration)|$(Platform)'=='Release|Win32'">Create</PrecompiledHeader>
      <PrecompiledHeader Condition="'$(Configuration)|$(Platform)'=='Release|x64'">Create</PrecompiledHeader>
  </ClCompile>
Echoechoic answered 20/9, 2021 at 16:24 Comment(0)
G
1

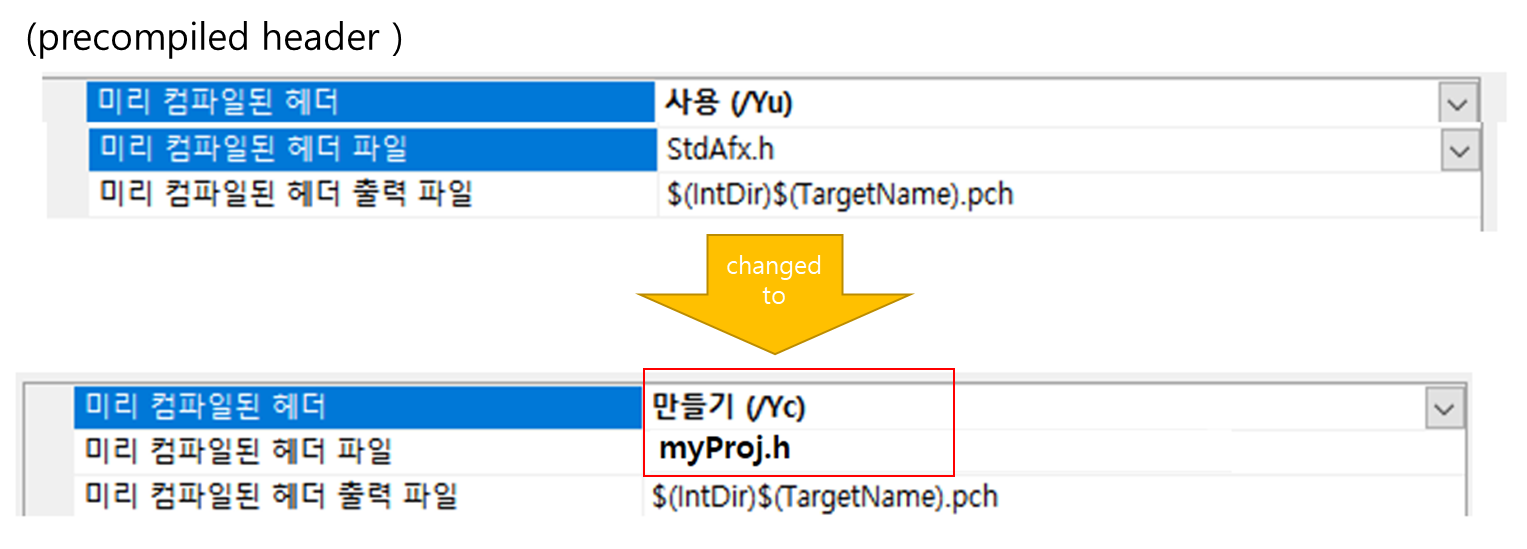
I had same issue, and I managed to solve it like this:

ERROR :

fatal error C1083: Cannot open precompiled header file : "Debug\myProj.pch". No such file or directory

first one is when I had an error,

and changed it like a second picture

  • make (/Yx)

  • myProj.h enter image description here

Gregoriagregorian answered 23/3, 2022 at 9:51 Comment(1)
I'm downvoting this. Consider to share in English next time.Mastat
R
1

In my case, it was necessary to select Create (/Yu), instead of the standard Use (/Yu) enter image description here to
enter image description here

Rating answered 8/2, 2023 at 18:7 Comment(0)
C
0

If everything is right, but this mistake is present, it need check next section in ****.vcxproj file:

<ClCompile Include="stdafx.cpp">
  <PrecompiledHeader Condition=

In my case it there was an incorrect name of a configuration: only first word.

Countershaft answered 30/10, 2016 at 16:14 Comment(0)

© 2022 - 2024 — McMap. All rights reserved.