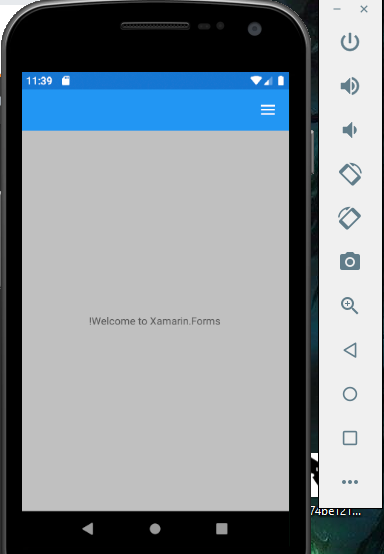
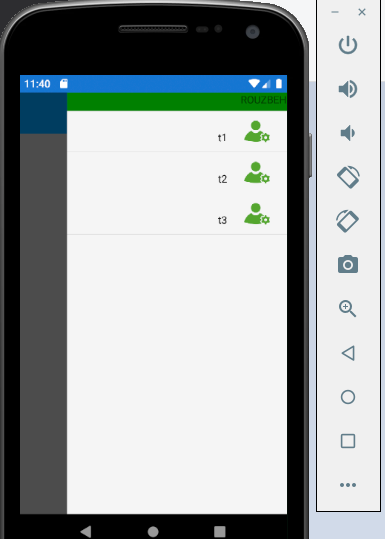
I'm using new forms feature Right-to-Left, it works well except MasterDetail hamburger menu icon. It stays on the left side and I need to move it to right whem localization is changed. Any ideas or could somebody help me with custom renderer?
well not impossible but some dirty coding is needed:
please check the solution here
as recap: To force the layout RTL and LTR on IOS:
1- Create this class/service
using System;
using System.IO;
using Xamarin.Forms;
using yourproject.iOS;
using yourproject.database;
using ObjCRuntime;
using System.Runtime.InteropServices;
using UIKit;
using System.Diagnostics;

[assembly: Dependency(typeof(PathManager_IOS))]
namespace yourproject.iOS
{
 public class PathManager_IOS : IPathManager
 {
[DllImport(ObjCRuntime.Constants.ObjectiveCLibrary, EntryPoint = "objc_msgSend")]
internal extern static IntPtr IntPtr_objc_msgSend(IntPtr receiver, IntPtr selector, UISemanticContentAttribute arg1);

    public PathManager_IOS()
    {

    }
   public void SetLayoutRTL()
    {
        try
        {
            Selector selector = new Selector("setSemanticContentAttribute:");
            IntPtr_objc_msgSend(UIView.Appearance.Handle, selector.Handle, UISemanticContentAttribute.ForceRightToLeft);
        }
        catch (Exception s)
        {
            Debug.WriteLine("failed to set layout...."+s.Message.ToString());
        }
    }
    public void SetLayoutLTR()
    {
        try
        {
            Selector selector = new Selector("setSemanticContentAttribute:");
            IntPtr_objc_msgSend(UIView.Appearance.Handle, selector.Handle, UISemanticContentAttribute.ForceLeftToRight);
        }
        catch (Exception s)
        {
            Debug.WriteLine("failed to set layout...." + s.Message.ToString());
        }
    }
 }
}
ps: please change "yourproject" to your project name...
To Call this on startup
in AppDelegate.cs
   PathManager_IOS pathManager = new PathManager_IOS();
   if (lang == 3)
    {
      pathManager.SetLayoutRTL();/* RTL */

    }
    if (lang == 1||lang == 2)
    {
       pathManager.SetLayoutLTR();/*   LTR   */
    }
    LoadApplication(new App(m, lang));
TO call this from the PCL shared pages or project
/* arabic */
DependencyService.Get<IPathManager>().SetLayoutRTL();

/* English */
DependencyService.Get<IPathManager>().SetLayoutLTR();
Don't forget to set the flow direction on language change
if(lang==3)
                {//arabic
                    this.FlowDirection = FlowDirection.RightToLeft;
                    this.Master.FlowDirection= FlowDirection.RightToLeft;
                    this.Detail.FlowDirection= FlowDirection.RightToLeft;

                }
hope this helps! all this for that hamburger icon !!!
Cheers, Rabih
To force Android navigation Bar to be RTL use masterDetailPage renderer on Android project something like this:
public class MyMasterDetailPageRenderer : MasterDetailPageRenderer
{
    public MyMasterDetailPageRenderer(Context context) : base(context)
    {


    }
    protected override void OnLayout(bool changed, int l, int t, int r, int b)
    {
        base.OnLayout(changed, l, t, r, b);
        var toolbar = FindViewById<Android.Support.V7.Widget.Toolbar>(Resource.Id.toolbar);
        toolbar.LayoutDirection = LayoutDirection.Rtl;

    }


}
the first step is to set master direction flow
<MasterDetailPage xmlns="http://xamarin.com/schemas/2014/forms"
             xmlns:x="http://schemas.microsoft.com/winfx/2009/xaml"
             x:Class="APPNAME.MainPage"
                  FlowDirection="RightToLeft">
and for Android you need to add android:supportsRtl="true" to AndroidManifest.xml like
<application android:label="APPNAME.Android" android:theme="@style/MainTheme" android:supportsRtl="true"></application>
and then your master page is rtl as well as the action bar.
© 2022 - 2024 — McMap. All rights reserved.


