Python in Xcode 4+?
Asked Answered
N

8

198

How does one create a Python friendly environment in Xcode 4, 5, 6 or 7?

Nainsook answered 11/3, 2011 at 18:40 Comment(13)
Komodo is a good Python specific alternative especially if you aren't trying to combine Python with any OSX specific stuff.Woodhouse
Hmm. It looks interesting but I don't feel like coughing up the cash.Nainsook
Komodo Edit is their free option. I have IDE and if you do serious Python work it is well worth it.Woodhouse
I'd recommend Wing 4 just for its code assistant ... very nice. But Xcode 4 is rather pretty :-).Coady
What the hell? A question for future? Dated Mar 11 '2011 at 18:40???Kluge
@PrajeetShrestha I update it from time to time to keep it relevant.Nainsook
@TylerCrompton I don't really thing it is a good ideia to update the version of this question. I mean, the answer (which is upvoted and marked) will probably not be correct for a new version. People will come here looking at how to use it in v7, and the answer will not provide that (just an example, haven't checked if the current answer is for v7).Cockahoop
@amfcosta, I update the answer whenever I update the question.Nainsook
@TylerCrompton I still think that a new version deserves a separate question and answer. People looking to do it on an older version would not find it...Cockahoop
@TylerCrompton: Please stop updating the version numbers of this question; whilst you're updating the accepted answer, you're not updating the other answers (which are still for 4, 5, and 6), which leaves a broken window. Where the steps change between major versions, you should ask another question instead.Euchromatin
@Matt, First, all of the other answers specifically mention the version number that the answer is for. Second, I have also kept the second most upvoted question up to date. Third, it's uncommon to have a majorly out of date Xcode version installed. Notice that nobody has complained that they are using an older version that the version that the question is for. In fact, people are recommending updates. Fourth, instructions for older versions are still accessible in the revision history. There is no reason to impede this question.Nainsook
@TylerCrompton: (1) Exactly; hence the broken window (e.g. answers to "How does one create a Python friendly environment in Xcode 7" starting off with "In XCode 4..."). (2) You made one edit to update the steps when the link content changed; you haven't kept it up to date w.r.t the question (nor should you). (3, 4) It is unreasonable to expect people to check the revision history. I don't understand why you rolled back my edit; it is an improvement over the previous for the reasons outlined in (1).Euchromatin
Note that "how to handle updated versions" has been widely discussed on meta, and the consensus have either been to a) post a new answer, b) append to your answer, or c) post a new question; never to re-write an question and answer. You might find meta.stackoverflow.com/q/338972/444991 or meta.https://mcmap.net/q/129876/-why-is-lazy-evaluation-useful/444991 related. If you wish to dispute this further, I would suggest opening a post on meta to discuss this, where the community can add their input as well.Euchromatin
N
265

I figured it out! The steps make it look like it will take more effort than it actually does.

These instructions are for creating a project from scratch. If you have existing Python scripts that you wish to include in this project, you will obviously need to slightly deviate from these instructions.

If you find that these instructions no longer work or are unclear due to changes in Xcode updates, please let me know. I will make the necessary corrections.

  1. Open Xcode. The instructions for either are the same.
  2. In the menu bar, click “File” → “New” → “New Project…”.
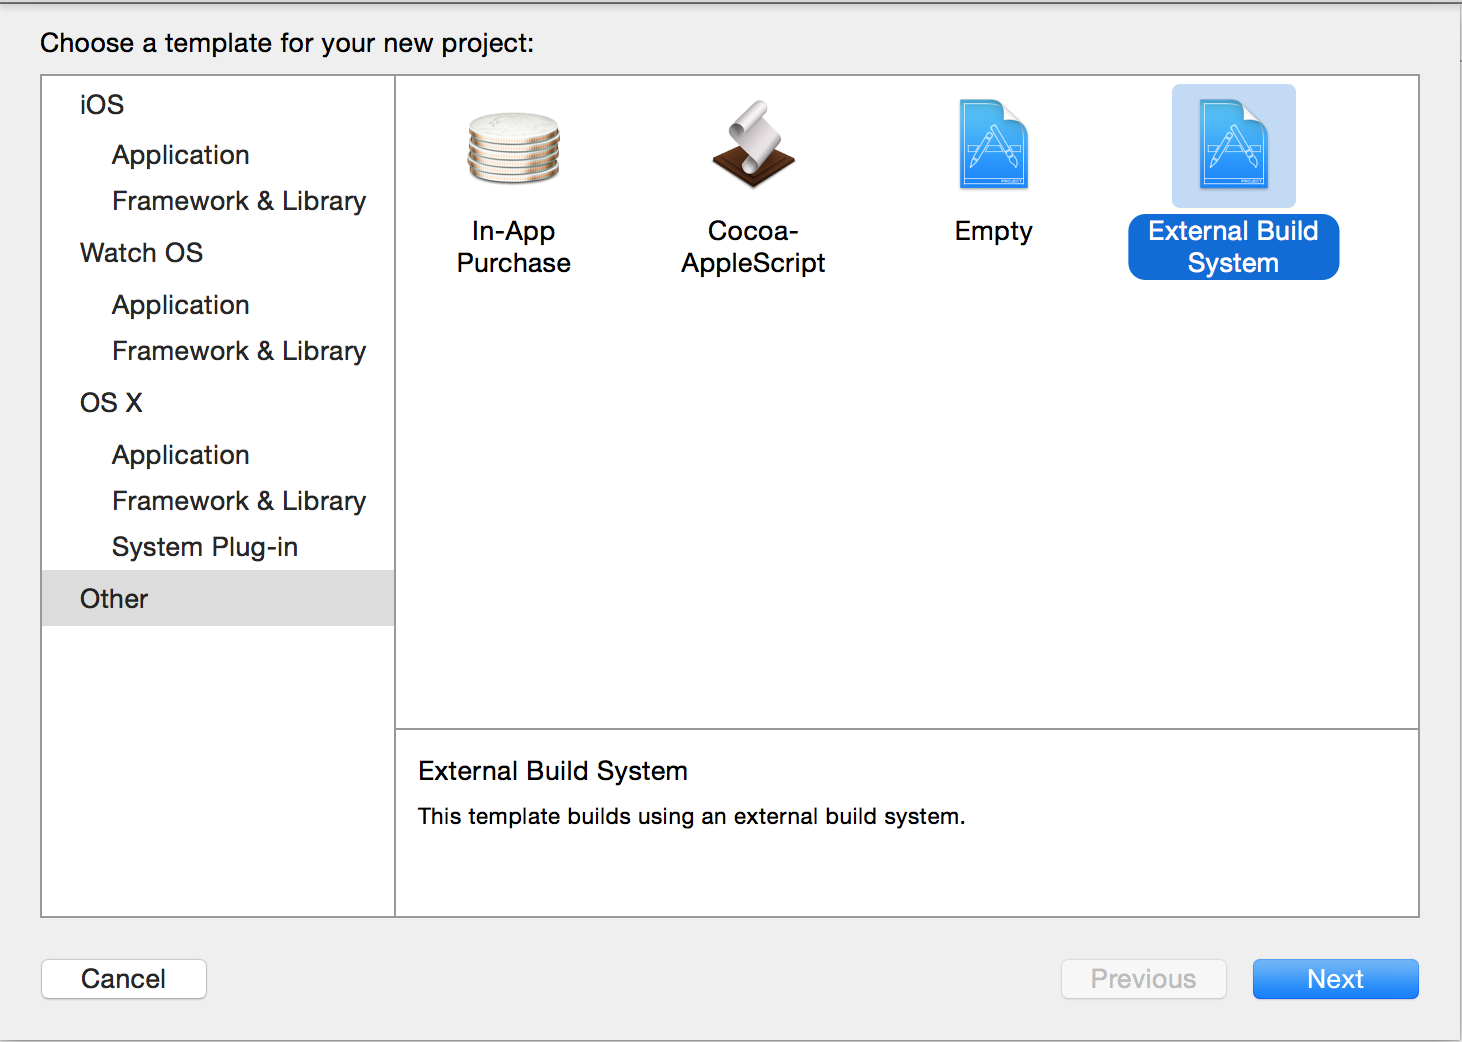
  3. Select “Other” in the left pane, then "External Build System" in the right page, and next click "Next".
  4. Enter the product name, organization name, or organization identifier.
  5. For the “Build Tool” field, type in /usr/local/bin/python3 for Python 3 or /usr/bin/python for Python 2 and then click “Next”. Note that this assumes you have the symbolic link (that is setup by default) that resolves to the Python executable. If you are unsure as to where your Python executables are, enter either of these commands into Terminal: which python3 and which python.
  6. Click “Next”.
  7. Choose where to save it and click “Create”.
  8. In the menu bar, click “File” → “New” → “New File…”.
  9. Select “Other” under “OS X”.
  10. Select “Empty” and click “Next”.
  11. Navigate to the project folder (it will not work, otherwise), enter the name of the Python file (including the “.py” extension), and click “Create”.
  12. In the menu bar, click “Product” → “Scheme” → “Edit Scheme…”.
  13. Click “Run” in the left pane.
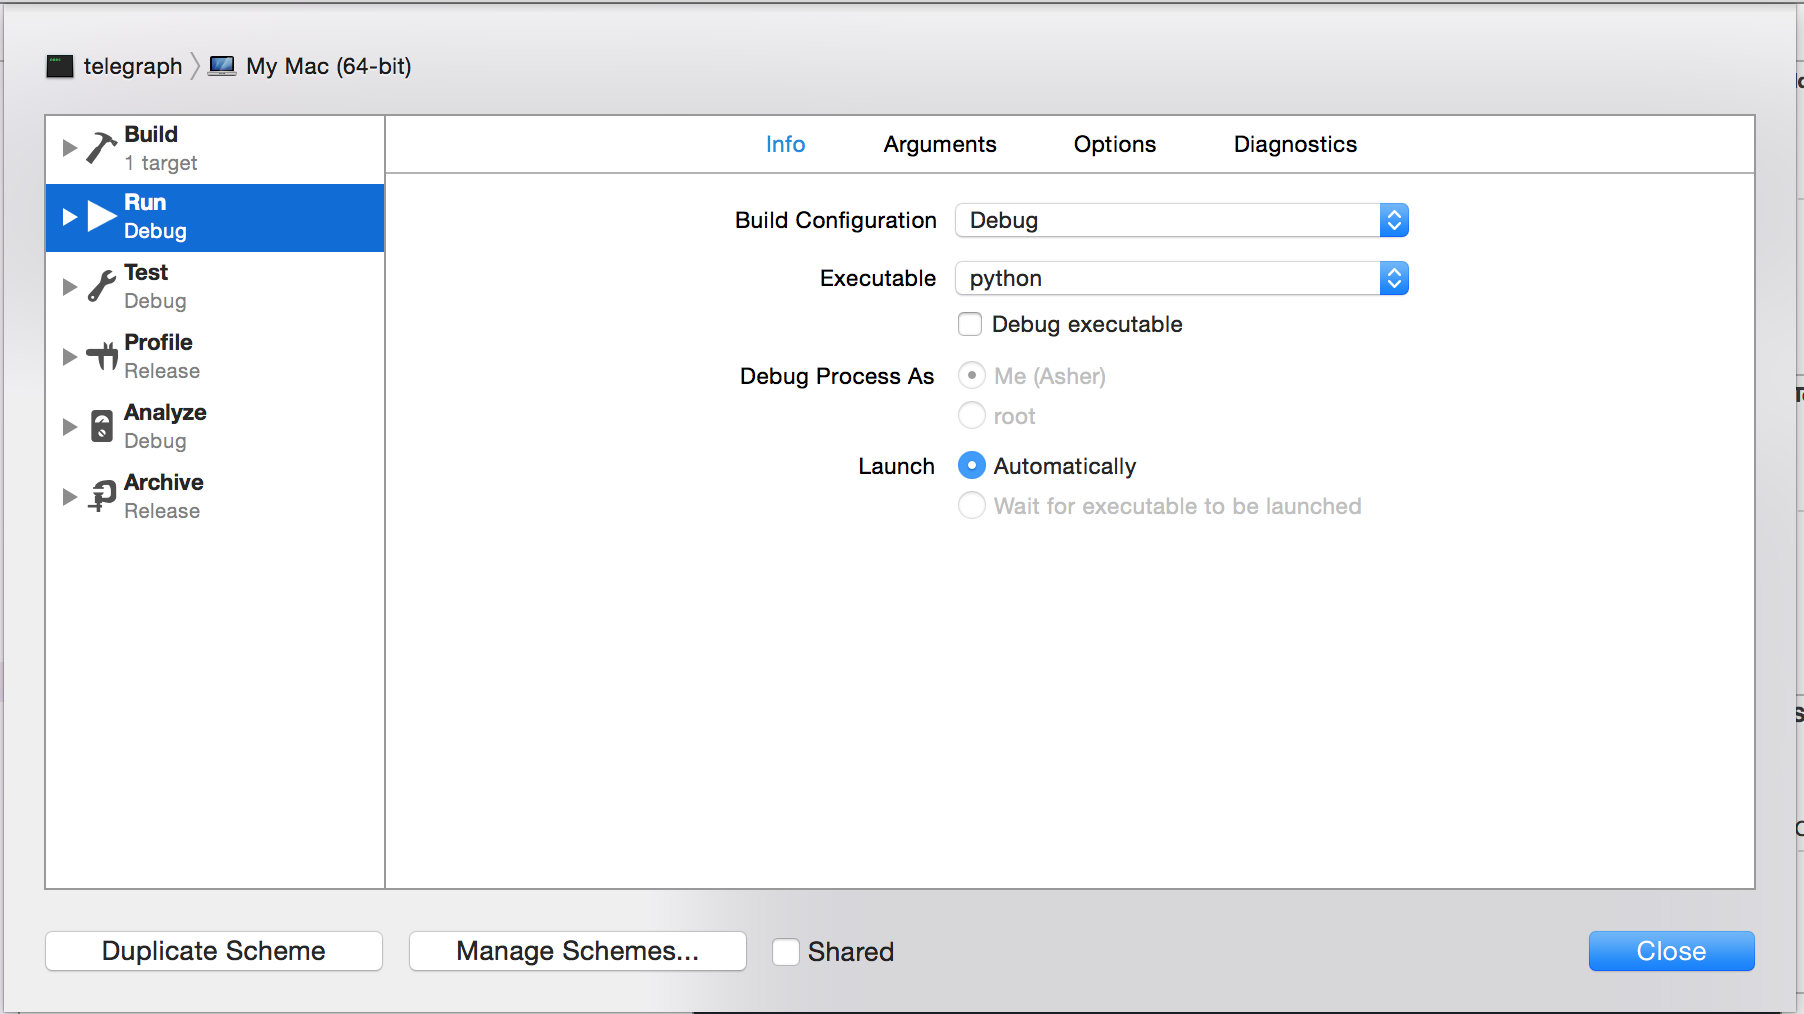
  14. In the “Info” tab, click the “Executable” field and then click “Other…”.
  15. Navigate to the executable from Step 5. You might need to use ⇧⌘G to type in the directory if it is hidden.
  16. Select the executable and click "Choose".
  17. Uncheck “Debug executable”. If you skip this step, Xcode will try to debug the Python executable itself. I am unaware of a way to integrate an external debugging tool into Xcode.
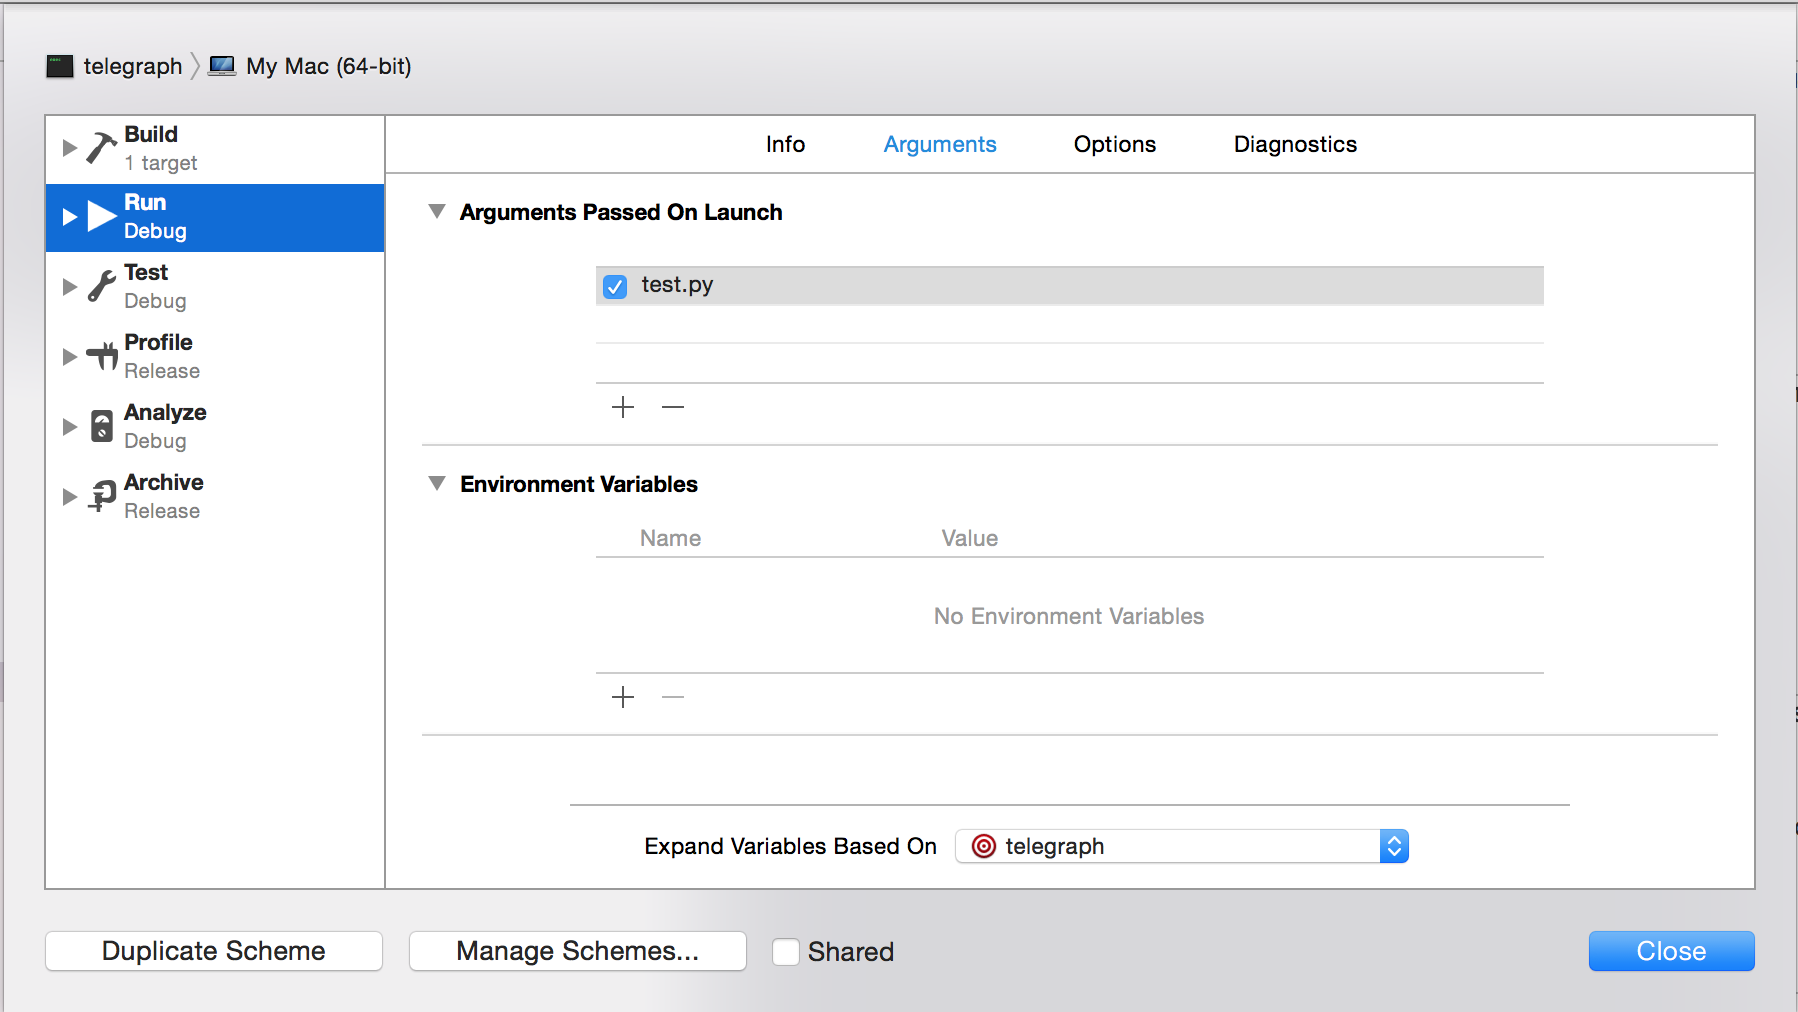
  18. Click the “+” icon under “Arguments Passed On Launch”. You might have to expand that section by clicking on the triangle pointing to the right.
  19. Type in $(SRCROOT)/ (or $(SOURCE_ROOT)/) and then the name of the Python file you want to test. Remember, the Python program must be in the project folder. Otherwise, you will have to type out the full path (or relative path if it's in a subfolder of the project folder) here. If there are spaces anywhere in the full path, you must include quotation marks at the beginning and end of this.
  20. Click “Close”.

Note that if you open the "Utilities" panel, with the "Show the File inspector" tab active, the file type is automatically set to "Default - Python script". Feel free to look through all the file type options it has, to gain an idea as to what all it is capable of doing. The method above can be applied to any interpreted language. As of right now, I have yet to figure out exactly how to get it to work with Java; then again, I haven't done too much research. Surely there is some documentation floating around on the web about all of this.

Running without administrative privileges:

If you do not have administrative privileges or are not in the Developer group, you can still use Xcode for Python programming (but you still won't be able to develop in languages that require compiling). Instead of using the play button, in the menu bar, click "Product" → "Perform Action" → "Run Without Building" or simply use the keyboard shortcut ^⌘R.

Other Notes:

To change the text encoding, line endings, and/or indentation settings, open the "Utilities" panel and click "Show the File inspector" tab active. There, you will find these settings.

For more information about Xcode's build settings, there is no better source than this. I'd be interested in hearing from somebody who got this to work with unsupported compiled languages. This process should work for any other interpreted language. Just be sure to change Step 5 and Step 16 accordingly.

Nainsook answered 25/3, 2011 at 21:41 Comment(23)
Awesome that you figured this out. is interactive debugging possible? I'd be curious to know for the few times that I have to do it.Remsen
Xcode4 often does some strange auto-indentation for me. Did you have similar problems? Have you come around them somehow?Mulvaney
@Albert, No, I have not had any problems with auto-indentation (yet). Lol. Don't jinx it. @Tom, I am not too familiar with the pdb module as I have not needed it yet. Print statements have sufficed for me so far. I would imagine it would, though. You can use input() (or raw_input() in Python 2) so I imagine that it work as if you are running it in Terminal or something similar.Nainsook
@Albert, you jinxed it. I think the auto-indentation still behaves as if you are using one if its native languages such as C, Objective-C, and C++.Nainsook
@Tyler Crompton Wow ! I will not use this description, as I have no Mac computer, but I upvote for the pretty work you have done and the fair info you gave for the interested persons.Assentation
I started learning Python today and found this very helpful. Thank you!Treasurer
This seems to work only with the python that comes with mac. I tried using my /library/frameworks/..../python2.7 and when I used ⇧⌘G to link it, it wouldn't let me open that folder. Anyone else have this problem? I use pyCharm anyway but it's really cool to know that you can do this. :)Kasi
@lciamp, I have no experience with pyCharm; however, I have gotten this to work on versions of Python that did not come pre-installed on OS X.Nainsook
I got this solution to work with Xcode 4.6 and Python2.x; make sure you pay attention to Step 20 if your path has any spaces.Bojorquez
Where is the "Base Expansions On" field?Slipslop
@xxmbabanexx, the instructions were slightly out of date. They changed the text of the label for that field. I have updated the instructions accordingly.Nainsook
@TylerCrompton Could the build tool be my virtualenv python? How would I set that up?Wildfire
I tried this in Xcode 5.02. It worked except for 2 things: 1) I couldn't get the scheme to work with $(SOURCE_ROOT) so I gave up and used a hardwired path; 2) when I run the python script Xcode stops at dyld`_dyld_start: If I "continue" it seems to work. Anyone else experience this?Sea
@macmadness86, yes, in Step 6, just use the binary stored within the virtual environment. If you don't know where this is, activate your virtual environment (if you haven't already done so) and use the which command as noted in Step 6.Nainsook
+1 for "which python3". When downloading Python3, it was difficult to find where the executable for it was placed, so this helped.Arelus
Just adding that in version 6.1.1 there still seems to be no auto-indentation for Python. I suppose there's no hack to make this possible?Squire
Do you have any good option on how to get provide input through xcode somehow? (I.e. That is getting either input() or raw_input() to work from within XCode?)Ferula
@Ferula include < filename as your last argument passed on launch.Nainsook
There is no way to get it interactive using XCode? Using < filename is a rather static approach...Ferula
Not that I'm aware of. Sorry.Nainsook
@TylerCrompton i have various versions of python installed and all of their executables are greyed out when attempting to select them. i have searched online and found that there are many people reporting this problem but haven't come across a solution. what determines if an executable is a valid selection for xcode?Coenocyte
Now that you mention it, I noticed that I’m experiencing the same problem. I got around it by editing the LaunchAction element in the scheme file (hidden within the project file itself) by setting selectedDebuggerIdentifier to the empty string, setting selectedLauncherIdentifier to "Xcode.IDEFoundation.Launcher.PosixSpawn", and adding <PathRunnable runnableDebuggingMode = "0" FilePath = "/usr/local/bin/python3"></PathRunnable> as a child element.Nainsook
In Xcode 8, Step 3 is now: Select "Cross-platform" instead of "Other"Loella
D
29

I've created Xcode 4 templates to simplify the steps provided by Tyler.
The result is Python Project Template for Xcode 4.

Now what you need to do is download the templates, move it to /Developer/Library/Xcode/Templates/Project Templates/Mac/Others/ and then new a Python project with Xcode 4.

It still needs manual Scheme setup (you can refer to steps 12–20 provided by Tyler.)

Digitiform answered 26/12, 2011 at 13:42 Comment(1)
I tried making a template to no avail. I don't know too much about it so I didn't get it completed. Props for the templates. Surely there's a way to automate the scheme setup. :/Nainsook
C
13

Procedure to get Python Working in XCode 7

Step 1: Setup your Project with a External Build System

enter image description here

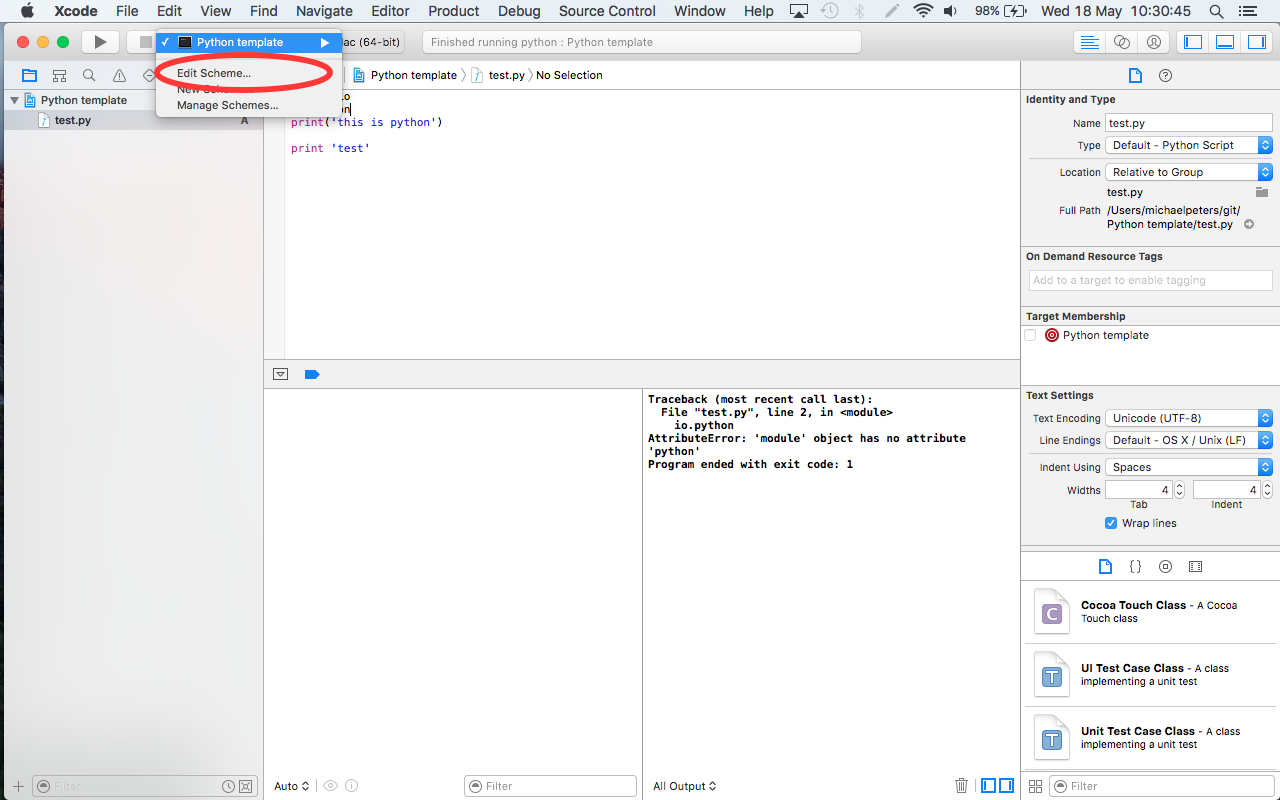
Step 1.1: Edit the Project Scheme

enter image description here

Step 2: Specify Python as the executable for the project (shift-command-g) the path should be /usr/bin/python

enter image description here

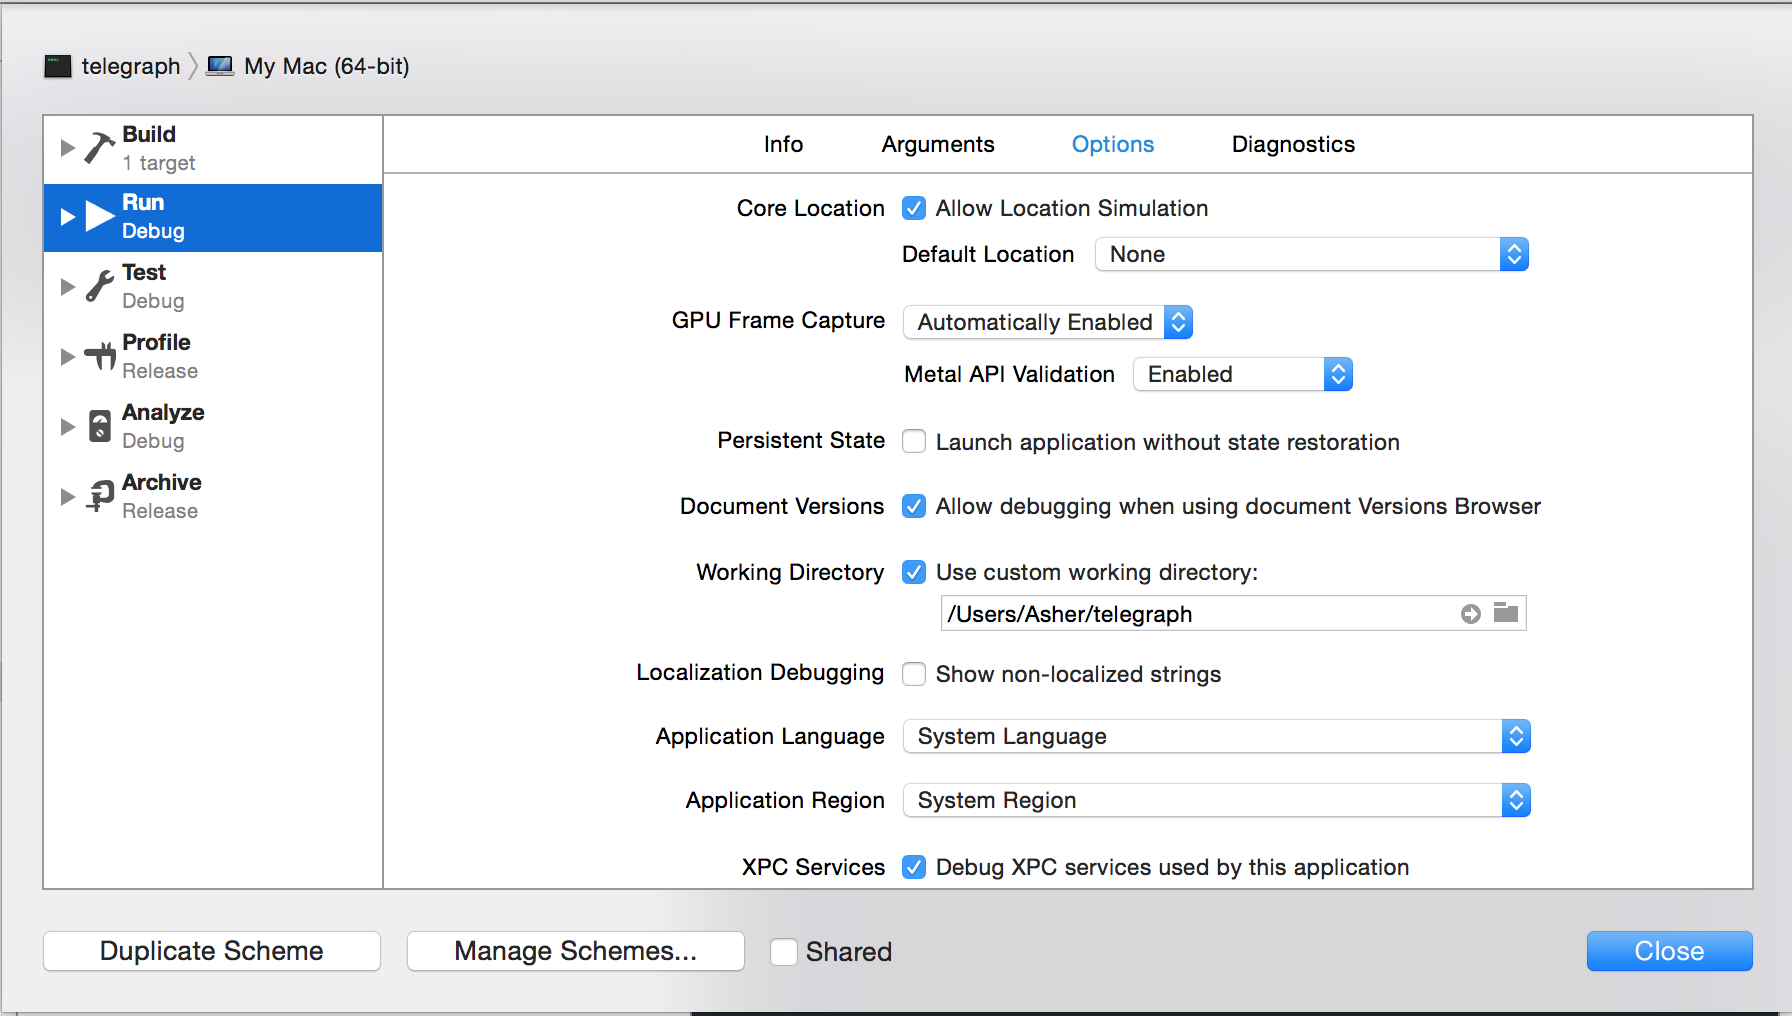
Step 3: Specify your custom working directory

enter image description here

Step 4: Specify your command line arguments to be the name of your python file. (in this example "test.py")

enter image description here

enter image description here

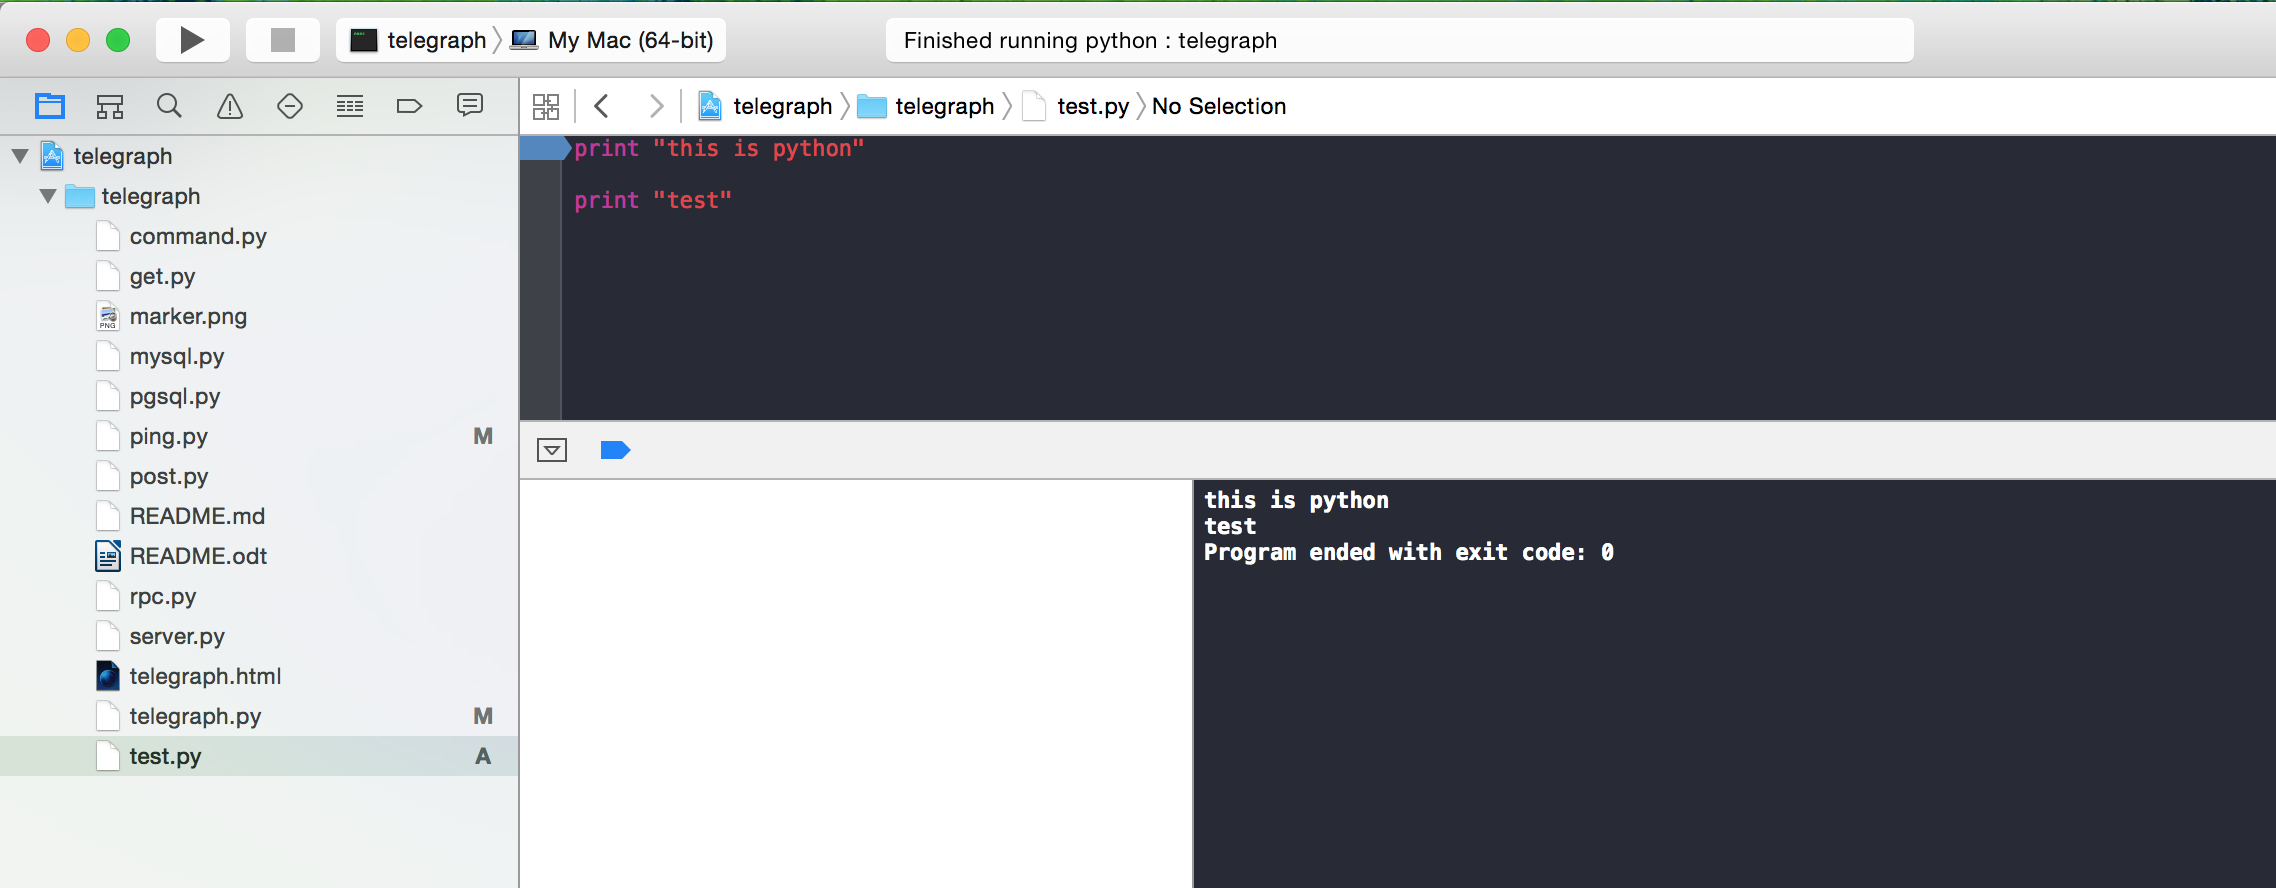
Step 5: Thankfully thats it!

(debugging can't be added until OSX supports a python debugger?)

Centner answered 25/8, 2015 at 2:50 Comment(3)
This process seems to be missing some steps, starting right after step 1, for Xcode 7.0.1 (7A1001)... Can you clarify? Specifically, I'm not able to find the dialog shown in Step 2, and shift-command-g is the "Find Previous" command...Selmaselman
@TraxusIV the step that is missing is: in the main Xcode window, click on the project name. You should get a menu with "Edit Scheme...", "New Scheme.." and "Manage Schemes..." Select "Edit Scheme..." and you will get to the required window, in step 2 above.Tseng
For the External Build System Build Tool, use the which command in Terminal to get the exact location for the Build Tool. "which lua" for instance returns "/usr/local/bin/lua" on my system.Cleaves
I
8

You should try PyDev plug in for Eclipse. I tried alot of editors/IDE's to use with python, but the only one i liked the most is the PyDev plugin for Eclipse. It has code completion, debugger and many other nice features. Plus both are free.

Interpellant answered 15/3, 2011 at 10:32 Comment(3)
That's what I am trying to do now. I haven't gotten it to work yet cause it seems like you have to jump through a couple of hoops to do so but that's looking like what I'll be doing.Nainsook
Yeah, once you add the Python interpreter your good to go. If you have any questions feel free to ask.Interpellant
How do you add Python interpreter to do interactive coding here?Senskell
C
6

Another way, which I've been using for awhile in XCode3:

See steps 1-15 above.

  1. Choose /bin/bash as your executable
  2. For the "Debugger" field, select "None".
  3. In the "Arguments" tab, click the "Base Expansions On" field and select the target you created earlier.
  4. Click the "+" icon under "Arguments Passed On Launch". You may have to expand that section by clicking on the triangle pointing to the right.
  5. Type in "-l". This will tell bash to use your login environment (PYTHONPATH, etc..)
  6. Do step #19 again.
  7. Type in "-c '$(SOURCE_ROOT)/.py'"
  8. Click "OK".
  9. Start coding.

The nice thing about this way is it will use the same environment to develop in that you would use to run in outside of XCode (as setup from your bash .profile).

It's also generic enough to let you develop/run any type of file, not just python.

Chiller answered 20/4, 2011 at 18:12 Comment(0)
C
2

This Technical Note TN2328 from Apple Developer Library helped me a lot about Changes To Embedding Python Using Xcode 5.0.

Cross answered 9/2, 2014 at 3:26 Comment(0)
F
2

This thread is old, but to chime in for Xcode Version 8.3.3, Tyler Crompton's method in the accepted answer still works (some of the names are very slightly different, but not enough to matter).

2 points where I struggled slightly:

Step 16: If the python executable you want is greyed out, right click it and select quick look. Then close the quick look window, and it should now be selectable.

Step 19: If this isn’t working for you, you can enter the name of just the python file in the Arguments tab, and then enter the project root directory explicitly in the Options tab under Working Directory--check the “Use custom working directory” box, and type in your project root directory in the field below it.

Freemanfreemartin answered 30/8, 2017 at 21:0 Comment(1)
That trick with the left-click and 'quick-look' is great! helped me get it work! in Xcode 9.2 many thanks!Stipple
R
1

Try Editra It's free, has a lot of cool features and plug-ins, it runs on most platforms, and it is written in Python. I use it for all my non-XCode development at home and on Windows/Linux at work.

Revulsive answered 15/3, 2011 at 16:27 Comment(0)

© 2022 - 2024 — McMap. All rights reserved.