How do I rotate a PyTorch image tensor around it's center in a way that supports autograd?
Asked Answered
P

4

8

I'd like to randomly rotate an image tensor (B, C, H, W) around it's center (2d rotation I think?). I would like to avoid using NumPy and Kornia, so that I basically only need to import from the torch module. I'm also not using torchvision.transforms, because I need it to be autograd compatible. Essentially I'm trying to create an autograd compatible version of torchvision.transforms.RandomRotation() for visualization techniques like DeepDream (so I need to avoid artifacts as much as possible).

import torch
import math
import random
import torchvision.transforms as transforms
from PIL import Image


# Load image
def preprocess_simple(image_name, image_size):
    Loader = transforms.Compose([transforms.Resize(image_size), transforms.ToTensor()])
    image = Image.open(image_name).convert('RGB')
    return Loader(image).unsqueeze(0)
    
# Save image   
def deprocess_simple(output_tensor, output_name):
    output_tensor.clamp_(0, 1)
    Image2PIL = transforms.ToPILImage()
    image = Image2PIL(output_tensor.squeeze(0))
    image.save(output_name)


# Somehow rotate tensor around it's center
def rotate_tensor(tensor, radians):
    ...
    return rotated_tensor

# Get a random angle within a specified range 
r_degrees = 5
angle_range = list(range(-r_degrees, r_degrees))
n = random.randint(angle_range[0], angle_range[len(angle_range)-1])

# Convert angle from degrees to radians
ang_rad = angle * math.pi / 180


# test_tensor = preprocess_simple('path/to/file', (512,512))
test_tensor = torch.randn(1,3,512,512)


# Rotate input tensor somehow
output_tensor = rotate_tensor(test_tensor, ang_rad)


# Optionally use this to check rotated image
# deprocess_simple(output_tensor, 'rotated_image.jpg')

Some example outputs of what I'm trying to accomplish:

First example of rotated image Second example of rotated image

Plovdiv answered 4/10, 2020 at 17:29 Comment(3)
I suggest you take a look at the Spatial Transformer, especially the grid generator & the sampler modules. See pytorch.org/tutorials/intermediate/… for implementation details.Piane
@GilPinsky That looks like it has to do with creating trainable layers. I'm going to be only optimizing a single image/tensor, and using rotations to help that optimization.Plovdiv
I would like to point out that kornia solely depends on pytorch, thus would not being any additional dependence overheadOmnipresent
P
13

So the grid generator and the sampler are sub-modules of the Spatial Transformer (JADERBERG, Max, et al.). These sub-modules are not trainable, they let you apply a learnable, as well as non-learnable, spatial transformation. Here I take these two submodules and use them to rotate an image by theta using PyTorch's functions torch.nn.functional.affine_grid and torch.nn.functional.affine_sample (these functions are implementations of the generator and the sampler, respectively):

import torch
import torch.nn.functional as F
import numpy as np
import matplotlib.pyplot as plt

def get_rot_mat(theta):
    theta = torch.tensor(theta)
    return torch.tensor([[torch.cos(theta), -torch.sin(theta), 0],
                         [torch.sin(theta), torch.cos(theta), 0]])


def rot_img(x, theta, dtype):
    rot_mat = get_rot_mat(theta)[None, ...].type(dtype).repeat(x.shape[0],1,1)
    grid = F.affine_grid(rot_mat, x.size()).type(dtype)
    x = F.grid_sample(x, grid)
    return x


#Test:
dtype =  torch.cuda.FloatTensor if torch.cuda.is_available() else torch.FloatTensor
#im should be a 4D tensor of shape B x C x H x W with type dtype, range [0,255]:
plt.imshow(im.squeeze(0).permute(1,2,0)/255) #To plot it im should be 1 x C x H x W
plt.figure()
#Rotation by np.pi/2 with autograd support:
rotated_im = rot_img(im, np.pi/2, dtype) # Rotate image by 90 degrees.
plt.imshow(rotated_im.squeeze(0).permute(1,2,0)/255)

In the example above, assume we take our image, im, to be a dancing cat in a skirt: enter image description here

rotated_im will be a 90-degrees CCW rotated dancing cat in a skirt:

enter image description here

And this is what we get if we call rot_img with theta eqauls to np.pi/4: enter image description here

And the best part that it's differentiable w.r.t the input and has autograd support! Hooray!

Piane answered 4/10, 2020 at 20:17 Comment(6)
Thanks, your code works amazingly well! Though how should I be handling multiple images stacked across the batch dimension? Should I do each individually with the same rotation matrix, or can it be modified slightly to work without a for statement?Plovdiv
My pleasure :), I've just updated my code so that it also works across the batch dimension. All you need to do is use .repeat(x.shape[0],1,1) in rot_img to repeat the rotation matrix such that it has the same batch dimension as x.Piane
Sir, would you please explain in the answer ways to rotate one gray scale image?Catmint
@Catmint This should work with a single greyscale image as well. Just make sure the image (im) has the appropriate dimensions: 1 x 1 x H x W where H & W are height and width respectively.Piane
Hi, quick question, if theta was a weight, this could be differentiable w.r.t theta?Tilford
@iyop45 Unfortunately not (though I could think of a custom differentiable implementation)Piane
P
2

With torchvision it should be simple:

import torchvision.transforms.functional as TF

angle = 30
x = torch.randn(1,3,512,512)

out = TF.rotate(x, angle)

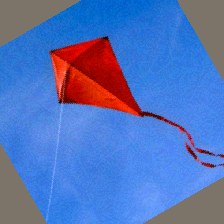
For example if x is:

Kite

out with a 30 degree rotation is (NOTE: counterclockwise):

Kite rotated

Pteryla answered 15/3, 2022 at 1:42 Comment(1)
True, it also supports autograd. Thanks!Discrepancy
G
1

There is a pytorch function for that:

x = torch.tensor([[0, 1],
            [2, 3]])

x = torch.rot90(x, 1, [0, 1])
>> tensor([[1, 3],
           [0, 2]])

Here are the docs: https://pytorch.org/docs/stable/generated/torch.rot90.html

Goodwill answered 4/10, 2020 at 20:22 Comment(1)
But this only lets you rotate by 90, 180 or 270 degrees...Piane
D
0

A slightly modified and 3D implementation of Gil's implementation (in case someone needs it). The 3D rotation happens along the axis given by the rotation_matrix.

def rotate_tensor(input_tensor, angle):
    """
    Rotates a 3D tensor by a given angle around the
        z-axis (0,1 in scipy.ndimage.rotate).
    Args:
        input_tensor (torch.Tensor): Input tensor with shape (B, C, D, H, W)
                                     and dtype=torch.float32
                                     Ideally on the 'cuda' for faster computation.
                                 
        angle (float): The angle in degrees by which to rotate the tensor.
    Returns:
        torch.Tensor: The rotated tensor with the same shape as the input tensor.
    """

    angle = torch.tensor(angle * torch.pi / 180).to(dtype=torch.float32, device=device)
    rotating_matrix = torch.tensor([
        [1, 0, 0, 0],
        [0, torch.cos(angle), -torch.sin(angle), 0],
        [0, torch.sin(angle), torch.cos(angle), 0]
        ]).to(dtype=torch.float32, device=device)
    rotating_matrix = rotating_matrix.unsqueeze(0).repeat(input_tensor.shape[0],1,1)
    grid = TF.affine_grid(rotating_matrix, input_tensor.size(), align_corners=True)
    return TF.grid_sample(input_tensor, grid, align_corners=True)

This kinda mimics the scipy.ndimage.rotate() function for numpy arrays with axes (0,1).

Desireah answered 18/9, 2024 at 14:47 Comment(0)

© 2022 - 2025 — McMap. All rights reserved.