how to modify the style of chips?
Asked Answered
C

3

8

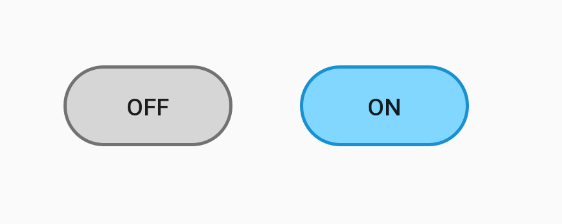
I need to make the following UI using chips

enter image description here

I have already implement the chips and make it checkable, but I do not know how to change the style of it to be like the picture

I changed the stroke color and background color and stroke width

so the normal chips has no problem, my problem is with the checked chips which is blue

can anyone advice please ?

Constrict answered 9/3, 2019 at 21:50 Comment(0)
D
17

Just use a custom style for your Chip:

<com.google.android.material.chip.Chip
      style="@style/Colors_Widget.MaterialComponents.Chip.Choice"
      ..>

with this style:

  <style name="Colors_Widget.MaterialComponents.Chip.Choice" parent="Widget.MaterialComponents.Chip.Choice">
    <item name="chipBackgroundColor">@color/color_choice_chip_background_color</item>
    <item name="chipStrokeColor">@color/color_choice_chip_strokecolor_selector</item>
    <item name="chipStrokeWidth">1dp</item>
    <item name="android:textColor">@color/color_choice_chip_text_color</item>
  </style>

where the chipBackgroundColor is a selector. Something like:

<selector xmlns:android="http://schemas.android.com/apk/res/android">
  <!-- 24% opacity -->
  <item android:alpha="0.24" android:color="@color/primaryLightColor" android:state_enabled="true" android:state_selected="true"/>
  <item android:alpha="0.24" android:color="@color/primaryLightColor" android:state_enabled="true" android:state_checked="true"/>
  <!-- 12% of 87% opacity -->
  <item android:alpha="0.10" android:color="#FFF" android:state_enabled="true"/>
  <item android:alpha="0.12" android:color="#FFF"/>
</selector>

the chipStrokeColor and android:textColor are selectors like:

<selector xmlns:android="http://schemas.android.com/apk/res/android">

  <item android:color="@color/primaryLightColor" android:state_enabled="true" android:state_selected="true"/>
  <item android:color="@color/primaryLightColor" android:state_enabled="true" android:state_checked="true"/>
  <!-- 87% opacity. -->
  <item android:alpha="0.87" android:color="#C6CCCD" android:state_enabled="true"/>
  <!-- 38% of 87% opacity. -->
  <item android:alpha="0.33" android:color="#C6CCCD"/>

</selector>

The final result:

enter image description here

Dorise answered 24/9, 2019 at 10:40 Comment(2)
Better mention the file location is res/color/color_choice_chip_background_color.xmlHomomorphism
Remove android:state_enabled="true" and android:state_selected="true". It'll save you some time...Elegy
S
2

The easiest way is to use ToggleButton which can be checked or not checked. As a background you can set file with states.

You can create layout with them:

<?xml version="1.0" encoding="utf-8"?>
<LinearLayout xmlns:android="http://schemas.android.com/apk/res/android"
    android:layout_width="match_parent"
    android:layout_height="match_parent"
    android:orientation="horizontal"
    android:padding="40dp">

    <ToggleButton
        android:id="@+id/toggle_button"
        android:layout_width="100dp"
        android:layout_height="wrap_content"
        android:background="@drawable/background" />

    <ToggleButton
        android:id="@+id/toggle_button2"
        android:layout_width="100dp"
        android:layout_height="wrap_content"
        android:layout_marginLeft="40dp"
        android:background="@drawable/background"
        android:checked="true" />

</LinearLayout>

As background you can set file which contains list of states:

<?xml version="1.0" encoding="utf-8"?>
<selector xmlns:android="http://schemas.android.com/apk/res/android">

    <item android:drawable="@drawable/blue_shape" android:state_checked="true" />

    <item android:drawable="@drawable/grey_shape" />

</selector>

And all of the states (checked and default - last one) can be shapes:

res > drawable > grey_shape.xml

<?xml version="1.0" encoding="utf-8"?>
<shape xmlns:android="http://schemas.android.com/apk/res/android"
    android:shape="rectangle">

    <solid android:color="#D6D6D6" />

    <corners android:radius="50dp" />

    <stroke
        android:width="2dp"
        android:color="#727272" />

</shape>

res > drawable > blue_shape.xml

<?xml version="1.0" encoding="utf-8"?>
<shape xmlns:android="http://schemas.android.com/apk/res/android"
    android:shape="rectangle">

    <solid android:color="#81D7FF" />

    <corners android:radius="50dp" />

    <stroke
        android:width="2dp"
        android:color="#1890D1" />

</shape>

You can expect different backgound when button is checked and not checked

enter image description here

Suzansuzann answered 9/3, 2019 at 23:27 Comment(0)
G
0

First create a custom theme for your Chip

Step 1

  • create some color selectors
  • create color selector for chip background

res/color/chip_background_color_selector.xml

<?xml version="1.0" encoding="utf-8"?>
<selector xmlns:android="http://schemas.android.com/apk/res/android">
    <item android:color="@color/chip_background_color_selected" android:state_checked="true" />
    <item android:color="@color/chip_background_color_unselected" android:state_checked="false" />
</selector>
  • create color selector for chip text

res/color/chip_text_color_selector.xml

<?xml version="1.0" encoding="utf-8"?>
<selector xmlns:android="http://schemas.android.com/apk/res/android">
    <item android:color="@color/chip_text_color_selected" android:state_checked="true" />
    <item android:color="@color/chip_text_color_unselected" android:state_checked="false" />
</selector>
  • create color selector for chip stroke/outline

res/color/chip_stroke_color_selector.xml

<?xml version="1.0" encoding="utf-8"?>
<selector xmlns:android="http://schemas.android.com/apk/res/android">
    <item android:color="@color/chip_stroke_color_selected" android:state_checked="true" />
    <item android:color="@color/chip_stroke_color_unselected" android:state_checked="false" />
</selector>

Step 2

  • create custom theme for Chip

res/values/themes.xml

<!--You can change the parent class according to your needs-->
<style name="CustomChipStyle" parent="Widget.MaterialComponents.Chip.Choice">
    <item name="chipBackgroundColor">@color/chip_background_color_selector</item>
    <item name="chipStrokeColor">@color/chip_stroke_color_selector</item>
    <item name="android:textColor">@color/chip_text_color_selector</item>
    <item name="chipStrokeWidth">@dimen/chip_stroke_width</item>
</style>

Step 3

  • use CustomChipStyle in your Chip

    <com.google.android.material.chip.ChipGroup
         android:id="@+id/chip_group"
         android:layout_width="wrap_content"
         android:layout_height="wrap_content"
         app:checkedChip="@+id/chip_one"
         app:selectionRequired="true"
         app:singleSelection="true">
    
         <com.google.android.material.chip.Chip
             android:id="@+id/chip_one"
             style="@style/CustomChipStyle"
             android:layout_width="wrap_content"
             android:layout_height="wrap_content"
             android:text="Chip One" />
    
         <com.google.android.material.chip.Chip
             android:id="@+id/chip_two"
             style="@style/CustomChipStyle"
             android:layout_width="wrap_content"
             android:layout_height="wrap_content"
             android:text="Chip Two" />
    
         <com.google.android.material.chip.Chip
             android:id="@+id/chip_three"
             style="@style/CustomChipStyle"
             android:layout_width="wrap_content"
             android:layout_height="wrap_content"
             android:text="Chip Three" />
    </com.google.android.material.chip.ChipGroup>
    

Thats it.

also refer Chip

Happy coding..

Galligaskins answered 9/5, 2023 at 16:22 Comment(0)

© 2022 - 2024 — McMap. All rights reserved.