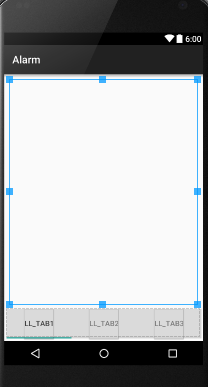
Add image on 3 tabs
Asked Answered
S

5

8

How can I add images into tab ? Currently I'm able to move the tab to bottom but have no idea on how to change the LL Tab1, LL Tab2, LL Tab3 to icon.Am I on the right path ? Any help would be greatly appreciated.

xml code

<?xml version="1.0" encoding="utf-8"?>
<TabHost xmlns:android="http://schemas.android.com/apk/res/android"
    android:id="@+id/tabhost"
    android:layout_width="fill_parent"
    android:layout_height="fill_parent" >

    <LinearLayout
        android:layout_width="fill_parent"
        android:layout_height="fill_parent"
        android:orientation="vertical"
        android:padding="5dp" >


        <FrameLayout
            android:id="@android:id/tabcontent"
            android:layout_width="fill_parent"
            android:layout_height="fill_parent"
            android:padding="5dp"
            android:layout_weight="1" >

            <LinearLayout
                android:id="@+id/ll_tab1"
                android:layout_width="match_parent"
                android:layout_height="match_parent"
                android:orientation="vertical" />

            <LinearLayout
                android:id="@+id/ll_tab2"
                android:layout_width="match_parent"
                android:layout_height="match_parent"
                android:orientation="vertical" />

            <LinearLayout
                android:id="@+id/ll_tab3"
                android:layout_width="match_parent"
                android:layout_height="match_parent"
                android:orientation="vertical" />
        </FrameLayout>
        <TabWidget
            android:id="@android:id/tabs"
            android:background="@color/light_gray"
            android:layout_width="fill_parent"
            android:layout_height="wrap_content"
            android:layout_weight="0"/>
    </LinearLayout>

</TabHost>

enter image description here

Anyone can help? Thanks a lot !

Shrine answered 7/3, 2016 at 13:35 Comment(0)
M
13

Try using TabLayout from Android Design Support Library to meet material design guidelines for tabs.

The Design library’s TabLayout implements both fixed tabs, where the view’s width is divided equally between all of the tabs, as well as scrollable tabs, where the tabs are not a uniform size and can scroll horizontally.

To implement TabLayout check this guide and how to add the icon for swipeable tabs to set icons to tabs using setIcon.

final int[] ICONS = new int[]{
        R.drawable.ic_action_document,
        R.drawable.ic_action_tick,
        R.drawable.ic_action_trash};
        ....
TabLayout tabLayout = (TabLayout) findViewById(R.id.tabs);
tabLayout.setupWithViewPager(mViewPager);

tabLayout.getTabAt(0).setIcon(ICONS[0]);
tabLayout.getTabAt(1).setIcon(ICONS[1]);
tabLayout.getTabAt(2).setIcon(ICONS[2]);

To set the tabs at the bottom in a TabLayout check - How can I set tabs at the bottom and also hide top actionbar? where you put the TabLayout in a relativeLayout and align it to parent bottom:

<android.support.design.widget.TabLayout
    android:id="@+id/tab_layout"
    app:tabMode="fixed"
    android:layout_width="match_parent"
    android:layout_height="wrap_content"
    android:background="?attr/colorPrimary"
    android:elevation="6dp"
    app:tabTextColor="#d3d3d3"
    app:tabSelectedTextColor="#ffffff"
    app:tabIndicatorColor="#ff00ff"
    android:minHeight="?attr/actionBarSize"
    android:layout_alignParentBottom="true"
    />

Although you can put your tab layout at the bottom, try not to use bottom tab bars if possible as per the Pure Android guide.

Other platforms use the bottom tab bar to switch between the app's views. Per platform convention, Android's tabs for view control are shown in action bars at the top of the screen instead.

Motor answered 10/3, 2016 at 6:45 Comment(0)
A
7
import android.os.Bundle;
import android.support.design.widget.TabLayout;
import android.support.v4.app.Fragment;
import android.support.v4.app.FragmentManager;
import android.support.v4.app.FragmentPagerAdapter;
import android.support.v4.view.ViewPager;
import android.support.v7.app.AppCompatActivity;
import android.support.v7.widget.Toolbar;

import java.util.ArrayList;
import java.util.List;


public class MainActivity extends AppCompatActivity {

    private Toolbar toolbar;
    private TabLayout tabLayout;
    private ViewPager viewPager;
    private int[] tabIcons = {
        R.drawable.ic_tab_favourite,
        R.drawable.ic_tab_call,
        R.drawable.ic_tab_contacts
};

    @Override
    protected void onCreate(Bundle savedInstanceState) {
        super.onCreate(savedInstanceState);
        setContentView(R.layout.activity_main);

        toolbar = (Toolbar) findViewById(R.id.toolbar);
        setSupportActionBar(toolbar);

        getSupportActionBar().setDisplayHomeAsUpEnabled(true);

        viewPager = (ViewPager) findViewById(R.id.viewpager);
        setupViewPager(viewPager);

        tabLayout = (TabLayout) findViewById(R.id.tabs);
        tabLayout.setupWithViewPager(viewPager);
        setupTabIcons();
    }
 private void setupTabIcons() {
    tabLayout.getTabAt(0).setIcon(tabIcons[0]);
    tabLayout.getTabAt(1).setIcon(tabIcons[1]);
    tabLayout.getTabAt(2).setIcon(tabIcons[2]);
}
    private void setupViewPager(ViewPager viewPager) {
        ViewPagerAdapter adapter = new ViewPagerAdapter(getSupportFragmentManager());
        adapter.addFragment(new OneFragment(), "ONE");
        adapter.addFragment(new TwoFragment(), "TWO");
        adapter.addFragment(new ThreeFragment(), "THREE");
        viewPager.setAdapter(adapter);
    }

    class ViewPagerAdapter extends FragmentPagerAdapter {
        private final List<Fragment> mFragmentList = new ArrayList<>();
        private final List<String> mFragmentTitleList = new ArrayList<>();

        public ViewPagerAdapter(FragmentManager manager) {
            super(manager);
        }

        @Override
        public Fragment getItem(int position) {
            return mFragmentList.get(position);
        }

        @Override
        public int getCount() {
            return mFragmentList.size();
        }

        public void addFragment(Fragment fragment, String title) {
            mFragmentList.add(fragment);
            mFragmentTitleList.add(title);
        }

        @Override
        public CharSequence getPageTitle(int position) {
            return mFragmentTitleList.get(position);
        }
    }
} 

Layout for Tab activity_main.xml

<android.support.design.widget.CoordinatorLayout xmlns:android="http://schemas.android.com/apk/res/android"
    xmlns:app="http://schemas.android.com/apk/res-auto"
    android:layout_width="match_parent"
    android:layout_height="match_parent">

    <android.support.design.widget.AppBarLayout
        android:layout_width="match_parent"
        android:layout_height="wrap_content"
        android:theme="@style/ThemeOverlay.AppCompat.Dark.ActionBar">

        <android.support.v7.widget.Toolbar
            android:id="@+id/toolbar"
            android:layout_width="match_parent"
            android:layout_height="?attr/actionBarSize"
            android:background="?attr/colorPrimary"
            app:layout_scrollFlags="scroll|enterAlways"
            app:popupTheme="@style/ThemeOverlay.AppCompat.Light" />

        <android.support.design.widget.TabLayout
            android:id="@+id/tabs"
            android:layout_width="match_parent"
            android:layout_height="wrap_content"
            app:tabMode="fixed"
            app:tabGravity="fill"/>
    </android.support.design.widget.AppBarLayout>

    <android.support.v4.view.ViewPager
        android:id="@+id/viewpager"
        android:layout_width="match_parent"
        android:layout_height="match_parent"
        app:layout_behavior="@string/appbar_scrolling_view_behavior"  />
</android.support.design.widget.CoordinatorLayout>

Fragments(Class) used in this tab

import android.os.Bundle;
import android.support.v4.app.Fragment;
import android.view.LayoutInflater;
import android.view.View;
import android.view.ViewGroup;


public class OneFragment extends Fragment{

    public OneFragment() {
        // Required empty public constructor
    }

    @Override
    public void onCreate(Bundle savedInstanceState) {
        super.onCreate(savedInstanceState);
    }

    @Override
    public View onCreateView(LayoutInflater inflater, ViewGroup container,
                             Bundle savedInstanceState) {
        // Inflate the layout for this fragment
        return inflater.inflate(R.layout.fragment_one, container, false);
    }

}

Xml file fragment_one.xml

<RelativeLayout xmlns:android="http://schemas.android.com/apk/res/android"
    xmlns:tools="http://schemas.android.com/tools"
    android:layout_width="match_parent"
    android:layout_height="match_parent"
    tools:context=".fragments.OneFragment">

    <TextView
        android:layout_width="wrap_content"
        android:layout_height="wrap_content"
        android:text="@string/one"
        android:textSize="40dp"
        android:textStyle="bold"
        android:layout_centerInParent="true"/>

</RelativeLayout>

TwoFragment.java

import android.os.Bundle;
    import android.support.v4.app.Fragment;
    import android.view.LayoutInflater;
    import android.view.View;
    import android.view.ViewGroup;


    public class TwoFragment extends Fragment{

        public TwoFragment() {
            // Required empty public constructor
        }

        @Override
        public void onCreate(Bundle savedInstanceState) {
            super.onCreate(savedInstanceState);
        }

        @Override
        public View onCreateView(LayoutInflater inflater, ViewGroup container,
                                 Bundle savedInstanceState) {
            // Inflate the layout for this fragment
            return inflater.inflate(R.layout.fragment_two, container, false);
        }

    }

fragment_two.xml

<RelativeLayout xmlns:android="http://schemas.android.com/apk/res/android"
    xmlns:tools="http://schemas.android.com/tools"
    android:layout_width="match_parent"
    android:layout_height="match_parent"
    tools:context=".fragments.TwoFragment">

    <TextView
        android:layout_width="wrap_content"
        android:layout_height="wrap_content"
        android:text="@string/one"
        android:textSize="40dp"
        android:textStyle="bold"
        android:layout_centerInParent="true"/>

</RelativeLayout>

You can create third fragment class, and layout as i have done above.

Run it. Hope this would work

Asyllabic answered 16/3, 2016 at 6:3 Comment(0)
A
2

Try this,

puth this activity_main.xml and set the custom height to TabLayout.

<android.support.design.widget.TabLayout
       android:id="@+id/tabs"
       android:layout_width="match_parent"
       android:layout_height="@dimen/custom_tab_layout_height"
       app:tabMode="fixed"
       app:tabGravity="fill"/>

Create an xml layout named custom_tab.xml under res ⇒ layout. In this layout we have defined the custom view for the tab.

<?xml version="1.0" encoding="utf-8"?>
<TextView xmlns:android="http://schemas.android.com/apk/res/android"
android:layout_width="wrap_content"
android:layout_height="wrap_content"
android:id="@+id/tab"
android:textColor="@color/colorAccent"
android:textSize="@dimen/tab_label"
android:fontFamily="@string/font_fontFamily_medium"/>

Open MainActivity.java and modify the code as below. Here if you observe setupTabIcons() method, I have rendered custom_tab.xml layout in each tab using below lines of code.

TextView tabOne = (TextView) LayoutInflater.from(this).inflate(R.layout.custom_tab, null);
tabOne.setText("ONE");
tabOne.setCompoundDrawablesWithIntrinsicBounds(0, R.drawable.ic_tab_favourite, 0, 0);
tabLayout.getTabAt(0).setCustomView(tabOne);

TextView tabTwo = (TextView) LayoutInflater.from(this).inflate(R.layout.custom_tab, null);
tabTwo.setText("TWO");
tabTwo.setCompoundDrawablesWithIntrinsicBounds(0, R.drawable.ic_tab_call, 0, 0);
tabLayout.getTabAt(1).setCustomView(tabTwo);

TextView tabThree = (TextView) LayoutInflater.from(this).inflate(R.layout.custom_tab, null);
tabThree.setText("THREE");
tabThree.setCompoundDrawablesWithIntrinsicBounds(0, R.drawable.ic_tab_contacts, 0, 0);
tabLayout.getTabAt(2).setCustomView(tabThree);
Adamina answered 15/3, 2016 at 10:36 Comment(0)
E
1

Try this,Really interesting.Must be the solution

http://www.androidhive.info/2015/09/android-material-design-working-with-tabs/

Excrete answered 16/3, 2016 at 11:32 Comment(0)
M
-1

Well you can either place an ImageView in your Linearlayout that is each tab, or you can set an drawable as a background for your LinearLayout. If your image will act a background then you will obviously want to add that image as a background and not add an ImageView as a child to your LinearLayout. If it is going to be content though, not a background, you should add an ImageView to each LinearLayout like you would add a child of any other type to a parent View.

Morganmorgana answered 7/3, 2016 at 13:38 Comment(1)
I set an drawable as a background for LinearLayout but image not showingShrine

© 2022 - 2024 — McMap. All rights reserved.