Drawing filled polygon using mouse events in open cv using python
Asked Answered
E

3

8

I am trying to draw a polygon between the coordinates which would be obtained by clicking by mouse events.

The first click should define the starting point of the polygon. Each additional click should sketch a line segment from the previous click. When whole clicked points sketch the polygon, inside of the polygon should be filled.

Can someone please suggest how to draw polygons between the points I click on the image? I am considering cv2.polylines function, however I have no idea how to integrate that with SetMouseCallback function.

Erdei answered 8/5, 2016 at 11:23 Comment(2)
Can you clarify exactly what you mean? What should each additional click do? Add another point to the polygon? How? Just as a line segment going from the previously entered point? With the polygon implicitly closed by a line segment between the last and first point entered? What does your code look like? Did you consider the polylines function to do the drawing?Knick
@DanMašek thanks for your response, i would love to get your help. each additional click should sketch a line segment from the previous click. And when whole clicked points sketch the polygon, inside of the polygon should be filled. I am considering polylines function but i have no idea how to integrate that with SetMouseCallback function.Erdei
F
23

To make the user interface more intuitive (since it would be very difficult for the user to click exactly in the same spot as the starting point), let's use the following actions:

  • Left mouse click add a point to the polygon at the clicked position
  • Right mouse click completes the data entry, and causes the program to display the final filled polygon

We will need several variables to keep track of our progress:

  • A list of the points defining our polygon. Each point will be a tuple (x, y)
  • A boolean flag that will signify when data entry is complete
  • As a bonus, the last known position of the mouse cursor, so we can animate the segment currently being entered (a line that follows the cursor).

We will use a mouse callback to update those variables periodically when the appropriate mouse events occur:

  • EVENT_MOUSEMOVE -- mouse has moved, update the current position
  • EVENT_LBUTTONDOWN -- user pressed the left mouse button, add current position to list of points
  • EVENT_RBUTTONDOWN -- user pressed the right mouse button, mark data entry as complete

Finally, we will have a function implementing the display loop.

This function will first create a named window, draw a blank canvas, and set up the mouse callback. Then it will repeatedly keep updating the screen by:

  • Creating a new canvas image (upon which to draw)
  • When there are points entered, draw the connected segments using cv2.polyline
  • Draw the current segment pointing from last entered point to current position with a different colour using cv2.line.
  • Show the new image.
  • Wait some time, pumping the window messages while doing so.

Once the data entry process is complete, the function will draw the final filled polygon and a clean canvas image, show it, and when the user presses a key return the final image.


Code Sample

import numpy as np
import cv2

# ============================================================================

CANVAS_SIZE = (600,800)

FINAL_LINE_COLOR = (255, 255, 255)
WORKING_LINE_COLOR = (127, 127, 127)

# ============================================================================

class PolygonDrawer(object):
    def __init__(self, window_name):
        self.window_name = window_name # Name for our window

        self.done = False # Flag signalling we're done
        self.current = (0, 0) # Current position, so we can draw the line-in-progress
        self.points = [] # List of points defining our polygon


    def on_mouse(self, event, x, y, buttons, user_param):
        # Mouse callback that gets called for every mouse event (i.e. moving, clicking, etc.)

        if self.done: # Nothing more to do
            return

        if event == cv2.EVENT_MOUSEMOVE:
            # We want to be able to draw the line-in-progress, so update current mouse position
            self.current = (x, y)
        elif event == cv2.EVENT_LBUTTONDOWN:
            # Left click means adding a point at current position to the list of points
            print("Adding point #%d with position(%d,%d)" % (len(self.points), x, y))
            self.points.append((x, y))
        elif event == cv2.EVENT_RBUTTONDOWN:
            # Right click means we're done
            print("Completing polygon with %d points." % len(self.points))
            self.done = True


    def run(self):
        # Let's create our working window and set a mouse callback to handle events
        cv2.namedWindow(self.window_name, flags=cv2.CV_WINDOW_AUTOSIZE)
        cv2.imshow(self.window_name, np.zeros(CANVAS_SIZE, np.uint8))
        cv2.waitKey(1)
        cv2.cv.SetMouseCallback(self.window_name, self.on_mouse)

        while(not self.done):
            # This is our drawing loop, we just continuously draw new images
            # and show them in the named window
            canvas = np.zeros(CANVAS_SIZE, np.uint8)
            if (len(self.points) > 0):
                # Draw all the current polygon segments
                cv2.polylines(canvas, np.array([self.points]), False, FINAL_LINE_COLOR, 1)
                # And  also show what the current segment would look like
                cv2.line(canvas, self.points[-1], self.current, WORKING_LINE_COLOR)
            # Update the window
            cv2.imshow(self.window_name, canvas)
            # And wait 50ms before next iteration (this will pump window messages meanwhile)
            if cv2.waitKey(50) == 27: # ESC hit
                self.done = True

        # User finised entering the polygon points, so let's make the final drawing
        canvas = np.zeros(CANVAS_SIZE, np.uint8)
        # of a filled polygon
        if (len(self.points) > 0):
            cv2.fillPoly(canvas, np.array([self.points]), FINAL_LINE_COLOR)
        # And show it
        cv2.imshow(self.window_name, canvas)
        # Waiting for the user to press any key
        cv2.waitKey()

        cv2.destroyWindow(self.window_name)
        return canvas

# ============================================================================

if __name__ == "__main__":
    pd = PolygonDrawer("Polygon")
    image = pd.run()
    cv2.imwrite("polygon.png", image)
    print("Polygon = %s" % pd.points)

Screenshots

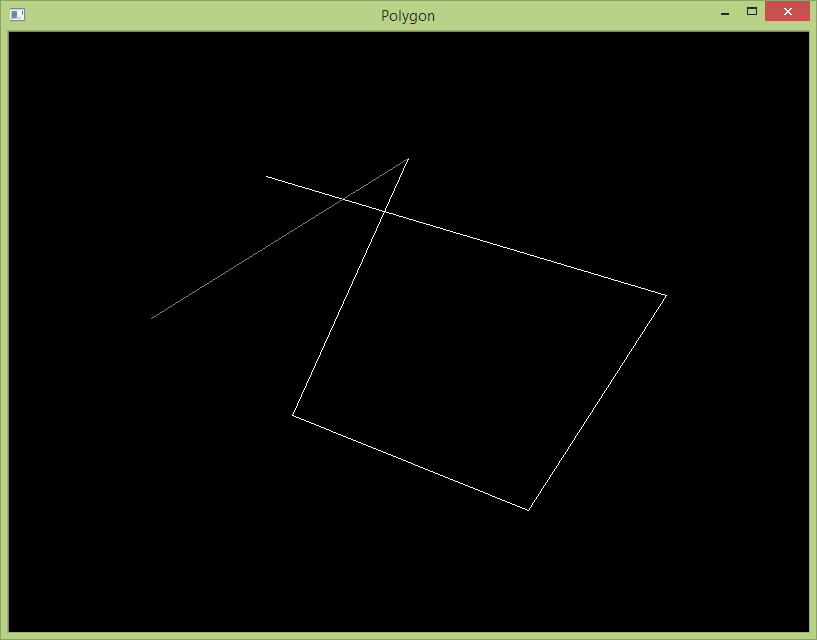
Drawing in progress, we have 5 points entered, and the current segment is being shown as a darker line pointing to the current position of the mouse:

Drawing in Progress

Drawing is complete, and the program is showing the whole polygon filled:

Drawing Complete


Final Image

Saved Image

Console Output

Adding point #0 with position(257,144)
Adding point #1 with position(657,263)
Adding point #2 with position(519,478)
Adding point #3 with position(283,383)
Adding point #4 with position(399,126)
Adding point #5 with position(142,286)
Adding point #6 with position(165,38)
Completing polygon with 7 points.
Polygon = [(257, 144), (657, 263), (519, 478), (283, 383), (399, 126), (142, 286), (165, 38)]
Fagoting answered 15/5, 2016 at 6:8 Comment(2)
How could I adapt this code to draw a polygon on an image imported using imageio.imread('img/path')?Pardner
@Pardner Use that image as canvas, instead of the blank image I create using np.zeros(CANVAS_SIZE, np.uint8).Knick
H
3

Same Code as above but with C++. Take an image as input rather than canvas

#include <boost/shared_ptr.hpp> 
#include <opencv2/opencv.hpp>


cv::Scalar FINAL_LINE_COLOR (255, 255, 255);
cv::Scalar WORKING_LINE_COLOR(127, 127, 127);

class PolygonDrawer {
public:

  std::string window_name_;
  bool done_;
  cv::Point current_;
  std::vector<cv::Point> points_;
  boost::shared_ptr<cv::Mat> imgPtr;

  PolygonDrawer(const std::string window_name, std::string imgName){
    window_name_ = window_name;
    done_ = false;
    current_ = cv::Point(0, 0); // Current position, so we can draw the line-in-progress
    imgPtr.reset(new cv::Mat(cv::imread(imgName)));
  }

  static void onMouse( int event, int x, int y, int f, void* data ) {
    PolygonDrawer *curobj = reinterpret_cast<PolygonDrawer*>(data);
    if (curobj->done_) // Nothing more to do
      return;

    if(event == cv::EVENT_MOUSEMOVE)
      // We want to be able to draw the line-in-progress, so update current mouse position
      curobj->current_ = cv::Point(x, y);
    else if(event == cv::EVENT_LBUTTONDOWN) {
      // Left click means adding a point at current position to the list of points
      printf("Adding point #%zu with position(%d,%d) \n", curobj->points_.size(), x, y);
      curobj->points_.push_back(cv::Point(x, y));
    } else if(event == cv::EVENT_RBUTTONDOWN) {
      // Right click means we're done
      printf("Completing polygon with %zu points \n", curobj->points_.size());
      curobj->done_ = true;
    }
  }

  void run() {
    // Let's create our working window and set a mouse callback to handle events
    cv::namedWindow(window_name_, cv::WINDOW_KEEPRATIO);
    cv::imshow(window_name_, *imgPtr);
    cv::waitKey(1);
    cv::setMouseCallback(window_name_, onMouse, this);
    while(!done_) {
      cv::Mat img;
      imgPtr->copyTo(img);
      if (points_.size() > 0){
        // Draw all the current polygon segments
        const cv::Point *pts = (const cv::Point*) cv::Mat(points_).data;
        int npts = cv::Mat(points_).rows;

        cv::polylines(img, &pts, &npts, 1, false, FINAL_LINE_COLOR);
        // And  also show what the current segment would look like
        cv::line(img, points_[points_.size()-1], current_, WORKING_LINE_COLOR, 1.0);
        // Update the window
      }
      cv::imshow(window_name_, img);
      // And wait 50ms before next iteration (this will pump window messages meanwhile)
      if(cv::waitKey(50) == 27)
        done_ = true;
    }
    const cv::Point *pts = (const cv::Point*) cv::Mat(points_).data;
    int npts = cv::Mat(points_).rows;

    // user finished entering the polygon points
    if (points_.size() > 0) {
      cv::fillPoly(*imgPtr, &pts, &npts, 1, FINAL_LINE_COLOR);
      cv::imshow(window_name_, *imgPtr);
      //Waiting for the user to press any key
      cv::waitKey();
      cv::destroyWindow(window_name_);
    }
  }
};


int main(int argc, char** argv) {
  PolygonDrawer pd("Polygon", argv[1]);
  pd.run();
  // cv2.imwrite("polygon.png", image)
  // print("Polygon = %s" % pd.points)
}
Hickman answered 6/2, 2018 at 11:28 Comment(0)
C
0

Just added in python the option to use an image instead of a canvas, resizing it according to a given image height to make annotation easier, if your image is too small for example.

You just need to provide three variables: window_name, image_in, resamp_height. These are: (1) the name of the window, (2) the image you want to annotate over and (3) the height of the image for annotation (results will be converted to the original image height/width space, simplifying later use of the coordinates).

# ==================================================================
# Drawing filled polygons using mouse events in open-cv using python
# ==================================================================

# ==================================================================
# packages

import numpy as np
import cv2

# ==================================================================

class PolygonDrawer:
    
    def __init__( self, window_name, image_in, resamp_height ):
        
        ##
        self.window_name = window_name # Name for our window
        self.done        = False       # Flag signaling we're done
        self.current     = (0, 0)      # Current position, so we can draw the line-in-progress
        self.points      = []          # List of points defining our polygon
        ##
        self.FINAL_LINE_COLOR   = (255, 255, 255)
        self.WORKING_LINE_COLOR = (127, 127, 127)
        ##
        self.resamp_height = resamp_height  # height of image to be annotated in pixels - used to resample image making it easier to annotate
        ##
        self.image_in = image_in


    def on_mouse(self, event, x, y, buttons, user_param):
        # Mouse callback that gets called for every mouse event (i.e. moving, clicking, etc.)

        if self.done: # Nothing more to do
            return

        if event == cv2.EVENT_MOUSEMOVE:
            # We want to be able to draw the line-in-progress, so update current mouse position
            self.current = (x, y)
        elif event == cv2.EVENT_LBUTTONDOWN:
            # Left click means adding a point at current position to the list of points
            print("Adding point #%d with position(%d,%d)" % (len(self.points), x, y))
            self.points.append((x, y))
        elif event == cv2.EVENT_RBUTTONDOWN:
            # Right click means we're done
            print("Completing polygon with %d points." % len(self.points))
            self.done = True


    def run( self ):
        # Let's create our working window and set a mouse callback to handle events
        cv2.namedWindow(self.window_name, flags=cv2.WINDOW_AUTOSIZE)
                
        ## Resize the image according to the desired height in pixels
        resamp_width     = int( np.ceil( self.resamp_height*(self.image_in.shape[1]/self.image_in.shape[0]) ) ) 
        up_points        = (resamp_width, self.resamp_height)
        image_in_resized = cv2.resize( self.image_in, up_points, interpolation = cv2.INTER_LINEAR)

        ##  
        cv2.imshow(self.window_name, image_in_resized)
        cv2.waitKey(1)
        cv2.setMouseCallback(self.window_name, self.on_mouse)

        while(not self.done):
            # This is our drawing loop, we just continuously draw new images
            # and show them in the named window
            canvas = image_in_resized
            if (len(self.points) > 0):
                # Draw all the current polygon segments
                cv2.polylines(canvas, np.array([self.points]), False, self.FINAL_LINE_COLOR, 1)
                # And  also show what the current segment would look like
                cv2.line(canvas, self.points[-1], self.current, self.WORKING_LINE_COLOR)
            # Update the window
            cv2.imshow(self.window_name, canvas)
            # And wait 50ms before next iteration (this will pump window messages meanwhile)
            if cv2.waitKey(50) == 27: # ESC hit
                self.done = True

        # User finished entering the polygon points, so let's make the final drawing
        canvas = image_in_resized
        # of a filled polygon
        if (len(self.points) > 0):
            cv2.fillPoly(canvas, np.array([self.points]), self.FINAL_LINE_COLOR)
        # And show it
        cv2.imshow(self.window_name, canvas)
        # Waiting for the user to press any key
        cv2.waitKey()

        ##
        cv2.destroyWindow(self.window_name)

        ## Get coordinates according to the original image dimensions
        ## obs.: cordinates are given in XY and image shape is YX/RowCol
        ## Calculate conversion factors
        convFactY = self.image_in.shape[0] / self.resamp_height
        convFactX = self.image_in.shape[1] / resamp_width
        ## Coordinates of the polygon vertices in the original image space
        coordOutX = [ int(np.ceil(self.points[val][0]*convFactX)) for val in range(len(self.points)) ]
        coordOutY = [ int(np.ceil(self.points[val][1]*convFactY)) for val in range(len(self.points)) ]
        ##
        self.points = [ [coordOutX[val], coordOutY[val]] for val in range(len(coordOutX)) ]

        ## 
        return canvas

To run the code you just need to do the following:

##
import PolygonDrawer
##
PDrawO = PolygonDrawer.PolygonDrawer( window_name = 'Image to Process', image_in = image_to_process,  resamp_height = 800 )
PDrawO.run()
Corrigan answered 9/7, 2024 at 12:11 Comment(0)

© 2022 - 2025 — McMap. All rights reserved.