SwiftUI: Change “About View” in macOS app
Asked Answered
P

5

8

I am building a macOS-app using SwiftUI and the new App lifecycle.

I would love to change the contents of the “About Window” (that appears when you tap “About DemoApp” in the apps’ menu) but have no idea how:

enter image description here

How can I replace the About view with a custom one?

Pulpboard answered 31/10, 2020 at 16:55 Comment(1)
Other people have answered the question but I'd like to leave a link to this blogpost that I found useful about getting in an attributed string into the existing 'about' window. This is great when you just need to add small pieces of information.Upanchor
C
13

You can do it but it does require creating an AppDelegate. Here's what your AppFile should look like:

struct MyApp: App {
    @NSApplicationDelegateAdaptor(AppDelegate.self) var appDelegate

    var body: some Scene {
        WindowGroup {
            MainView()
        }
        .commands {
            CommandGroup(replacing: CommandGroupPlacement.appInfo) {
                Button(action: {
                    appDelegate.showAboutPanel()
                }) {
                    Text("About My App")
                }
            }
        }
    }
}

and your AppDelegate Should Look like this:

class AppDelegate: NSObject, NSApplicationDelegate {
    private var aboutBoxWindowController: NSWindowController?

    func showAboutPanel() {
        if aboutBoxWindowController == nil {
            let styleMask: NSWindow.StyleMask = [.closable, .miniaturizable,/* .resizable,*/ .titled]
            let window = NSWindow()
            window.styleMask = styleMask
            window.title = "About My App"
            window.contentView = NSHostingView(rootView: AboutView())
            aboutBoxWindowController = NSWindowController(window: window)
        }

        aboutBoxWindowController?.showWindow(aboutBoxWindowController?.window)
    }
}

Then, just make a SwiftUI View named AboutView and it'll display that in your About Box. For Example:

struct AboutView: View {
    var body: some View {
        VStack {
            Spacer()
            HStack {
                Spacer()
                Text("Hello, World!")
                Spacer()
            }
            Spacer()
        }
        .frame(minWidth: 300, minHeight: 300)
    }
}
Conservatoire answered 14/2, 2021 at 22:45 Comment(0)
A
11

You need to add a Credits.rtf file to your Bundle. This will be automatically detect and be inserted in the About Dialog.

You can find more here

Aguirre answered 31/10, 2020 at 18:7 Comment(2)
Really appreciate your help, @davidev! This is super helpful in case you want to add credits to the existing About Panel. However I am asking about how to completely replace that panel with my very own view, I don’t want just to customise the default one.Pulpboard
The About window does not expand to accommodate graphics, so keep them small. Otherwise, .rtfd works without problems.Slam
Z
5
import Foundation
import SwiftUI

struct AboutView: View {
    var body: some View {
        VStack(spacing: 10) {
            Image(nsImage: NSImage(named: "AppIcon")!)
            
            Text("\(Bundle.main.appName)")
                .font(.system(size: 20, weight: .bold))
                // Xcode 13.0 beta 2
                //.textSelection(.enabled)
            
            Link("\(AboutView.offSiteAdr.replace(of: "http://", to: ""))", destination: AboutView.offCiteUrl )
            
            Text("Ver: \(Bundle.main.appVersionLong) (\(Bundle.main.appBuild)) ")
                // Xcode 13.0 beta 2
                //.textSelection(.enabled)
            
            Text(Bundle.main.copyright)
                .font(.system(size: 10, weight: .thin))
                .multilineTextAlignment(.center)
        }
        .padding(20)
        .frame(minWidth: 350, minHeight: 300)
    }
}

///////////////////////////////////
/// HELPERS
//////////////////////////////////
class AppDelegate: NSObject, NSApplicationDelegate {
    private var aboutBoxWindowController: NSWindowController?
    
    func showAboutWnd() {
        if aboutBoxWindowController == nil {
            let styleMask: NSWindow.StyleMask = [.closable, .miniaturizable,/* .resizable,*/ .titled]
            let window = NSWindow()
            window.styleMask = styleMask
            window.title = "About \(Bundle.main.appName)"
            window.contentView = NSHostingView(rootView: AboutView())
            window.center()
            aboutBoxWindowController = NSWindowController(window: window)
        }
        
        aboutBoxWindowController?.showWindow(aboutBoxWindowController?.window)
    }
}

extension AboutView {
    private static var offSiteAdr: String { "http://www.taogit.com" }
    private static var offEmail: String { "[email protected]" }
    
    public static var offCiteUrl: URL { URL(string: AboutView.offSiteAdr )! }
    public static var offEmailUrl: URL { URL(string: "mailto:\(AboutView.offEmail)")! }
}
extension Bundle {
    public var appName: String { getInfo("CFBundleName")  }
    //public var displayName: String {getInfo("CFBundleDisplayName")}
    //public var language: String {getInfo("CFBundleDevelopmentRegion")}
    //public var identifier: String {getInfo("CFBundleIdentifier")}
    public var copyright: String {getInfo("NSHumanReadableCopyright").replace(of: "\\\\n", to: "\n") }
    
    public var appBuild: String { getInfo("CFBundleVersion") }
    public var appVersionLong: String { getInfo("CFBundleShortVersionString") }
    //public var appVersionShort: String { getInfo("CFBundleShortVersion") }
    
    fileprivate func getInfo(_ str: String) -> String { infoDictionary?[str] as? String ?? "⚠️" }
}

And assign to menu line:

struct MyApp: App {
    @NSApplicationDelegateAdaptor(AppDelegate.self) var appDelegate

    var body: some Scene {
        WindowGroup {
            MainView()
        }
        // Replacement of standard About window
        .commands {
            CommandGroup(replacing: CommandGroupPlacement.appInfo) {
                Button("About \(Bundle.main.appName)") { appDelegate.showAboutWnd() }
            }
        }
    }
}

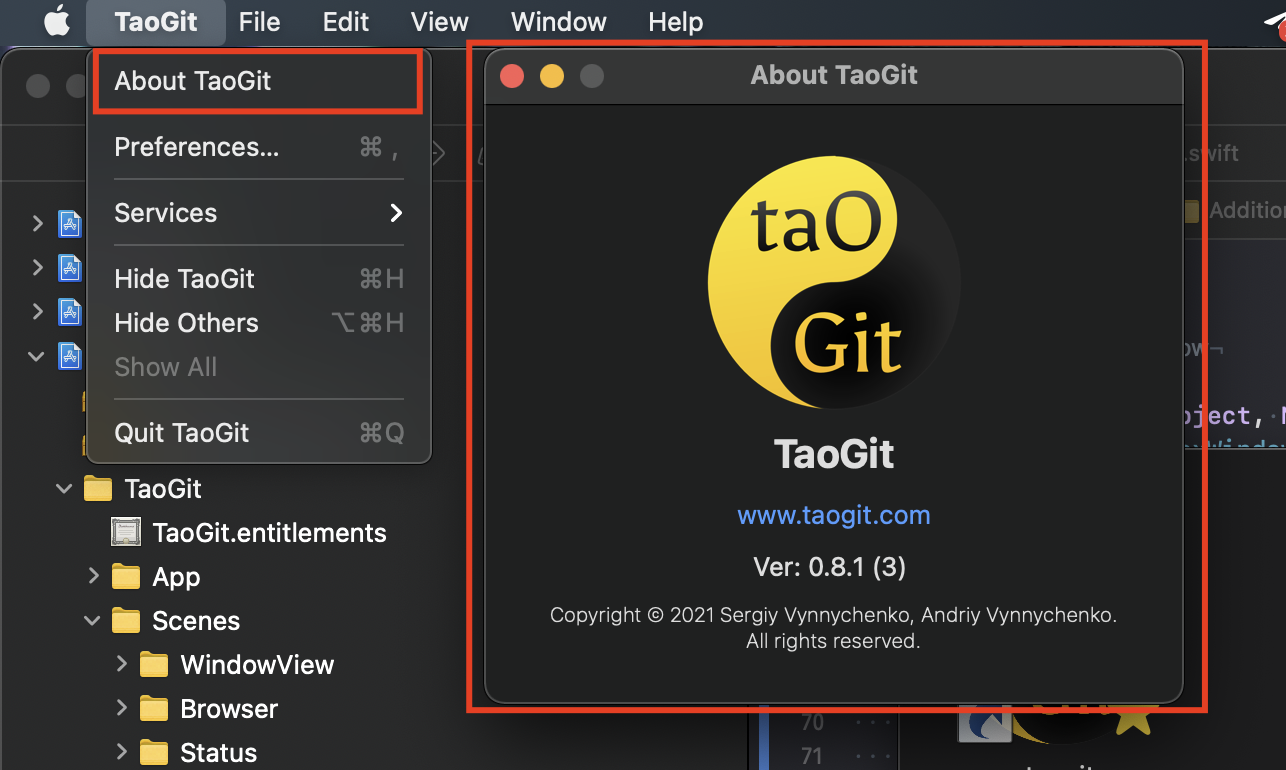
result:

enter image description here

Bonus: Support of "\n" in Copyright

enter image description here

Zircon answered 25/8, 2021 at 12:25 Comment(1)
Thanks for the good, detailed answer!Immolate
O
3

So I was using the method described by hayesk for a while, but I realized that this can be done entirely through SwiftUI UI (no need for an app delegate).

struct MyApp: App {
    @Environment(\.openWindow) private var openWindow

    var body: some Scene {
        Window("My App", id: "main") {
            MainView()
        }
        .commands {
            CommandGroup(replacing: CommandGroupPlacement.appInfo) {
                Button(action: {
                    // Open the "about" window
                    openWindow(id: "about")
                }, label: {
                    Text("About My App")
                })
            }
        }
        // Note the id "about" here
        Window("About My App", id: "about") {
            AboutView()
        }
    }
}
Oas answered 10/6 at 20:19 Comment(3)
This works with Xcode 16; 'Window' was introduced at WWDC2024 and can be deployed to MacOS 14.5, but probably not to earlier versions. (Both 'about' and 'About' work as id).Slam
I have been using Window with XCode 15 just fine since probably Feb this year. I can't speak for XCode 14. Additionally the documentation says it works with macos 13+ developer.apple.com/documentation/swiftui/window. The openWindow command says the same. Additionally any ID can be used as long as the openWindow call matches the Window. The announced window features in WWDC2024 I believe would all this code sample to work even after removing the whole .command { ... } block, but with the .command { ... } block it works back to macOS 13Oas
Good to know. I seem to have missed that, and the video I saw gave the strong impression that Window was new. It's very very useful. (I vaguely remember it being a real faff to disable the 'multiple windows for the same item' feature.)Slam
E
0

Alternatively if you just want to add some informations below the default app icon and version number you can create (and include in your app bundle) a Credits.html file for example with the following content:

<html>
<head>
<title>Credits</title>
<style type="text/css">
body{
    font-family: Helvetica, Verdana;
    text-align: center;
}
</style>
</head>
<body>
Copyright &copy; 2020 Your Name</br>All rights reserved.
</body>
</html>
Enhanced answered 25/9 at 7:31 Comment(0)

© 2022 - 2024 — McMap. All rights reserved.