How to set ASPNETCORE_ENVIRONMENT to be considered for publishing an ASP.NET Core application
Asked Answered
P

21

236

When I publish my ASP.NET Core web application to my local file system, it always takes the production-config and the ASPNETCORE_ENVIRONMENT variable with the value = "Production".

How and where do I have to set the value of the ASPNETCORE_ENVIRONMENT variable so that it will be considered not only for debugging, but also for the publishing? I already tried the following options without success:

  • in windows settings
  • in file .pubxml file
  • in file launchSettings.json
  • in file project.json
Popery answered 9/1, 2017 at 11:24 Comment(4)
Do you read official docs learn.microsoft.com/en-us/aspnet/core/fundamentals/environments or this tutorial andrewlock.net/…?Photogenic
#37669260Claraclarabella
#43493759 this has 2 options to check real error.Oenone
if you dont want to get bothered on modifying launchSettings.json often, follow the answer 9 of this link: anycodings.com/1questions/45494/…Juxtaposition
H
223

There are couple of solutions:

  1. Command line options using dotnet publish

    Additionally, we can pass the property EnvironmentName as a command-line option to the dotnet publish command. The following command includes the environment variable as Development in the web.config file:

    dotnet publish -c Debug -r win-x64 /p:EnvironmentName=Development
    

  1. Modifying the project file (.csproj) file

    MSBuild supports the EnvironmentName property which can help to set the right environment variable as per the environment you wish to deploy. The environment name would be added in the web.config during the publish phase.

    Simply open the project file (*.csProj) and add the following XML:

    <!-- Custom property group added to add the environment name during publish    
         The EnvironmentName property is used during the publish
         for the environment variable in web.config
    -->
    <PropertyGroup Condition=" '$(Configuration)' == '' Or '$(Configuration)' == 'Debug'">
      <EnvironmentName>Development</EnvironmentName>
    </PropertyGroup>
    
    <PropertyGroup Condition=" '$(Configuration)' != '' AND '$(Configuration)' != 'Debug' ">
      <EnvironmentName>Production</EnvironmentName>
    </PropertyGroup>
    

    The above code would add the environment name as Development for a debug configuration or if no configuration is specified. For any other configuration, the environment name would be Production in the generated web.config file. More details are here.


  1. Adding the EnvironmentName property in the publish profiles.

    We can add the <EnvironmentName> property in the publish profile as well. Open the publish profile file which is located at Properties/PublishProfiles/{profilename.pubxml}. This will set the environment name in web.config when the project is published. More details are here.

    <PropertyGroup>
      <EnvironmentName>Development</EnvironmentName>
    </PropertyGroup>
    
Hilarity answered 30/1, 2019 at 2:9 Comment(11)
This seems like the best answer as far as I can tell. The ability to set it per publish profile really helped me a lot.Safier
The third option works for me. Do you know if /p:EnvironmentName option mention anywhere in dotnet documentation?Kirst
dotnet publish -c Debug -r win-x64 /p:EnvironmentName=Development is exactly what I was looking for. Thanks!Dogtired
If your environment does not reload when you publish, reload the project.Appellation
I like the idea of doing it via dotnet publish above but that just adds it to the web.config file which apparently my aspnet core 3.1 app isn't reading by default.Tambourin
A Lil a bit more on that: learn.microsoft.com/en-us/aspnet/core/host-and-deploy/iis/…Diverge
not working using csprojJuxtaposition
One issue to be aware of with the 3rd option is if you right click the web.config and hit "Publish web.config" it doesn't use the settings from the publish.pubxml file and thus will ignore the environment variable change.Dovetail
This answer represents what should be the default .csproj template. This is not easy information to find. Thank you for such an excellent answer, @Abhinav!Weakling
Ditto @ajgo -- Option 2 looked cool but didn't work for me today. It looks like this might be overridden by Launch Profiles settings. In VS, I found those by expanding the project's files in Solution Explorer, double-clicking Properties, clicking Debug, clicking "Open debug launch profiles UI". Check the "Environment variables" section. Mine read ASPNETCORE_ENVIRONMENT=Development. Changing that does what you'd expect and the environment is changed. Figured there was an easier way; there is: That value is saved in C:\Path\To\YourApp\Properties\launchSettings.json.Persian
spent maybe an hour on this, pouring over terrible circular microsoft "learn" documents. #3 worked for me! added it to the publish file and was able to see the actual error as run from my local IIS (not through Visual Studio).Pistareen
S
122

Option1:

To set the ASPNETCORE_ENVIRONMENT environment variable in Windows:

  • Command line - setx ASPNETCORE_ENVIRONMENT "Development"

  • PowerShell - $Env:ASPNETCORE_ENVIRONMENT = "Development"

For other OSes, refer to Use multiple environments in ASP.NET Core

Option 2:

If you want to set ASPNETCORE_ENVIRONMENT using web.config then add aspNetCore like this -

<configuration>
  <!--
    Configure your application settings in appsettings.json. Learn more at http://go.microsoft.com/fwlink/?LinkId=786380
  -->
  <system.webServer>
    <handlers>
      <add name="aspNetCore" path="*" verb="*" modules="AspNetCoreModule" resourceType="Unspecified" />
    </handlers>
    <aspNetCore processPath=".\MyApplication.exe" arguments="" stdoutLogEnabled="false" stdoutLogFile=".\logs\stdout" forwardWindowsAuthToken="false">
      <environmentVariables>
        <environmentVariable name="ASPNETCORE_ENVIRONMENT" value="Development" />
      </environmentVariables>
    </aspNetCore>
  </system.webServer>
</configuration>
Soak answered 9/1, 2017 at 15:33 Comment(10)
Both of these are terrible options. 1) sets this for the entire OS, I'd like it per site in IIS. 2) AspNet Core does not support web.config transforms. How do you suggest web.config gets modified for deployment?Guthrun
Refer official documentation here - learn.microsoft.com/en-us/aspnet/core/hosting/…Soak
Once you came across better option... please do share here :)Soak
goes straight to my local wikiSquad
The idea of ASPNETCORE_ENVIRONMENT is that you can use docker and have only one docker running one IIS. And the other one I think that ASP net core if you use Web.Config you should do it manualy the transformation.Doctorate
these kind of configuration design seems very messy.Gunfire
You can override this in the publish profiles for multiple environments.Merryman
option 2 is for when your app is already deployed, it works fineSantanasantayana
Thank you, I really like option 2. It allows me to change my environment in my VS project and publish it to IIS. This is the most efficient way for me right now because I don't have to set the variable for the entire machine like option 1, it's done per-application level.Odysseus
BTW, there is a way to set env variables that are specific to an app pool in IIS, but you'll have to dig a bit with configuration editor on system.applicationHost/applicationPools, find your pool and then add/change its environmentVariables propertyGermanism
I
43

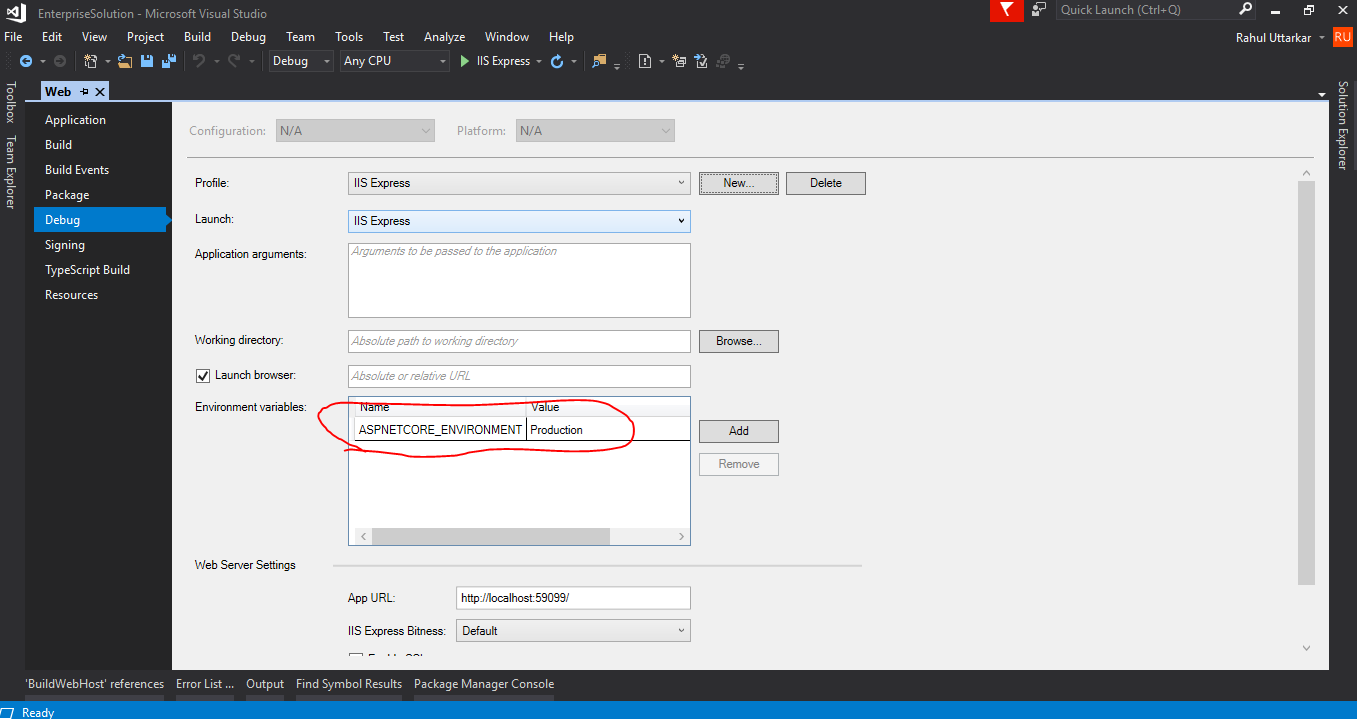
A simple way to set it in the Visual Studio IDE.

Menu ProjectPropertiesDebugEnvironment variables

Enter image description here

Inapproachable answered 24/9, 2017 at 12:9 Comment(2)
But then you need to remember changing this everytime you need to publish to a different environment.Commentator
That's not correct. That only works when running the IDE. Stores it in the launchsettings.json file which is a Visual Studio thing. Won't work for deployments.Dismast
C
35

This is how we can set it at run time:

public class Program
{
    public static void Main(string[] args)
    {
        Environment.SetEnvironmentVariable("ASPNETCORE_ENVIRONMENT", "Development");

        BuildWebHost(args).Run();
    }

    public static IWebHost BuildWebHost(string[] args) =>
        WebHost.CreateDefaultBuilder(args)
            .UseStartup<Startup>()
            .Build();
}
Cambell answered 19/2, 2019 at 21:35 Comment(9)
not sure why this was down-voted, cause it's the only thing that worked for me.Hebel
It was most likely down-voted due to the hard-coded values in the code.Fluvial
Quickest to test, but I agree not something that I'd like to see as checked-in code, longer-term.Arst
although this is hardcoded, I see this as the easiest way to do this.Cockerel
My preferred method, I use it in combination with DEBUG to set the right value.Beeves
I wrok with Asp.net core 2.2 (self hosting kestrel). Also only working solution for me (have added environment entries in web.config -> don't work).Ibson
this is the simplest way and worked for me. thanksLingcod
In my case, I need to programmatically set it based on another variable I'm provided (by Kubernetes) in my various environments. So this is perfect, and a reasonable "hard coding".Whitten
You should not have to set the enviroment INSIDE the actual application code. The fact it is a relatively easy option is a major fail by MS. Another massively over-engineered change by MS to something that should be simple.Outface
B
33
  1. Create your appsettings.*.json files. (Examples: appsettings.Development.json, appsettings.Staging.json, and appsettings.Production.json)

  2. Add your variables to those files.

  3. Create a separate publish profile for each environment, like you normally would.

  4. Open the PublishProfiles/Development.pubxml file (naming will be based on what you named the Publish Profile).

  5. Simply add a tag to the PublishProfile to set the EnvironmentName variable, and the appsettings.*.json file naming convention does the rest.

    <PropertyGroup>
        <EnvironmentName>Development</EnvironmentName>
    </PropertyGroup>
    

Reference: Visual Studio publish profiles (.pubxml) for ASP.NET Core app deployment

Refer to the “Set the Environment” section.

Baffle answered 19/12, 2019 at 23:32 Comment(4)
I have done this and whilst it is setting environment correctly in the published web.config file I am struggling with the appsettings.*.json files. I have appsettings.Staging.json but when I publish it stays as appsettings.Staging.json and isn't turned into appsettings.json and the website doesn't work (doesnt read that file)Itin
@Itin in fact dotnetcore will read and load appsettings.json (and fail if it's not well-formed or doesn't exist at all), and will also try to read appsettings.{currentEnv}.json (and NOT fail if it's not well-formed or doesn't exist). It's the call to "WebHost.CreateDefaultBuilder()" in the "CreateWebHostBuilder" method in the Program.cs file which automatically load these files by default.Koehler
Not working with dotnet 6 :/ I add the prop but env is always production.Metallurgy
In your publish profile you can add this to only copy the correct settings file for each environment ``` <ItemGroup> <Content Update="appsettings.json" CopyToPublishDirectory="PerserveNewest" /> <Content Update="appsettings.*.json" CopyToPublishDirectory="Never" /> <Content Update="appsettings.Production.json" CopyToPublishDirectory="PreserveNewest" /> </ItemGroup> ```Adinaadine
L
22

You should follow the instructions provided in the documentation, using the web.config.

<aspNetCore processPath="dotnet"
        arguments=".\MyApp.dll"
        stdoutLogEnabled="false"
        stdoutLogFile="\\?\%home%\LogFiles\aspnetcore-stdout">
  <environmentVariables>
    <environmentVariable name="ASPNETCORE_ENVIRONMENT" value="Production" />
    <environmentVariable name="CONFIG_DIR" value="f:\application_config" />
  </environmentVariables>
</aspNetCore>

Note that you can also set other environment variables as well.

The ASP.NET Core Module allows you specify environment variables for the process specified in the processPath attribute by specifying them in one or more environmentVariable child elements of an environmentVariables collection element under the aspNetCore element. Environment variables set in this section take precedence over system environment variables for the process.

Lane answered 9/1, 2017 at 15:36 Comment(5)
how would I set it in a .net core console app?Unlisted
Set them up via the Environment Variables dialog of Windows.Lane
But is there a way to set it in the project rather than the OS?Unlisted
Not for console apps in .NET Core that I'm aware of... no - maybe this -- https://mcmap.net/q/119564/-setting-environment-variables-in-net-core-2-0?Lane
Hi @MarkWorrall - see learn.microsoft.com/aspnet/core/host-and-deploy/iis/…Lane
B
12

This variable can be saved in JSON. For example, envsettings.json with content as below

{
    // Possible string values reported below. When empty, it uses the ENV variable value or
    // Visual Studio setting.
    // - Production
    // - Staging
    // - Test
    // - Development

    "ASPNETCORE_ENVIRONMENT": "Development"
}

Later modify your program.cs file as below

public class Program
{
    public static IConfiguration Configuration { get; set; }
    public static void Main(string[] args)
    {
        var currentDirectoryPath = Directory.GetCurrentDirectory();
        var envSettingsPath = Path.Combine(currentDirectoryPath, "envsettings.json");
        var envSettings = JObject.Parse(File.ReadAllText(envSettingsPath));
        var environmentValue = envSettings["ASPNETCORE_ENVIRONMENT"].ToString();

        var builder = new ConfigurationBuilder()
               .SetBasePath(Directory.GetCurrentDirectory())
               .AddJsonFile("appsettings.json");

        Configuration = builder.Build();

        var webHostBuilder = new WebHostBuilder()
          .UseKestrel()
          .CaptureStartupErrors(true)
          .UseContentRoot(currentDirectoryPath)
          .UseIISIntegration()
          .UseStartup<Startup>();

        // If none is set it use Operative System hosting enviroment
        if (!string.IsNullOrWhiteSpace(environmentValue))
        {
            webHostBuilder.UseEnvironment(environmentValue);
        }

        var host = webHostBuilder.Build();

        host.Run();
    }
}

This way it will always be included in publish and you can change to the required value according to the environment where the website is hosted.

This method can also be used in a console application as the changes are in file Program.cs.

Beshore answered 11/10, 2019 at 15:32 Comment(1)
This is the best solution. Microsoft really blew it with this one. It was a terrible idea to use the ASPNETCORE_ENVIRONMENT for setting the environment and as a key for associating appsettings with launch settings.Laux
F
7

You can directly add ASPNETCORE_ENVIRONMENT env into your web.config file:

<configuration>
  <system.webServer>
    <aspNetCore processPath="dotnet" arguments=".\MyProject.dll" stdoutLogEnabled="true" stdoutLogFile=".\logs\stdout" hostingModel="inprocess">
      <environmentVariables>
        <environmentVariable name="ASPNETCORE_ENVIRONMENT" value="Development" />
      </environmentVariables>
    </aspNetCore>
  </system.webServer>
</configuration>
Futile answered 22/4, 2022 at 21:59 Comment(0)
P
6

With the latest version of the dotnet CLI (2.1.400 or greater), you can just set this MSBuild property $(EnvironmentName) and publish tooling will take care of adding ASPNETCORE_ENVIRONMENT to the web.config with the environment name.

Also, XDT support is available starting 2.2.100-preview1.

Sample: https://github.com/vijayrkn/webconfigtransform/blob/master/README.md

Proviso answered 24/8, 2018 at 21:58 Comment(2)
Could you elaborate on you can just set this msbuild property $(EnvironmentName) and publish or provide a reference?Circus
how would I set it in a .net core console app?Unlisted
T
4

Rather than hardwiring dev settings, add this to your .csproj:

<!-- Adds EnvironmentName variable during publish -->
<PropertyGroup Condition="'$(Configuration)' == 'Debug'">
    <EnvironmentName>Development</EnvironmentName>
</PropertyGroup>

<PropertyGroup Condition="'$(Configuration)' == 'Release'">
    <EnvironmentName>Production</EnvironmentName>
</PropertyGroup>
Tenderize answered 12/4, 2021 at 14:51 Comment(1)
I know this has nothing to do with the original question, but if you use web deploy this approach is excellent. When you're using a development and staging environment these instances can also run easily on the same mache without sharing the ASPNETCORE_ENVIRONMENT environment variable.Infantile
L
4

For .NET 6 i found this to be the nicest Solution:

var webAppOptions = new WebApplicationOptions()
{   
    Args = args,

    #if DEBUG
        EnvironmentName = Environments.Development,
    #else
        EnvironmentName = Environments.Production,
    #endif

};

var builder = WebApplication.CreateBuilder(webAppOptions);

We could also read the EnvironmentName from a config file and set it in the WebApplicationOptions before calling WebApplication.CreateBuilder

Now we can also test the Production Environment on our development machine. We just have to switch to release build and we have the Production Environment.

No need to set any ENVIRONMENT variables.

The advatage of doing it like this is also that we can not accidently create a release build that runs under a Development Environment.

Legitimate answered 17/2, 2022 at 12:15 Comment(2)
This way is so much easier than anything else. For Debug I want Development environment and for Release I want Production environment. I don't want to run in the Visual Studio environment so this works perfectly.Prearrange
This is the least ugly way I could get the environment to set when publishing to an azure linux appservice. I think there really is something broken but this is at least a workaround.Dashpot
P
3

If you are using the Rider IDE (from JetBrains) on Windows, Linux or Mac:

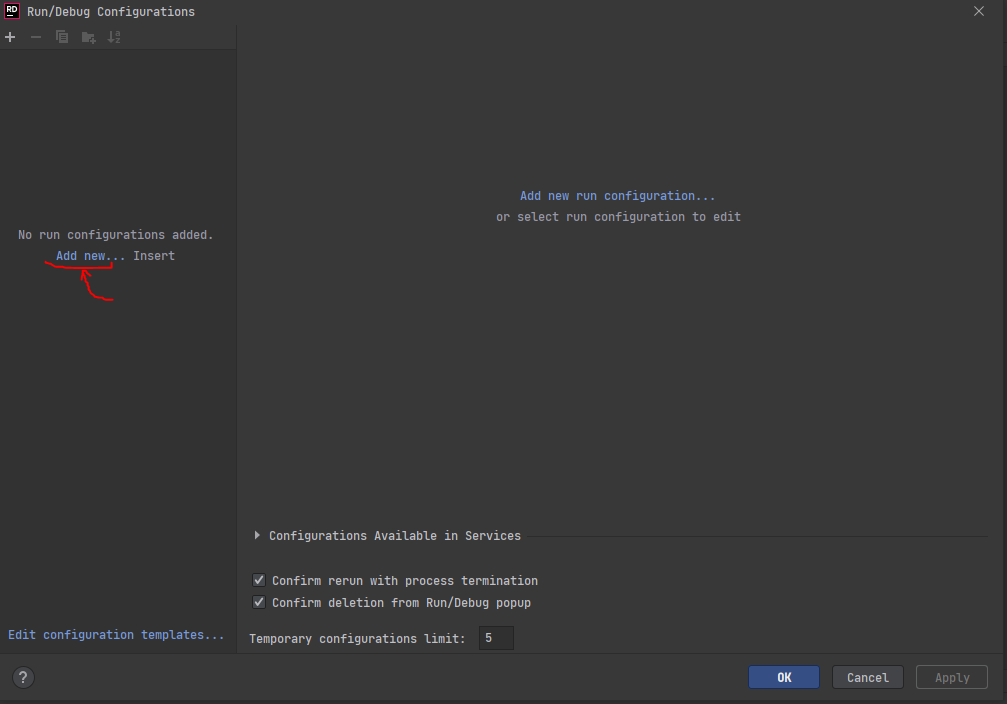
  • Click in Add Configuration; Enter image description here
  • In the modal window, click in Add New... located in the left column. Modal window with no configuration
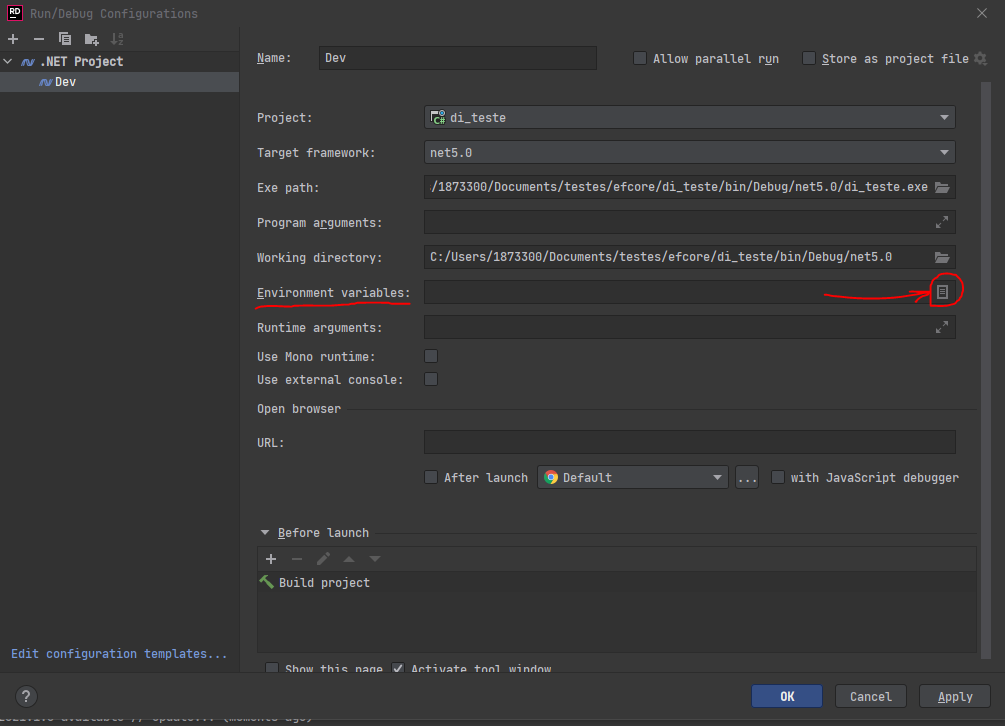
  • Chose .NET project (the template will depend on your project type)
  • In Environment Variables field, click in the document icon on the right side; Environment field in .NET Project modal window.
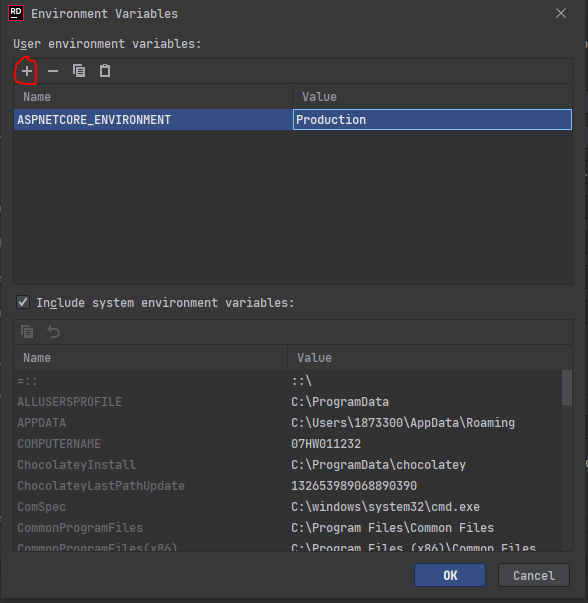
  • In the new window, click on the + to create a new environment variable, which you will input the key/value ASPNETCORE_ENVIRONMENT/Development; Adding a new environment variable.
  • Click OK at the bottom right side of the window.
  • Click Apply at the bottom right side of the window.

Rider has included the launch settings for your project and has set it as the default for your project debugging and runs.

Environment settings concluded and default

Printing answered 6/6, 2021 at 10:16 Comment(0)
I
2

A simple solution

I use the current directory to determine the current environment and then flip the connection string and environment variable. This works great so long as you have a naming convention for your site folders, such as test, beta, and sandbox.

protected override void OnConfiguring(DbContextOptionsBuilder optionsBuilder)
{
    var dir = Environment.CurrentDirectory;
    string connectionString;

    if (dir.Contains("test", StringComparison.OrdinalIgnoreCase))
    {
        connectionString = new ConnectionStringBuilder(server: "xxx", database: "xxx").ConnectionString;
        Environment.SetEnvironmentVariable("ASPNETCORE_ENVIRONMENT", "Development");
    }
    else
    {
        connectionString = new ConnectionStringBuilder(server: "xxx", database: "xxx").ConnectionString;
        Environment.SetEnvironmentVariable("ASPNETCORE_ENVIRONMENT", "Production");
    }

    optionsBuilder.UseSqlServer(connectionString);
    optionsBuilder.UseLazyLoadingProxies();
    optionsBuilder.EnableSensitiveDataLogging();
}
Implement answered 29/10, 2019 at 11:4 Comment(0)
K
1

Another option that we use in our projects in order to be able to set the environment per-site is to add a Parameters.xml file to the project with the following content:

<parameters>
      <parameter name="IIS Web Application Name" defaultValue="MyApp" tags="IisApp" />
      <parameter name="Environment" description="Environment" tags="">
        <parameterEntry kind="XmlFile" scope="Web.config"  match="/configuration/location/system.webServer/aspNetCore/environmentVariables/environmentVariable[@name='ASPNETCORE_ENVIRONMENT']/@value" />
      </parameter>
</parameters>

The Build Action for this file is Content and the Copy Action is Copy If Newer, so it will be part of the package to deploy.

Then, to deploy the package and set the environment, in the Release, under the "WinRM - IIS Web App Deployment" task (it works just as well when using the "IIS web app deploy" task), we set additional arguments for msdeploy:

-setParam:kind=ProviderPath,scope=contentPath,value="MySite" -setParam:name="Environment",value="Stage"

This way we can have multiple releases, all using the same artifact, but deployed as different environments.

Kief answered 24/10, 2019 at 13:37 Comment(0)
O
1

I had to manually add this piece of code to my main method. This will base the environment based on Azure's App Settings

static async Task Main(string[] args)
{
   ...
   //set the environment variable based on App Settings
   var environment = Environment.GetEnvironmentVariable("ASPNETCORE_ENVIRONMENT");
   builder.UseEnvironment(environment);
Oriya answered 13/3, 2021 at 18:20 Comment(0)
E
1

This one was also giving me troubles. I don't want to have switches within my code and want to rule it from the outside. And that is possible. There are a lot of options what you see in the posts above. This is what I did.

Setup code

In Program.cs add this

var _configuration = new ConfigurationBuilder()
    .SetBasePath(Directory.GetCurrentDirectory())
    .AddJsonFile("appsettings.json", optional: false, reloadOnChange: true)
    .AddJsonFile($"appsettings.{builder.Environment.EnvironmentName}.json", optional: true)
    .AddEnvironmentVariables()
    .Build();

The forth sentence is for environmental settings in json. The fifth sentence is for overruling in staging and prod by using environment variables.

Then add three files:

  • appsettings.json
  • appsettings.Development.json
  • appsettings.Staging.json
  • appsettings.Production.json

In appsettings.json I place the generic values for every environment. IE the name of the application. In appsettings.Development.json I place the connection string. You can also do that in Staging and Production. I did that different for security reasons.

Tip

The setup above can run your environment in dev-mode. In launchsettings.json you can change the ASPNETCORE_ENVIRONMENT to ie Staging to see how it works in test/staging mode.

Deployment

When I deploy to docker I overrule the environment setting to get the code running in the right environment. That is this way (this is is how pass from Nomad environment variables to docker, docker-compose will have a different format, but idea is the same):

env {
    ASPNETCORE_ENVIRONMENT = "Staging"
    CONNECTIONSTRINGS__MYCS = "MyConnectionString"
}

When you work this way, you have clean code.

Eponym answered 5/1, 2023 at 19:37 Comment(0)
M
0

I found it working for me by setting this variable directly on the Azure platform (if you use it).

Just select your web application → ConfigurationApplication settings and add the variable and its value. Then press the Save button.

Megadeath answered 9/9, 2019 at 11:43 Comment(0)
P
0

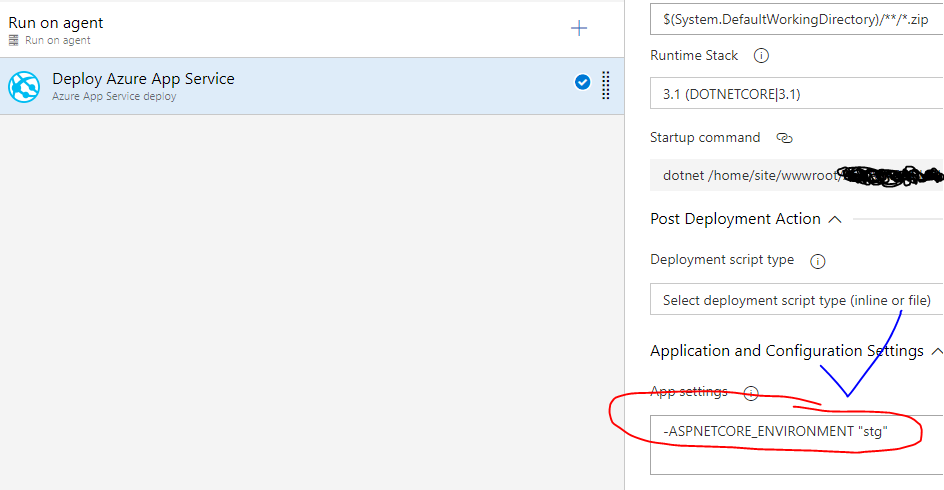
I was looking for an answer for this for last few days to understand how this can be achieved via Azure DevOps release pipeline deploying to Azure App Service. Here is what how I achieved it - Hope this will help you.

On Azure App Service deploy task > Set this value in Application & Configuration Settings : -ASPNETCORE_ENVIRONMENT ""

enter image description here

Pictograph answered 4/3, 2022 at 22:39 Comment(0)
U
0

What might help for some:

For a NET6 app; setting the ASPNETCORE_ENVIRONMENT to Development did not seem to work when I ran my published app locally.

However, when copied to the server with IIS it did work... So might be due to local environment variables.

But, then on the server my swagger docs were loaded, due to ASPNETCORE_ENVIRONMENT: Development.

I solved this by adding an extra appsettings.Staging.json file and publish with:

dotnet publish -c Release -r win-x64 --no-self-contained /p:EnvironmentName=Staging 

Finally, I ensured that environment specific variables are not in the generic appsettings.json, but only in the respective appsettings.{env}.json files.

Upas answered 27/5, 2022 at 12:38 Comment(0)
H
0

You add these lines into the publish profile as others indicated before:

<PropertyGroup>
    <EnvironmentName>Production</EnvironmentName>
</PropertyGroup>

Then use this syntax in the condition section of .csproj file, for example:

<Exec WorkingDirectory="$(SpaRoot)" Command="npm build --prod" Condition="'$(EnvironmentName)' == 'Production'>
Hayleyhayloft answered 27/6, 2022 at 8:22 Comment(0)
M
0

When I change the launch settings from say Debug to Staging I want the correct app<envronmentName>Settings.json to be loaded without having to remember to change the ASPNETCORE_ENVIRONMENT setting in the project from "Development" to "Staging". To this end I modify the Build conditional compilation symbols as follows;

[![enter image description here][1]][1]

Within my code I then use;

string environmentName = "";

#if DEBUG
    environmentName = "Development";
#elif STAGING
    environmentName = "Staging";
#else
    environmentName = "Production";
#endif

IConfigurationRoot config = new ConfigurationBuilder()
    .AddJsonFile("appsettings.json", optional: false)
    .AddJsonFile($"appsettings.{environmentName}.json", true)
    .AddUserSecrets(Assembly.GetExecutingAssembly(), true)
    .Build();

This synchronises the appSettings file used to match the launch configuration selected. [1]: https://i.stack.imgur.com/1XJlW.jpg

Megadeath answered 13/1, 2023 at 4:56 Comment(0)

© 2022 - 2024 — McMap. All rights reserved.