How to Add UDID to Xcode Managed Provisioning Profile
Asked Answered
U

2

10

A couple months ago, I used crashlytics to distribute beta versions of my app and all was well. Recently, I was asked to add another beta tester. This appears to be a simple thing in crashlytics, I clicked "distribute" added an email address, and all seemed fine except for a confounding message along the lines of...

You’ll need to distribute again to make a build that will work for this tester. We’ll walk you through adding any missing devices to the correct provisioning profile

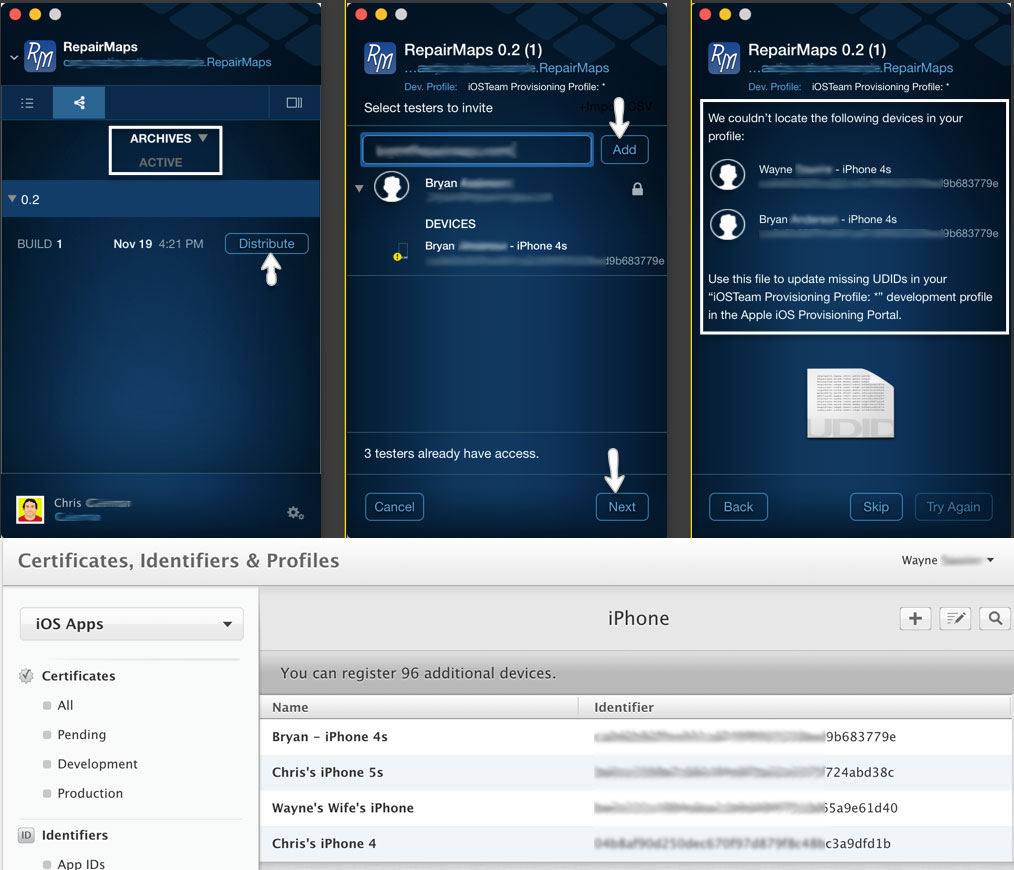
Unfortunately, Crashlytics didn't "walk me through" adding missing devices. I did however login to Apple Developer, went to Devices > iOS, and manually added the tester's UDID. I'm pretty sure this is correct, but I'm unsure how to "distribute again". See the screenshot below for a walk through of what I tried.

The target beta tester is (Bryan). The phone also shows up under Wayne's profile because he attempted to add the phone as well to help troubleshoot. In any case, you'll notice on the last page that it reports that the UDID is missing from the"iOSTeam Provisioning Profile: *".

The iOSTeam Provisioning Profile only contains the original 3 devices and I'm unable to edit from Apple Developer since this profile is apparently managed in Xcode. I created a new profile which includes the added device, but I'm unsure how to get Crashlytics to recognize and use it.

I found this article titled "Fabric for Enterprise Beta Distribution" on Twitter Community which suggested the user run this command...

rm -rf ~/Library/Caches/com.crashlytics.mac

Which I did (after shutting down Fabric), but it had zero affect.

Any suggestion as to what my next steps ought to be? After much head scratching, I'm at a loss.

enter image description here

Unreeve answered 19/1, 2016 at 18:3 Comment(0)
B
7

After adding the UDID into provisioning profile, you should do the following.

  1. Go to Xcode->Settings->Accounts.
  2. Select your team-> View Details...-> Download All.
  3. After download finishes, select updated provisioning profile in the Build Settings ( old should become invalid ).
  4. Press Cmd+Shift+K, Cmd+Alt+Shift+K to clean the project and build folder.
  5. Archive your project and distribute again.
Barracoon answered 19/1, 2016 at 18:38 Comment(6)
I don't see an option to update provisioning profile under build settings. Also, you said "after download finishes", after clicking "download all" nothing even seems to happen so I assume it happened instantly. I received zero feedback though and have no idea how to tell if it worked.Unreeve
@ChrisGeirman regarding "Download all" you are right. Is required provisioning profile there in the list? Regarding updating provisioning profile... I just meant to select it again ( project -> build settings -> Code signing -> provisioning profile.Barracoon
Under build settings, I don't see any mention of provisioning profile. I'm probably either blind or looking in the wrong place. Here's a screencast of what I'm seeing. screencast.com/t/g6iy9voJ7SNUnreeve
@ChrisGeirman there is a switch on the top in the video you shared ( basic/all ). Select all, than in the search bar type "provisioning profile"Barracoon
Thanks Dennis, I did as you suggested which got me over that hump and got through your step 4. Then I did Cmd+B to build the app again, but the Product > Archive option is grayed out. sigh. I'm not clear on what it takes to make that active. I remember last time I did this, it was gray... then magically activated somehowUnreeve
To activate Product->Archive, you should select device, not simulator ( top bar of Xcode window, to the right of Run and Stop buttons )Barracoon
C
5

For me only works:

Go to folder

~/Library/MobileDevice/Provisioning Profiles/

Delete all the Provisioning Profiles

Press CMD + K

Archive again.

Tested it in Xcode 10

Commodity answered 22/10, 2018 at 17:49 Comment(1)
Almost right. Cmd + Shift + K to Clean Build Folder, then Archive again.Brunson

© 2022 - 2024 — McMap. All rights reserved.