How to fix 'Unable to determine application id: com.android.tools.idea.run.ApkProvisionException: No outputs for the main artifact of variant:'
Asked Answered
M

27

277

I am trying to run a selected build variant but giving me following error in Run tab,

Unable to determine application id: com.android.tools.idea.run.ApkProvisionException: No outputs for the main artifact of variant: madhyapradesh-debug

So kindly suggest the solution to it.

Muzzy answered 4/6, 2019 at 8:57 Comment(1)
I wonder why every Android Studio update is so painful. I prefer to keep existing version as long as possible because of this.Plante
I
358

First clean your project by

Build -> Clean project

Then rebuild project

Build -> Rebuild project

Then run your project. I hope this will work.

if not then go to

File -> Invalidate Caches / Restart -> Invalidate and restart

The last option is you can sync Gradle again in case nothing worked

Increment answered 15/10, 2020 at 13:47 Comment(7)
File > Invalidate Cashes / Restart... helped.Umbrian
It is sad that such problems keep happening now and then.Exsanguinate
File->Invalidate Cashes /restart-> Invalidate and restart workedEquitable
I have done this before and it has helped, but this time it hasn't. I had to do the gradle sync.Corvine
File->Invalidate Cashes /restart-> Invalidate and restart worked well when I check very old commit in git to testSoundboard
File -> Invalidate Caches / Restart -> Invalidate and restart worked for me :)Betseybetsy
File > Sync project with Gradle Files worked for me :)Vulcanology
F
146

Your Gradle is out of sync. Go to: File -> Sync Project with Gradle Files. It should fix the problem.

enter image description here

Finley answered 16/11, 2020 at 18:42 Comment(1)
Pressing shift twice, searching sync gradle then pressing enter do the same stuff if you are lazy to move the cursor by mouse or touchpad.Carner
E
83

This is because your gradle version in project build.gradle configuration is too old for a newer Android Studio version, like Android Studio 3.6.1,

1. you should change the gradle configuration into a newer one under: build.gradle(project)->buildscript->dependencies->classpath;

for example, you should change:

classpath 'com.android.tools.build:gradle:2.3.1'

into:

classpath 'com.android.tools.build:gradle:3.1.2'

2. after this, may be you should also change the configuration in gradle-wrapper.properties into a newer version, for example, change:

distributionUrl=https\://services.gradle.org/distributions/gradle-3.3-all.zip

into:

distributionUrl=https\://services.gradle.org/distributions/gradle-4.4-all.zip

3. after this, may be you should also add google() at:

build.gradle(project)->buildscript->repositories

and

build.gradle(project)->allprojects->repositories

Ectomy answered 30/3, 2020 at 8:37 Comment(4)
Update the classpath in the Project build works for me.Thank you!Blinni
After updating my gradle versions, I had to also Sync Project with Gradle Files to have it work. Thanks!!Tound
But shouldn't be this applicable to all the projects. I find this strange incase of 2 project with same Gradle and build tool plugin projects for 1 it is working fine and for other suddenly started throwing error for last 2 weeks, before that it was working fine.Supernal
They talk about 'gradle version' and 'plugin version'? Is distri-url->plugin and classpath->gradle? Or vice verca? See link: developer.android.com/studio/releases/gradle-plugin I want to know the latest versions.Preceptory
G
30

I faced this problem today.

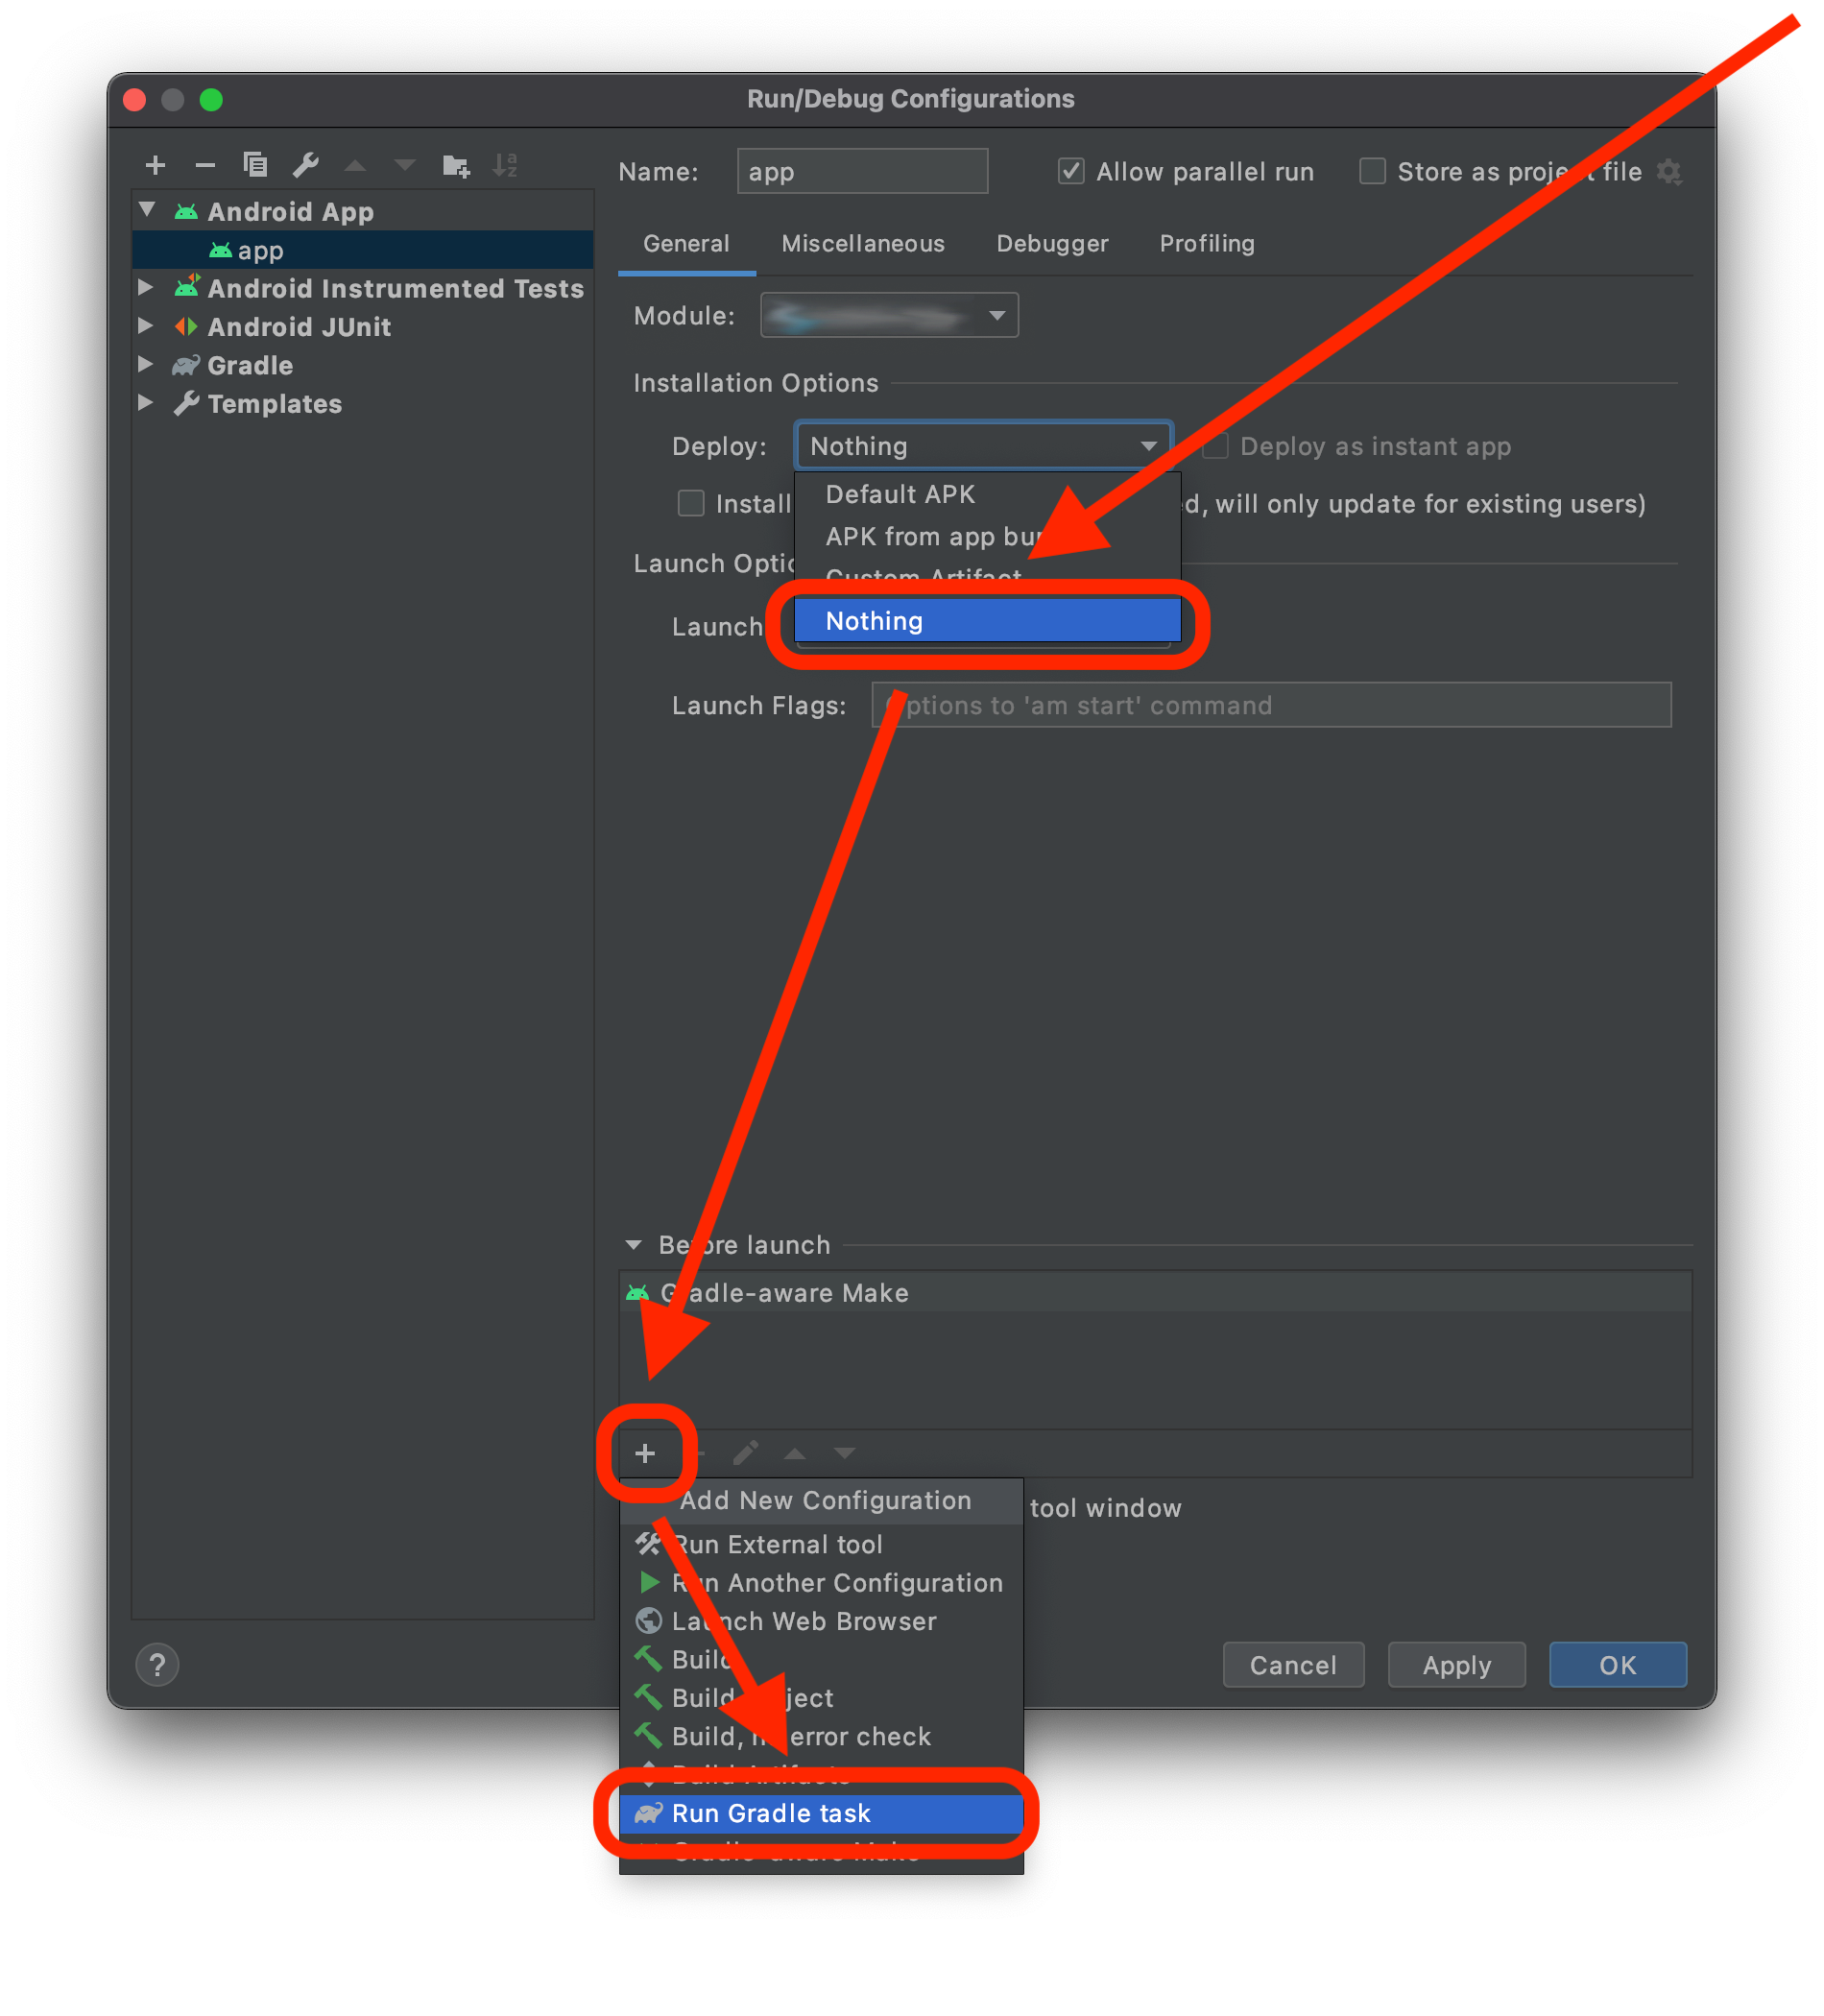
Select nothing from the installation option and click on the add icon button. Select Run Gradle task. enter image description here

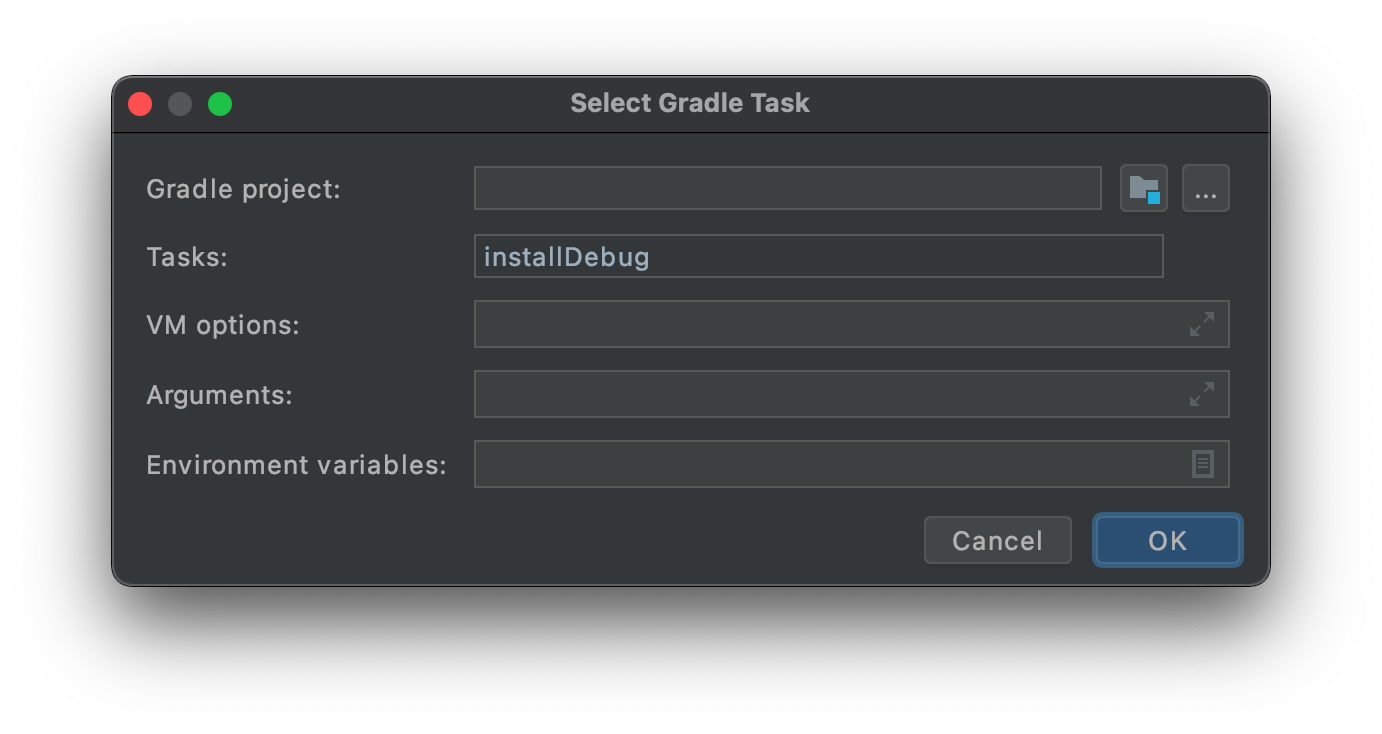
Double click on the run Gradle task and there will be a pop-up option like the image. Change the first option to the app and the second option to install debug like the image.

Now finally you solved the problem

enter image description here

Gunderson answered 29/1, 2021 at 13:53 Comment(5)
You saved my day!Biology
on windows Run tab->Edit config further as was said above then that plus mark appers on scroll. Also had picked up launch activity name in Launch option in advance.Wismar
It worked. Thanks a lotGomulka
Suberp....This should be high voted answerMeans
wow, it worked! but how can you explainTetrabranchiate
L
27

I have the same issue with a Cordova Project after I updated Android Studio to 3.6.1

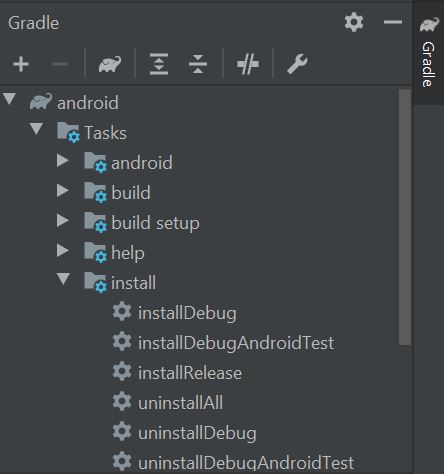
As a workaround (at least for the first installation of the app) I use installDebug Gradle Task from Gradle Tab View -> Tasks -> Install

enter image description here

La answered 25/3, 2020 at 9:3 Comment(2)
this fix the problem I had with my LibGdx game. Thx!Sadirah
My computer's power was disconnected due to an electricity issue while I was working on an android project. So I started facing this issue after that. Your answer solved my problem. Thanks!Henslowe
B
15

For me doing:

File -> Invalidate Caches / Restart

worked fine ^^

Boot answered 15/2, 2022 at 16:27 Comment(0)
D
9

For me the solution was apparently to update the Gradle plugin...

Diamine answered 3/3, 2020 at 10:41 Comment(1)
to which versionHeteropolar
T
9

Workaround 1

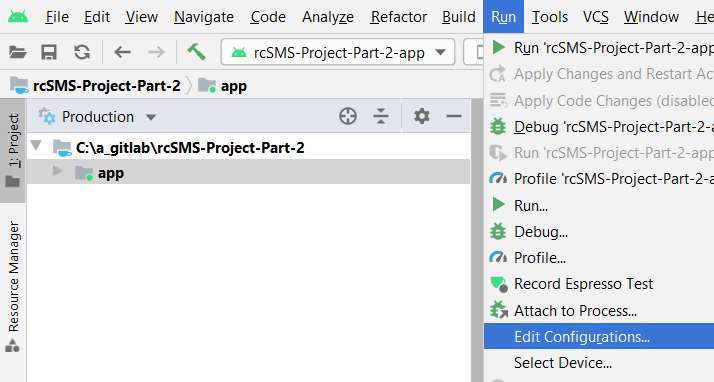
Create a new configuration for Run with the same parameters as the default config app. This work for me.

  1. Run
  2. Edit Configuration
  3. Add New Configuration (NOT COPY) -> Android App
  4. Rename
  5. Choose app Module
  6. Apply

Workaround 2

  1. Use the task for install in Gradle Tab View -> Tasks -> Install
  2. Run the app.

Workaround 3

  1. Delete .gradle folder
  2. Invalidate Caches / Restart ...
  3. Run the app
Thirtytwomo answered 12/2, 2021 at 21:38 Comment(2)
Workaround 1 worked by deleting the app run config and resyncing the Gradle.Meath
workaround 1 worked but plz can u tell me the reason behind that?? why does it works? and why it wasn't working before?Planish
R
7

I faced this problem today.

Select "Default APK" from the installation option and click on the add icon button. Select "Gradle-aware Make"->"OK" enter image description here

Rika answered 13/10, 2021 at 7:29 Comment(1)
Nothing else worked but this did.Wahlstrom
C
5

Do follow the three steps:

  1. Clean project: Build(menu) >> Clean Project
  2. Sync project: File(Menu) >> Sync Project with Gradle Files
  3. Rebuild project: Build(menu) >> Rebuild Project

Now run your app and enjoy.

Cud answered 6/6, 2021 at 6:0 Comment(0)
I
4

Sometimes a gradle sync and run will do the job. I was facing this after gradle plugin update too. Gradle sync might not have happened sometimes.

Intestine answered 15/10, 2020 at 4:17 Comment(0)
L
4

First clean your project and then rebuild the project it will solve the problem

Lackey answered 18/5, 2022 at 7:42 Comment(0)
N
3

Set Deploy to NOTHING worked for me. (kudos to above nvatvm above)

enter image description here

enter image description here

Nikitanikki answered 19/5, 2020 at 16:3 Comment(1)
I believe this will just run the application, but without updating it. At least if it's not an instant app.Bohi
I
3

First of all Clean Project and Rebuild Project. If it doesn't work then the Easy, Hardcore, Fast approach which works for me was just deleting the two following folder named .gradle and .idea after closing the IDE and restart it -

enter image description here

Igbo answered 26/2, 2021 at 4:52 Comment(1)
Only removing .gradle folder actually helped me. Invalidate Caches / Restart, Rebuilding project had no effectBastard
L
3

The other answers are not working for me. The only solution that worked for me was to delete .gradle and .idea folders.

Laminate answered 13/12, 2022 at 2:4 Comment(1)
I tried all the soludion mentioned in below answers and comments. Neither those workaround or your mentioned work around is working for me :(. Also I noticed a strange a problem for another project with same Gradle and Android Gradle plugin version it is working fine. The project for which I got issue was working fine even after Android Studio update to Dolphin but suddenly past 2 week this issue occured.Supernal
F
2

Ensure that your have set applicationId "com.example.myapp" in your build.gradle

android {
    ...
    defaultConfig {
        applicationId "com.example.myapp"
        minSdkVersion 19
        targetSdkVersion 28
        versionCode 1
        versionName "1.0"
    }
    ...
}

And from app -> Edit Configurations, ensure that you have selected "Default Activity"

Fitter answered 4/6, 2019 at 9:5 Comment(0)
S
2

Project Structure - Suggestions - Update Gradle

Superstructure answered 6/11, 2020 at 16:36 Comment(0)
P
2

Try running the following command on the Android Studio Terminal:

  • gradlew connectedAndroidTest
Pyemia answered 17/6, 2021 at 5:3 Comment(1)
Thanks, dear, you are a lifesaver. Very Helpful in my caseConformity
L
1

My solution was to upgrade Android Studio from "Artic Fox | 2021.3.1 Canary 12" to "Artic Fox | 2021.3.1 Canary 13"

Livraison answered 7/4, 2021 at 9:47 Comment(0)
N
1

You need to update the Gradle version: go to File -> Project structure, then update the Android Gradle Plugin version, and Gradle Version to the latest stable versions(now 7.0.2 & 7.2 respectively)

Nuts answered 21/9, 2021 at 15:36 Comment(1)
Your answer could be improved with additional supporting information. Please edit to add further details, such as citations or documentation, so that others can confirm that your answer is correct. You can find more information on how to write good answers in the help center.Enkindle
F
0

View Gradle Table => right click the application => click "Reload Gradle Project"

Filly answered 27/3, 2021 at 14:36 Comment(0)
K
0

Check if you have Build Variant selected: Go to Menu > Build > Select Build Variant

Select a build variant that ends with Debug for the Release Variants you need the signing certificate configured correctly.

Kiarakibble answered 5/5, 2021 at 15:48 Comment(1)
My build variant is greyed out but my device is plugged in and recognized by Android StudioFugal
S
0

setting Installation Options-> Deploy: APK from app bundle worked for me.

Sodden answered 29/11, 2022 at 10:28 Comment(0)
A
0

Nothing worked for me like the clean build, rebuild and invalidate cache restart. Here's my solution to this problem.

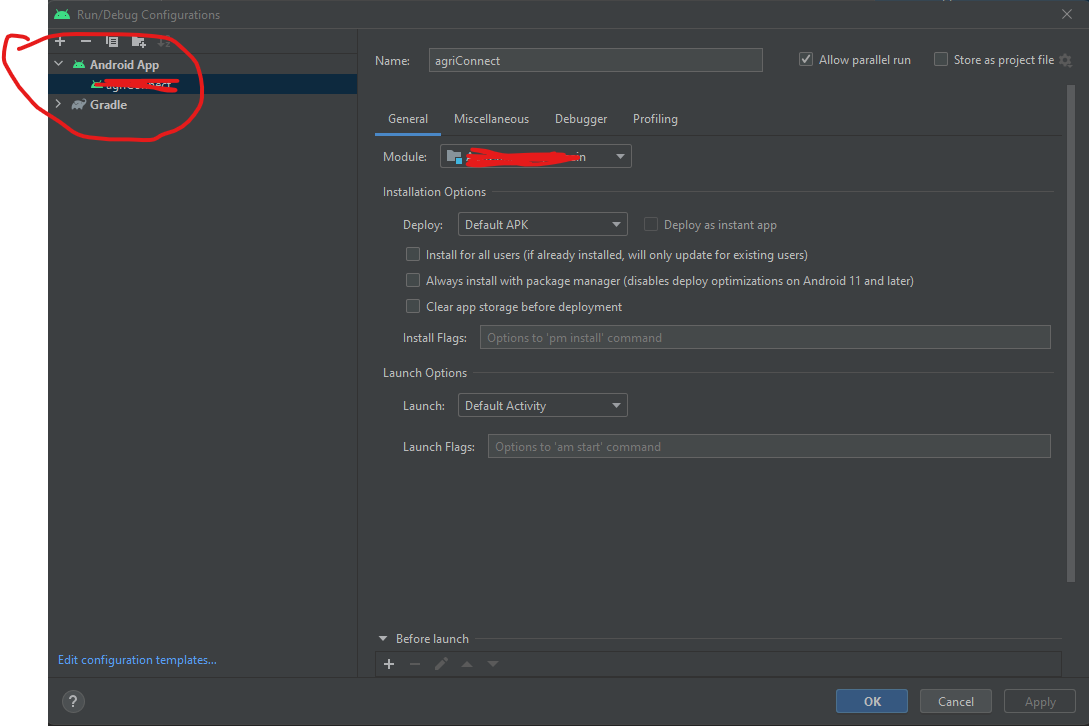
The workaround was to delete the existing app configuration from Run/Debug Configurations. enter image description here

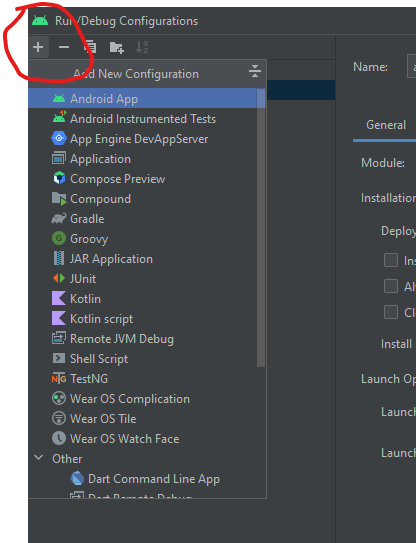
After that add new configuration by clicking the left top + icon and then add Android App.

enter image description here

Alake answered 12/1, 2023 at 10:49 Comment(0)
F
0

After migrate my project to another computer I get the same error.

The Solution for my case was:

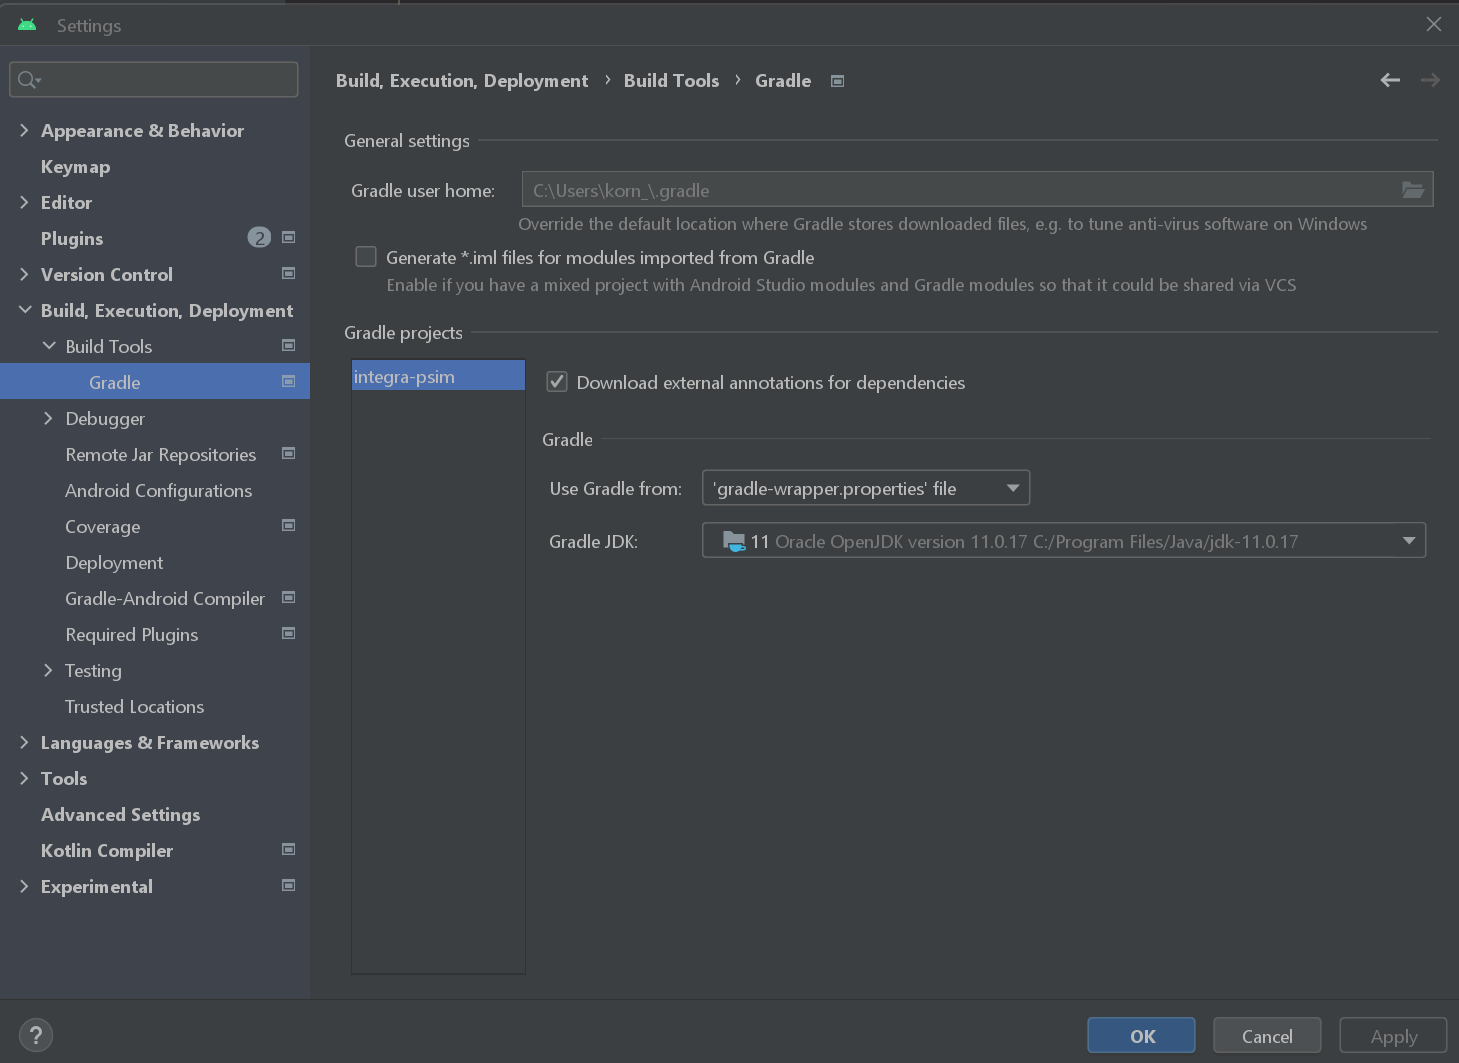
The problem was because I had diferent Java Versions in the .gradle and the Settings Build Tools. After I update both I made a Rebuild Project and my project compile again. Here are my correct configurations:

enter image description here

My build.gradle.kts enter image description here

Flyover answered 21/10, 2023 at 3:52 Comment(0)
O
-1

The answer by @applixy worked for me. 1.Just note to update the classpath to the latest version in project->build.gradle to

classpath 'com.android.tools.build:gradle:4.1.1'

2.And in the gradle->wrapper.proprties just apply sync with gradle upon distributionUrl=https://services.gradle.org/distributions/gradle-6.5-all.zip

3.My project already had the google() method on allprojects{}. So build your project and run you are good to go.

Offal answered 5/1, 2021 at 8:46 Comment(0)
A
-3

Error: Unable to determine application id: com.android.tools.idea.run.ApkProvisionException: No outputs for the main artifact of variant: debug

Solution : Go to:

  1. File
  2. project structure (Ctrl + Alt + Shift + S)
  3. Suggestions
  4. Update Graddle

Then wait for downloading griddle to solve your problem.

Antonantone answered 29/11, 2020 at 13:12 Comment(1)
These questions has already similar answers. Please don't copy other's answers.Creatural

© 2022 - 2024 — McMap. All rights reserved.