Error: No toolchains found in the NDK toolchains folder for ABI with prefix: llvm
Asked Answered
M

55

278

I want to compile an open source android project (Netguard) using gradel (gradlew clean build) But I encountered this Error:

A problem occurred configuring project ':app'.
> Exception thrown while executing model rule: NdkComponentModelPlugin.Rules#cre
ateToolchains
   > No toolchains found in the NDK toolchains folder for ABI with prefix: llvm

I serached but didn't find enything helping. Here is the main build.gradle:

buildscript {
    repositories {
        jcenter()
    }
    dependencies {
        classpath 'com.android.tools.build:gradle-experimental:0.6.0-alpha1'
    }
}
allprojects {
    repositories {
        jcenter()
    }
}
task clean(type: Delete) {
    delete rootProject.buildDir
}

And here is the build.gradle of the app project:

apply plugin: 'com.android.model.application'

model {
    android {
        compileSdkVersion = 23
        buildToolsVersion = "23.0.2"

        defaultConfig.with {
            applicationId = "eu.faircode.netguard"
            minSdkVersion.apiLevel = 21
            targetSdkVersion.apiLevel = 23
            versionCode = 2016011801
            versionName = "0.76"
            archivesBaseName = "NetGuard-v$versionName-$versionCode"
        }
    }
    android.ndk {
        moduleName = "netguard"
        toolchain = "clang"
        ldLibs.add("log")
    }
    android.sources {
        main {
            jni {
                source {
                    srcDir "src/main/jni/netguard"
                }
                exportedHeaders {
                }
            }
        }
    }
    android.buildTypes {
        release {
            minifyEnabled = true
            proguardFiles.add(file('proguard-rules.pro'))
            ndk.with {
                debuggable = true
            }
        }
    }
    android.buildTypes {
        debug {
            ndk.with {
                debuggable = true
            }
        }
    }
    android.productFlavors {
        create("all") {
        }
    }
}

dependencies {


compile fileTree(dir: 'libs', include: ['*.jar'])
    compile 'com.android.support:appcompat-v7:23.1.+'
    compile 'com.android.support:recyclerview-v7:23.1.+'
    compile 'com.squareup.picasso:picasso:2.5.+'
}

And I'm using gradle-2.9-all and android-ndk-r10e. I don't know if I should mention anything else, so comment if you need any information.

Mogul answered 1/2, 2016 at 10:29 Comment(3)
Try to update the gradle tools. classpath 'com.android.tools.build:gradle:3.2.0-beta05'Consalve
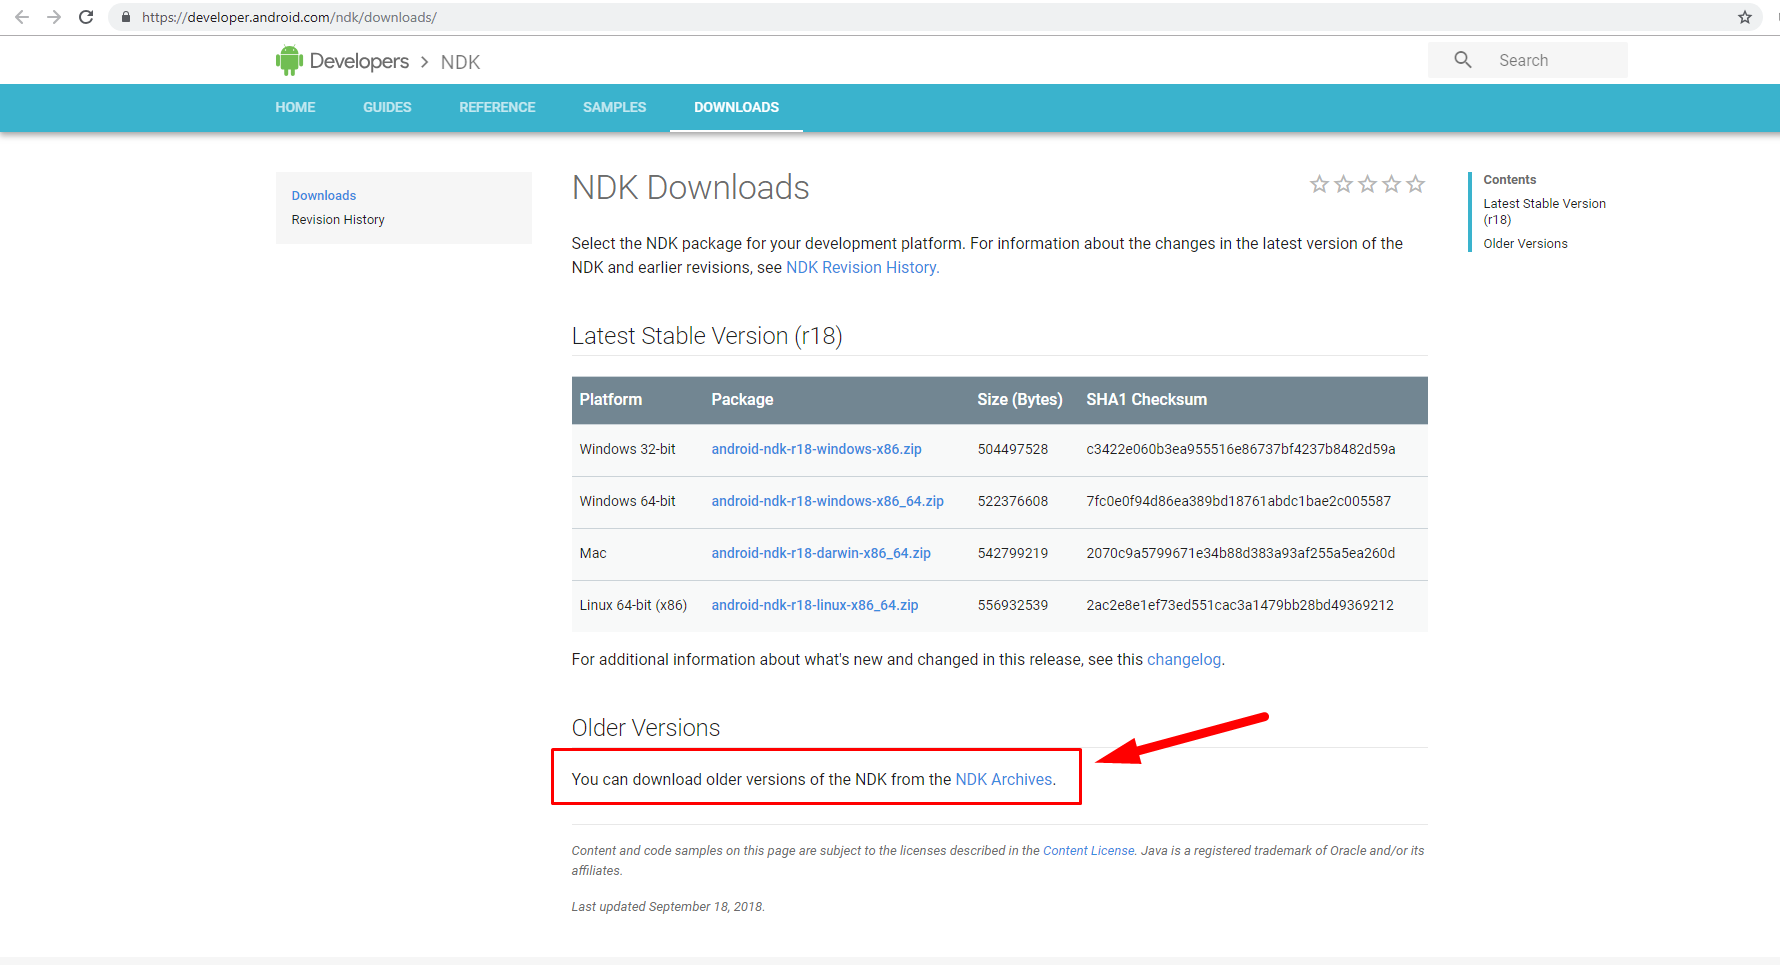
use developer.android.com/ndk/downloads/older_releases and Android NDK, Revision 16b (December 2017) version to download required folders and fix the issue.Outfield
Check this thread of three options for solving this kind of issueSweettalk
F
416

Two years has passed, now if you come across here, you may possibly encounterd error message like this:

No toolchains found in the NDK toolchains folder for ABI with prefix mips64el-linux-android

or

No toolchains found in the NDK toolchains folder for ABI with prefix mipsel-linux-android

Latest NDK removed support for mips abi, and earler version of android gradle plugin still check for the existance of mips toolchain. see here for more info.

Solution: Upgrade android gradle plugin to 3.1 or newer.

e.g. Add following in the project level gradle [28-Sept-2018]

 classpath "com.android.tools.build:gradle:3.2.0"

Workaround: Create mipsel-linux-android folder structure to fool the tool. The easiest way would be to symbolic link to aarch64-linux-android-4.9.

# on Mac
cd  ~/Library/Android/sdk/ndk-bundle/toolchains
ln -s aarch64-linux-android-4.9 mips64el-linux-android
ln -s arm-linux-androideabi-4.9 mipsel-linux-android

Check this thread of three options for solving this kind of issue

Flowerage answered 6/9, 2018 at 12:28 Comment(15)
Tried with gradle 4.1, didn't work, but workaround (creation of folder mipsel-linux-android-dummy) worked. Thanks @lazybug.Hobnob
@Girish upgrade Android Gradle Plugin in top level build.gradle file, something like com.android.tools.build:gradle:3.2.0-rc02, not Gradle versionLathe
The Workaround mentioned here is the correct one: # on Mac cd ~/Library/Android/sdk/ndk-bundle/toolchains ln -s aarch64-linux-android-4.9 mips64el-linux-android ln -s arm-linux-androideabi-4.9 mipsel-linux-androidEndoenzyme
On Windows: mklink /d mips64el-linux-android aarch64-linux-android-4.9 and mklink /d mipsel-linux-android arm-linux-androideabi-4.9 worked for me too.Capper
The "on Mac" workaround works fine (adapt ~/Library part). But the next update of NDK (2018 Oct 14) found a whole bunch of unexpected files in the mips* trees. Not surprising. So I removed the symbolic links again.London
On windows create this folder structure to solve the error: Android\sdk\ndk-bundle\toolchains\mips64el-linux-android\prebuilt.Cutcheon
worked for me : classpath "com.android.tools.build:gradle:3.2.0"Clabo
From the cited link under 'see here for more info': "You will also need to upgrade to Android Studio 3.1 or newer." - Make sure you do that.Shaky
I upgraded to AS 3.2.1 and got this stupid dependency failure even though the project I'm building doesn't use NDK. I upgraded the project Gradle as per the instructions in #17728145 and went through two passes of upgrades, including tools. Finally AS is back to baseline functionality. Gradle's purpose is to make these build problems go away, but maintaining Gradle is its own source of the problems.Slipstream
Worked like a charm! Had exactly the same situation: forked a git project with implicit classpath 'com.android.tools.build:gradle:3.0.0' in build.gradle. Changed to classpath 'com.android.tools.build:gradle:3.2.1' and everything started to compile fine.Lauder
Not working for me "ERROR: Expected caller to ensure valid ABI: MIPS".Pastry
The work around no longer works in android studio 3.3 on mac. After creating symbolic links receiving an index out of bounds -1 error during the gradle sync. Very frustrating there is zero support for older gradle version, I thought the point of using a wrapper was to avoid this.Brandonbrandt
Creating twice symbolic links solved my problem on MacOS, Android Studio 3.3.Dissociable
You can check your native dependencies' SO files, if any. It may contain SO for MIPS that is not supported anymore, thus making NDK fail. Removing those SO files for MIPS is safe, and it will make error disappear.Whidah
For me works this github.com/flutter/flutter/issues/76393#issuecomment-836625949Septuplet
D
104

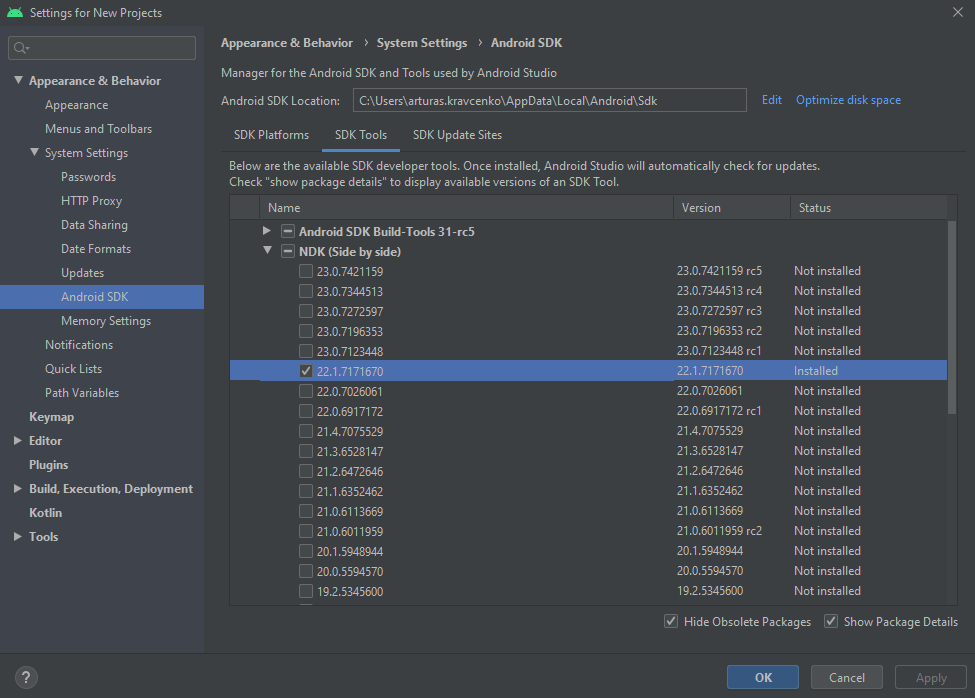
I fixed this Error by uninstalling the NDK in the SDK-Tools. So, if you don't need the NDK, uninstall it.

Dorm answered 11/3, 2016 at 15:16 Comment(8)
What if I need NDK?Middleclass
same here if we want NDK then what is the solution for it?Kauffman
Its fixed if uninstall the NDK but if you required to use NDK then please Check this https://mcmap.net/q/107992/-error-no-toolchains-found-in-the-ndk-toolchains-folder-for-abi-with-prefix-llvmBangs
To uninstall follow this https://mcmap.net/q/110290/-no-toolchains-found-in-the-ndk-toolchains-folder-for-abi-with-prefix-mips64el-linux-android-duplicateVenavenable
Its very strange despite the fact this is not the perfect answer to the problem , its still up voted .Tanbark
works still in 2023 ;)Capper
To solve the headache, let's kill the patient. Done!Merriman
This is the best solution. If you need NDK I believe it installs it for you automaticallySandlin
V
71

For Android studio 3.2.1+

Upgrade your Gradle Plugin

classpath 'com.android.tools.build:gradle:3.2.1'

If you are now getting this error:

Could not find com.android.tools.build:gradle:3.2.1.

just add google() to your repositories, like this:

repositories {
    google()
    jcenter()
}
Vane answered 20/10, 2018 at 6:28 Comment(2)
Check this thread of three options for solving this kind of issueSweettalk
this worked for me . instead of this classpath 'com.android.tools.build:gradle:3.2.1'Stypsis
R
39

I have faced the same problem while update Android studio from 2.0 to 2.1 in my Windows 8 machine.

I found a solution for that.Please use the following steps.

  1. Download the android NDK for windows from https://developer.android.com/ndk/downloads/index.html.
  2. Extract the same and copy the "toolchain" folder from the bundle.
  3. Paste the folder under installed NDK folder under C:\android-sdk-win\ndk-bundle.[Installed the path may vary based on your installation]
  4. Restart android studio.

This is happening because Android studio won't gets full NDK update in the stable channel. If you are not using NDK for your project development you can simply remove the NDK folder from your SDK directory.

Rancor answered 11/7, 2016 at 12:2 Comment(2)
Works with Android Studio 3.2!Shingle
This also worked for me for fixing the error "Error : Android MIPS ToolChain directory "" does not exist" in Game Maker Studio 2 on a Mac. But I needed to get version 17c of the NDK from here : developer.android.com/ndk/downloads/older_releases (as per: reddit.com/r/gamemaker/comments/9m958a/…) Thank You @nithinjith ! ... still not building however, need to solve : Android NDK: Please fix the APP_ABI definition in /Users/../Library/Android/sdk/ndk-bundle/build/core/default-application.mk Arachnoid
V
37

Error message:

No toolchains found in the NDK toolchains folder for ABI with prefix: llvm.

After fresh web installation of Android Studio with NDK, I imported an Android code sample that used NDK from GitHub and tried to compile it.

As a result had an Error:

No toolchains found in the NDK toolchains folder for ABI with prefix: llvm

Solution: for some reasons standard installation process on macOS had failed to install a complete set:

~/Library/Android/sdk/ndk-bundle had missed folder toolchains with all tools,

(it should be like this: ~/Library/Android/sdk/ndk-bundle/toolchains)

The solution was to download NDK separately, open it, copy folder toolchain and paste it to the folder:

~/Library/Android/sdk/ndk-bundle
Vouchsafe answered 5/6, 2016 at 19:39 Comment(3)
in my case it's there but no file there with prefix aarch64-linux-android. Any suggestion !!Actaeon
folder 'mips64el-linux-android-4.9' & 'mipsel-linux-android-4.9' are not available after ndk bundle 16, so i have to download and add these two folder in android sdk bundle inside toolchains folder hence issue solved, still didn't understand why this error?Arbogast
Check this thread of three options for solving this kind of issueSweettalk
M
27

Step-by-step:

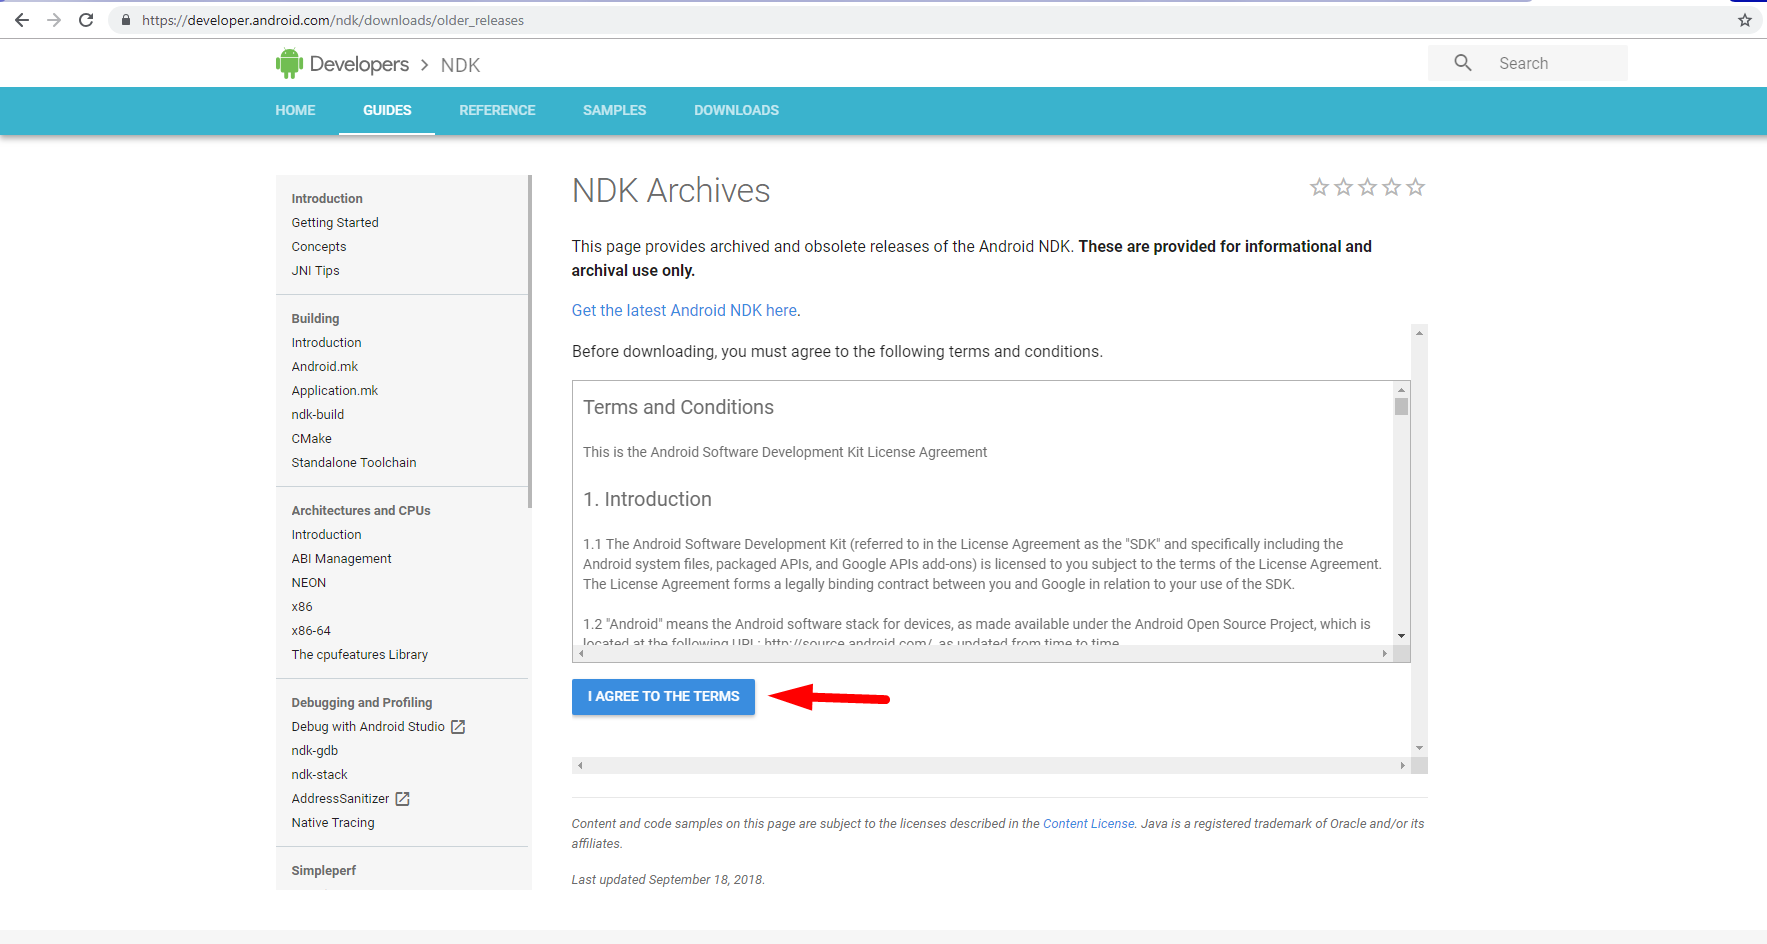
1) Open the page with old NDK versions:

https://developer.android.com/ndk/downloads/older_releases

enter image description here

2) Agree the Terms:

enter image description here

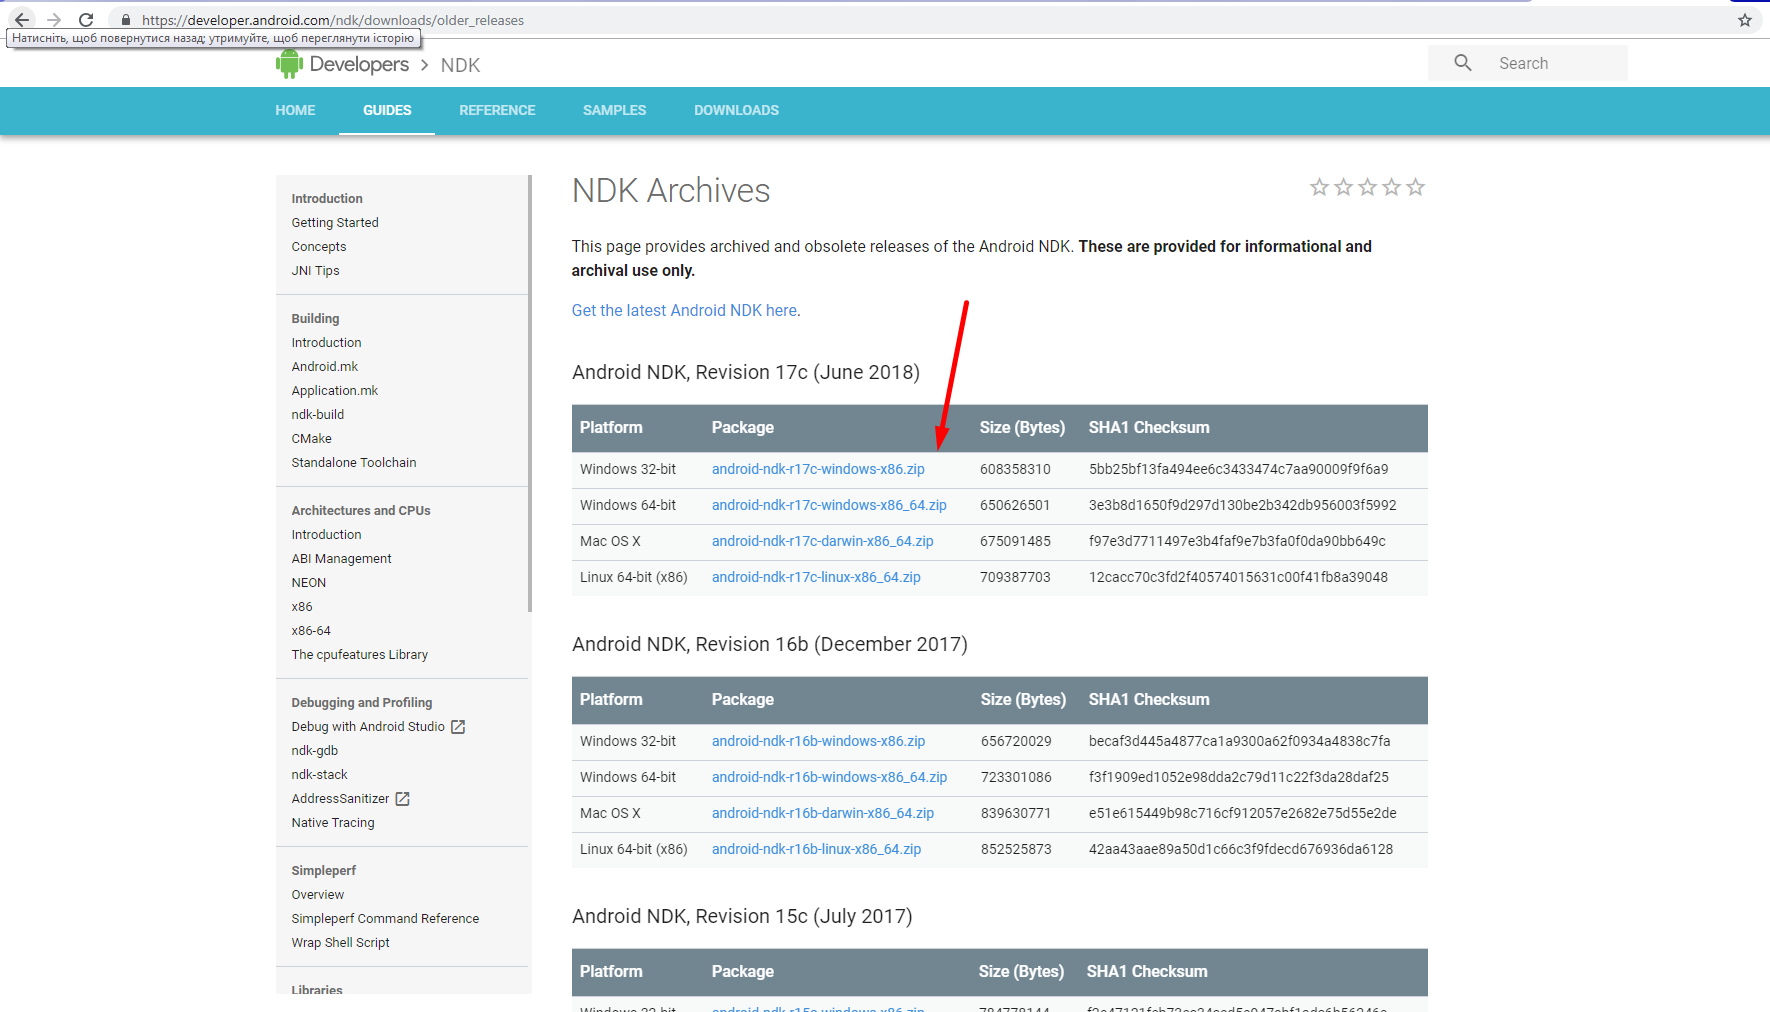
3) Download the older version of NDK (for example 16b):

enter image description here

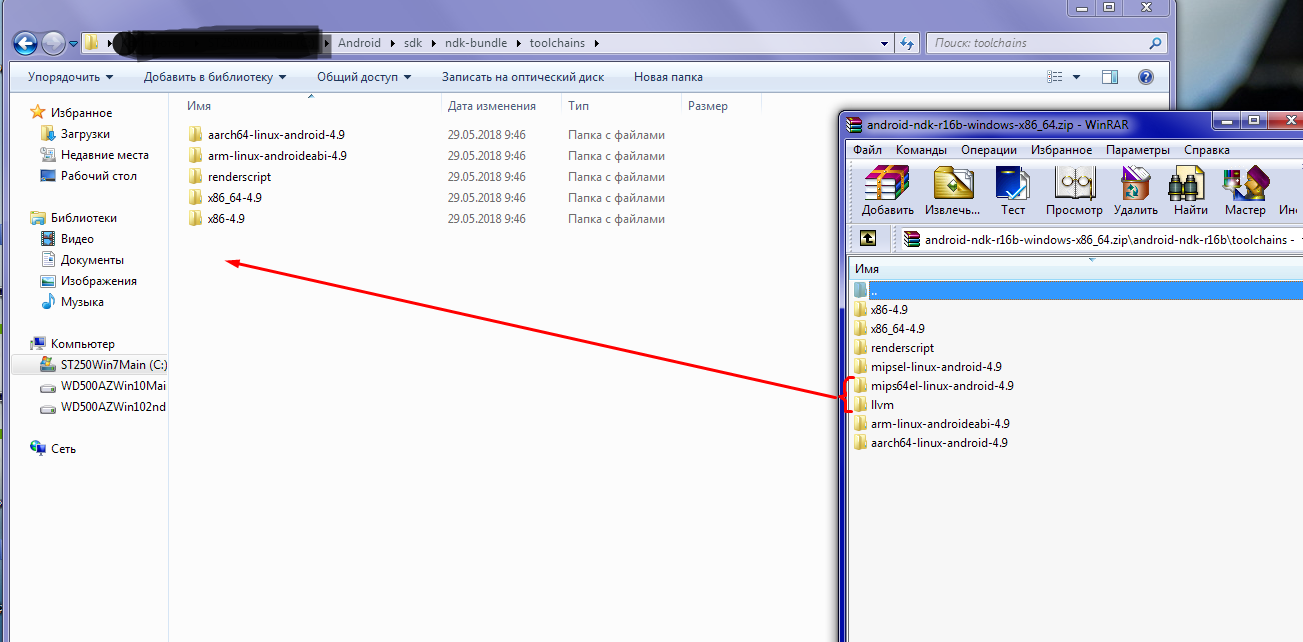
4) Open your toolchains directory.

5) Transfer files that you need from toolchains folder of downloaded zip-file to your toolchains folder:

enter image description here

6) Rebuild the Project:

enter image description here


UPD 30 Sep 2018:
I used Android NDK Revision r16b for fix this error in my own case. So I present the example with this version.
But it's better to use the Android NDK, Revision r17c (June 2018). It is the last one, supporting mips (reasonable reccomendation from Weekend's comment).

Millsaps answered 22/9, 2018 at 8:16 Comment(6)
Instead of (for example 16b), it's better to clarify which NDK version is the last one supporting mips. via release note of Android NDK Revision r17c (June 2018): Support for ARMv5 (armeabi), MIPS, and MIPS64 has been removed. Attempting to build any of these ABIs will result in an error. It's 16b exactly.Maestas
@Maestas Thanks for your recommendation. I added it to my answer.Millsaps
@vmarch Sorry but It's 16b exactly. r17c is the first version which removed the support for MIPS :)Maestas
@Oh, I read your previous comment so very quickly. That's why I missed the point. My apologize! But these files are still present in the Android NDK, Revision r17c (June 2018). And in version 18 they were finally removed. Just look into the archive. developer.android.com/ndk/downloads/…Millsaps
@vmarch Well done! I didn't check r17c archive, just inferred the previous conclusion from release notes.Maestas
awesome solution - exactly what I needed.Bronwynbronx
H
20

The best solution for this problem is:

  1. Go to SDK Manager.

  2. Next choose SDK tools.

  3. Unselect NDK (side by side).

  4. Apply and OK.

Heavyhearted answered 15/11, 2021 at 11:40 Comment(1)
easy! tnx for the quick solutionBonine
C
18

Without downloading, copying, or symlinking anything, I was able to "fix" the error by simply creating an empty directory where the older version of the Android Gradle plugin expects the removed mips toolchain:

mkdir -p $ANDROID_HOME/ndk-bundle/toolchains/mips64el-linux-android/prebuilt/linux-x86_64

Obviously, $ANDROID_HOME points to the root of the Android SDK installation here. If you are using MacOS, replace linux-x86_64 with darwin-x86_64 in the command above. On Windows use windows-x86_64.

Cannonry answered 2/10, 2018 at 12:51 Comment(2)
Worked like charm.Aruwimi
Depends on what your project refers to. Did not work for me, but is a nice and simple trick for some. I had to copy the real toolchain to get rid of the error.Lifeline
B
16

I uninstalled the NDK since I didn't need it . Go to SDK manager on Android studio ( Tools -> Android -> SDK Manager ) . If NDK is installed . Just uncheck the box and click OK . The installed components will be deleted .

Britzka answered 24/5, 2016 at 9:38 Comment(0)
S
10

To resolve the issue just go to:

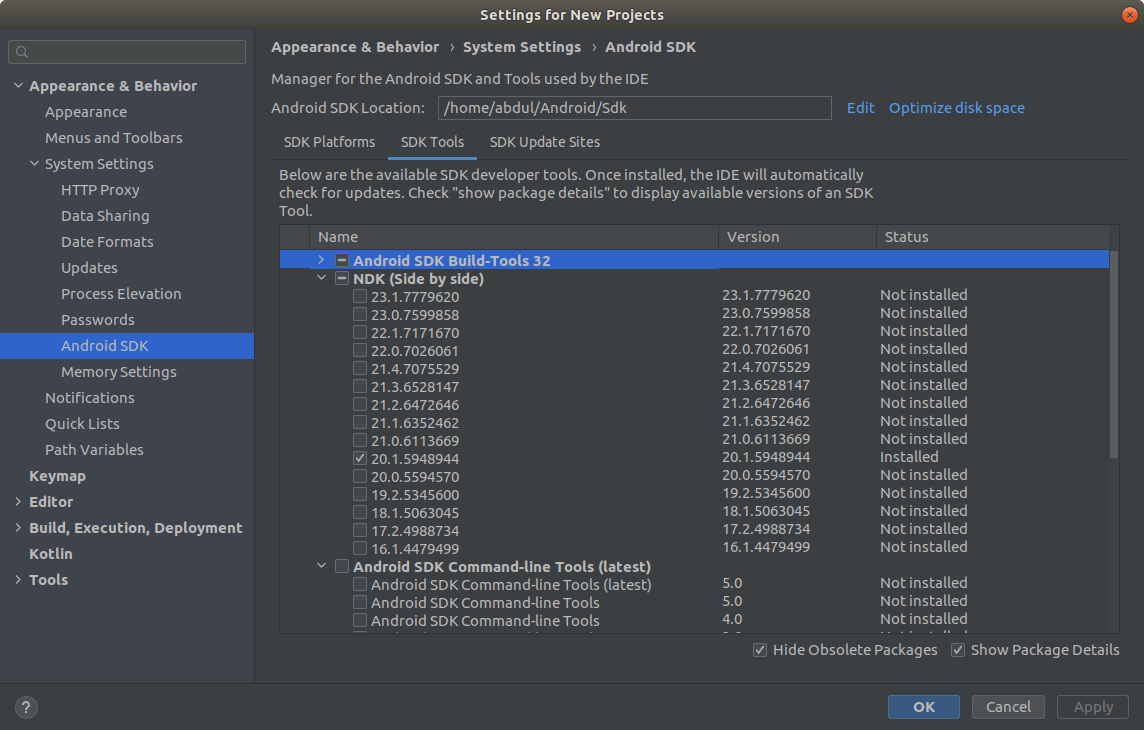
tools->Sdk Manager -> Android Sdk -> SDK Tools in Android Studio and Uncheck the NDK versions and only select 20.1.5948944 version and install that. enter image description here

I resolved the same issue in linux(Ubuntu) machine using this technique.

Sept answered 18/1, 2022 at 8:51 Comment(2)
On Catalina removed NDK and it worked.Ghetto
If you are here with same issue, today being 5th April 2024, 5:52 PM. This stuff was the solution to my problem with a legacy Flutter code. Flutter version 1.22.4. to be precise.Phenology
D
9

In my case, this error occured when creating a new Android Studio (Android studio 3.2.1) Java Project with

    classpath 'com.android.tools.build:gradle:2.0.0-beta6'

So I´ve downgraded to

       dependencies {
        classpath 'com.android.tools.build:gradle:3.2.1'
      }

Not the best solution stay at an older version, but maybe it´s just a temporary bug in the beta as the NDK path in local.properties is still the same, but the IDE doesn´t complain anymore

Doble answered 13/3, 2016 at 11:20 Comment(2)
I think this is a bug of outdated gradle plugin. Just update to the latest one. It helped to me (from 3.0 to 3.2.0-beta05 in my case)Arthurarthurian
I think It's upgraded not downgraded ... PCranial
C
7

Android NDK 18.0* seems has an issue not creating all the files in folders after extraction. Due to it, your app compilation will fail which uses ndk builds.

Better is to use NDK 17.1* (https://developer.android.com/ndk/downloads/) etc version and you can extract or use the android studio extraction to ndk-bundle by default will work good.

Crosier answered 30/7, 2018 at 7:58 Comment(0)
M
5

Open Android Studio, Go to Tools then Android and then SDK, uncheck NDK If you do not need this, and restart android studio.

Menchaca answered 8/10, 2018 at 9:31 Comment(0)
A
5

[https://github.com/tensorflow/tensorflow/tree/master/tensorflow/examples/android][1]

For people trying out this example and facing issues with latest NDK. Can follow this solution. In build.gradle change this

classpath 'com.android.tools.build:gradle:3.0.1'

To

classpath 'com.android.tools.build:gradle:3.1.2'

The reason is mips are deprecated in the latest ndk versions, Gradle version 3.1.2 will not have a compulsion for mips. It assumes the presence for these missing folders.

Aplanospore answered 17/12, 2018 at 9:58 Comment(0)
B
5

The simple solution is download and extract the following file which contains mips64el-linux-android-4.9 and mipsel-linux-android-4.9 folders,to your toolchains folder inside sdk "android-sdk\ndk-bundle\toolchains".

Downlod this file and extraxt to toolchains foolder

Bethlehem answered 24/2, 2019 at 16:28 Comment(1)
Extract and then execute # on Mac cd ~/Library/Android/sdk/ndk-bundle/toolchains ln -s aarch64-linux-android-4.9 mips64el-linux-android ln -s arm-linux-androideabi-4.9 mipsel-linux-androidKenyakenyatta
G
5

Had the same issue. Installed latest NDK rc version by default. Latest stable release fixed the issue. enter image description here

Gallice answered 28/6, 2021 at 9:6 Comment(0)
G
4

When compiling a project in android studio, I occasionally encounter:

Error: No toolchains found in the NDK toolchains folder for ABI with prefix: arm-linux-androideabi/llvm

This may be caused by updating related components. The solution is to Android studio ( Tools -> Android -> SDK Manager ) . Select the ndk item and delete it. If the program needs it, you can re-install it. This will ensure that the folder location is correct and there will be no such problem.

Gignac answered 1/8, 2018 at 8:3 Comment(1)
I deleted it. But when I compile my app, ndk is downloaded again. Did not work for me.Glassy
U
4

After looking around, the solution was to remove the NDK designation from my preferences.

Android Studio → Preferences → System Settings → Android SDK → SDK Tools → Unselect NDK → Apply button.

Project and Gradle compiled fine after that and I was able to move on with my project work.

As far as why this is happening, I do not know but for more info on NDK check out:

Urethrectomy answered 16/7, 2019 at 15:5 Comment(0)
L
4

Uninstalling the ndk solve the problem for me.

Lesialesion answered 11/5, 2022 at 17:50 Comment(0)
M
3

I've had a similar problem, but I wanted to use NDK version r9d due to project requirements.

In local.properties the path was set to ndk.dir=C\:\\Android\\ndk\\android-ndk-r9d but that lead to the problem:

No toolchains found in the NDK toolchains folder for ABI with prefix: [toolchain-name]

The solution was to:

  1. Install the newest NDK using sdk manager
  2. Copy the missing toolchain [toolchain-name] from the new ndk to the old. In my case from sdk\ndk-bundle\toolchains to \ndk\android-ndk-r9d\toolchains
  3. Repeat the process till all the required toolchains are there

It looks to me that the copied toolchains are not used, but for some reason it is needed to for them be there.

Maurya answered 23/3, 2017 at 11:30 Comment(0)
X
3

Solved it by adding google() dependency into both repositories in build.gradle(Project: ProjectName). then sync your project

buildscript {
    repositories {
        google()
        jcenter()
    }
    dependencies {
        classpath 'com.android.tools.build:gradle:2.3.2'

        // NOTE: Do not place your application dependencies here; they belong
        // in the individual module build.gradle files
    }
}

allprojects {
    repositories {
        google()
        jcenter()
    }
}
Xenophon answered 19/10, 2018 at 19:19 Comment(0)
T
3

In your project level Gradle file increase the dependencies classpath version low to high like

dependencies {
        classpath 'com.android.tools.build:gradle:3.0.0'
    }

to change like

dependencies {
        classpath 'com.android.tools.build:gradle:3.2.1'
    }
Tamarah answered 8/11, 2018 at 14:25 Comment(0)
S
2

I solved this question by unInstalled ndk, becasuse I dont't need it

Spawn answered 10/5, 2018 at 6:20 Comment(0)
O
2

I navigated to local.properties, and in there the

ndk.dir=/yo/path/for/NDK

line needs to be updated to where your ndk lies.

I was using Crystax NDK, and didn't realize the original Android NDK was still in use.

Osana answered 22/10, 2018 at 21:56 Comment(0)
C
2

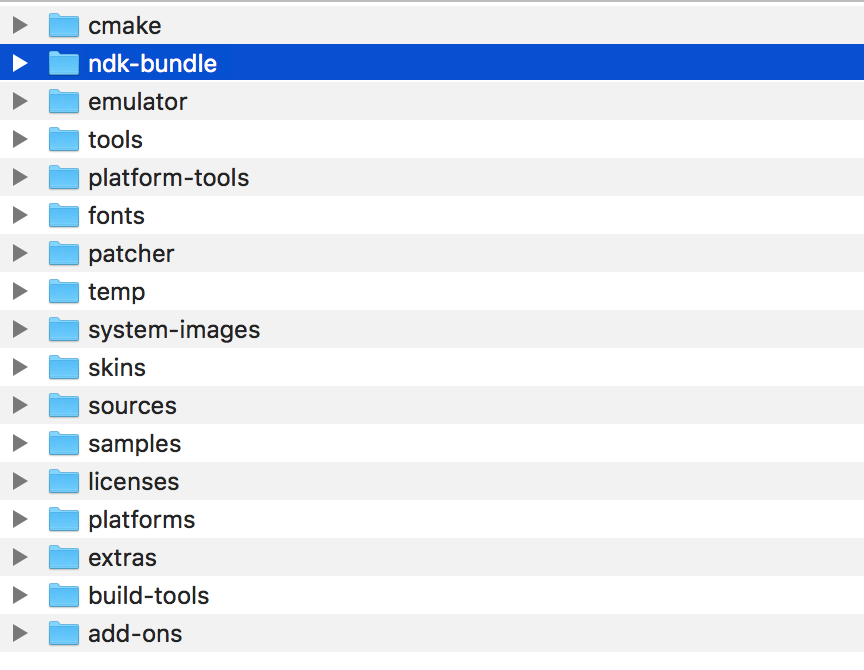
Find your own local android-SDK, if you download the relevant SDK of ndk, there will be a folder called "ndk-bundle"

enter image description here

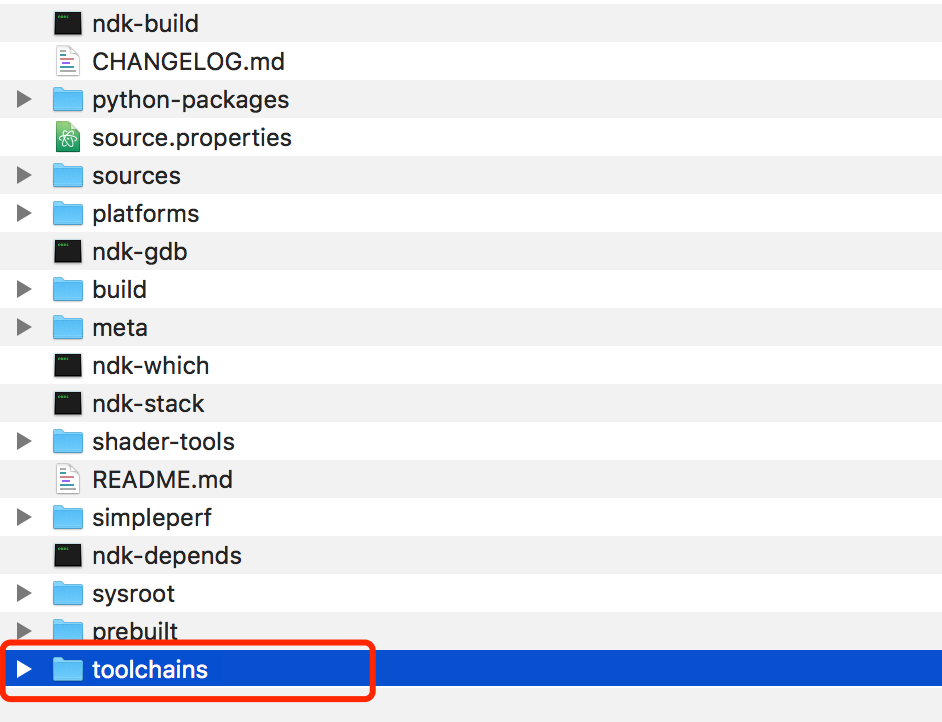
There is a folder called "toolchains" inside.

enter image description here

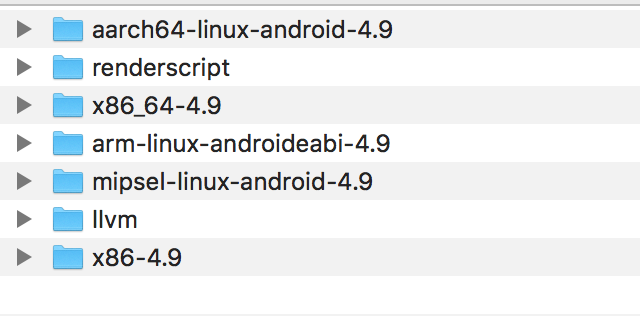
We noticed that there are no mips64el related files inside.

enter image description here

The solution is as follows:

Click here to download the NDK package separately through the browser. After unzipping, open the "toolchains" folder, compare it with the android-sdk->ndk-bundle->toolchains folder, find the missing folder, copy the past three. Recompile, the problem is solved.

Convalescence answered 15/12, 2018 at 9:10 Comment(0)
F
2

To fix it like i did

Android Studio File> project structure and go to project

change Gradle version to 4.6 & Android plugin version to 3.2.1

check screenshot

then clean project if you got this Error "Could not find aapt2-proto.jar"

go to build.gradle (project)

Try moving the google() method (.gradle file) to the top of its execution block the order of repositories it searches in that causes the issue.

for example, change this:

repositories {
  maven { url 'https://maven.fabric.io/public' }
  google()      <===  from here
  mavenCentral()
}

To this:

repositories {
  google()     <===  to here
  maven { url 'https://maven.fabric.io/public' }
  mavenCentral()
}

Make those changes in both "buildscript" and "allprojects "

check screenshot

If you didn't find google() add it

Fuddyduddy answered 17/12, 2018 at 0:26 Comment(0)
A
2

For Android Studio 3.2.1 Update your

Gradle Version 4.6

Android plugin version 3.2.1

Alcuin answered 1/1, 2019 at 9:25 Comment(0)
C
2

The issue comes mostly when you are cloning a previous project specially from github. What you can do is

  1. Change the classpath to

classpath 'com.android.tools.build:gradle:3.2.1'

in your project level gradle.

  1. Then Change all the instances of compile with implementation except compileSdkVersion keep it as it is in your app level gradle.

  2. Instead of sync now click on make project(Ctrl+F9)

  3. Add google maven repositories if needed.

  4. Upgrade the gradle wrapper if needed.

(Android Studio IDE will ask / guide you with the same for steps 4 and 5)

Charlatanry answered 26/1, 2019 at 18:1 Comment(0)
R
2

I try to solve the problem using following method:

  1. Stay Android build tools version the same with gradle version. For example:if you use the build tools version is 3.3.0,your gradle version must be 4.10.1.You can reference by the link https://developer.android.com/studio/releases/gradle-plugin and chagne your build tools & gradle version in your AS(File->Project Structure->Project)

  2. If method1 don't work,you can custom your ndk toolchains version to solve the problem :like download ndk18 or ndk16 , setting the ndk path is your AS(File->Project Structure->SDK Location->Android NDK Location)

Reminiscence answered 28/7, 2019 at 3:51 Comment(0)
V
2

Navigate to C:\Users\lalit\AppData\Local\Android\Sdk\ndk-bundle\toolchains.

Now, find the folder name aarch64-linux-android-4.9 and rename it to mips64el-linux-android.

Re-run the android app.

Vomitory answered 5/5, 2020 at 18:21 Comment(0)
D
2

Delete all your NDK in sdk tools.

Discoloration answered 26/7, 2021 at 3:10 Comment(0)
C
1

For me I think there might be some issue in installing android NDK from android studio. I was able to resolve this in following manner

Downloaded android ndk from

https://developer.android.com/ndk/downloads/index.html

and placed inside ndk-bundle (where your android sdk is installed ). For more info check this screens.

https://app.box.com/s/dfi4h9k7v4h0tmbu3z9qnqx3d12fdejn

Clariceclarie answered 22/2, 2017 at 17:24 Comment(0)
C
1

If you don't use the NDK, unset the environment variable ANDROID_NDK_HOME.

Colugo answered 31/10, 2017 at 9:46 Comment(0)
H
1

I fixed the issue by reinstalling the NDK.

Harlequin answered 3/9, 2018 at 12:6 Comment(0)
S
1

If you are using Ionic 3 Remove ndk from android studio sdk tools.

Sit answered 30/9, 2018 at 8:40 Comment(1)
Great, as a temporary solution for the specific need of building ionic android projects, although is not ideal.Tye
R
1

Open your buldle.gradle file and upgrade the versions for following both classpath:

classpath 'com.android.tools.build:gradle:3.2.1'
classpath 'com.google.gms:google-services:4.2.0'

Then Sync and after get one dialog for update Gradle version as well then click that link and wait for download all required updates.

Robbery answered 25/12, 2018 at 18:34 Comment(0)
B
1

First, try updating the ndk version https://developer.android.com/ndk/downloads/

If that's not working then you can try the following:

  • Create a folder

    Go to the Sdk\ndk-bundle\toolchains folder (in my case its C:\Users\USER\AppData\Local\Android\Sdk\ndk-bundle\toolchains; you can find yours under File->project structure->SDK location in you android studio) and create a folder with the name that's shown as missing in the error for eg: if the error is

    Gradle sync failed: No toolchains found in the NDK toolchains folder for ABI with prefix: mipsel-linux-android

    Then create a folder with name mipsel-linux-android

  • Include content Go to the Sdk\ndk-bundle\toolchains folder again and open any folder that's already in it. For example:Sdk\ndk-bundle\toolchains\aarch64-linux-android-4.9 (in mycase C:\Users\USER\AppData\Local\Android\Sdk\ndk-bundle\toolchains\aarch64-linux-android-4.9) copy the prebuilt folder in it to the folder we created in the last step

Buchbinder answered 8/1, 2019 at 17:5 Comment(0)
O
1

NOTE: This answer seems to be specific to: No toolchains found in the NDK toolchains folder for ABI with prefix: mips64el-linux-android, but it was linked here by:

* https://mcmap.net/q/110290/-no-toolchains-found-in-the-ndk-toolchains-folder-for-abi-with-prefix-mips64el-linux-android-duplicate

From NDK r19b:

more ~/Android/Sdk/ndk-bundle/CHANGELOG.md
  • This version of the NDK is incompatible with the Android Gradle plugin version 3.0 or older. If you see an error like No toolchains found in the NDK toolchains folder for ABI with prefix: mips64el-linux-android, update your project file to [use plugin version 3.1 or newer]. You will also need to upgrade to Android Studio 3.1 or newer.
Outermost answered 28/1, 2019 at 2:8 Comment(0)
S
1

In my case some supporting file was missing in new NDK version "23.0.7599858" so i downgraded the version to "22.1.7171670".You can also find all the downloaded version of NDK at "../Sdk/ndk".

android {
compileSdkVersion 30
buildToolsVersion "29.0.2"

defaultConfig {
    ...
    ...
    ndkVersion "22.1.7171670"
}
Steelhead answered 30/9, 2021 at 9:37 Comment(0)
D
1

Add the below line in local.properties(SDK Location)

ndk.dir=C\:\\Users\\<username>\\AppData\\Local\\Android\\Sdk\\ndk-bundle
Doris answered 26/11, 2022 at 20:6 Comment(0)
M
0

The steps I have followed to fix the issue are as follows:

  1. Analyze -> Code Cleanup

  2. File -> Project Structures -> Select project from the list and update the gradle version to latest.

  3. Build -> Clean Project

  4. Build -> Make Project

Now the issue related to the build may get reported like using compile instead of implementation etc.

Malefactor answered 2/9, 2018 at 15:0 Comment(0)
I
0

If you want to add NDK in your project then follow below steps:

  1. If you installed NDK using SDK Manager then uninstall first. (untick from SDK tools and apply)
  2. Download manually NDK from its official site. (any version) if project old then prefer version 17.
  3. Extract that file.
  4. Go to your project structure > NDK path > add Extracted file path here.
  5. Build Project.
Incommodious answered 3/10, 2018 at 8:17 Comment(0)
R
0

Upgrade your Gradle Plugin

  1. com.android.tools.build:gradle:3.1.4
    Upgrade gradle wraperpropeties

    distributionUrl=https://services.gradle.org/distributions/gradle-4.4-all.zip

Rarebit answered 10/12, 2018 at 14:2 Comment(0)
S
0

Open android/gradle/gradle-wrapper.properties and change this line: distributionUrl=

https\://services.gradle.org/distributions/gradle-4.1-all.zip

to this line:

distributionUrl=

https\://services.gradle.org/distributions/gradle-4.4-all.zip

Open android/build.gradle and change this line:

classpath 'com.android.tools.build:gradle:3.0.1'

to this:

classpath 'com.android.tools.build:gradle:3.1.2'
Schoolroom answered 11/12, 2018 at 7:50 Comment(0)
A
0

Update project gradle version

classpath 'com.android.tools.build:gradle:3.2.1'

Update app gradle:implementation 'com.android.support:appcompat-v7:28.0.0' implementation 'com.android.support:design:28.0.0'

Auberbach answered 28/12, 2018 at 5:57 Comment(1)
this worked with gradle-wrapper.properties url set to https\://services.gradle.org/distributions/gradle-4.4-all.zipSabotage
M
0

Uninstall the older version of SDK from IntellJ IDEA -> Appearance -> System Settings -> Android SDK -> SDK platforms.

Install the new Android SDK version whatever version you want.

While installing the new SDK, uncheck the NDK checkbox under SDK tools.

Manhunt answered 8/2, 2019 at 8:22 Comment(0)
S
0

Just upgrade you Android Studio with latest version >> connect with the internet for download content according to your project.

Shipmate answered 30/7, 2019 at 18:11 Comment(0)
T
0

link file is not good for me.

ln -s aarch64-linux-android-4.9 mips64el-linux-android
ln -s arm-linux-androideabi-4.9 mipsel-linux-android

Because there is another error.

* What went wrong:
A problem occurred configuring project ':Test'.
> Expected caller to ensure valid ABI: MIPS

Add this in defaultConfig if you build with gralde

ndk {
    abiFilters 'armeabi-v7a','arm64-v8a','x86','x86_64'
}

If you use ndk-build command, add this in Application.mk.

APP_ABI := armeabi-v7a arm64-v8a x86 x86_64
Tripping answered 26/8, 2019 at 8:59 Comment(0)
B
0

To continue with your older gradle version, we can use below solution:

Notice the file android-ndk-r17-beta2/toolchains/mips64el-linux-android- 4.9/prebuilt/darwin-x86_64/NOTICE-MIPS64. The content of the file is below.

This mips64el-linux-android-4.9 directory exists to make the NDK compatible with the Android SDK's Gradle plugin, version 3.0.1 and earlier, which expects the NDK to have a MIPS64 toolchain directory.

So, i can say, using Android SDK's Gradle plugin above 3.0.1, or create even a directory marked with 'mipsel' and 'mips64el', can both resolve the problem. The latter method is below.

cd "path-to-ndk"

OS_=$(uname -s | tr [A-Z] [a-z])
mkdir -p toolchains/mipsel-linux-android-4.9/prebuilt/${OS_}-x86_64
touch toolchains/mipsel-linux-android-4.9/prebuilt/${OS_}-x86_64/NOTICE-MIPS
mkdir -p toolchains/mips64el-linux-android-4.9/prebuilt/${OS_}-x86_64
touch toolchains/mips64el-linux-android-4.9/prebuilt/${OS_}-x86_64/NOTICE-MIPS64

Got the solutions from here

Bronchi answered 4/8, 2020 at 15:39 Comment(0)
P
0

First go to SDK folder by using following location C:\Users\CHALAKMIAN\AppData\Local\Android\Sdk find Ndk folder and delete it. Know run your project

Palmar answered 13/4, 2021 at 9:5 Comment(0)
M
0

Use this option to filter out wish Abi prefix to be used:

android {
    defaultConfig {
        ndk {
            abiFilters 'arm64-v8a', 'x86_64', ...
        }
    }
}
Mcgrath answered 4/8, 2022 at 23:30 Comment(0)
G
0

Update your gradle to

In your gradle-wrapper.properties file

distributionUrl=https\://services.gradle.org/distributions/gradle-7.4-all.zip

And in your android/build.gradle file

dependencies {
        ...
        classpath 'com.android.tools.build:gradle:7.1.2'
        ...
    }
Greyhound answered 8/6, 2023 at 8:0 Comment(0)
B
-1

Update classpath 'com.android.tools.build:gradle:X.X.X' in Project Build.Gradle and replace X to the latest version you have.

Blancmange answered 6/10, 2018 at 16:27 Comment(0)
F
-1

Change gradle version of project-label .gradle file to Latest:

 classpath 'com.android.tools.build:gradle:3.2.1'

and add these checks on app label .gradle file:

packagingOptions{
    doNotStrip '*/mips/*.so'
    doNotStrip '*/mips64/*.so'
}
Fenestra answered 18/10, 2018 at 12:57 Comment(0)
W
-1

Download an older version of the NDK (14b) and go to Android Studio to File | Project Structure and select it.

Wyne answered 20/11, 2018 at 12:33 Comment(0)

© 2022 - 2024 — McMap. All rights reserved.