ADB Install Fails With INSTALL_FAILED_TEST_ONLY
Asked Answered
P

28

279

I am having issues installing an apk to my device.

adb install <.apk>

Using the above command returns the following:

5413 KB/s (99747 bytes in 0.017s)
        pkg: /data/local/tmp/AppClient.TestOnly.App3.apk
Failure [INSTALL_FAILED_TEST_ONLY]

Any idea on what might cause this issue?

It definitely recognizes the device. Could it be an issue with the apk?

Puga answered 12/8, 2014 at 21:24 Comment(0)
N
378

Looks like you need to modify your AndroidManifest.xml
Change android:testOnly="true" to android:testOnly="false" or remove this attribute.

If you want to keep the attribute android:testOnly as true you can use pm install command with -t option, but you may need to push the apk to device first.

$ adb push bin/hello.apk /tmp/
5210 KB/s (825660 bytes in 0.154s)

$ adb shell pm install /tmp/hello.apk 
    pkg: /tmp/hello.apk
Failure [INSTALL_FAILED_TEST_ONLY]

$ adb shell pm install -t /tmp/hello.apk 
    pkg: /tmp/hello.apk
Success

I was able to reproduce the same issue and the above solved it.

If your APK is outside the device (on your desktop), then below command would do it:

$ adb install -t hello.apk
Nepali answered 13/8, 2014 at 4:23 Comment(6)
You don't need to adb push and pm install, you can specify the -t switch just after the adb install command: adb install -t -r package.apkNettie
no need to push the apk anymore adding -t works in adb install works fine , for the full command check my answer below.Sunbreak
adb push bin/hello.apk /tmp/ doesn't work for me, adb push ./debug.apk /sdcard/temp/debug.apk workedIrreverence
adb install -t app/build/outputs/apk/usUnitedStates/debug/app-usUnited-debug.apk worked for me.Amyloid
Thanks. That solved my problem. My app was a system app. Thus -f was needed. -f: Install package on the internal system memory.Mena
The android:testOnly="true" is only set in the build/intermediates/**/AndroidManifest.xml files. So I never added the flag in the first case.Gant
A
111

I had a similar problem with Android Studio 3.0.0 Beta 7 and could not publish anymore to the play store.

As stated here: https://developer.android.com/studio/run/index.html

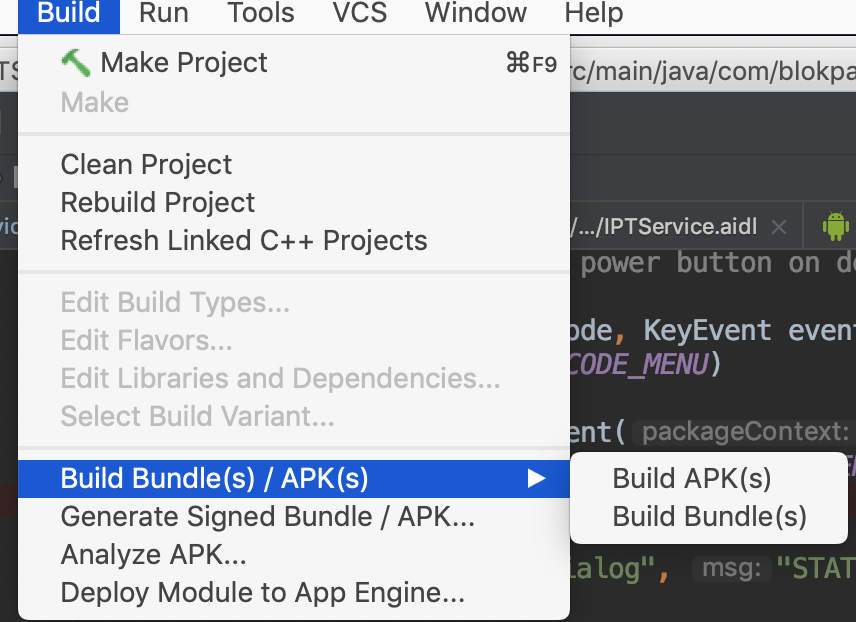
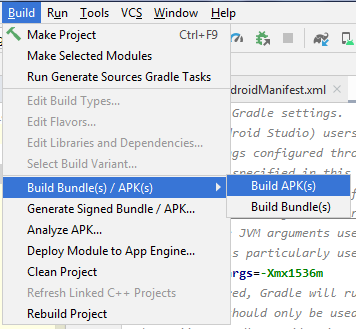
Note: The Run button builds an APK with testOnly="true", which means the APK can only be installed via adb (which Android Studio uses). If you want a debuggable APK that people can install without adb, select your debug variant and click Build > Build APK(s).

Same goes for release build, with Android Studio 3 you need to go to Build > Build APK(s) to have a non testable release apk that you can submit to the store.

Augustineaugustinian answered 10/10, 2017 at 8:28 Comment(3)
I suspect that right now (Oct/Nov 2017) this is the correct answer for most people who get here. Before AS 3, the APK produced by "Run" was installable even outside of AS, no it is not.Woodshed
there's update and there's some more tweak.. took me a while to figure it out :/Rocambole
Perfect. you saved my time. I had the same problem that I sent debug apk in outputs folder of project. I didn't know that I should build it using BUILD APKLunitidal
S
75

Add -t install flag, as on the screenshot below:

answer is in the red box

Schnorkle answered 27/4, 2017 at 10:0 Comment(5)
The sample project I compile use 'com.android.tools.build:gradle:2.4.0-alpha7' and does not compile with a stable version, only adding -t as mentioned solved the issue for me.Dumpy
Please explain what -t does.Mcgraw
in adb help, you will see install with -t means allow test packagesDieball
screen is launched via clicking Edit Configurations on the module dropdown menu - between Make and Run, Debug buttons at top of IDE : developer.android.com/studio/run/rundebugconfig.htmlMaintenance
@Mcgraw From the command line you can run "adb" to see the flag meaning, which is: "-t: allow test packages"Reward
R
56

In my case this mistake was in unstable gradle version. Just use a stable version of gradle (not alpha, not even beta). And it was fixed for me

Roxanneroxburgh answered 23/3, 2017 at 7:14 Comment(3)
Saved the day! Changed the gradle version from 2.4.0-alpha3 to 2.3.0Ungula
The price of sticking to the bleeding edge... Thanks!Serrulation
Can anyone confirm that setting android:testOnly="true" will fix it for unstable gradle versions too?Merta
A
54

After searching and browsing all day, the only one works is adding

android.injected.testOnly=false

to the gradle.properties file

Amur answered 10/4, 2018 at 1:24 Comment(3)
Would I be able to release this build on play-store with key set as android.injected.testOnly = false or should I revert it back to "true" when I am uploading to play-store?Sauer
@prahlad-v-thej Pretty sure the opposite is true: Trying to upload an testOnly version to the Play-Store will fail. My suspicion is that Google added testOnly so you don't accidentally upload a version meant for debugging and testing to the store. Since I make clean builds before upload it doesn't matter to me.Gant
This works, but then of course the app is more limited in terms of developing it... :(Complain
F
29

None of the previous post solve my issue. Here is what's happening with me:

I normally load the app from Android Studio by clicking on the "Run" button. When you do this, Android would create an app that's good for debug but not for install. If you try to install using:

adb install -r yourapk

you will get a message that says:

Failure [INSTALL_FAILED_TEST_ONLY]

When this happens, you will need to rebuilt the apk by first clean the build, then select Build->Build APK. See the image below:

build android apk

This APK is ready to be installed either through adb install command or any other methods.

Finkle answered 1/8, 2019 at 18:18 Comment(4)
You are a lifesaver. I was having trouble with the release build (faulty keystore) and wanted to distribute debug builds to my testers.Psychomotor
If you're using appium, you need to specify "allowTestPackages": "true" to your e2e scheme capabilities.Lindner
@JoshuaPinter Can you please elaborate where to put allowTestPackages": "true"Swipe
@Swipe You add it to your Appium driver config, like config.allowTestPackages = true. Note, this only pertains to end to end tests using Appium.Lindner
E
28

I agree with Elisey. I got this same error after opening my project in the 2.4 preview and then opening the same project in android studio 2.3

Fixed the issue by changing this line in build.gradle from

classpath 'com.android.tools.build:gradle:2.4.0-alpha5'

to

classpath 'com.android.tools.build:gradle:2.3.1'
Ellene answered 14/4, 2017 at 21:11 Comment(0)
A
20

Android studio 3.0 generates test only APK.

I have solved the issue by adding the "android:testOnly" property to android manifest's tag.

 <application
    .....
    android:testOnly="false"
    android:theme="@style/AppTheme">

And then generated the APK by Android studio3.0 menu:Build-->Build APK(s).

More Info: https://commonsware.com/blog/2017/10/31/android-studio-3p0-flag-test-only.html

Actor answered 29/11, 2017 at 8:46 Comment(0)
E
16

If you want to test the apk, just add the -t command line option.

Example command:

adb install -t .\app-debug.apk
Englishism answered 31/8, 2017 at 15:5 Comment(0)
T
16

add this line to your ‘gradle.properties’

android.injected.testOnly=false
Trod answered 10/4, 2018 at 16:50 Comment(2)
Thanks! This will fix spoon runner issue as well!Sentimentalism
@nicklee Would I be able to release this build on play-store with key set as android.injected.testOnly = false or should I revert it back to "true" when I am uploading to play-store?Sauer
E
11

In my case was by uploading an APK, that although it was signed with production certificate and was a release variant, was generated by the run play button from Android studio. Problem solved after generating APK from Gradle or from Build APK menu option.

Ecthyma answered 7/6, 2017 at 14:55 Comment(1)
This started happening with Android Studio 3.0, and your suggestion fixed it for me.Larynx
H
8

Android 3.6.2 or later

Build >> Build/Bundle apk >> Build apk

enter image description here

Its working fine.

Hartman answered 5/5, 2020 at 2:1 Comment(0)
H
8

In my case, using Android Studio 4.0, the below solved the issue;

Add to 'gradle.properties' file;

android.injected.testOnly=false 
Haddock answered 20/5, 2020 at 7:56 Comment(0)
K
5

This works for me:

adb install -t myapk.apk
Kafiristan answered 29/10, 2017 at 16:54 Comment(2)
it was useful for me , thank youVickievicksburg
For the sake of clarity, the -t option allows the installation of an APK with test-only permissions.Eboni
S
5

I see the accepted answer but you dont have to actually push the apk and then run the command on adb shell direct adb install with -t flag actually works

adb install -t "path to apk in ur computer"

attaching a screenshot for reference enter image description here

Sunbreak answered 16/11, 2017 at 9:24 Comment(0)
J
3

The easiest to solve this, without reverting to an older gradle version is to add the '-t' option in the run configurations (for pm install).

testOnly='false' had no effect whatsoever. The error is caused by the alpha version of gradle plugin that makes debug APK 'for test only purposes'. The -t option allows such APK to be installed. Setting it in run configuration makes it automatically install you APK as usual.

Joline answered 17/4, 2017 at 19:5 Comment(0)
C
3

My finding is as below. If I compile using the Android Studio UI, and the APK generated, I can't just

adb install <xxx.apk>

It will generate Failure [INSTALL_FAILED_TEST_ONLY]

I need to compile it using the gradle i.e. ./gradlew app:assembleRelease. Then only the generated apk, then it can only be installed.

This is because the Android Studio UI Compile, only generate test apk for a particular device, while ./gradlew app:assembleRelease command is the actual apk generation to be installed on all device (and upload to playstore)

Component answered 21/1, 2018 at 4:52 Comment(1)
Refers to medium.com/@elye.project/… to understand better of the issue.Component
C
2

I don't know if it's gonna be useful for anyone or not, but I got this error message, when I accidentally tried to build and install my project with test gradle plugin ('gradle:2.4.0-alpha5') version in stable Android Studio version (2.3, not in 2.4 preview 5 version I'd downloaded and installed before).

When I realized my mistake, I launched preview Android Studio version and it built and installed my project without any problem.

Concierge answered 12/4, 2017 at 13:7 Comment(0)
G
2

As mentioned in documentation:

Android Studio automatically adds this attribute when you click Run

So, to be able to install your apk with adb install <path to apk file> you need to assemble build from terminal: ./gradlew assembleDebug and install with adb. Or just run ./gradlew installDebug to build and install on the device simultaneously.

Gilchrist answered 19/2, 2018 at 17:52 Comment(0)
W
2

Build your distribution .apk from Android Studio as follow

Build --> Build Apk(s) (for unsigned build) Build --> Generate Signed APK ( for signed build)

These option builds the APK with android:testOnly="false" option which allows you to install the APK expicitly into device by the commond.

adb install yourBuilT.apk

Wheeler answered 14/3, 2018 at 14:10 Comment(0)
N
2

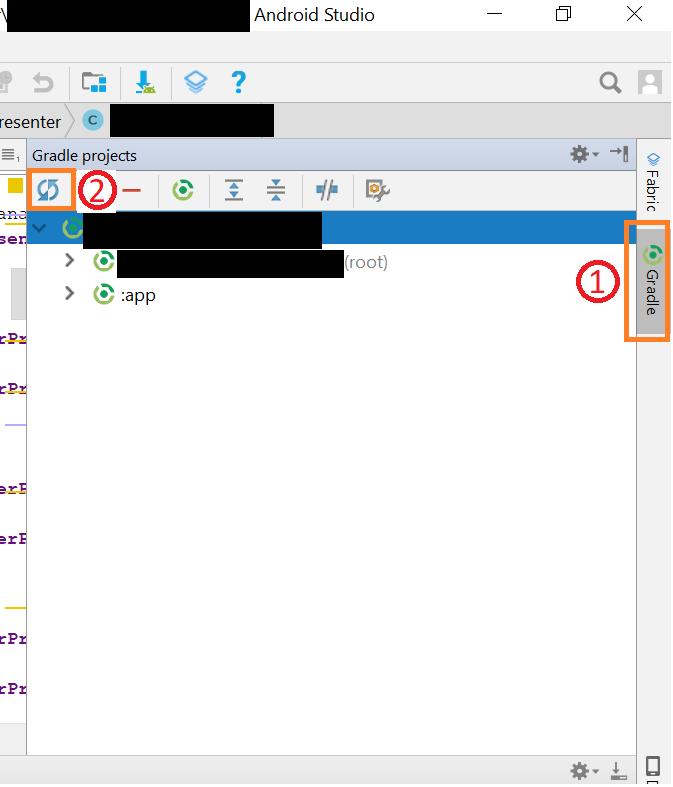
What worked for me is performing Refresh all Gradle projects from the Gradle toolbar from the right menu.

PFB the screenshot from Android Studio.

  1. Select Gradle toolbar from the right menu.
  2. Select the Refresh icon

This resolved the issue for me.

Screenshot from Android Studio

Norma answered 5/6, 2018 at 13:30 Comment(1)
Thanks mate. It started after upgrading android gradle to 4. Deploying the app directly from android studio works fine but not if using the terminal (adb install etc..) After refreshing the gradle as you mentioned it worked.Meunier
P
1

Although I am sure Saurabh's answer will work for most other people, I did want to identify the extra steps I had to take in order to get my apk installed.

I tried pushing to the device with the following result:

? adb push AppClient.TestOnly.App3.apk \tmp\
failed to copy 'AppClient.TestOnly.App3.apk' to '\tmp\': Read-only file system

After looking around to change the filesystem RW permissions I ended up executing the following commands:

? adb shell
255|shell@android:/ $ su
shell@android:/ # mount -o remount,rw /
mount -o remount,rw /

I got this when I tried to push again:

? adb push AppClient.TestOnly.App3.apk /tmp
failed to copy 'AppClient.TestOnly.App3.apk' to '/tmp': Permission denied

I was able to push to the sdcard:

? adb push AppClient.TestOnly.App3.apk /sdcard/
3178 KB/s (99747 bytes in 0.030s)

At which point I was able to execute Saurabh's command:

shell@android:/ # pm install -t /sdcard/AppClient.TestOnly.App3.apk
pm install -t /sdcard/AppClient.TestOnly.App3.apk
        pkg: /sdcard/AppClient.TestOnly.App3.apk
Success
Puga answered 13/8, 2014 at 16:27 Comment(2)
I should add that some of this may not be necessary for others.Puga
Appreciate the extra effort!.Nepali
H
1

For me it has worked execute the gradle task 'clean' (under :app, at Gradle pane, usually located at the right) and run again the project.

Henebry answered 26/2, 2018 at 21:7 Comment(0)
F
0

I tried external project, with multiple apk.

The command from Studio, looked like

adb install-multiple -r ....

Solution -

  • select console
  • aste command with -t
Foredoom answered 15/5, 2017 at 17:40 Comment(0)
G
0

If you are looking for a less permanent solution then adding android.injected.testOnly=false to your gradle.properties file and you don't mind using the command line then the following two commands before installation will do:

rm -v **/build/**/AndroidManifest.xml
gradle build

For Windows users: delete all AndroidManifest.xml from all build directories. But not from the src directories so DEL /S is not the best idea.

Gant answered 29/7, 2021 at 8:36 Comment(0)
R
0

I got the same issue and no answer helps. At last, I find there's still an install in my Safe Folder(Or Secure folder depending phone brands), which had not been removed when Android uninstalled the ordinary install. Remove it and this issue fixed. Hope this can help some guys else!

Radiothermy answered 7/3, 2022 at 9:5 Comment(0)
E
0

Android studio from Iguana beta 1 stopped acepting generated apk file names with spaces.
If you are changing the apk name to include spaces, just remove them. This is was a 2hr time waster without proper error messages or whatnot! Thanks google!

Eason answered 29/12, 2023 at 21:56 Comment(0)
G
-2

first remove the unstable version:

adb uninstall problematic-package-name

; and then reinstall the apk.

Gustafson answered 27/2, 2018 at 12:18 Comment(1)
No, that doesn't work — my test scripts do an uninstall automatically when the install fails.Gant

© 2022 - 2024 — McMap. All rights reserved.