Add Image to TextField/SecureField in SwiftUI, add padding to placeholder text
Asked Answered
B

5

10

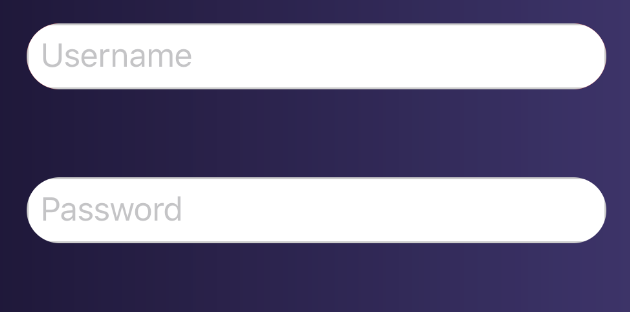
I made a textfield and a securetextfield in SwiftUI but I have no idea how to add in an image into my textfield/secure textfield in SwiftUI. There is not much documentation online for SwiftUI like there was for the older versions of Swift. I also want to shift over the (placeholder/typed in text) over by a designated amount say for example like 30 points to the right. I also was trying out to see if the background color would change from white to red, but as you can see, it is in my code with no effect on the UI.

Note:I have the GeometryReader called earlier in my code as well as the @state variables for the username and the password.

My goal is to have it look like this desired outcome, right now it looks like this current/undesired view

            VStack (spacing: deviceSize.size.height * (50/812)) {
                TextField ("Username", text: self.$username)
                    .foregroundColor(.black)//text color when you type
                    .accentColor(.blue)//cursor color
                    .background(Color(.red))//????
                    .textFieldStyle(RoundedBorderTextFieldStyle())
                    .cornerRadius(50)

                // .border(Color.white)
                //.font(.title)

                SecureField ("Password", text: self.$password)
                    .textFieldStyle(RoundedBorderTextFieldStyle())
                    .cornerRadius(50)

            }
            .padding(.init(top: 0, leading: deviceSize.size.width * (38/375), bottom: 0, trailing: deviceSize.size.width * (38/375)))
Bandicoot answered 26/11, 2019 at 19:54 Comment(0)
G
19

The easiest way to achieve such a design would be to place the Image and TextField in a HStack and give it one Rounded background. It is slightly more complicated with the password field as it needs an extra Button, and when you hide/show the password you need to change between TextField and SecureField. Here is my take on it:

struct ContentView: View {
    
    @State private var username = ""
    @State private var password = ""
    @State private var showPassword = false
    
    var body: some View {
        ZStack {
            Color.blue
            VStack {
                HStack {
                    Image(systemName: "person")
                        .foregroundColor(.secondary)
                    TextField("Username",
                              text: $username)
                }   .padding()
                    .background(Capsule().fill(Color.white))
                HStack {
                    Image(systemName: "lock")
                        .foregroundColor(.secondary)
                    if showPassword {
                        TextField("Password",
                        text: $password)
                    } else {
                    SecureField("Password",
                              text: $password)
                    }
                    Button(action: { self.showPassword.toggle()}) {
                        
                        Image(systemName: "eye")
                        .foregroundColor(.secondary)
                    }
                }   .padding()
                    .background(Capsule().fill(Color.white))
            }   .padding()
        }
    }
}

The resulting username and password fields

Goode answered 26/11, 2019 at 20:34 Comment(6)
Great answer. Note that the image frames aren't aligned properly. Give both images a frame width their width and height. Or choose to use the aspectratio. Makes it a little bit more cleaner :-)Pastoral
Good eye for detail @TobiasHesselink!Goode
@Goode this images on the left hand side of the textfield did not show up for me until used the resizable () methodBandicoot
@Bandicoot have you copied and pasted my example or have you used other images?Goode
@Goode I used my own images and resized them, I see that you used the System default images which seems to give you a more sized icon, but for some reason it was not coming up for me so I just went my workaround. All is fine now though thanks for the help with this one. You got me 95% of the way.Bandicoot
System images that I used work more like font so didn't need the resizing. Glad you figured it out.Goode
C
3

I'm really new to SwiftUI, but I found a workaround for this that I hope doesn't cause any issues in the future or it will be a big lesson learned. If anyone has any suggestion I'd appreciate it too! =]

I embedded the TextField and the image in a ZStack and I put the image inside a View and gave the view a padding.

struct FormInputBox: View {

@State private var text: String = ""
@State private var textFieldState: TextFieldState = .empty

private var textFieldType: TextFieldType
private var textViewPlaceholder = ""

init(placeholder: String,
     textFieldType: TextFieldType) {
    self.textViewPlaceholder = placeholder
    self.textFieldType = textFieldType
}

var body: some View {
    ZStack(alignment: Alignment(horizontal: .trailing, vertical: .center), content: {
        TextField(textViewPlaceholder, text: $text)
            .textFieldStyle(MyTextFieldStyle(textFieldState: $textFieldState))
        AnyView(
            Image("tick")
                .resizable()
                .frame(width: 20, height: 20, alignment: .leading)
        )
            .padding(32)
        
    })
}

this is how it looks

Cloy answered 20/4, 2021 at 21:25 Comment(1)
This is a really elegant solution that doesn't require thinking about hiding/disguising the background of the text field input. You don't need to wrap the Image in an AnyView, however. Thanks!Whorton
M
1

I have created a reusable SwiftUI Textfield named ASTextField which works similar to the textField in UIKit, where you can add the leftView and rightView of the textField and can handle the events related them.

You can find the implementation of this at gist.

This the way you can consume it:-

struct ContentView : View , ASTextFieldDelegate {

   let leftImage = UIImage(systemName: "calendar")
   let rightImage = UIImage(systemName: "eye")
   let rightImage1 = UIImage(systemName: "trash")

   @State var text : String? = "with simple binding"
   @State var text1 : String? = "with closure for right item"
   @State var text2 : String? = "for secure entry"

   var body: some View {
       VStack {
          Spacer()
           ASTextField(text: $text)

          Spacer()

          ASTextField(rightItem: rightImage1, leftItem: leftImage, handleLeftTap: {
            print("right icon tapped.....")
          }, delegate: self, text: $text1)

          Spacer()

          ASTextField(rightItem: rightImage, leftItem: leftImage, isSecuredEntry: true, delegate: self, text: $text2)

          Spacer()

      }
   }
}
Manly answered 13/5, 2020 at 15:24 Comment(0)
S
1

"Introspect" will work for you

 Textfield()
    .introspectTextField { textfield in
        textfield.rightViewMode = .unlessEditing
        textfield.rightView = UIImageView(image: UIImage(named: ImageCatalog.error.content))
     }
Sepulchre answered 3/5, 2021 at 9:7 Comment(0)
H
1

I am totally newborn toddle in iOS Dev. So i wrote just like this. My apologises in advance if someone will get blind from the ugliness of the written code.

struct ContentView: View {

@State private var nameSearch: String = ""
var body: some View {

ZStack {
            RoundedRectangle(cornerRadius: 25)
                .frame(width: 230, height: 30)
                .border(.black, width: 0.2)
                .foregroundColor(.white)
            HStack {
                ZStack {
                    Image(systemName: "magnifyingglass.circle")
                        .foregroundColor(.gray)
                        .frame(width: 10, height: 10, alignment: .leading)
                        .padding(.trailing, 200)
                    TextField( "Search", text: $nameSearch)
                        .frame(width: 180, height: 30)
                        .padding(.leading, 20 )
                }
            }
        }
Hardboard answered 22/11, 2022 at 18:15 Comment(0)

© 2022 - 2024 — McMap. All rights reserved.