Scrollable CardView with RecyclerView inside
Asked Answered
C

3

11

I would like to implement a screen where I have a Card view containing a RecyclerView.

The CardView should of the same height of the content of the recycler view, this means that if the RecyclerView has few item, I should see the bottom corners and the bottom shadow of the card but if the RecyclerView has many items, the Card view should "scroll" with the RecyclerView to have the bottom corners and shadow of the cardview at the bottom of the RecylerView.

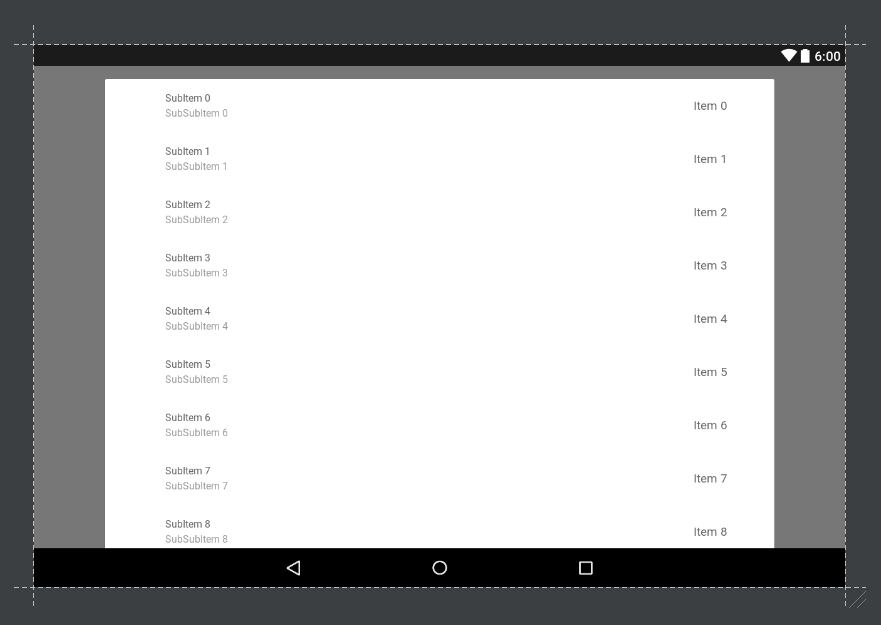
Here what it should look like when the RecyclerView is at top : List at top

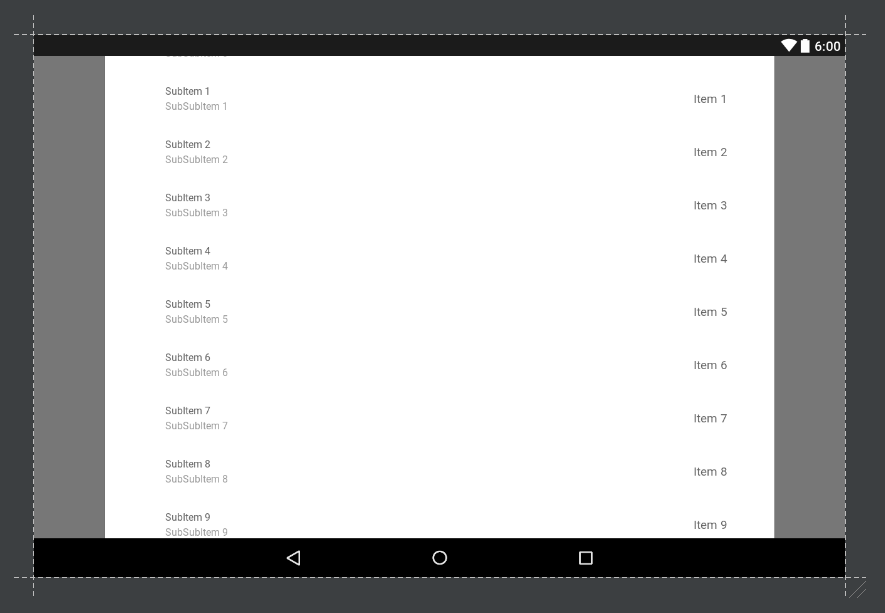
When the user begins to scroll, the top corners disappear with the RecyclerView scrolling : List during scroll

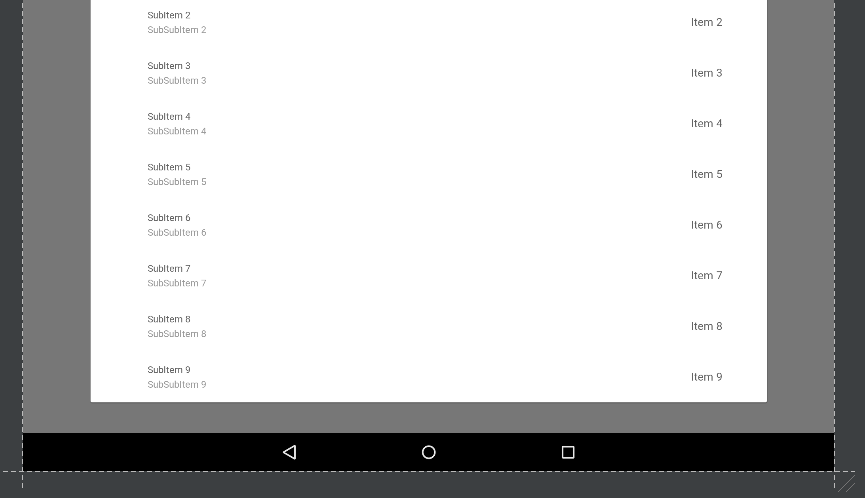
And finally, when the user reaches the bottom of the RecyclerView, the bottom corners and the shadow of the CardView appears : List at end

From now, I managed to have a working implementation by putting the RecyclerView inside the CardView and the CardView inside a NestedScrollView but this breaks the fling gesture...

<android.support.design.widget.CoordinatorLayout
    xmlns:android="http://schemas.android.com/apk/res/android"
    xmlns:app="http://schemas.android.com/apk/res-auto"
    xmlns:tools="http://schemas.android.com/tools"
    android:clipChildren="false"
    android:id="@+id/containerLayout"
    android:layout_height="match_parent"
    android:layout_width="match_parent"
    android:orientation="vertical"
    tools:ignore="MissingPrefix">

    <android.support.v4.widget.NestedScrollView
        android:clipToPadding="false"
        android:layout_height="match_parent"
        android:layout_width="match_parent"
        android:paddingBottom="16dp"
        android:paddingLeft="85dp"
        android:paddingRight="85dp"
        android:paddingTop="16dp">

        <android.support.v7.widget.CardView
            android:layout_height="wrap_content"
            android:layout_width="match_parent"
            app:cardBackgroundColor="?android:attr/windowBackground">

            <android.support.v7.widget.RecyclerView
                android:id="@+id/recyclerView"
                android:layout_height="wrap_content"
                android:layout_width="match_parent"/>
        </android.support.v7.widget.CardView>
    </android.support.v4.widget.NestedScrollView>
</android.support.design.widget.CoordinatorLayout>

Do you have any hints or idea on how I could implement such design ? I guess that CoordinatorLayout could help me but I couldn't find anything ...

Thank you

Congruous answered 23/8, 2016 at 13:45 Comment(4)
I face the same problem. android:nestedScrollingEnabled="false" fixes fling gesture, but interface is super laggy if your RecyclerView is big enough. Do you have any progress on this?Diabetic
@Congruous I was thinking to a solution without NestedScrollView, but with a scroll listener into a RecyclerView. When you scroll from down to up, the CardView will go out of your screen; when you reach the end of your items, the bottom will be showed. This can be achieved by using cardView.animate().y(theNewPosition).setDuration(0).start(). This is merely an idea, I didn't tested it on code.Bunny
Be aware, that using RecyclerView inside NestedScrollView is like using LinearLayout inside ScrollView. There will be no recycling, RecyclerView will have the height of itemHeight*itemCount. If you don't worry about that, replace NestedScrollView with ScrollView and you will have fling gesture.Bakker
Another not very elegant idea is rewrite the recycler adapter in a way that first and last items will have rounded corners and this extra space with transparent background.Bakker
C
5

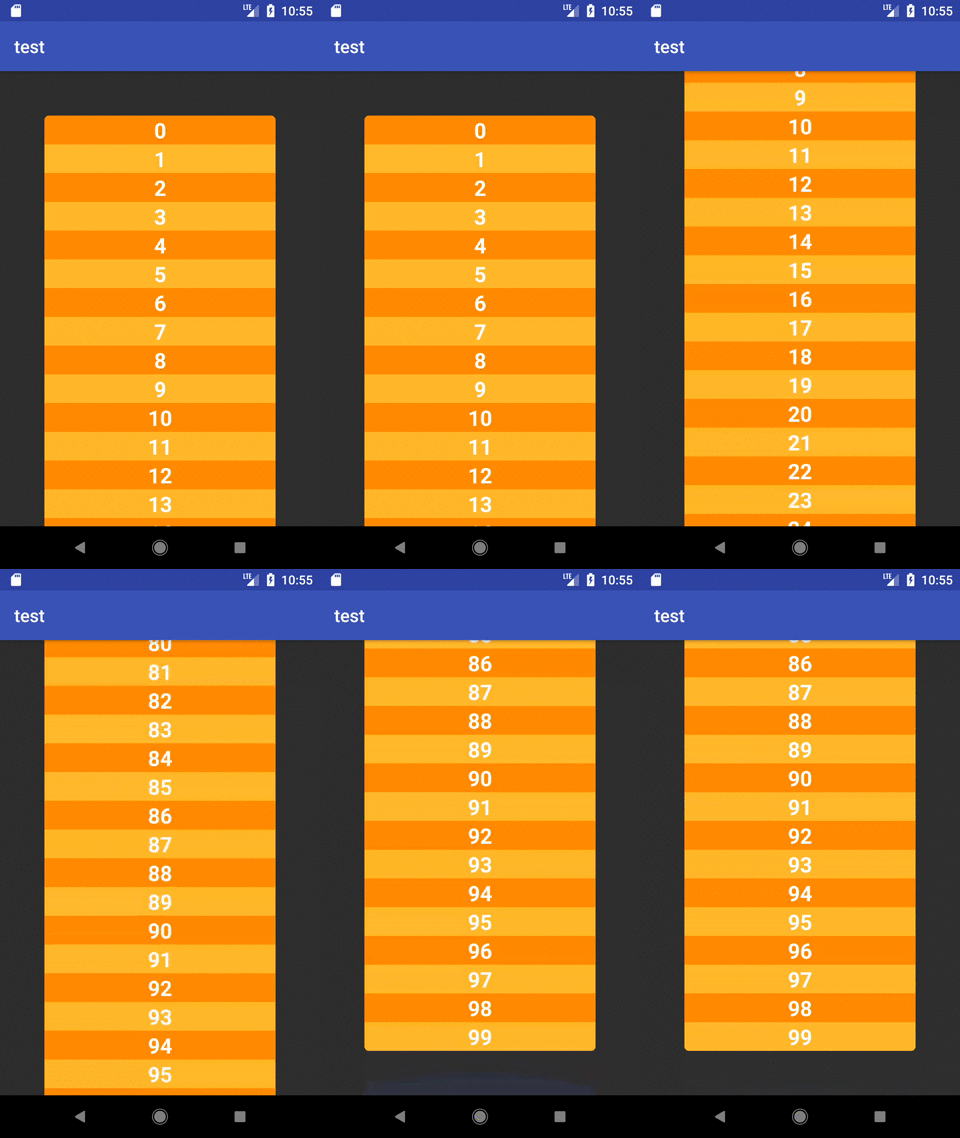
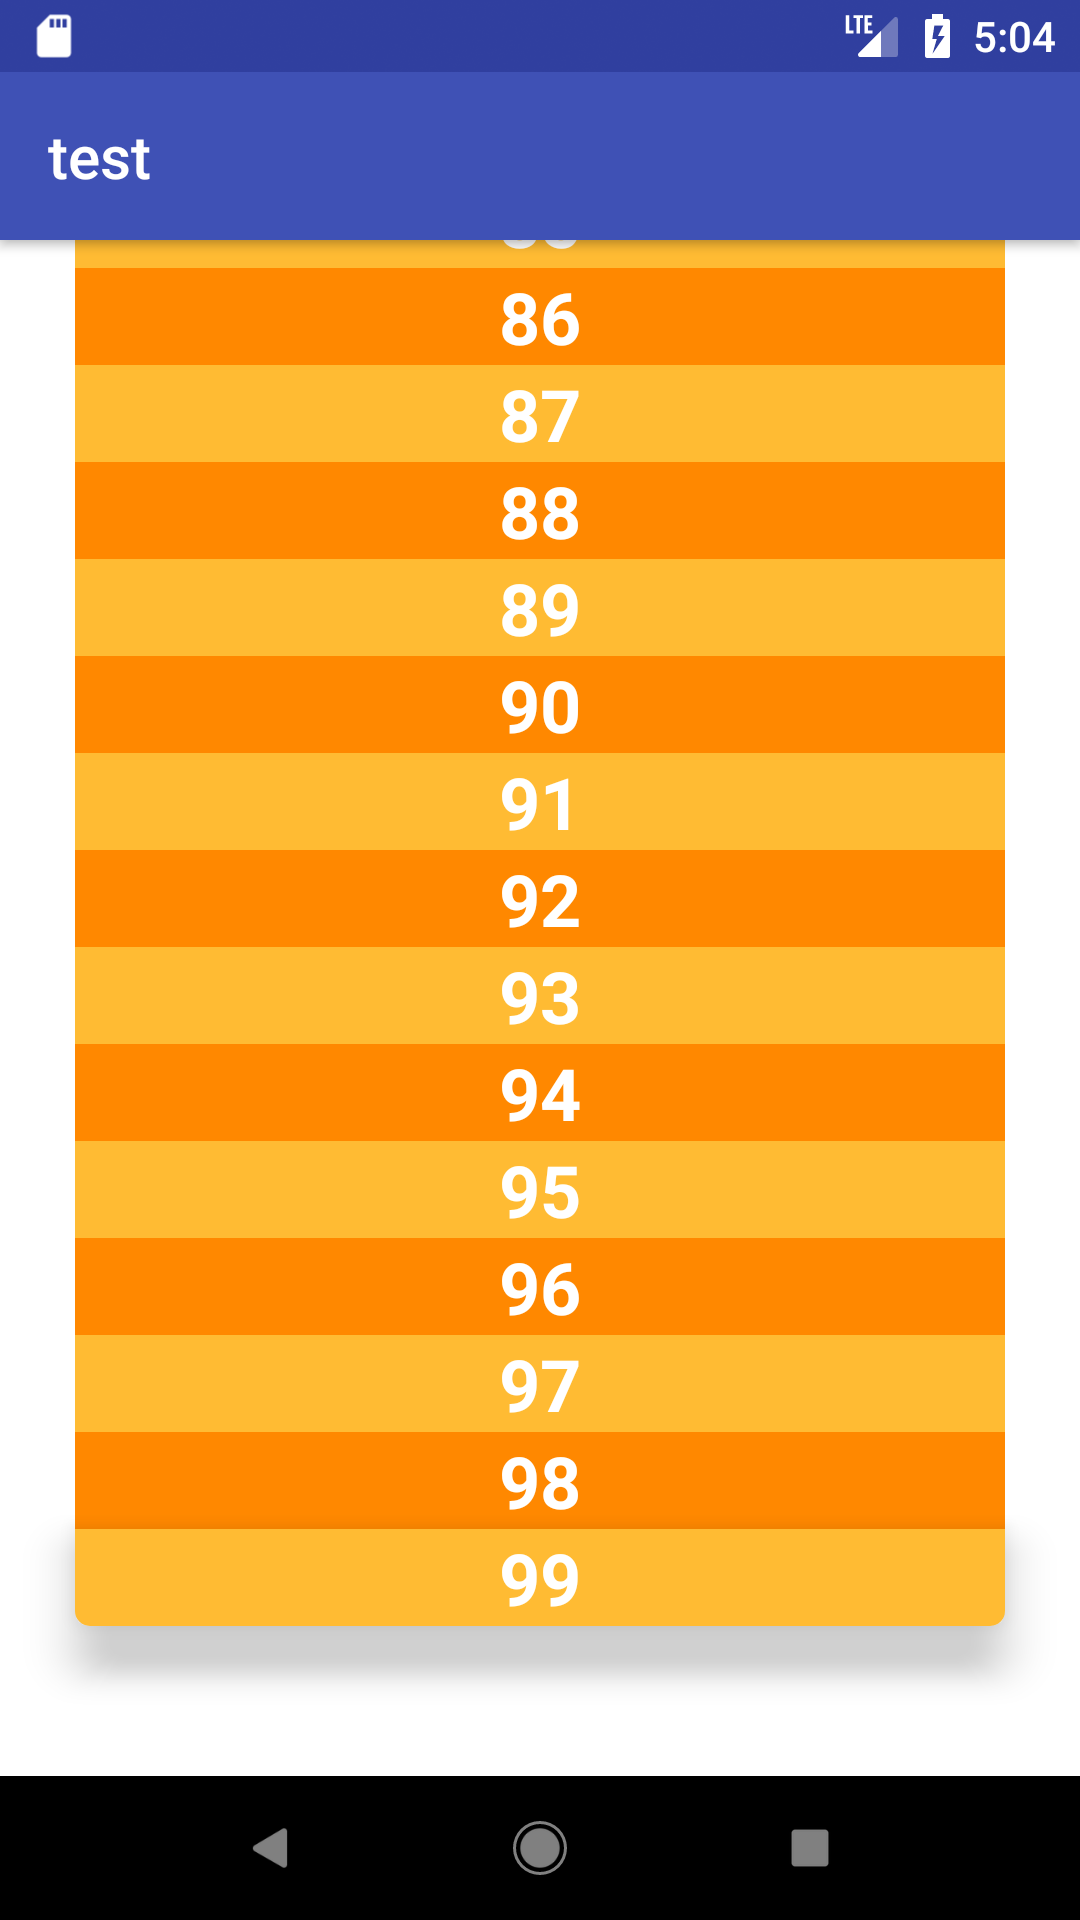
Picking up Oknesif's idea of a manipulated adapter, I made an adapter with three layouts (topitem, middleitem, bottomitem) with two XML drawable shapes for topitem and bottomitem. Thus, I was able to completely get rid of the NestedScrollView and the CardView.

This is what it looks like:

enter image description here

And here is the code. First, MainActivity:

public class MainActivity extends AppCompatActivity {
    final static int LIST_SIZE = 100;

    final static int TOP = 0;
    final static int BOTTOM = LIST_SIZE;
    final static int MIDDLE = 1;

    @Override
    protected void onCreate(Bundle savedInstanceState) {
        super.onCreate(savedInstanceState);

        setContentView(R.layout.activity);

        final ArrayList<Integer> list = new ArrayList<>();
        for (int i = 0; i < LIST_SIZE; i++) {
            list.add(i);
        }

        class Viewholder extends RecyclerView.ViewHolder {
            TextView textView;

            Viewholder(View itemView) {
                super(itemView);
                textView = itemView.findViewById(R.id.textView);
            }
        }

        RecyclerView recyclerView = findViewById(R.id.recyclerView);
        final RecyclerView.Adapter<Viewholder> adapter = new RecyclerView.Adapter<Viewholder>() {
            LayoutInflater inflater = LayoutInflater.from(MainActivity.this);

            @Override
            public Viewholder onCreateViewHolder(ViewGroup parent, int viewType) {
                switch (viewType) {
                    case TOP:
                        return new Viewholder(inflater.inflate(R.layout.topitem, parent, false));
                    case BOTTOM:
                        return new Viewholder(inflater.inflate(R.layout.bottomitem, parent, false));
                    case MIDDLE:
                    default:
                        return new Viewholder(inflater.inflate(R.layout.middleitem, parent, false));
                }
            }

            @Override
            public void onBindViewHolder(Viewholder holder, int position) {
                holder.textView.setText(String.valueOf(list.get(position)));
                if (position != 0 && position != LIST_SIZE - 1) {
                    int color = position % 2 == 0 ? android.R.color.holo_orange_dark : android.R.color.holo_orange_light;
                    holder.itemView.setBackgroundColor(getResources().getColor(color));
                }
            }

            @Override
            public int getItemCount() {
                return LIST_SIZE;
            }

            @Override
            public int getItemViewType(int position) {
                int itemViewType;
                switch (position) {
                    case 0:
                        itemViewType = TOP;
                        break;
                    case LIST_SIZE - 1:
                        itemViewType = BOTTOM;
                        break;
                    default:
                        itemViewType = MIDDLE;
                }
                return itemViewType;
            }
        };
        recyclerView.setAdapter(adapter);
        recyclerView.setLayoutManager(new LinearLayoutManager(MainActivity.this));
    }
}

res/layout/activity.xml:

<?xml version="1.0" encoding="utf-8"?>
<android.support.design.widget.CoordinatorLayout xmlns:android="http://schemas.android.com/apk/res/android"
    android:id="@+id/containerLayout"
    android:layout_width="match_parent"
    android:layout_height="match_parent"
    android:orientation="vertical">

    <android.support.v7.widget.RecyclerView
        android:id="@+id/recyclerView"
        android:layout_width="match_parent"
        android:layout_height="wrap_content"
        android:clipToPadding="false"
        android:paddingLeft="25dp"
        android:paddingRight="25dp" />
</android.support.design.widget.CoordinatorLayout>

res/layout/topitem.xml:

<?xml version="1.0" encoding="utf-8"?>
<TextView xmlns:android="http://schemas.android.com/apk/res/android"
    android:id="@+id/textView"
    android:layout_width="match_parent"
    android:layout_height="wrap_content"
    android:background="@drawable/topbackground"
    android:layout_marginTop="50dp"
    android:textAlignment="center"
    android:textColor="@android:color/white"
    android:textSize="24sp"
    android:textStyle="bold" />

res/layout/middleitem.xml:

<?xml version="1.0" encoding="utf-8"?>
<TextView xmlns:android="http://schemas.android.com/apk/res/android"
    android:id="@+id/textView"
    android:layout_width="match_parent"
    android:layout_height="wrap_content"
    android:textAlignment="center"
    android:textColor="@android:color/white"
    android:textSize="24sp"
    android:textStyle="bold" />

res/layout/bottomitem.xml:

<?xml version="1.0" encoding="utf-8"?>
<TextView xmlns:android="http://schemas.android.com/apk/res/android"
    android:id="@+id/textView"
    android:layout_width="match_parent"
    android:layout_height="wrap_content"
    android:background="@drawable/bottombackground"
    android:layout_marginBottom="50dp"
    android:textAlignment="center"
    android:textColor="@android:color/white"
    android:textSize="24sp"
    android:textStyle="bold" />

res/drawable/topbackground.xml:

<?xml version="1.0" encoding="utf-8"?>
<shape xmlns:android="http://schemas.android.com/apk/res/android"
    android:shape="rectangle">
    <corners
        android:topLeftRadius="5dp"
        android:topRightRadius="5dp" />
    <solid android:color="@android:color/holo_orange_dark" />
</shape>

res/drawable/bottombackground.xml:

<?xml version="1.0" encoding="utf-8"?>
<shape xmlns:android="http://schemas.android.com/apk/res/android"
    android:shape="rectangle">
    <corners
        android:bottomLeftRadius="5dp"
        android:bottomRightRadius="5dp" />
    <solid android:color="@android:color/holo_orange_light" />
</shape>

EDIT:

Adding this line to the bottom XML item layouts:

android:elevation="12dp"

and changing the background to white, gives the following result:

enter image description here

Cawnpore answered 4/12, 2017 at 10:15 Comment(3)
Can you try on a white background with elevation on cells ? I'm sure there will be some shadow overlaps at the side separation of each cell. That's the main reason why the goal of this is to use only 1 cardview for the entire listCongruous
Your shadow is clipped on the side. Add clipToPadding="false" to the recyclerviewCongruous
Yes, you were right. There are "shadows" creeping out of the cell separations when the padding is not clipped and when there is elevation on all three layouts. However, using elevation on the bottom layout only gives you the result I just posted. Is this what you want?Cawnpore
W
1

it's just a simple line of code

recycler.setNestedScrollingEnabled(false);

and don't forget to make cardview height to wrap_content

Wong answered 6/12, 2017 at 7:4 Comment(0)
A
0

I have a suggestion based on the Constraintlayout which I have used before. You can create two Guideline to set the starting and ending position of the CardView during the scrolling process. Let me illustrate the XML for the start position of the view

<android.support.constraint.ConstraintLayout
xmlns:android="http://schemas.android.com/apk/res/android"
xmlns:app="http://schemas.android.com/apk/res-auto"
xmlns:tools="http://schemas.android.com/tools"
android:clipChildren="false"
android:id="@+id/containerLayout"
android:layout_height="match_parent"
android:layout_width="match_parent"
android:orientation="vertical"
tools:ignore="MissingPrefix">

<android.support.constraint.Guideline
    android:layout_width="match_parent"
    android:layout_height="match_parent"
    android:id="@+id/guideline"
    android:orientation="horizontal"
    app:layout_constraintGuide_percent="0.1"/>

<android.support.constraint.Guideline
    android:layout_width="match_parent"
    android:layout_height="match_parent"
    android:id="@+id/guideline2"
    android:orientation="horizontal"
    app:layout_constraintGuide_percent="0.9"/>

<android.support.v7.widget.CardView
    android:layout_height="wrap_content"
    android:layout_width="match_parent"
    app:cardBackgroundColor="?android:attr/windowBackground"

    app:layout_constraintTop_toTopOf="@+id/guideline">

    <android.support.v7.widget.RecyclerView
        android:id="@+id/recyclerView"
        android:layout_height="wrap_content"
        android:layout_width="match_parent" />
</android.support.v7.widget.CardView>

here I am assuming that you want to leave roughly 10% of screen space empty on top. If you want less or more, please adjust.

Once the user starts scrolling you can adjust the top constraint of the Cardview to the top of the parent and once he reaches the bottom of the list you can adjust the bottom constraint of the Cardview to the guideline2 which will leave 10% of screen space below.

This should achieve the desired effect without much performance issues since you are doing away with the Scrollview.

Please let me know if you need me to elaborate any part of my answer in more detail.

Amieva answered 3/12, 2017 at 10:52 Comment(0)

© 2022 - 2024 — McMap. All rights reserved.