How to create new Anaconda Environments within JupyterHub and bind a Environment to a new Jupyter- Notebook?
Asked Answered
A

2

0

I installed JupyterHub using Docker container.

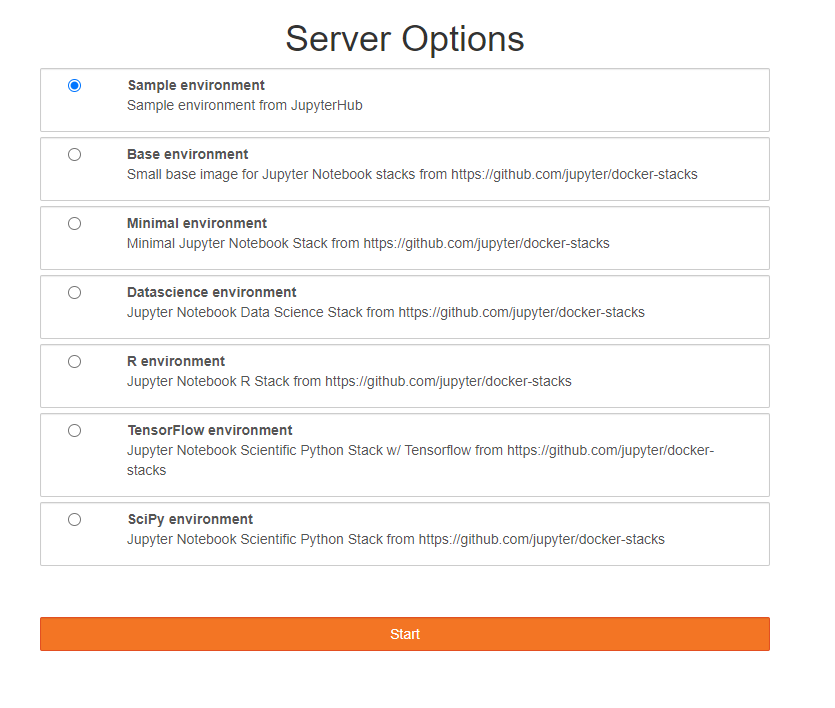
When I log in the web interface, I see the following environment options: Server Options
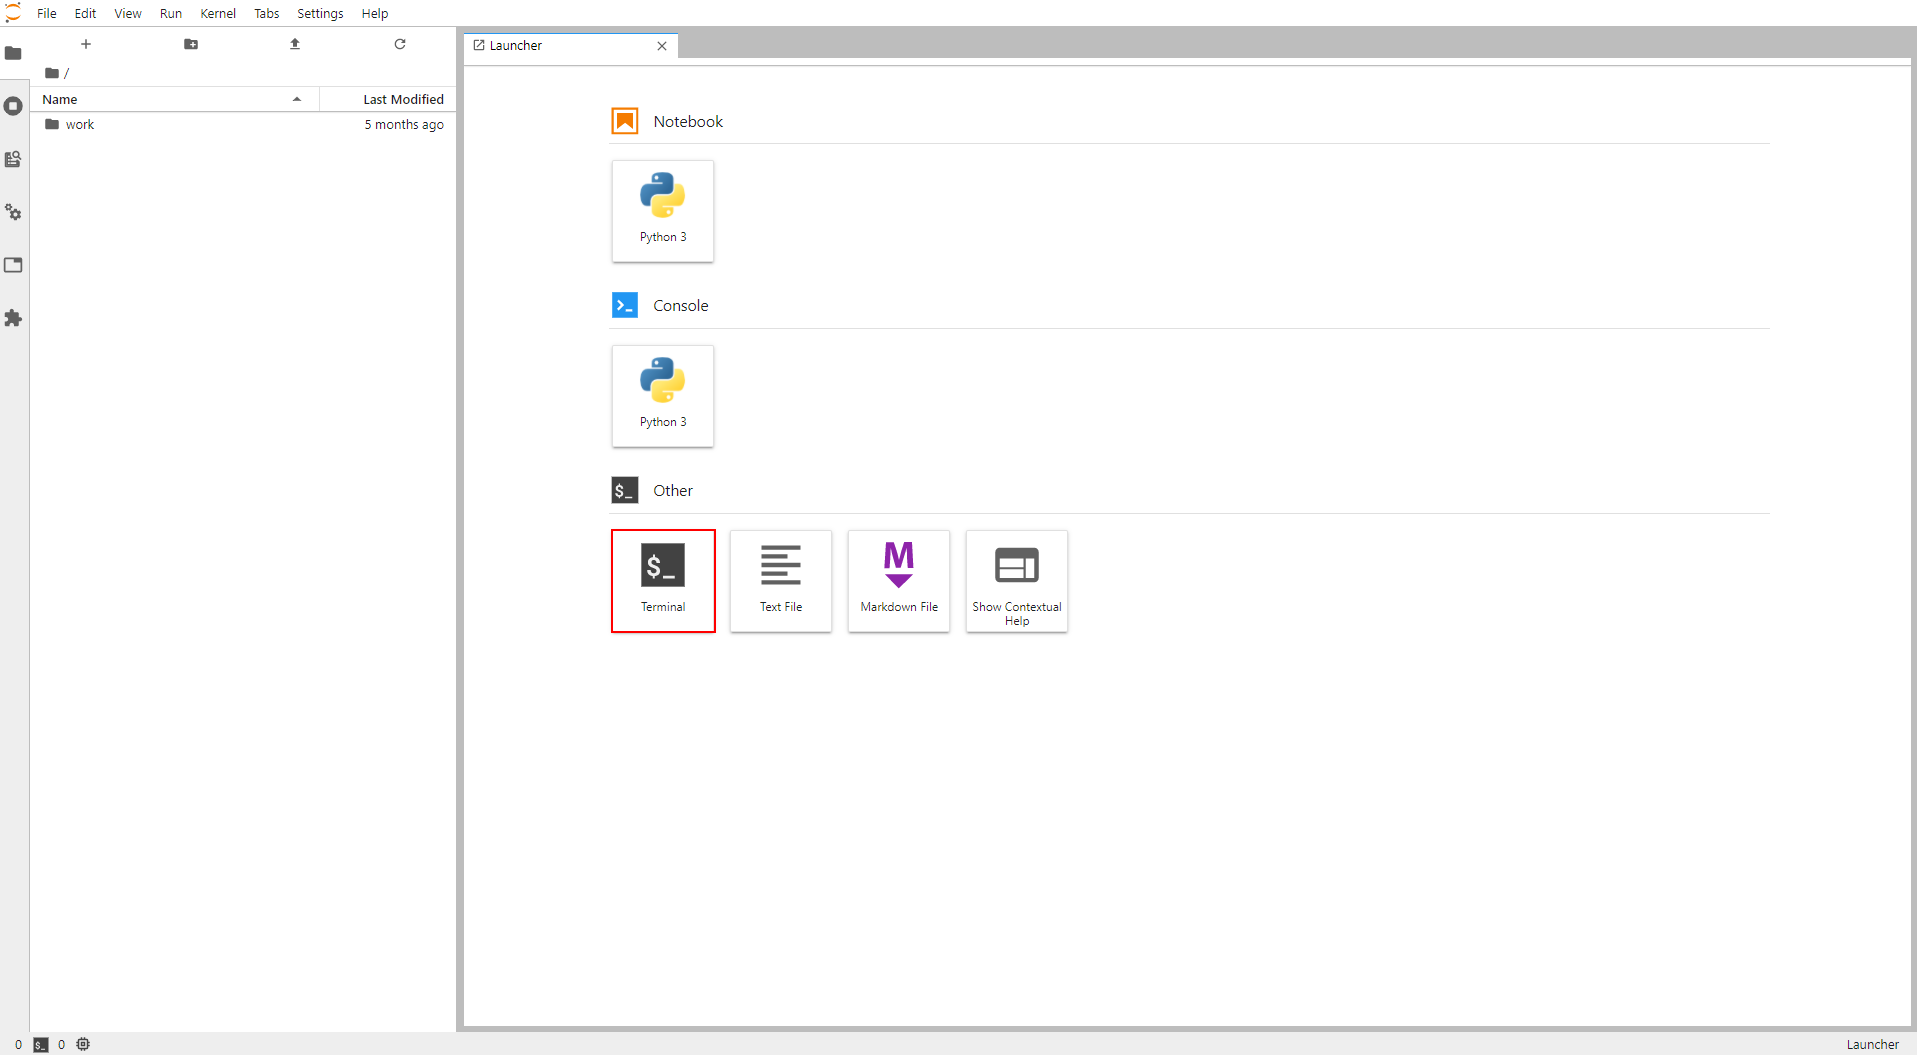
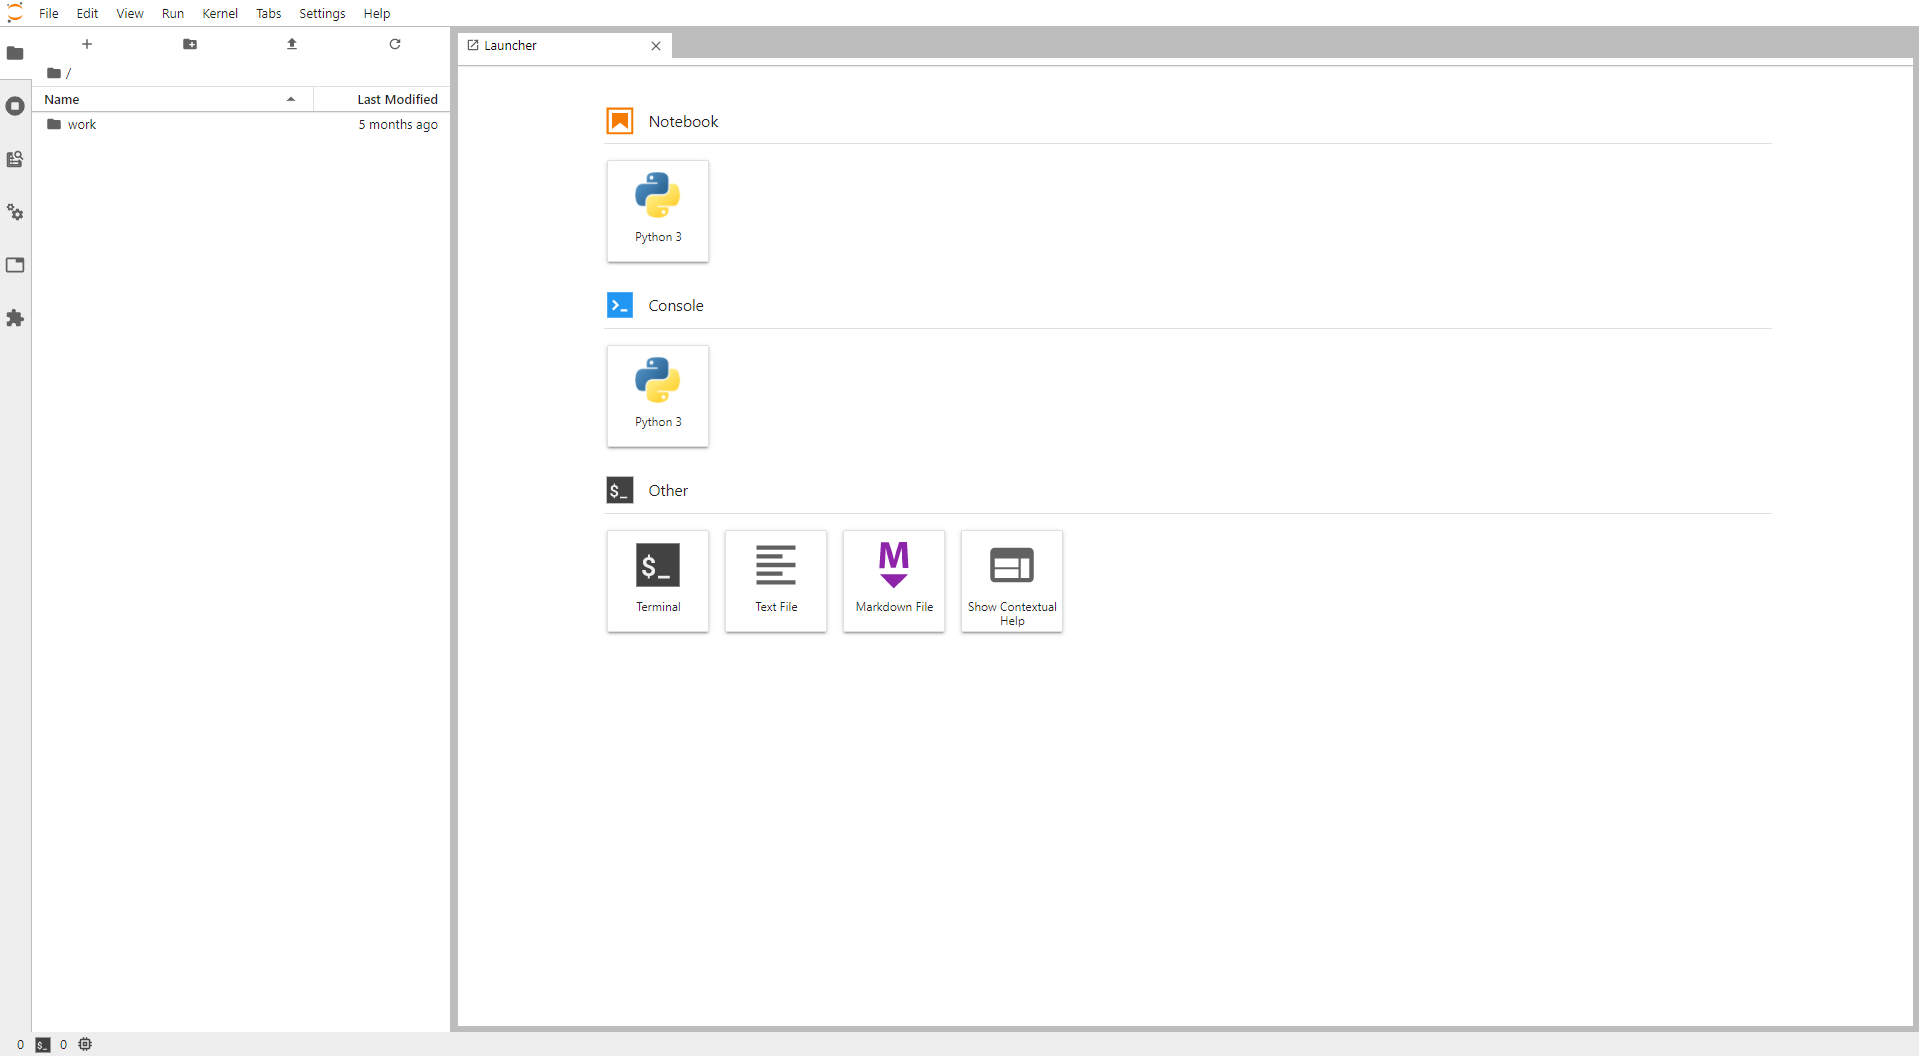
After a while of loading, I see the Launcher tab as follows:

Launcher

Now, I would like to create some new Anaconda Environments (MyDevEnvPy3.7, MyTestEnvPy3.7, MyDevEnvPy3.8, MyTestEnvPy3.8), and start a new JupyterNotebook that uses exactly one of these Anaconda Environments mentioned above.

The idea is, that I'd be able to configure each Anaconda Environment with different packages and python versions (i.e. 3.7 or 3.8).

Especially in the case, if I need to upgrade some Python packages, i.e. in my MyDevEnvPy3.7, I would like to upgrade the Python packages first in MyTestEnvPy3.7, to see if my code is still running. Then I would like to do like this using MyDevEnvPy3.7.

How can I do this?

Or is it even possible? I've only worked with the Anaconda Navigator So far. Anaconda Navigator was my starting point, where I configured my Environments in the "Environment" tab first, and then switched to the "Home" tab, selected the Anaconda Environment to be used and launched the Jupyter Notebook (using this Environment). But now in JupyterHub, I don't have a clue, what's the best practice to start a Jupyter Notebook using a specific Anaconda Environment ...

Accumbent answered 9/3, 2021 at 13:1 Comment(0)
A
-1

I finally managed to create differenct Anaconda Environments:

  1. Open "Terminal" in Launcher tab Terminal

  2. Paste in the following commands:

    # Creates a new Anaconda Environment called "MyDevEnvPy3.7" using Python Version 3.7 
    # in silent mode (parameter "-y")
    conda create -n MyDevEnvPy3.7 python=3.7 -y
    
    # Activates the new created Anaconda Environment "MyDevEnvPy3.7"
    conda activate MyDevEnvPy3.7
    
    # Installs "ipykernel" in active Anaconda Environment "MyDevEnvPy3.7" in silent mode
    conda install ipykernel -y
    
    # Installs new Kernel called "MyDevEnvPy3.7" in Anaconda Environment "MyDevEnvPy3.7"
    python -m ipykernel install --user --name MyDevEnvPy3.7 --display-name="MyDevEnvPy3.7"
    
    # Deactivates the new created Anaconda Environment "MyDevEnvPy3.7"
    conda deactivate


    # Creates a new Anaconda Environment called "MyTestEnvPy3.7" using Python Version 3.7
    # in silent mode (parameter "-y")
    conda create -n MyTestEnvPy3.7 python=3.7 -y
    
    # Activates the new created Anaconda Environment "MyTestEnvPy3.7"
    conda activate MyTestEnvPy3.7
    
    # Installs "ipykernel" in active Anaconda Environment "MyTestEnvPy3.7" in silent mode
    conda install ipykernel -y
    
    # Installs new Kernel called "MyTestEnvPy3.7" in Anaconda Environment "MyTestEnvPy3.7"
    python -m ipykernel install --user --name MyTestEnvPy3.7 --display-name="MyTestEnvPy3.7"
    
    # Installs "numpy" in active Anaconda Environment "MyTestEnvPy3.7" in silent mode
    conda install numpy -y
    
    # Deactivates the new created Anaconda Environment "MyTestEnvPy3.7"
    conda deactivate


    # Creates a new Anaconda Environment called "MyDevEnvPy3.8" using Python Version 3.8
    # in silent mode (parameter "-y")
    conda create -n MyDevEnvPy3.8 python=3.8 -y
    
    # Activates the new created Anaconda Environment "MyDevEnvPy3.8"
    conda activate MyDevEnvPy3.8
    
    # Installs "ipykernel" in active Anaconda Environment "MyDevEnvPy3.8" in silent mode
    conda install ipykernel -y
    
    # Installs new Kernel called "MyDevEnvPy3.8" in Anaconda Environment "MyDevEnvPy3.8"
    python -m ipykernel install --user --name MyDevEnvPy3.8 --display-name="MyDevEnvPy3.8"
    
    # Deactivates the new created Anaconda Environment "MyDevEnvPy3.8"
    conda deactivate


    # Creates a new Anaconda Environment called "MyTestEnvPy3.8" using Python Version 3.8
    # in silent mode (parameter "-y")
    conda create -n MyTestEnvPy3.8 python=3.8 -y
    
    # Activates the new created Anaconda Environment "MyTestEnvPy3.8"
    conda activate MyTestEnvPy3.8
    
    # Installs "ipykernel" in active Anaconda Environment "MyTestEnvPy3.8" in silent mode
    conda install ipykernel -y
    
    # Installs new Kernel called "MyTestEnvPy3.8" in Anaconda Environment "MyTestEnvPy3.8"
    python -m ipykernel install --user --name MyTestEnvPy3.8 --display-name="MyTestEnvPy3.8"
    
    # Installs "numpy" in active Anaconda Environment "MyTestEnvPy3.8" in silent mode
    conda install numpy -y
    
    # Deactivates the new created Anaconda Environment "MyTestEnvPy3.8"
    conda deactivate
    
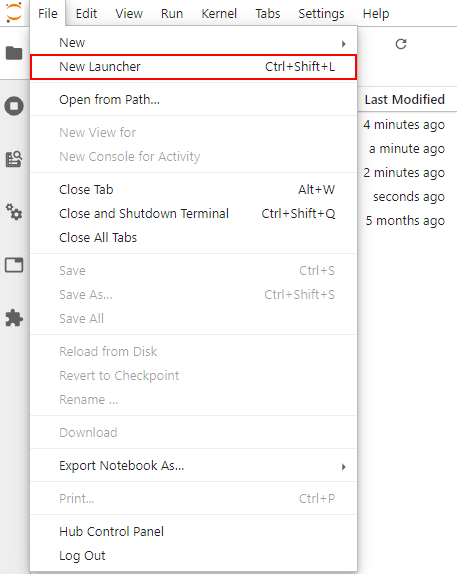
  3. Select "File" --> "New Launcher"

    New Launcher

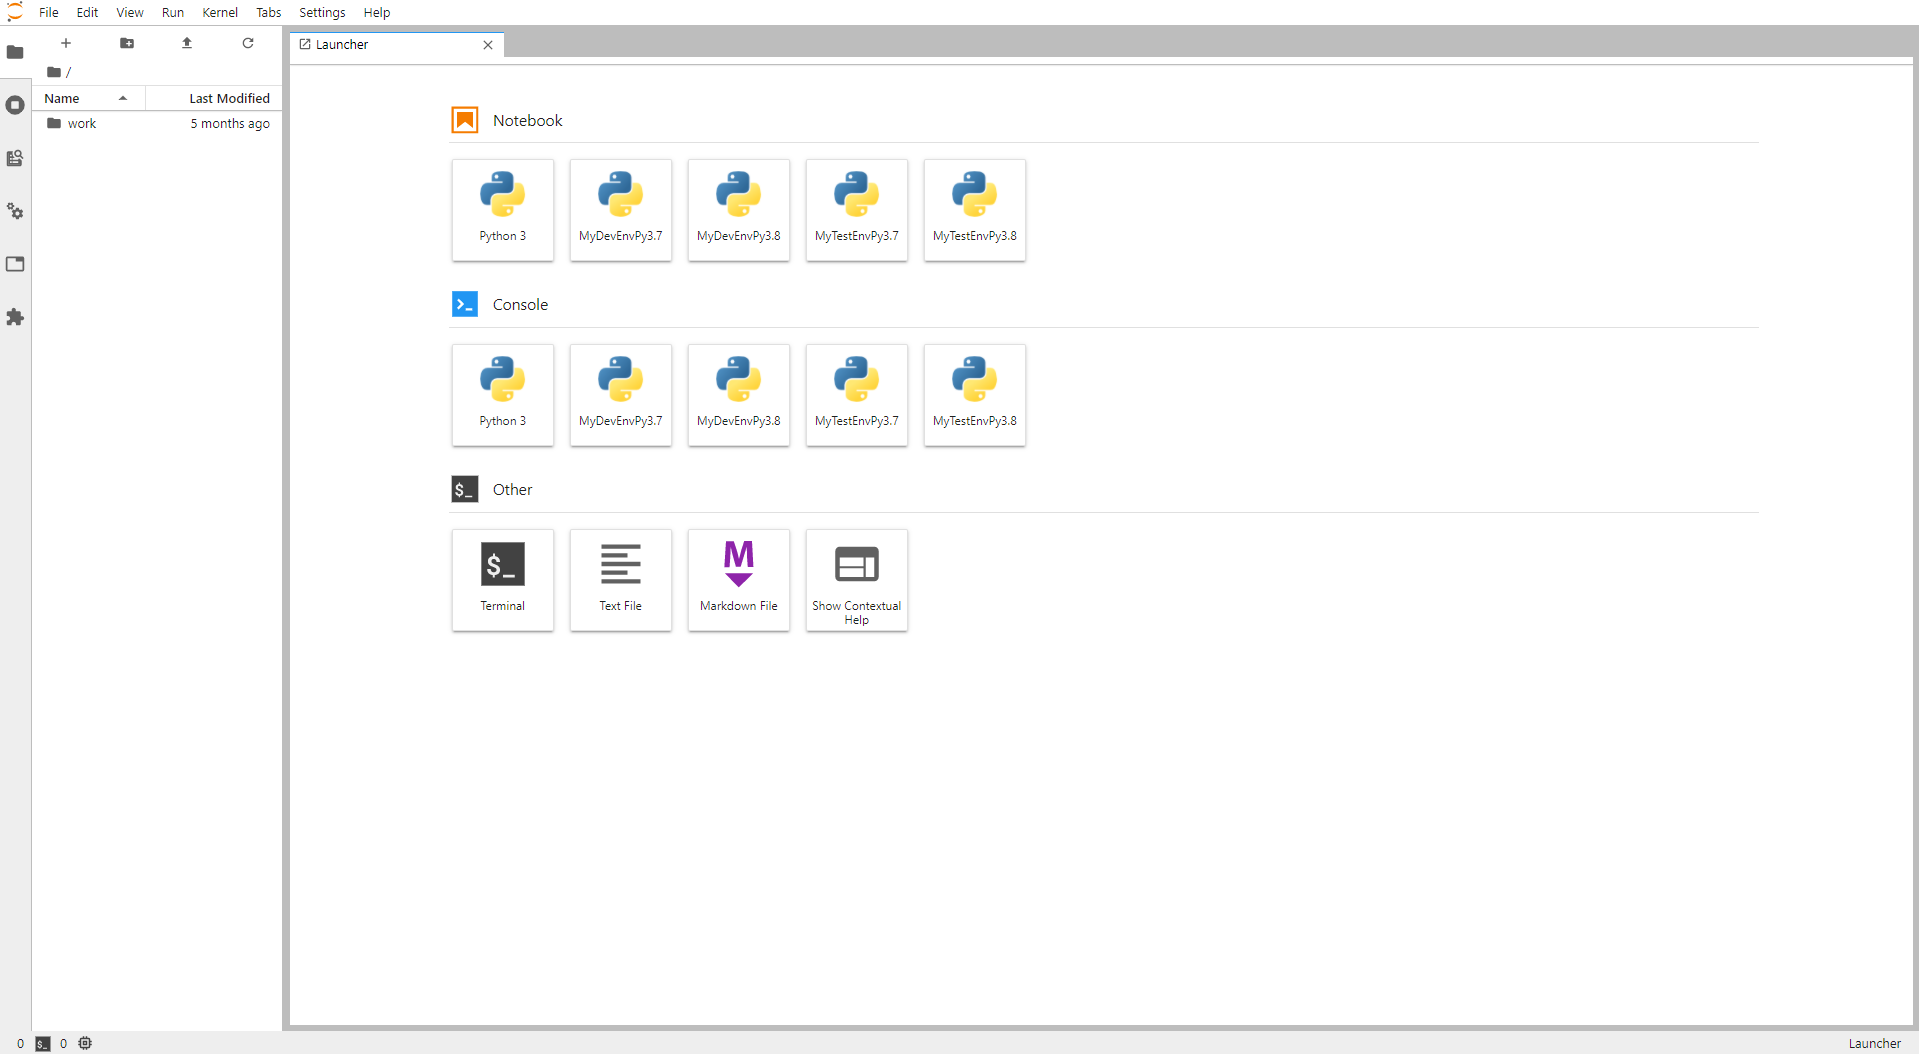
  4. Now, you should see the 4 new Anaconda Environments: 4 new Anaconda Environments

  5. By selecting the desired Anaconda Environment in the Notebook section, a new Jupyter Notebook will be launched, and is bound to the selected Anaconda Environment.

    Let's check this:

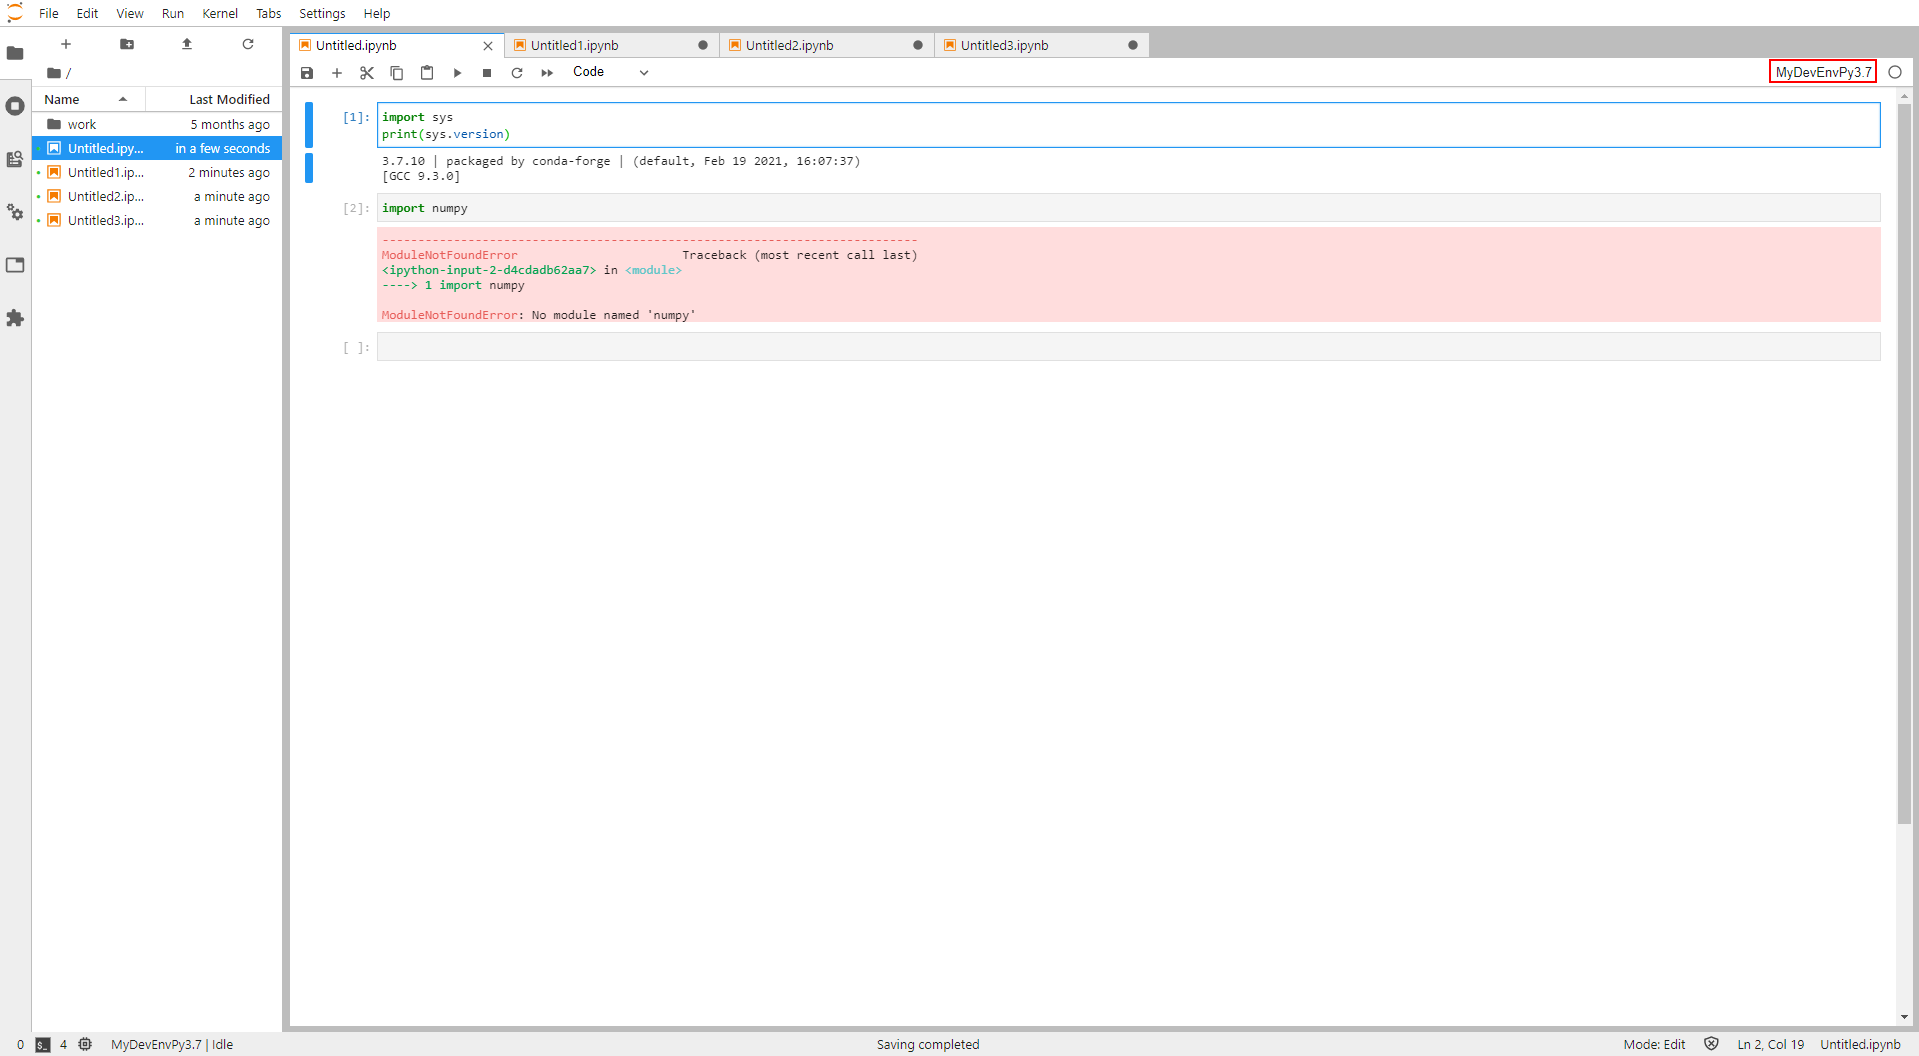
    As you can see on the upper right side, the current selected Anaconda Environment is MyDevEnvPy3.7. We expect the Python version 3.7, and that numpy can't be imported, as it wasn't installed in this Anaconda Environment before. MyDevEnvPy3.7

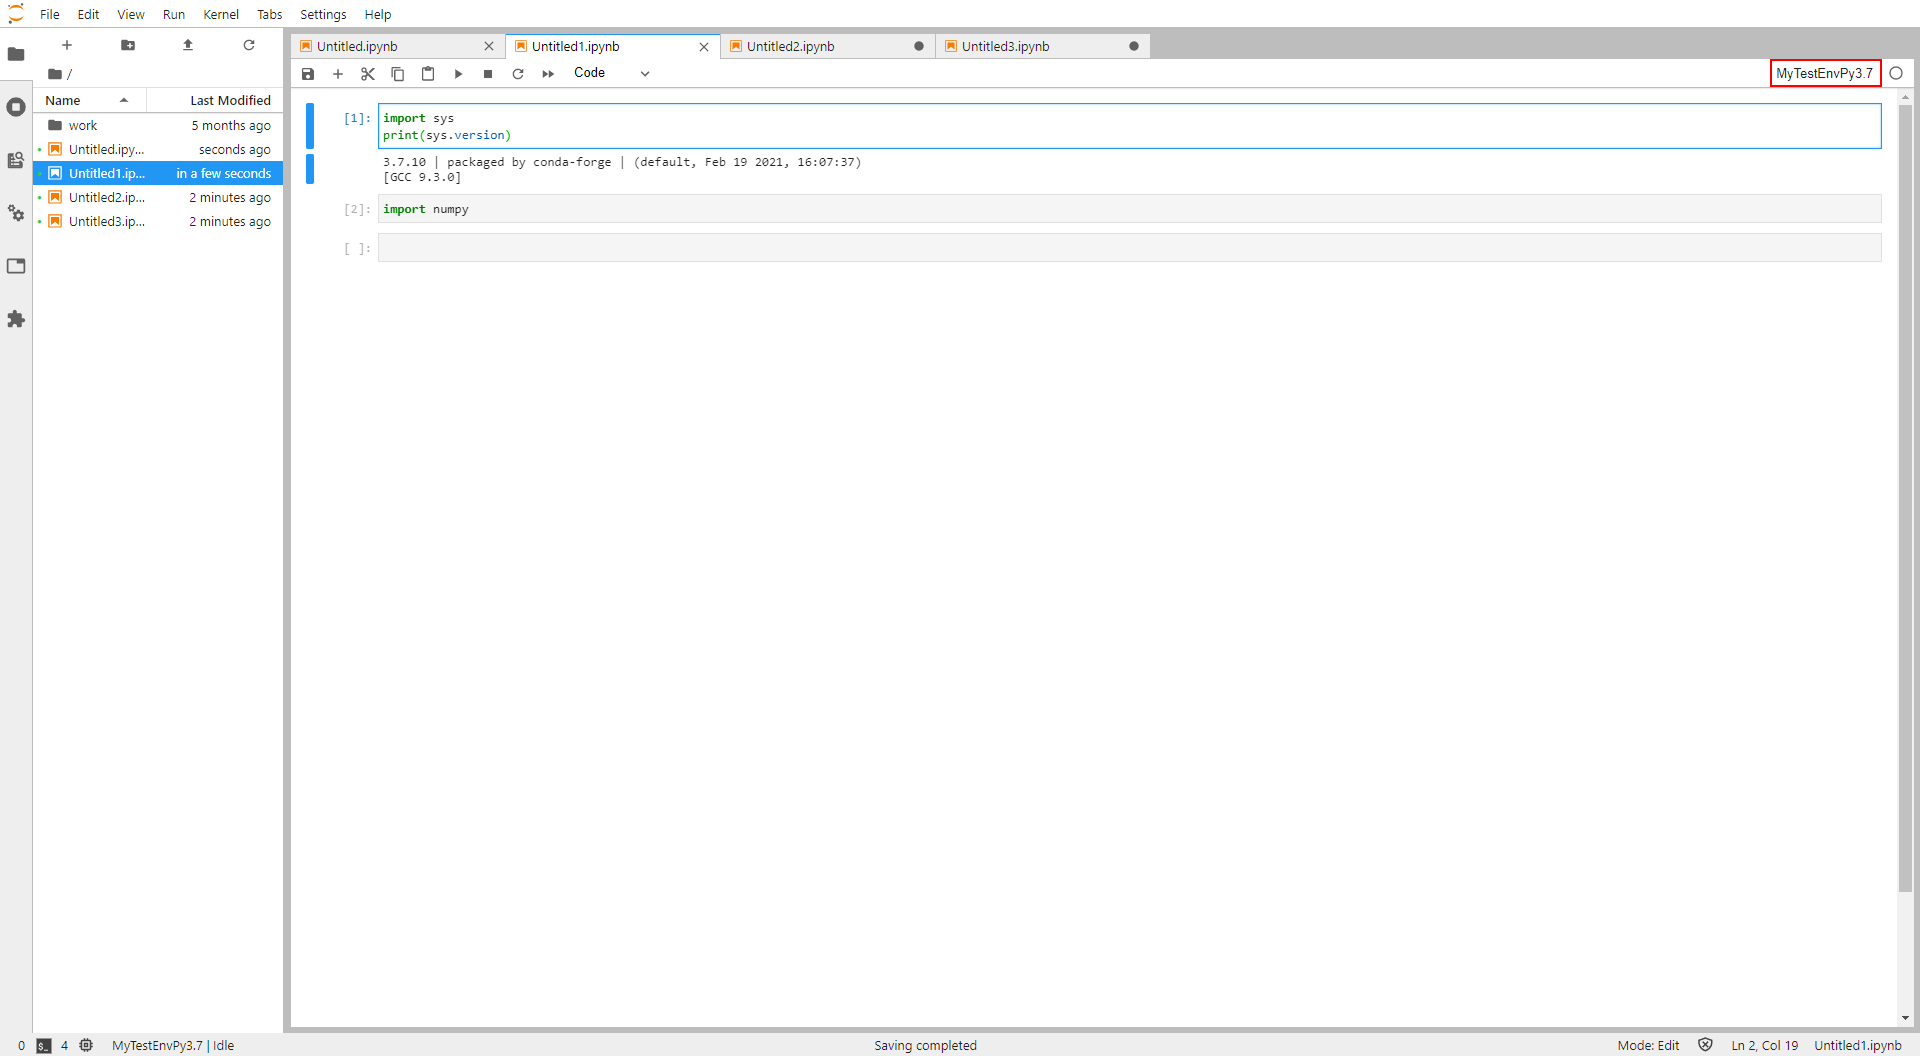
    As you can see on the upper right side, the current selected Anaconda Environment is MyTestEnvPy3.7. We expect the Python version 3.7, and that numpy can be imported, as it was installed in this Anaconda Environment before. MyTestEnvPy3.7

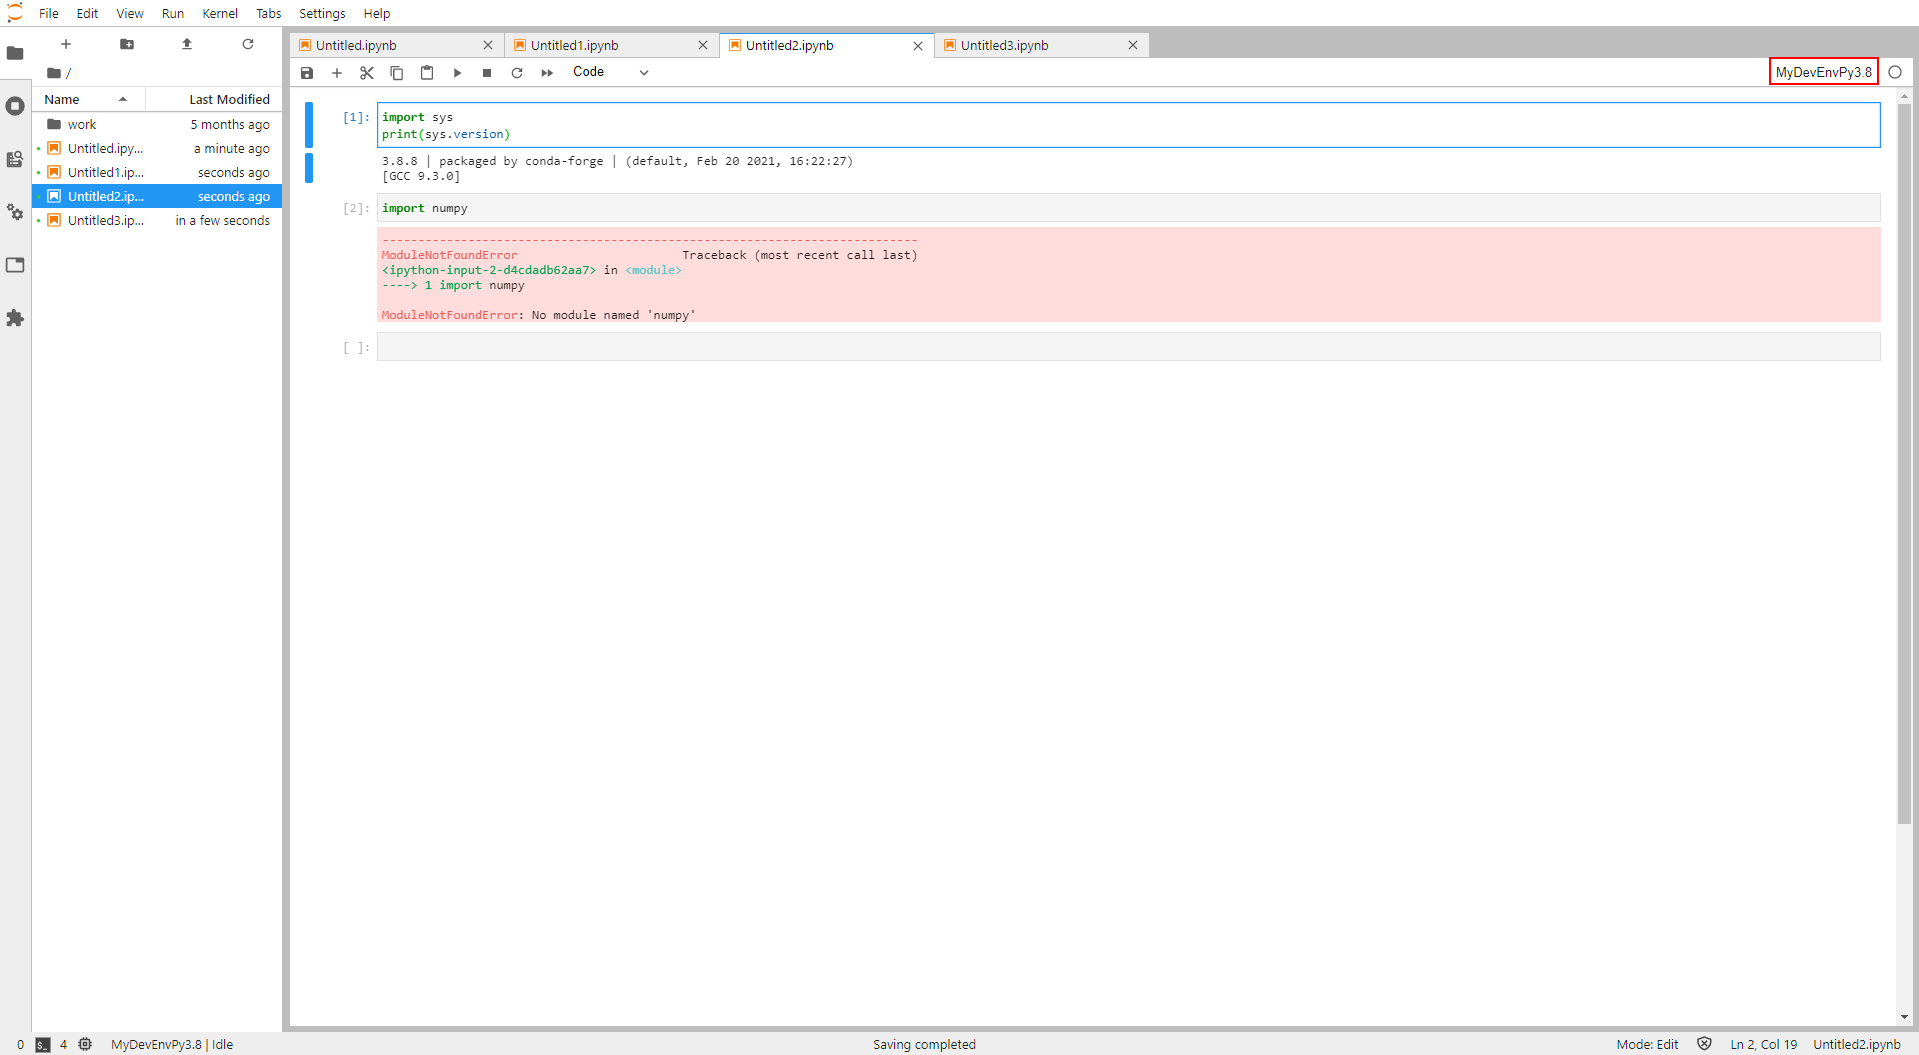
    As you can see on the upper right side, the current selected Anaconda Environment is MyDevEnvPy3.8. We expect the Python version 3.8, and that numpy can't be imported, as it wasn't installed in this Anaconda Environment before. MyDevEnvPy3.8

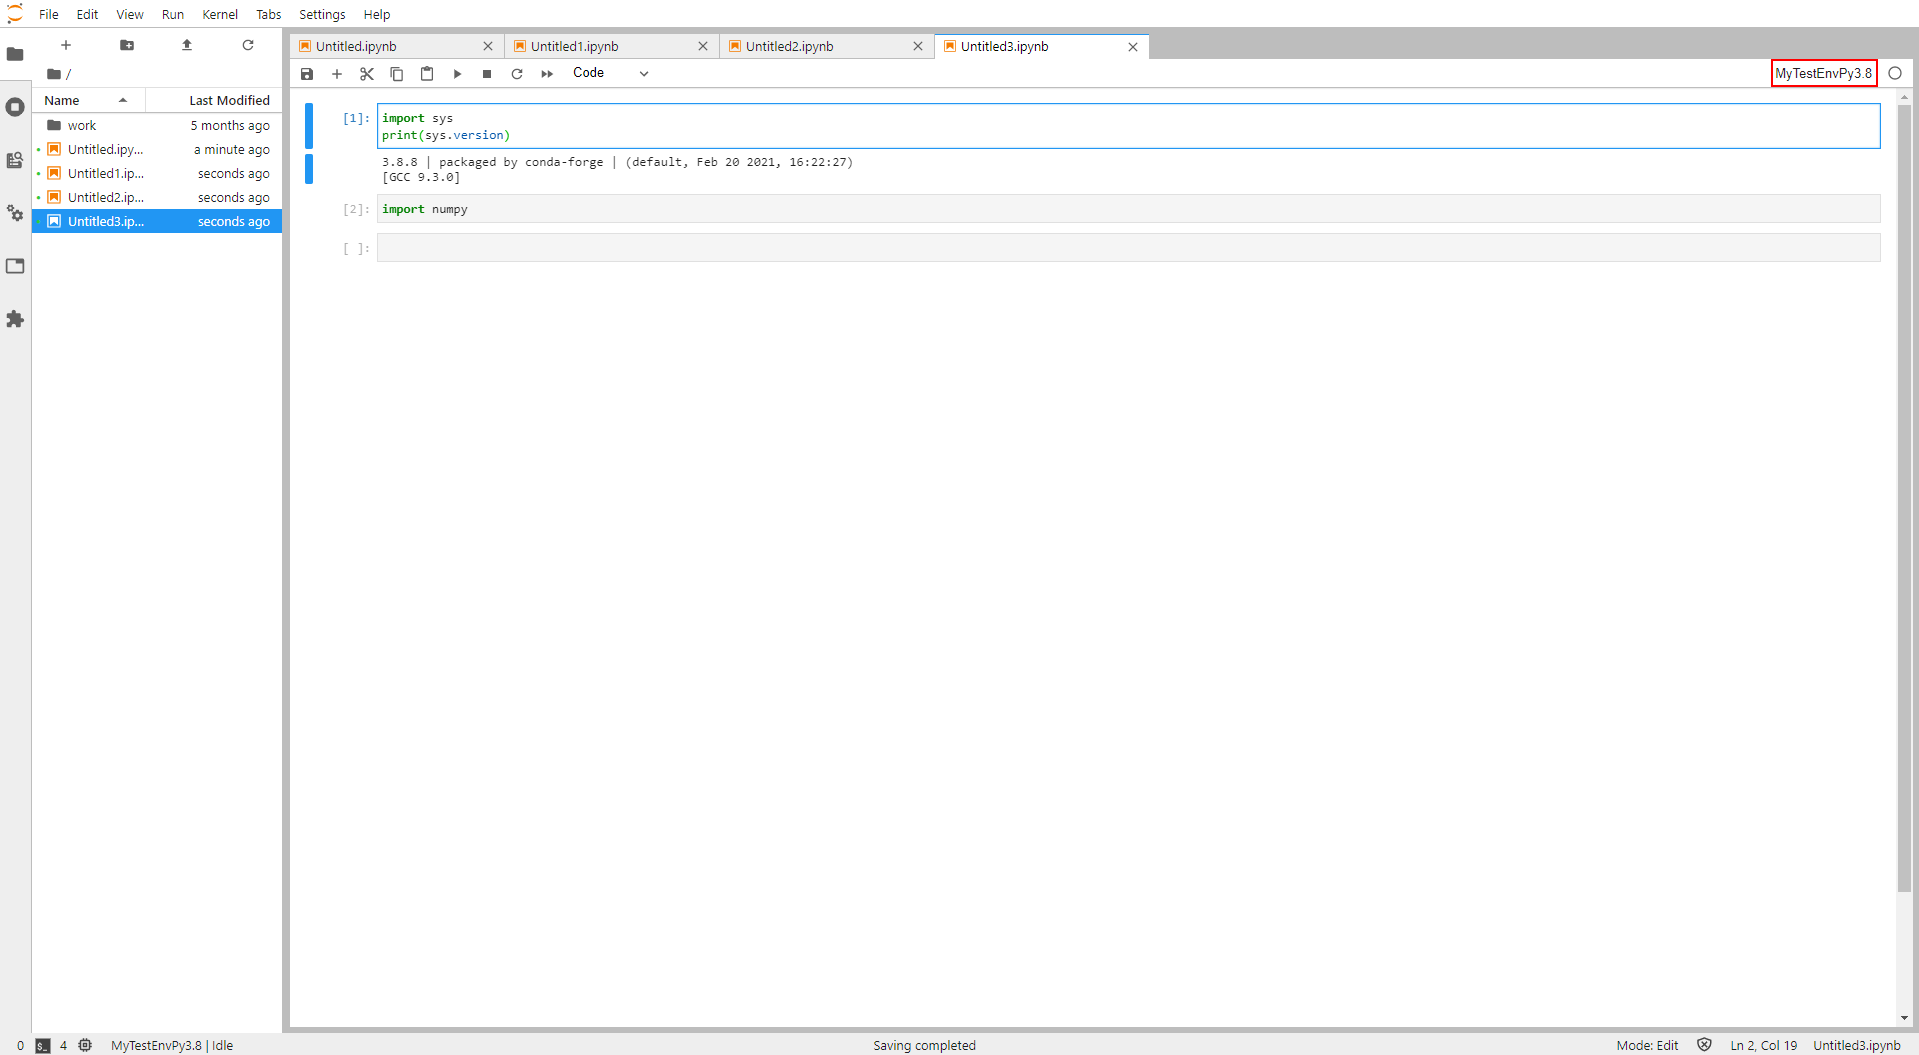
    As you can see on the upper right side, the current selected Anaconda Environment is MyTestEnvPy3.8. We expect the Python version 3.8, and that numpy can be imported, as it was installed in this Anaconda Environment before. MyTestEnvPy3.8

Accumbent answered 10/3, 2021 at 10:54 Comment(2)
Oh you figured it out all by yourself! I answered few minutes before your own answer, it's basically the same as yours. The extra thing is just jupyter kernelspec command.Meisel
There's also quite a useful documentation from Technical University Dresden, Germany. See: doc.zih.tu-dresden.de/hpc-wiki/bin/view/Compendium/JupyterHubAccumbent
M
0

This is pretty much a standard functionality provided by Jupyter/IPython, which technically is called 'adding new kernel'. Please follow these steps (in a shell terminal):

  1. Say you have a conda env named MyTestEnvPy3.8. Activate this env.

  2. Install ipykernel in the conda env you want to add to Jupyter:

    $ conda install ipykernel
    
  3. Install the kernel

    $ python -m ipykernel install --user --name test --display-name "MyTestEnvPy3.8"
    

    You can always change the name (how this kernel appears in your jupyter directory) and display-name (how it appears in the JupyterLab's 'Select Kernel' window).

  4. Check if you installed the kernel successfully:

    $ jupyter kernelspec list
    

And now you can find the kernel you installed in JupyterLab's 'Select Kernel' window. To interface you called 'launcher' is the start window of JupyterLab. JupyterHub hosts multiple Jupyter server, once you launch the JupyterLab from it, you are in the world of JupyterLab!

There's no such thing as 'bind a kernel with the notebook', notebook is just a file format, when you open it in JupyterNotebook or JupyterLab interface, you can switch between the kernels anytime.

Meisel answered 10/3, 2021 at 10:45 Comment(0)
A
-1

I finally managed to create differenct Anaconda Environments:

  1. Open "Terminal" in Launcher tab Terminal

  2. Paste in the following commands:

    # Creates a new Anaconda Environment called "MyDevEnvPy3.7" using Python Version 3.7 
    # in silent mode (parameter "-y")
    conda create -n MyDevEnvPy3.7 python=3.7 -y
    
    # Activates the new created Anaconda Environment "MyDevEnvPy3.7"
    conda activate MyDevEnvPy3.7
    
    # Installs "ipykernel" in active Anaconda Environment "MyDevEnvPy3.7" in silent mode
    conda install ipykernel -y
    
    # Installs new Kernel called "MyDevEnvPy3.7" in Anaconda Environment "MyDevEnvPy3.7"
    python -m ipykernel install --user --name MyDevEnvPy3.7 --display-name="MyDevEnvPy3.7"
    
    # Deactivates the new created Anaconda Environment "MyDevEnvPy3.7"
    conda deactivate


    # Creates a new Anaconda Environment called "MyTestEnvPy3.7" using Python Version 3.7
    # in silent mode (parameter "-y")
    conda create -n MyTestEnvPy3.7 python=3.7 -y
    
    # Activates the new created Anaconda Environment "MyTestEnvPy3.7"
    conda activate MyTestEnvPy3.7
    
    # Installs "ipykernel" in active Anaconda Environment "MyTestEnvPy3.7" in silent mode
    conda install ipykernel -y
    
    # Installs new Kernel called "MyTestEnvPy3.7" in Anaconda Environment "MyTestEnvPy3.7"
    python -m ipykernel install --user --name MyTestEnvPy3.7 --display-name="MyTestEnvPy3.7"
    
    # Installs "numpy" in active Anaconda Environment "MyTestEnvPy3.7" in silent mode
    conda install numpy -y
    
    # Deactivates the new created Anaconda Environment "MyTestEnvPy3.7"
    conda deactivate


    # Creates a new Anaconda Environment called "MyDevEnvPy3.8" using Python Version 3.8
    # in silent mode (parameter "-y")
    conda create -n MyDevEnvPy3.8 python=3.8 -y
    
    # Activates the new created Anaconda Environment "MyDevEnvPy3.8"
    conda activate MyDevEnvPy3.8
    
    # Installs "ipykernel" in active Anaconda Environment "MyDevEnvPy3.8" in silent mode
    conda install ipykernel -y
    
    # Installs new Kernel called "MyDevEnvPy3.8" in Anaconda Environment "MyDevEnvPy3.8"
    python -m ipykernel install --user --name MyDevEnvPy3.8 --display-name="MyDevEnvPy3.8"
    
    # Deactivates the new created Anaconda Environment "MyDevEnvPy3.8"
    conda deactivate


    # Creates a new Anaconda Environment called "MyTestEnvPy3.8" using Python Version 3.8
    # in silent mode (parameter "-y")
    conda create -n MyTestEnvPy3.8 python=3.8 -y
    
    # Activates the new created Anaconda Environment "MyTestEnvPy3.8"
    conda activate MyTestEnvPy3.8
    
    # Installs "ipykernel" in active Anaconda Environment "MyTestEnvPy3.8" in silent mode
    conda install ipykernel -y
    
    # Installs new Kernel called "MyTestEnvPy3.8" in Anaconda Environment "MyTestEnvPy3.8"
    python -m ipykernel install --user --name MyTestEnvPy3.8 --display-name="MyTestEnvPy3.8"
    
    # Installs "numpy" in active Anaconda Environment "MyTestEnvPy3.8" in silent mode
    conda install numpy -y
    
    # Deactivates the new created Anaconda Environment "MyTestEnvPy3.8"
    conda deactivate
    
  3. Select "File" --> "New Launcher"

    New Launcher

  4. Now, you should see the 4 new Anaconda Environments: 4 new Anaconda Environments

  5. By selecting the desired Anaconda Environment in the Notebook section, a new Jupyter Notebook will be launched, and is bound to the selected Anaconda Environment.

    Let's check this:

    As you can see on the upper right side, the current selected Anaconda Environment is MyDevEnvPy3.7. We expect the Python version 3.7, and that numpy can't be imported, as it wasn't installed in this Anaconda Environment before. MyDevEnvPy3.7

    As you can see on the upper right side, the current selected Anaconda Environment is MyTestEnvPy3.7. We expect the Python version 3.7, and that numpy can be imported, as it was installed in this Anaconda Environment before. MyTestEnvPy3.7

    As you can see on the upper right side, the current selected Anaconda Environment is MyDevEnvPy3.8. We expect the Python version 3.8, and that numpy can't be imported, as it wasn't installed in this Anaconda Environment before. MyDevEnvPy3.8

    As you can see on the upper right side, the current selected Anaconda Environment is MyTestEnvPy3.8. We expect the Python version 3.8, and that numpy can be imported, as it was installed in this Anaconda Environment before. MyTestEnvPy3.8

Accumbent answered 10/3, 2021 at 10:54 Comment(2)
Oh you figured it out all by yourself! I answered few minutes before your own answer, it's basically the same as yours. The extra thing is just jupyter kernelspec command.Meisel
There's also quite a useful documentation from Technical University Dresden, Germany. See: doc.zih.tu-dresden.de/hpc-wiki/bin/view/Compendium/JupyterHubAccumbent

© 2022 - 2024 — McMap. All rights reserved.