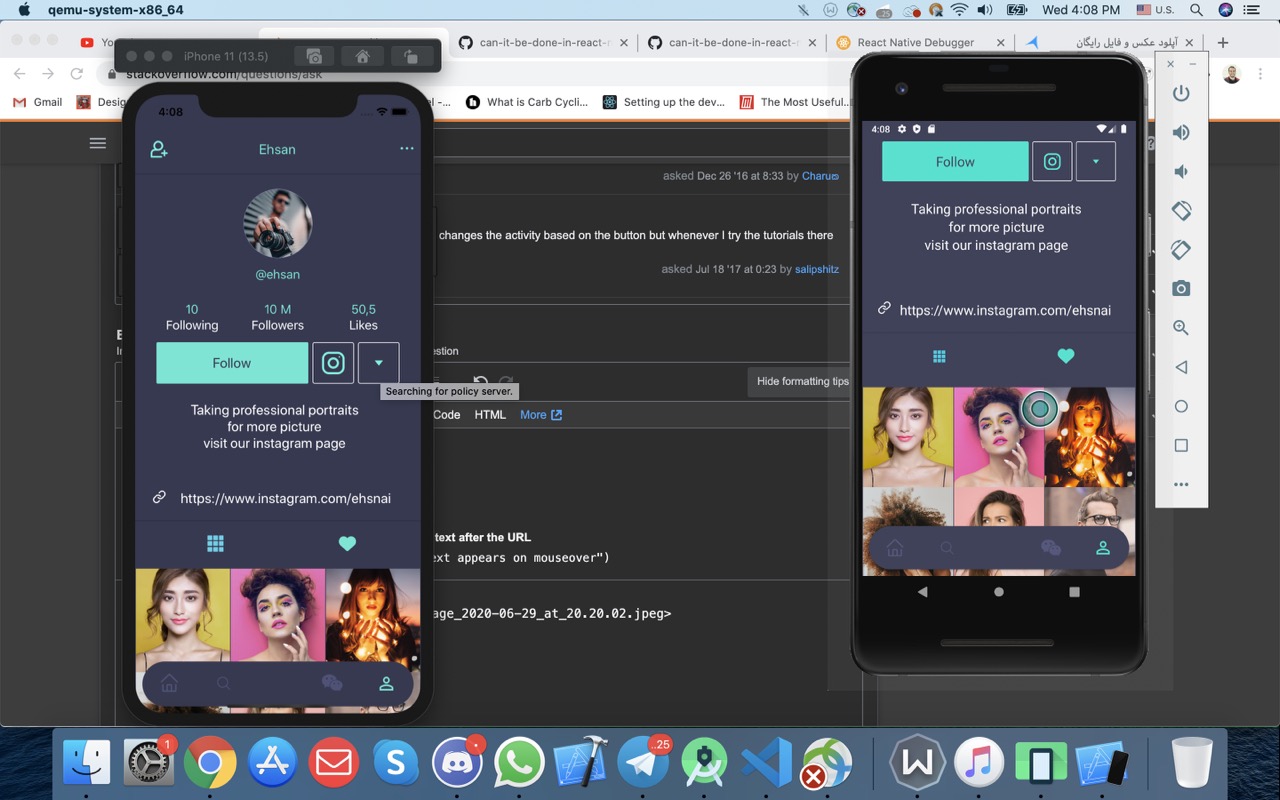
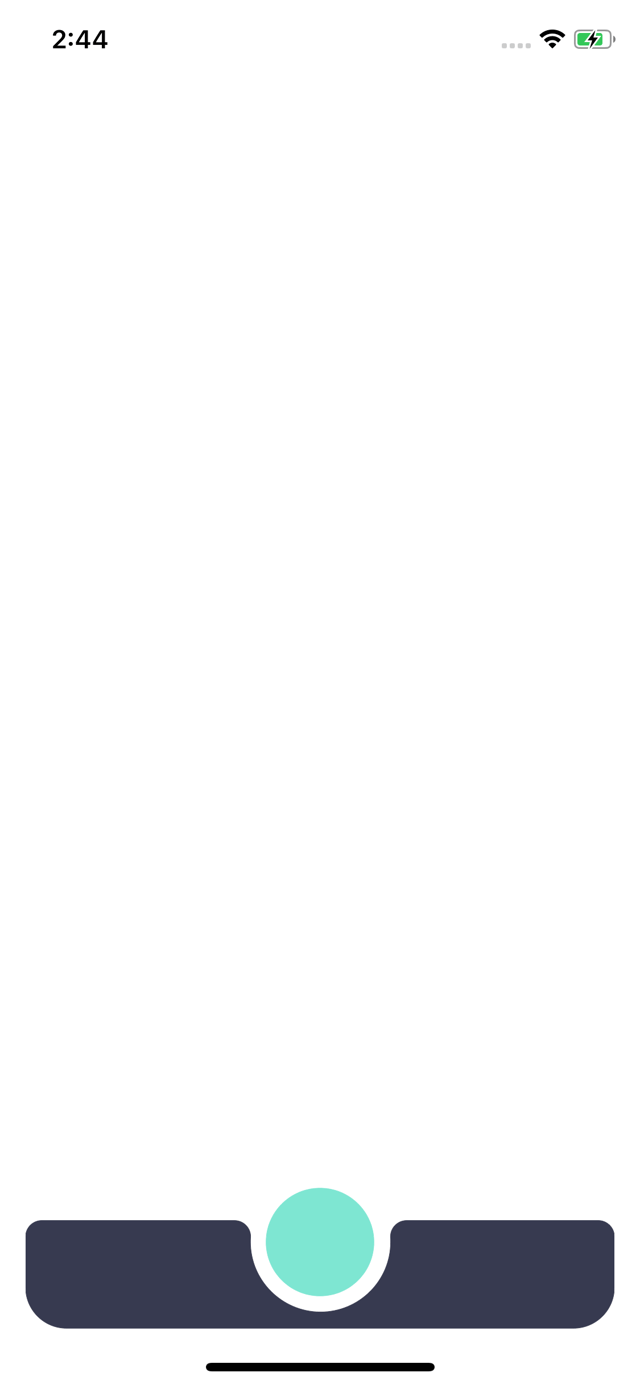
create a curved bottom navigation (before after implementation)
Asked Answered
S

5

11

How can I achieve this in react native?

enter image description here

So far I have this and I want to implement the middle curve. I don't know to either handle it with a transparent view or switch to SVG completely

enter image description here

and this the tabBar component

/* eslint-disable react/prop-types */
import React, { Component } from 'react'
import { TouchableOpacity, Text, StyleSheet, View } from 'react-native'
import { Colors } from 'App/Theme'

export default class TabBar extends Component {
  render() {
    let {
      renderIcon,
      getLabelText,
      activeTintColor,
      inactiveTintColor,
      onTabPress,
      onTabLongPress,
      getAccessibilityLabel,
      navigation,
      showLabel,
    } = this.props

    let { routes, index: activeRouteIndex } = navigation.state

    return (
      <View style={styles.tabBar}>
        {routes.map((route, routeIndex) => {
          let isRouteActive = routeIndex === activeRouteIndex
          let tintColor = isRouteActive ? activeTintColor : inactiveTintColor

          return (
            <TouchableOpacity
              key={routeIndex}
              style={styles.tab}
              onPress={() => {
                onTabPress({ route })
              }}
              onLongPress={() => {
                onTabLongPress({ route })
              }}
              accessibilityLabel={getAccessibilityLabel({ route })}
            >
              {renderIcon({ route, focused: isRouteActive, tintColor })}
              {showLabel ? <Text>{getLabelText({ route })}</Text> : null}
            </TouchableOpacity>
          )
        })}
      </View>
    )
  }
}

const styles = StyleSheet.create({
  tab: {
    alignItems: 'center',
    flex: 1,
    justifyContent: 'center',
  },
  tabBar: {
    alignSelf: 'center',
    backgroundColor: Colors.primary,
    borderRadius: 50,
    bottom: 10,
    elevation: 2,
    flexDirection: 'row',
    height: 65,
    position: 'absolute',
    width: '95%',
  },
  infinity: {
    width: 80,
    height: 100,
  },
  infinityBefore: {
    position: 'absolute',
    top: 0,
    left: 0,
    width: 0,
    height: 0,
    borderWidth: 20,
    borderColor: 'red',
    borderStyle: 'solid',
    borderTopLeftRadius: 50,
    borderTopRightRadius: 50,
    borderBottomRightRadius: 50,
    borderBottomLeftRadius: 0,
    transform: [{ rotate: '-135deg' }],
  },
  infinityAfter: {
    position: 'absolute',
    top: 0,
    right: 0,
    width: 0,
    height: 0,
    borderWidth: 20,
    borderColor: 'red',
    borderStyle: 'solid',
    borderTopLeftRadius: 50,
    borderTopRightRadius: 0,
    borderBottomRightRadius: 50,
    borderBottomLeftRadius: 50,
    transform: [{ rotate: '-135deg' }],
  },
})
Steelmaker answered 1/7, 2020 at 11:42 Comment(4)
I have started bounty on this question, because i really need the answer to this question.Rinse
@Ferin Patel Can you add it to stackblitz.comTonality
Have a look at this . This should solve your issue.Invertase
@ChandradeeptaLaha that answer made the background color of that button the same as the background, and once it floats to top, it will show. we need a curved transparent which means ha;f of the main container must become curvedSteelmaker
A
9

here is a demo: https://snack.expo.io/@nomi9995/cf371e

you need to use react-native-svg

yarn add react-native-svg
import React, { Component } from "react";
import {
  Text,
  StyleSheet,
  View,
  Dimensions,
  TouchableHighlight,
} from "react-native";
import Svg, { Circle, Path } from "react-native-svg";

const tabs = [1, 2, 3, 4, 5];
export default class App extends Component {
  constructor(props) {
    super(props);
    this.state = {
      pathX: "357",
      pathY: "675",
      pathA: "689",
      pathB: "706",
    };
  }
  render() {
    return (
      <View style={[styles.container]}>
        <View style={[styles.content]}>
          <View style={styles.subContent}>
            {tabs.map((_tabs, i) => {
              return (
                <TouchableHighlight
                  key={i}
                  underlayColor={"transparent"}
                  onPress={() => console.log("onPress")}
                >
                  <View>
                  </View>
                </TouchableHighlight>
              );
            })}
          </View>
          <Svg
            version="1.1"
            id="bottom-bar"
            x="0px"
            y="0px"
            width="100%"
            height="100"
            viewBox="0 0 1092 260"
            space="preserve"
          >
            <Path
              fill={"#373A50"}
              stroke={"#373A50"}
              d={`M30,60h${this.state.pathX}.3c17.2,0,31,14.4,30,31.6c-0.2,2.7-0.3,5.5-0.3,8.2c0,71.2,58.1,129.6,129.4,130c72.1,0.3,130.6-58,130.6-130c0-2.7-0.1-5.4-0.2-8.1C${this.state.pathY}.7,74.5,${this.state.pathA}.5,60,${this.state.pathB}.7,60H1062c16.6,0,30,13.4,30,30v94c0,42-34,76-76,76H76c-42,0-76-34-76-76V90C0,73.4,13.4,60,30,60z`}
            />
            <Circle
              fill={"#7EE6D2"}
              stroke={"#7EE6D2"}
              cx="546"
              cy="100"
              r="100"
            />
          </Svg>
        </View>
      </View>
    );
  }
}

const styles = StyleSheet.create({
  container: {
    flex: 1,
    overflow: "hidden",
  },
  content: {
    flexDirection: "column",
    zIndex: 0,
    width: Dimensions.get("window").width - 30,
    marginBottom: "4%",
    left: "4%",
    right: "4%",
    position: "absolute",
    bottom: "1%",
  },
  subContent: {
    flexDirection: "row",
    marginLeft: 15,
    marginRight: 15,
    marginBottom: 10,
    zIndex: 1,
    position: "absolute",
    bottom: 5,
  }
});

i hope this will help you.

enter image description here

Aland answered 6/8, 2020 at 21:46 Comment(8)
Perfect. Although I wanted to ask how did you manage to learn SVG? or you use a specific tool or website?Steelmaker
@Alirezatk you can learn from this link w3schools.com/graphics/svg_intro.aspAland
How can handle it with bottom Tabbar navigation in react-navigation?Cos
@OliverD you can use like this https://mcmap.net/q/558243/-custom-tab-bar-react-navigation-5Aland
Sadly not work as expected, the tabs rendering in the left of the View, Not flexible to take the full width with the numbers of Tabs[]Cos
@OliverD you can pass flex:1 to give equally widthAland
@MuhammadNuman can u check this related Q? #65792742Cos
Hey bro, how can I put two colors to the background. On fill: {["#ceccc8", "#fdfdfd"]}Og
H
3

Here is 2 solution according to your requirement.

If you want this type of design without selection then this code will help you : https://github.com/alex-melnyk/clipped-tabbar

And if you need on each tab selection then here is other easy library for you : https://github.com/Jm-Zion/rn-wave-bottom-bar

Hammertoe answered 30/1, 2021 at 11:57 Comment(0)
R
0

It's not obvious that this can be done with only <View/> components. I would split the TabBar into a flex row container with three subviews, and create an SVG with the filled inverted radius to be used in the center subview. To render the SVG, use react-native-svg. See a rough layout below:

...

import { SvgXml } from 'react-native-svg';
import TabCenterSvg from ‘assets/my-svg.svg’

export default class TabBar extends Component {
    render() {
        return (
            <View style={styles.tabBar}>
                <View style={styles.leftContainer}>
                    {/* Left Buttons */}
                </View>
                <View style={styles.centerContainer}>
                    <View style={styles.centerInnerTopContainer}>
                        {/* Add Button */}
                    </View>
                    <View style={styles.centerInnerBottomContainer}>
                        <SvgXml xml={TabCenterSvg} />
                    </View>
                </View>
                <View style={styles.rightContainer}>
                    {/* Right Icons */}
                </View>
            </View>
        )
    }
}

const styles = StyleSheet.create({
    tabBar: {
        alignSelf: 'center',
        borderRadius: 50,
        bottom: 10,
        elevation: 2,
        flexDirection: 'row',
        height: 65,
        position: 'absolute',
        width: '95%',
    },
    leftContainer: {
        flex: 1,
        flexDirection: 'row',
        borderBottomLeftRadius: 50,
        borderTopLeftRadius: 50,
        borderTopRightRadius: 50,
        backgroundColor: Colors.primary,
    },
    centerContainer: {
        flex: 1,
        flexDirection: 'column',
    },
    centerInnerTopContainer: {
        flex: 1,
    },
    centerInnerBottomContainer: {
        flex: 1,
    },
    rightContainer: {
        flex: 1,
        flexDirection: 'row',
        borderTopLeftRadius: 50,
        borderTopRightRadius: 50,
        borderBottomRightRadius: 50,
        backgroundColor: Colors.primary,
    },
})
Remainder answered 3/8, 2020 at 5:5 Comment(0)
H
0

Use this library's code and customize according to your UI

https://www.npmjs.com/package/curved-bottom-navigation-bar

Note: I'll not recommend this library as there are low weekly downloads. Rather than using the whole library, you can use its code.

Heinrich answered 4/8, 2020 at 14:23 Comment(0)
E
0

can now be easily done with this package: react-native-curved-bottom-bar

import { CurvedBottomBar } from 'react-native-curved-bottom-bar';

  const renderTabBar = ({ routeName, selectedTab, navigate }: 
    TabBarProps) => {
     return (
       <TouchableOpacity
         onPress={() => navigate(routeName)}
         style={styles.tabBarBtns}
       >
       {_renderIcon(routeName, selectedTab)}
       <Text
        fontFamily={typography.primary}
        style={{ fontSize: typography.FONT_SIZE_10 }}
        color={routeName === selectedTab ? palette.primary : 
        palette.gray}
       >
      {routeName}
    </Text>
  </TouchableOpacity>
  );
}


  <CurvedBottomBar.Navigator
    strokeWidth={1}
    circleWidth={56}
    strokeColor="#DDDDDD"
    defaultScreenOptions={navigation}
    style={styles.bottomBar}
    screenOptions={{ headerShown: false }}
    bgColor={isDarkMode ? palette.black : palette.white}
    initialRouteName={SCREENS.HOME}
    borderTopLeftRight
    renderCircle={() => (
     <IconButton
      height={spacing.SCALE_56}
      width={spacing.SCALE_56}
      onPress={handleAddComittee}
      borderRadius={spacing.SCALE_28}
      style={styles.btnCircle}
     >
      <FeatherIcon
        name={'plus'}
        color={palette.white}
        size={spacing.SCALE_22}
      />
    </IconButton>
  )}
  tabBar={renderTabBar}
>
  <CurvedBottomBar.Screen
    name={strings?.home}
    position="LEFT"
    component={Home}
  />
  <CurvedBottomBar.Screen
    name={strings?.chat}
    position="LEFT"
    component={Chat}
  />
  <CurvedBottomBar.Screen
    name={strings?.calendar}
    component={Calendar}
    position="RIGHT"
  />
  <CurvedBottomBar.Screen
    name={strings?.settings}
    component={Settings}
    position="RIGHT"
  />
</CurvedBottomBar.Navigator>

curved-bottom-bar

Epitome answered 15/3, 2023 at 7:36 Comment(0)

© 2022 - 2024 — McMap. All rights reserved.