Android Studio: “new module -> import existing project” vs. “import module”
Asked Answered
S

6

16

What I have:

Four independently working Android modules:

  1. MyProjectMainModule, a main container application, attached to MyProject

  2. MyGradleModule, a library, with all necessary components built during gradlew process.

  3. MyPreGradleModule, a library, with src/, res/, AndroidManifest.xml, and pom.xml, without gradle wrapper

  4. MyRawModule, a library, with src/, res/, AndroidManifest.xml, without pom.xml (commonly seen in Ant-based Eclipse projects)

What I'd like to achieve:

To import all three modules (i.e. MyGradleModule, MyPreGradleModule, MyRawModule) into MyProject as dependencies of MyProject. The complete project structure should resemble below project structure:

MyProject
|--MyProjectMainModule
|--MyGradleModule
|--MyPreGradleModule
|--MyRawModule

Question:

Realizing all three modules (MyGradleModule, MyPreGradleModule, and MyRawModule) have different structures, what are the most optimal ways to import each modules with minimal efforts?

Could you please match one of the following Android Studio menu items with each modules in your answer (if you use any):

  1. File -> Import Module...
  2. File -> New Module... -> Import Existing Project
  3. File -> New Module... -> Android Library
Selfimmolation answered 13/10, 2014 at 22:14 Comment(0)
W
24

You can add the three modules to the same project by creating a settings.gradle file in the MyProject/ folder and adding the modules to it:

include ':MyGradleModule'
include ':MyPreGradleModule'
include ':MyRawModule'

Then for each module, configure the build.gradle dependencies to reference the other modules as needed. For example, add this to the MyProjectMainModule to make it use the output produced by MyGradleModule:

dependencies {
  compile project(':MyGradleModule')
}

Finally, if your project has heterogeneous submodules then you can configure their structure using the 'sourceSets' closure. For example, your raw module would have a configuration similar to this:

android {
    sourceSets {
        main {
            manifest.srcFile 'AndroidManifest.xml'
            java.srcDirs = ['src']
            resources.srcDirs = ['src']
            aidl.srcDirs = ['src']
            renderscript.srcDirs = ['src']
            res.srcDirs = ['res']
            assets.srcDirs = ['assets']
        }
        androidTest.setRoot('tests')
    }
}

Check out this section of the Gradle Plugin Guide to see what configuration options are available.

Wyckoff answered 14/10, 2014 at 1:2 Comment(0)
F
7

This worked out for me:

  1. Open your project in Android Studio
  2. Download the library (using Git, or a zip archive to unzip)
  3. Go to File > Import Module and import the library as a module
  4. Go to File > Project Structure > Modules
  5. Locate your main project module, click on it. It should have a few android libraries, such as: support-v4, etc.
  6. Click on the more on the left green "+" button > Module dependency
  7. Select "your Library"
Faultfinding answered 13/7, 2016 at 11:53 Comment(1)
Just a word of advice: If you added an import statement for the new dependency BEFORE you've tried all of the above, and Android Studio still refuses to find the import, try deleting that line and rewriting it.Newcastle
C
7

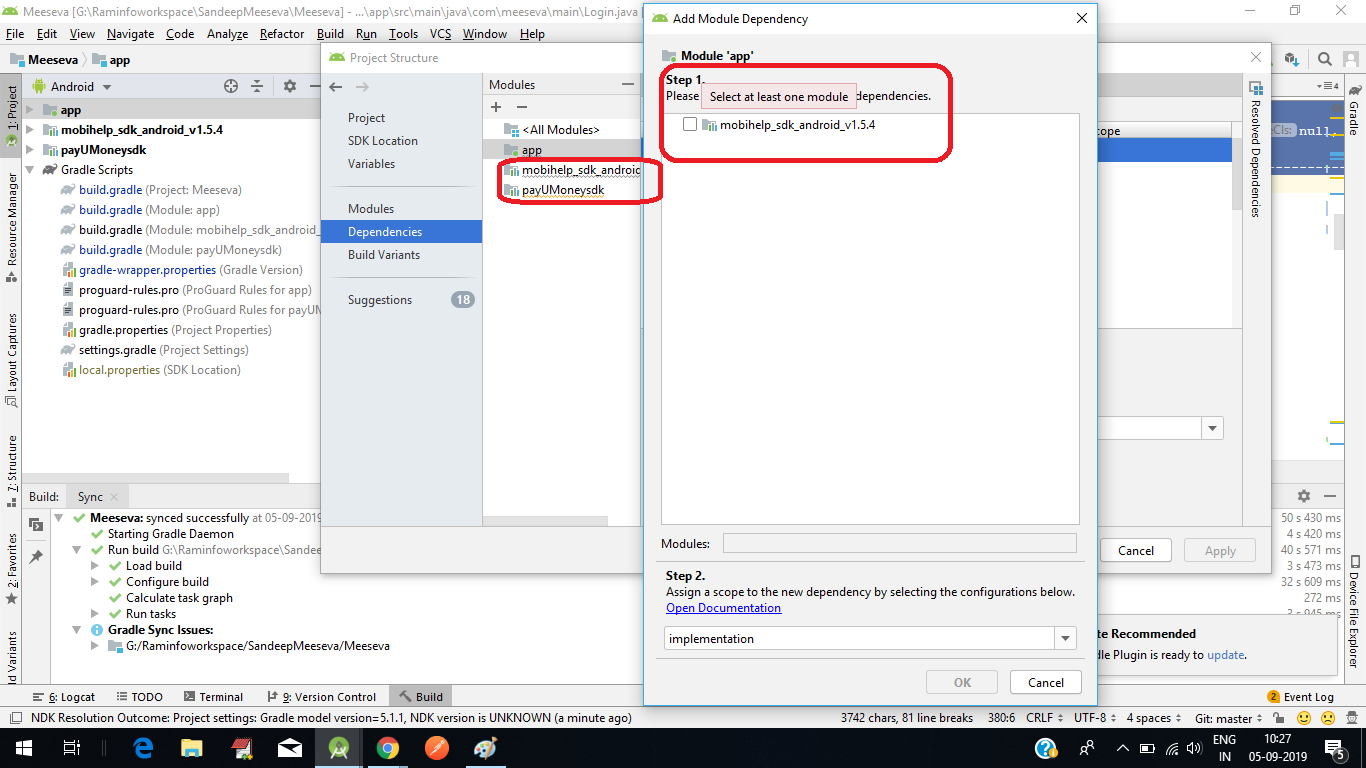
enter image description hereFor Adding Module into Android Studio

  1. File>>New>>Import Module>>select module, click on finish

  2. Goto settings.gradle file and add the module name as below separated by comma i.e. include ':app', ':payUMoneysdk'

  3. Now module is added in the project see in the app root folder.

  4. Goto project setting and click on dependencies click on the plus (+) symbol and choose the module, click on ok.

  5. The following module is added in the build.gradle with name implementation project(':payUMoneysdk')

Here i am sharing the image for your reference... i added PayUmoney and Mobilehelpsdk modules in my project its working properly..

Computation answered 23/5, 2018 at 8:3 Comment(1)
Sir can you take a look at this question #57780298 thank you for your time.Inutile
I
0

If the above answers not clear to you or you are confused So please follow these simple steps.

  1. Go to File > New > Import Module...
  2. Select the source directory where is your library or module present.
  3. Give module name or leave it as default and then click on finish and your module is added successfully.
Inconformity answered 26/3, 2018 at 12:47 Comment(0)
U
0

Adding the module in Settings.Gradle file fixed issue for me.

include ':app' include ':Other-Module-Folder'

Ultraconservative answered 26/6, 2018 at 12:57 Comment(0)
T
0

did you try this? https://developer.android.com/studio/projects/android-library.

You need to create a Create a library module and Convert an app module to a library module and then Add your library as a dependency. Check ANT Android project to Android Studio

Torbart answered 29/6, 2018 at 20:50 Comment(0)

© 2022 - 2024 — McMap. All rights reserved.