Azure App Service unable to validate .pfx file: Certificate failed validation because it could not be loaded
Asked Answered
B

4

24

For years I was able to upload new pfx files for SSL binding on Azure App Services using the OpenSSL creation method in this Stack Overflow answer:

openssl pkcs12 -export -out domain.name.pfx -inkey domain.name.key -in domain.name.crt

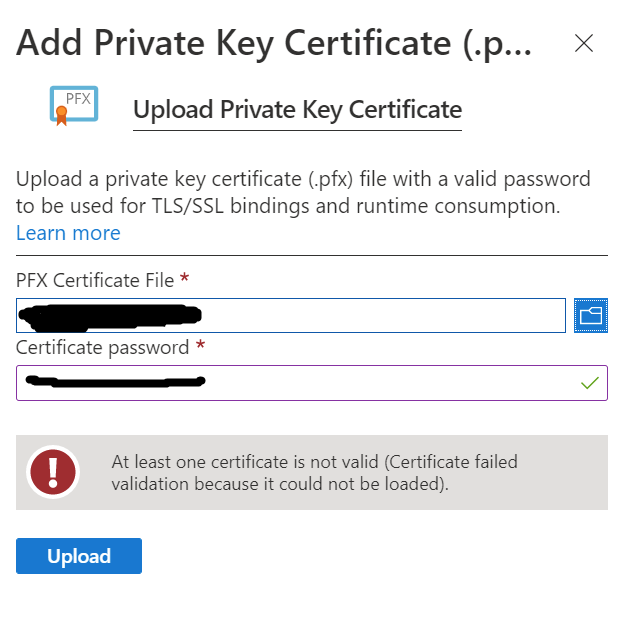
However, doing the same now provides this error:

At least one certificate is not valid (Certificate failed validation because it could not be loaded.)

pfx error

What ways can this issue be resolved?

Bollinger answered 16/7, 2022 at 4:57 Comment(1)
The comments on the very answer you link (now including mine) tell you that recent OpenSSL (specifically 3.0.0 up) uses a different encryption for PKCS12 by default that Azure doesn't accept, and how to change it backBuchenwald
B
49

App Service private certificate requirements

App Service private certificates must meet the following requirements:

  • Exported as a password-protected PFX file, encrypted using triple DES.
  • Contains private key at least 2048 bits long
  • Contains all intermediate certificates and the root certificate in the certificate chain.

Option 1: Use legacy provider in OpenSSL 3+

OpenSSL 3+ no longer uses DES encryption as a default. The original command needs the -legacy and -provider-path (path to legacy.dll) arguments appended:

openssl pkcs12 -export -out domain.name.pfx -inkey domain.name.key -in domain.name.crt -legacy -provider-path 'C:\Program Files\OpenSSL-Win64\bin'

Option 2: Let Windows re-encrypt the file

If for some reason your OpenSSL installation does not contain the legacy provider:

Open PowerShell and run this command, replacing -FilePath with the path to your non-working pfx file, and the password -String argument with its respective password:

Import-PfxCertificate -FilePath "pfx file path" -CertStoreLocation Cert:\LocalMachine\My -Password (ConvertTo-SecureString -String 'MyPassword' -AsPlainText -Force) -Exportable

A successful output will look like:

export pfx result

Use this thumbprint to export the cert to a new pfx file, replacing the -Cert, -FilePath, and password -String arguments:

Export-PfxCertificate -Cert Microsoft.PowerShell.Security\Certificate::LocalMachine\My\B56CE9B122FB04E29A974A4D0DB3F6EAC2D150C0 -FilePath 'newPfxName.pfx' -Password (ConvertTo-SecureString -String 'MyPassword' -AsPlainText -Force)

Azure should now be able to validate the new pfx file output.

Bollinger answered 16/7, 2022 at 4:57 Comment(4)
And for those doing this on WSL/Linux using OpenSSL 3+, add the -legacy option: openssl pkcs12 -export -out certificate.pfx -inkey privateKey.key -in certificate.crt -legacyZeiler
Thanks! TripleDES was the issue with mine.Geodetic
Option 1 did not work for me on Windows - OpenSSL 3.1.1. Option 2 made the trick, thank youSubvene
Thank you @MagnusJohansson! Dropping the -provide-path option and keeping -legacy worked for me on Ubuntu/WSL.Felicidad
U
3

For me, the issue was simply solved by changing the password. My previous password had special characters, which then i changed to only alphabetic letters.

Unger answered 17/11, 2022 at 8:54 Comment(2)
This was down-voted, but it solved my issue. OpenSSL was generating an invalid PFX file when the password contained special characters (&@^ in my case). I'm not sure if it was garbled by the shell or an issue with OpenSSL, but removing them worked.Mckeown
I experienced this too: nonalphanumerical characters in the password prevent Azure from importing the PFX.Laruelarum
K
1

I had the same problem using OpenSSL. I finally found that this worked for me (for a CRT file downloaded from GoDaddy).

Convert CRT file to CER file

  1. Double-click on the .crt file and click on the Open button in the Open File dialog.
  2. Select the Details tab, and click on the Copy to File button.
  3. Select Next in the Certificate Wizard.
  4. Select Base-64 encoded X.509(.CER) and then select Next.
  5. Select Browse, locate where you want to save your .CER file, and type in a name for your certificate.
  6. Select Next and then Finished.

Convert CER file to PFX file

  1. Open the command prompt and navigate to the folder with the CER file
  2. Use the Windows utility certutil as below (you will need to enter a password, so I prefer to come up with one first and have it to hand in notepad)
certutil -MergePFX cert_name.cer cert_name.pfx
  1. Enter a password, and then confirm it (I usually find it is best to paste the password in and hit return as you will not see any characters coming up).

I was then able to use the generated PFX file to bind my App Service without any problems.

Karlis answered 18/9, 2023 at 17:33 Comment(0)
D
0

If the specific error is

Error adding private key certificate. At least one certificate is not valid (Certificate failed validation because it could not be loaded)

And if you are using the following script from OpenSSL to generate

openssl pkcs12 -export -out forUploadToAzure.pfx -inkey privateKeyUsedToGenerateCRT.key -in certificateGenerated.crt

And if this is the issue, then....

OpenSSL 3 generates a longer certificate serial number when you run the pfx generation script. I would suggest downloading the OpenSSL 1 from the portal (https://slproweb.com/products/Win32OpenSSL.html) and this should help generate a shorter certificate serial number which Azure pfx import tool will accept

Reference - https://learn.microsoft.com/en-us/answers/questions/192112/error-message-occurs-when-trying-to-upload-pfx-cer.html

Dunton answered 12/10, 2022 at 16:49 Comment(0)

© 2022 - 2024 — McMap. All rights reserved.