How do I set adaptive multiline UILabel text?
Asked Answered
H

9

66

I have a UILabel named titleLabel in my storyboard nib set to its default height. I want it to programatically expand in height to fit it's content. Here is what I have tried so far:

// just setting content
titleLabel.text = "You don't always know what you are getting with mass-market cloud computing services. But with SimpliCompute, the picture is clear. SimpliCompute gives you powerful virtual servers you can deploy using just your web browser. That’s enterprise grade technology you can deploy and control on-the-fly."

titleLabel.numberOfLines = 0

titleLabel.preferredMaxLayoutWidth = 700

titleLabel.lineBreakMode = NSLineBreakMode.ByWordWrapping

titleLabel.sizeToFit()

None of this works for me in any combination! I always only see one line of text in my UILabel. What am I doing wrong?

I absolutely need the text content to be variable.

Habited answered 10/6, 2014 at 7:8 Comment(15)
Did you try setting height to something really high?Valenza
like in the thousands?Habited
Are you using autolayout? because then you should call the update constrains methods.Yordan
and which property do you mean when you say height?Habited
@Yordan I am not using autolayout explicitly (It's turned on though) - should I? Just for the label?Habited
By height I mean height. If your height is to low, there won't be enough space to display multiple lines.Valenza
@MarcMosby there is no height property on UILabel - so titleLabel.height = 500 won't work. How exactly do I set the height programatically?Habited
If it is turned on it means that you are using it, you should just add the correct contsrains in interface builder. Or tun Autolayout off.Yordan
Well it should have a frame, and the height of that frame could be changed.Valenza
@MarcMosby I do not wish to physically change the frame in the storyboardHabited
@AmitErandole either use AutoLayout, this is the easiest option. Or turn it off. If autolayout is turned on in the storyboard all ui element that do not have constraints are layout as they are in the Interface Builder. \Yordan
ou can set the height programmatically, but if your constraints are keeping it there, it won't budge. The other option is to have a constraint with a flexible height, and modify the constraint at the top or bottom as needed.Dorset
@Matthew How do I set "constraint with a flexible height"? Do it through interface builder or programatically?Habited
As with any IBOutlet or IBAction you can just drag a line from the constraint in the storyboard to your controller. This connection will be of type NSLayoutConstraint, and you can then set constraint.constant = 500 to set the new height.Valenza
@MarcMosby I took the vertical constraint and added it to the controller as you said and set the constant/ But these are the results: cl.ly/image/0O2X3Y2k2z1pHabited
H
35

I kind of got things working by adding auto layout constraints:

auto layout contraints

But I am not happy with this. Took a lot of trial and error and couldn't understand why this worked.

Also I had to add to use titleLabel.numberOfLines = 0 in my ViewController

Habited answered 10/6, 2014 at 8:38 Comment(4)
@MarcMosby Could you explain why this worked? Also I did not add any outlets to my controller etc.Habited
Why are you not happy with your solution? numberofLines = 0 means numberOfLines is infinity. As for your constraints, you have a fixed width and a dynamic height. If you want to set the height of your label dynamically according to the amount of text, I can give you a code snippet on how to do so.Valenza
I guess I am unhappy because I don't understand Auto Layout too well. But I am remedying that now. Thank you for your quick explanation and pointing me in the right direction. Could you give me that code snippet for reference as well?Habited
Wow, this idea made my day!! I guess that 2 years later you already know why, but it works because with the top constraint you give the point where it has to start and if it needs extra lines it grows to the bottom because there's no fixed height for the label or bottom constraint.Skerry
D
28

I know it's a bit old but since I recently looked into it :

let l = UILabel()
l.numberOfLines = 0
l.lineBreakMode = .ByWordWrapping
l.text = "BLAH BLAH BLAH BLAH BLAH"
l.frame.size.width = 300
l.sizeToFit()

First set the numberOfLines property to 0 so that the device understands you don't care how many lines it needs. Then specify your favorite BreakMode Then the width needs to be set before sizeToFit() method. Then the label knows it must fit in the specified width

Disclimax answered 22/11, 2016 at 14:9 Comment(8)
This is not a good solution. Think of all the different screen sizes, in both portrait and landscape. Statically setting the width to 300 would not be pretty on all of them.Tumular
@Tumular You're right. But you can set the width dynamically as follow : l.frame.size.width = UIScreen.main.bounds.width * percentage. Then, the width of the label will adapt according to the width of the screen. Obviously, this is a dummy example, you can then adapt according to whether the device is an iPad or and iPhone, etc.Disclimax
That's still not dynamic. It won't work when you rotate the device.Tumular
You 're right about the orientation. And from what I recall about this solution, I guess I have been using viewWillTransition or the NotificationCenter class. Although, I'd use the storyboard's constraints for any recent project, even if it doesn't work well with the native UIScrollViewDisclimax
Yeah, but using viewWillTransition for TableViewCells? Meh.Tumular
This works well for me whilst using a dynamic width.Deanadeanda
This works great even with dynamic width, or autolayout for rotation. I set width, top, left, center anchors with Autolayout, and leave height to manage the frame. I even have a second label below that is anchored to the label's bottom anchor and it works great.Saber
Instead of giving it a fixed frame size l.frame.size.width, you can provide leading and trailing constraints, which is better than a fixed width.Margherita
S
27

This is much better approach if you are looking for multiline dynamic text label which exactly takes the space based on its text.

No sizeToFit, preferredMaxLayoutWidth used

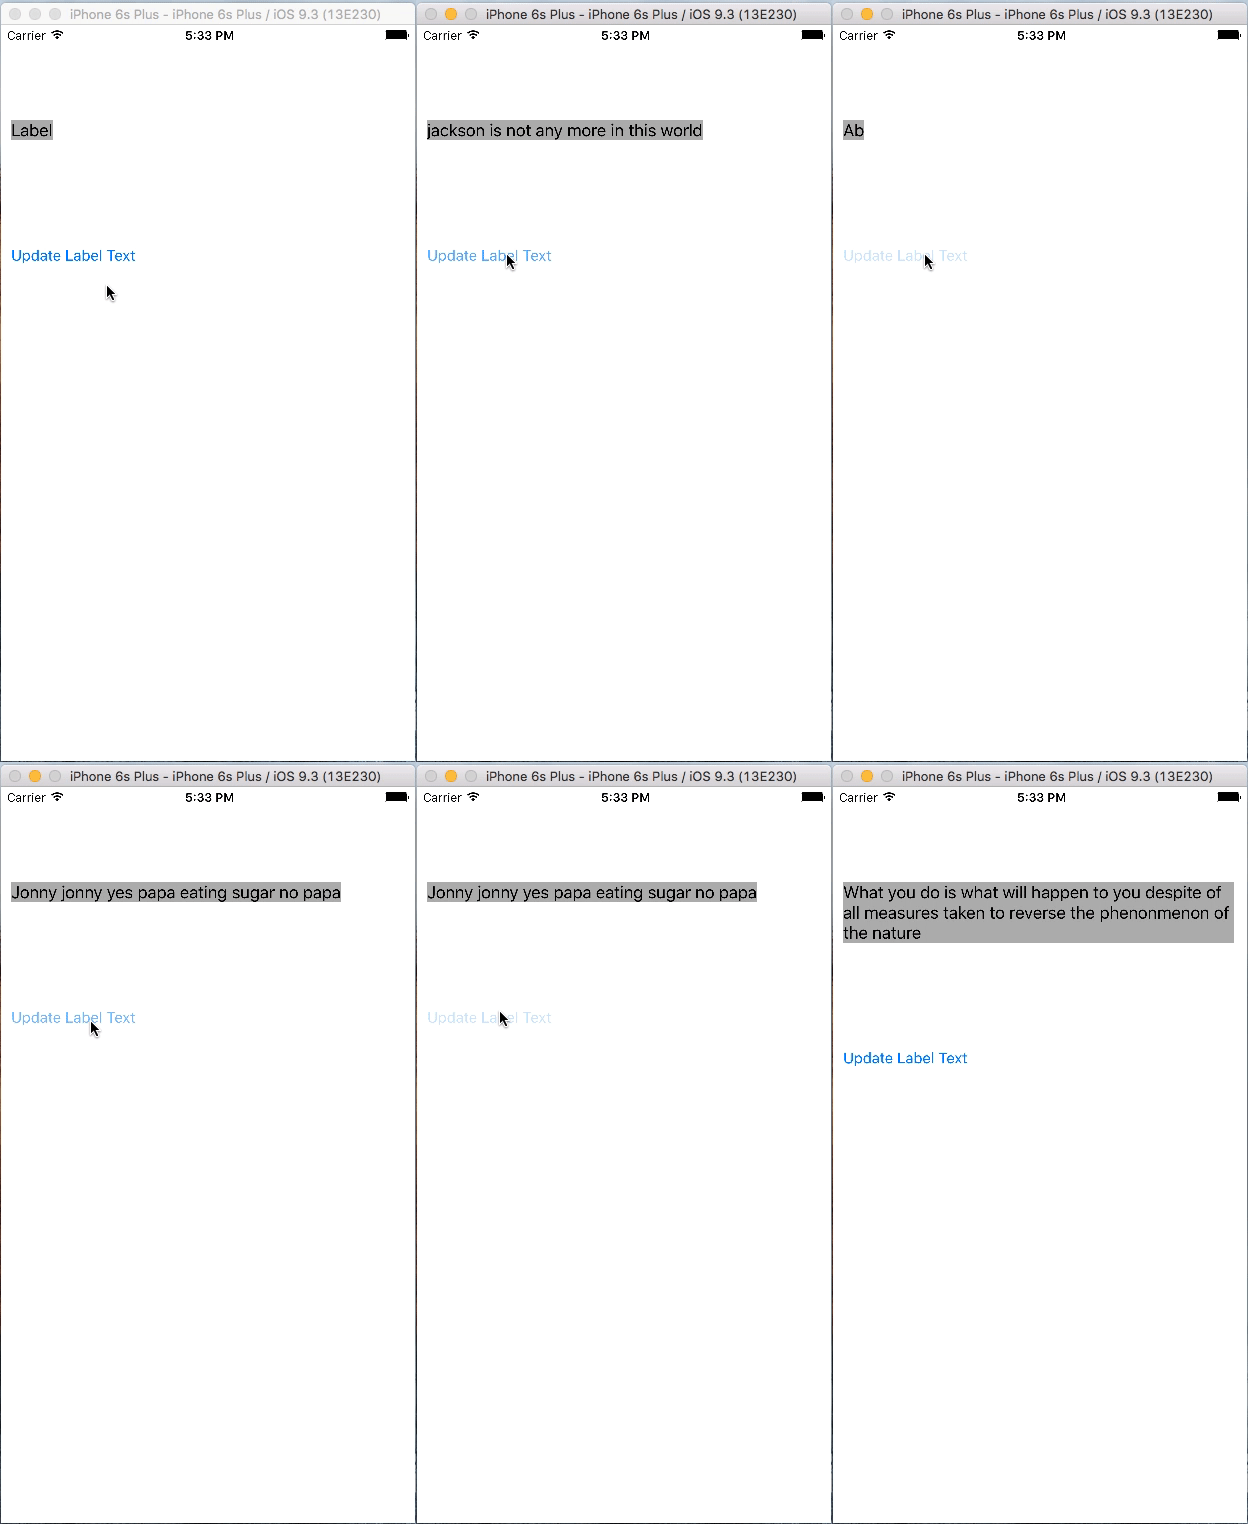
Below is how it will work.

enter image description here

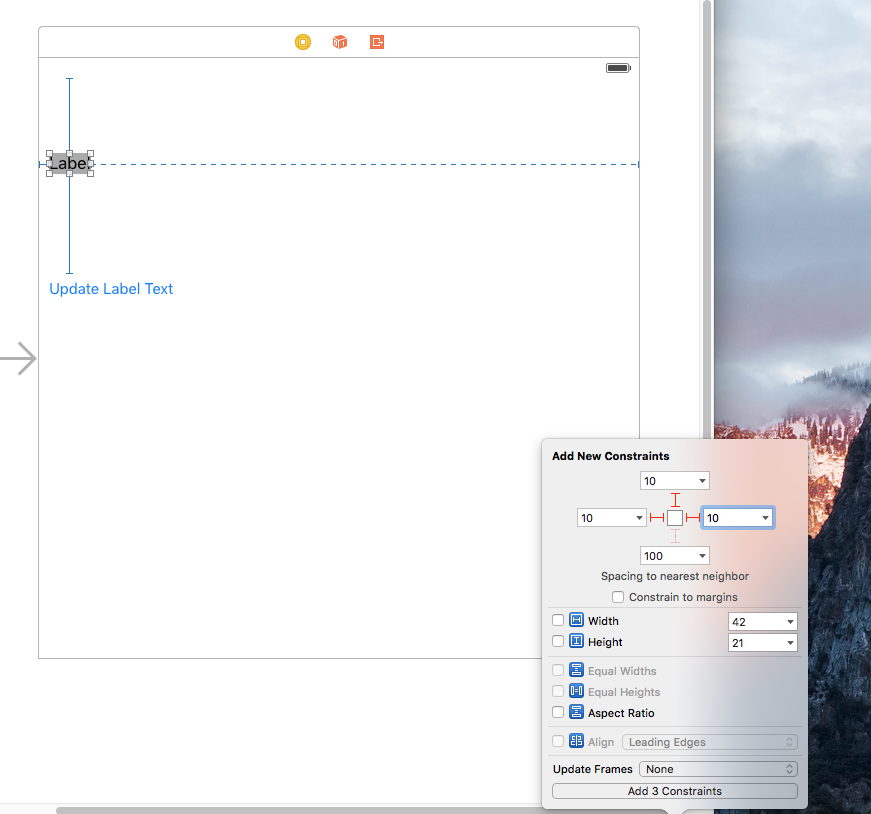
Lets set up the project. Take a Single View application and in Storyboard Add a UILabel and a UIButton. Define constraints to UILabel as below snapshot:

enter image description here

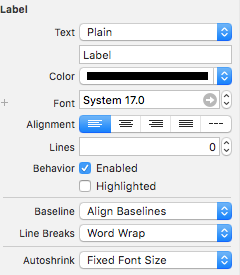
Set the Label properties as below image:

enter image description here

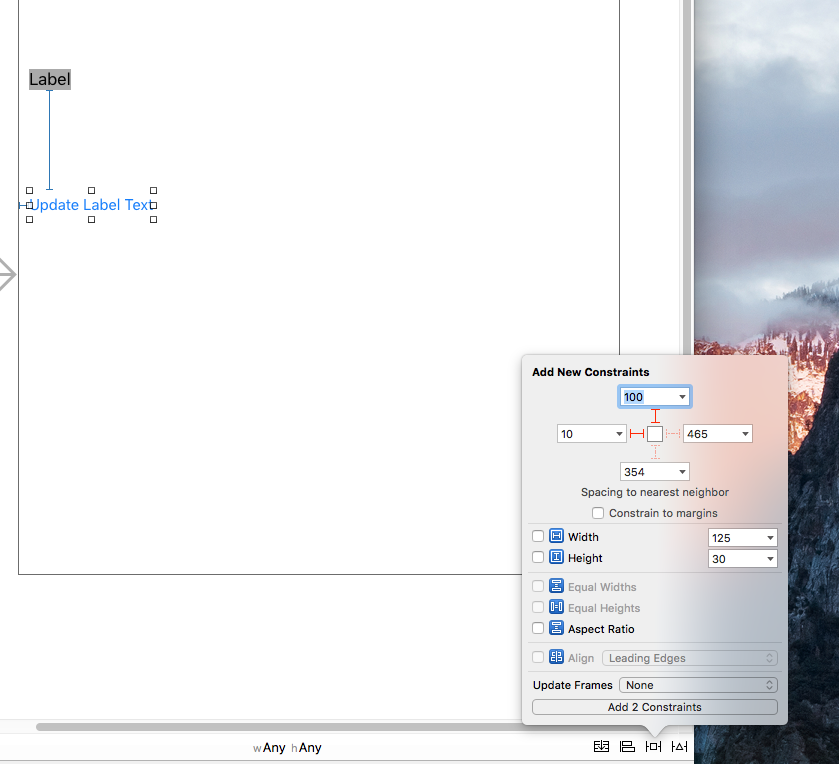
Add the constraints to the UIButton. Make sure that vertical spacing of 100 is between UILabel and UIButton

enter image description here

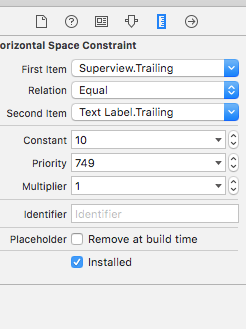
Now set the priority of the trailing constraint of UILabel as 749

enter image description here

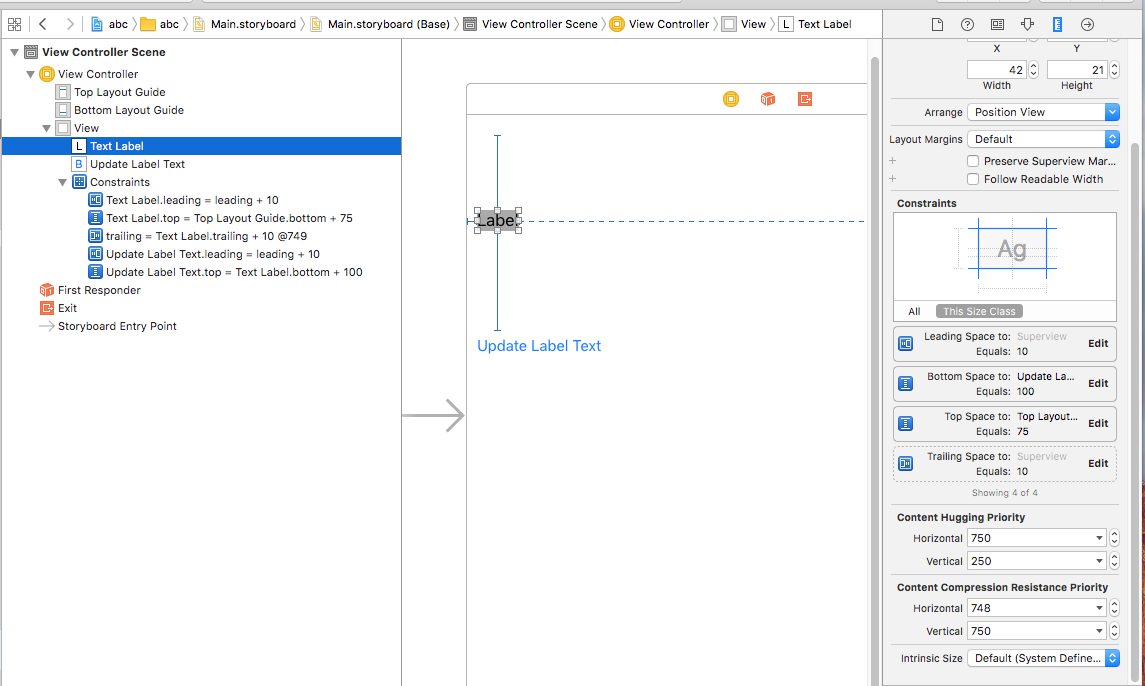
Now set the Horizontal Content Hugging and Horizontal Content Compression properties of UILabel as 750 and 748

enter image description here

Below is my controller class. You have to connect UILabel property and Button action from storyboard to viewcontroller class.

import UIKit

class ViewController: UIViewController {

@IBOutlet weak var textLabel: UILabel!
var count = 0
let items = ["jackson is not any more in this world", "Jonny jonny yes papa eating sugar no papa", "Ab", "What you do is what will happen to you despite of all measures taken to reverse the phenonmenon of the nature"]


@IBAction func updateLabelText(sender: UIButton) {
    if count > 3 {
        count = 0
    }
    textLabel.text = items[count]
    count = count + 1
}

override func viewDidLoad() {
    super.viewDidLoad()
    // Do any additional setup after loading the view, typically from a nib.
    //self.textLabel.sizeToFit()
    //self.textLabel.preferredMaxLayoutWidth = 500
}

override func didReceiveMemoryWarning() {
    super.didReceiveMemoryWarning()
    // Dispose of any resources that can be recreated.
}


}

Thats it. This will automatically resize the UILabel based on its content and also you can see the UIButton is also adjusted accordingly.

Suspend answered 12/5, 2016 at 12:21 Comment(3)
Superb Solution Brother..!! Hats OffMoncear
works great.. can you explain why did you change the priority to 749?Exercitation
Arun, I have a similar problem trying to accomplish the same results but so far all the suggestions I have received do not work. Would you be able to look at my post here: #46716623 and help me solve my constraint issue? Your post here was excellent!!Stoffel
V
21

It should work. Try this

var label:UILabel = UILabel(frame: CGRectMake(10
    ,100, 300, 40));
label.textAlignment = NSTextAlignment.Center;
label.numberOfLines = 0;
label.font = UIFont.systemFontOfSize(16.0);
label.text = "First label\nsecond line";
self.view.addSubview(label);
Vinnievinnitsa answered 10/6, 2014 at 7:17 Comment(5)
But I don't want to set an explicit frame because the text content will be variableHabited
you can get the size of a your String, and apply that size.height to labelVinnievinnitsa
there must be a better way no? that sounds like a terrible solution. IOS8 layouts are meant to be adaptive and flexibleHabited
yeah I agree. But need to explore. If you find anything please answer it, so it will help others as well.Vinnievinnitsa
You should be able to use just .Center. In swift, there's type inference, and since the property is of type NSTextAlignment, theres no need to put it there.Dorset
A
11

With Graphical User Interface (GUI) in Xcode, you can do the following:

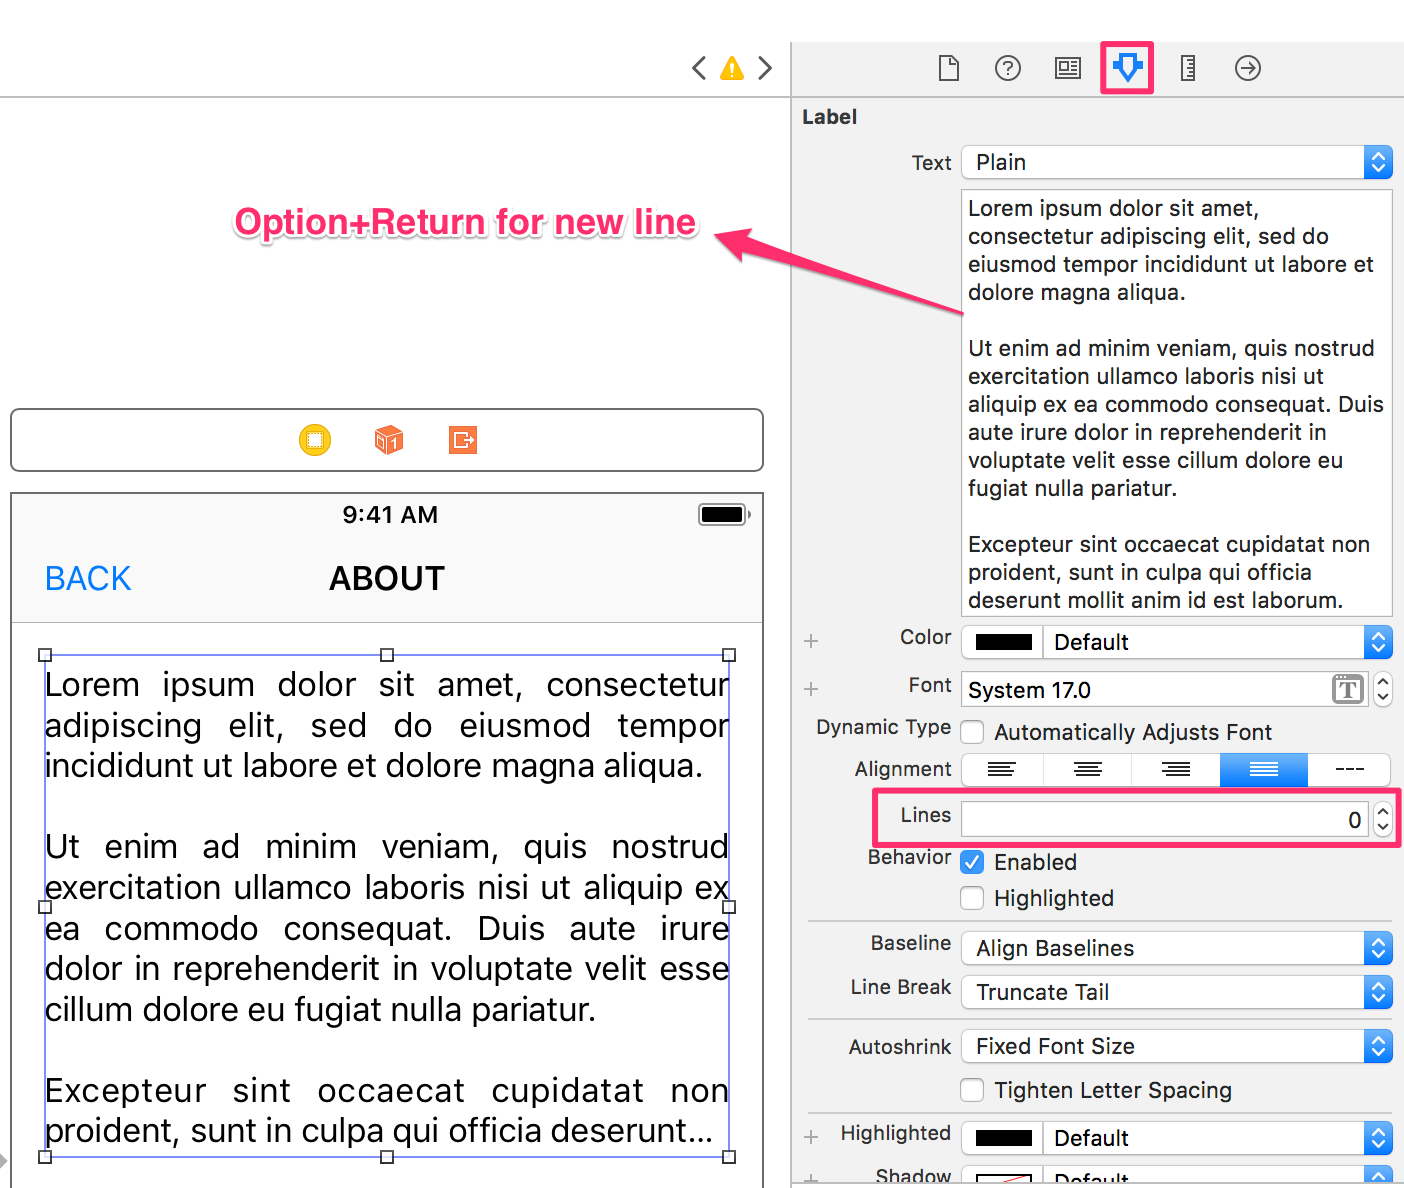
  • Go to "Attribute Inspector" and set Lines value to 0. By default, it is set to 1.
  • The Label text can be written in multi-line by hitting option + return.

enter image description here

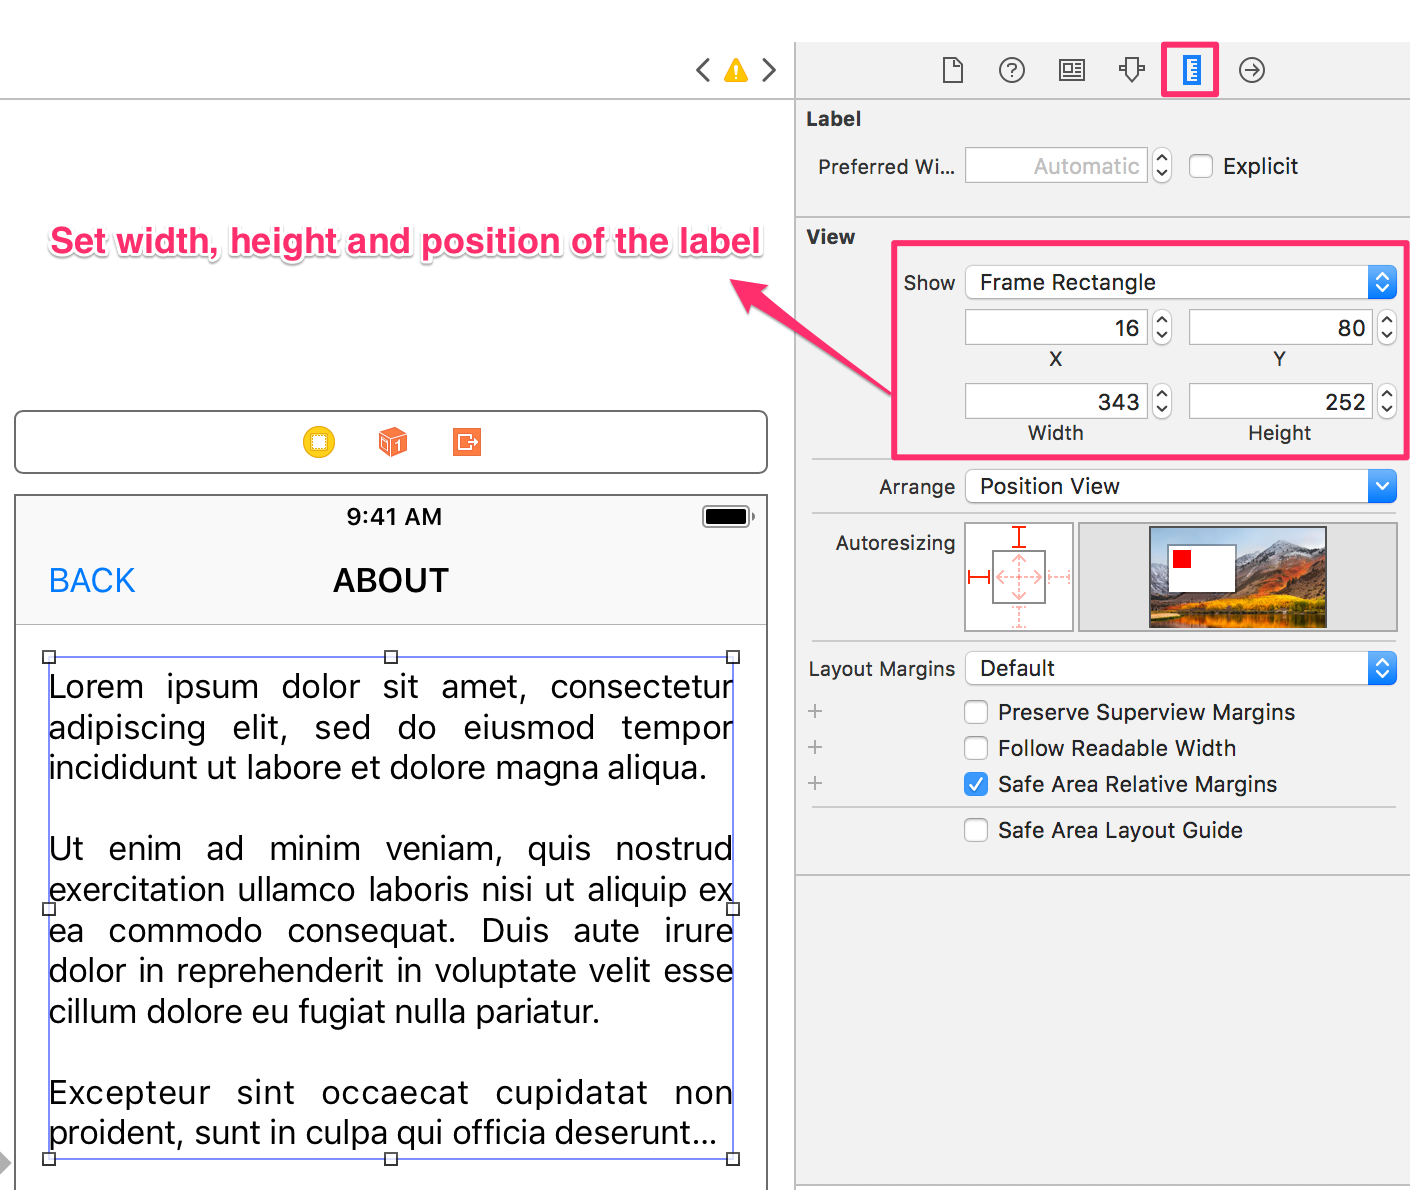
  • Now, go to "Size Inspector" and set the width, height, X & Y position of the Label.

enter image description here

That's all.

Ailurophile answered 6/6, 2018 at 4:58 Comment(1)
question how to set alignment of the text top-left?Quadrilateral
C
3

Programmatically, Swift

label.lineBreakMode = NSLineBreakMode.byWordWrapping
label.titleView.numberOfLines = 2
Colporteur answered 7/5, 2019 at 14:58 Comment(0)
S
0

Programmatically in Swift 5 with Xcode 10.2

Building on top of @La masse's solution, but using autolayout to support rotation

Set anchors for the view's position (left, top, centerY, centerX, etc). You can also set the width anchor or set the frame.width dynamically with the UIScreen extension provided (to support rotation)

label = UILabel()
label.numberOfLines = 0
label.lineBreakMode = .byWordWrapping
self.view.addSubview(label)
// SET AUTOLAYOUT ANCHORS
label.translatesAutoresizingMaskIntoConstraints = false
label.leftAnchor.constraint(equalTo: self.view.leftAnchor, constant: 20).isActive = true
label.rightAnchor.constraint(equalTo: self.view.rightAnchor, constant: -20).isActive = true
label.topAnchor.constraint(equalTo: self.view.topAnchor, constant: 20).isActive = true
// OPTIONALLY, YOU CAN USE THIS INSTEAD OF THE WIDTH ANCHOR (OR LEFT/RIGHT)
// label.frame.size = CGSize(width: UIScreen.absoluteWidth() - 40.0, height: 0)
label.text = "YOUR LONG TEXT GOES HERE"
label.sizeToFit()

If setting frame.width dynamically using UIScreen:

extension UIScreen {   // OPTIONAL IF USING A DYNAMIC FRAME WIDTH
    class func absoluteWidth() -> CGFloat {
        var width: CGFloat
        if UIScreen.main.bounds.width > UIScreen.main.bounds.height {
            width = self.main.bounds.height // Landscape
        } else {
            width = self.main.bounds.width // Portrait
        }
        return width
    }
}
Saber answered 28/5, 2019 at 17:0 Comment(3)
where self.leftAnchor comes from?Mcalpin
.leftAnchor is the NSLayoutAnchor from the superView... The example code considered that the UILabel was embedded in another view (self). To make it easier to understand, I changed it to self.view (assuming that the UILabel was added in a ViewController's view)Saber
Your answer should not used external confusing variables. Example code should reflect minimal workable property.Mcalpin
B
0
extension UILabel {

    var textSize: CGSize { text?.size(withAttributes: [.font: font!]) ?? .zero }

    func setSizeForText(_ str: String, maxWidth: CGFloat) {
        text = str
        let dividedByMaxWidth = Int(textSize.width / maxWidth)
        if dividedByMaxWidth == 0 {
            frame.size = textSize
        } else {
            numberOfLines = dividedByMaxWidth + 1
            frame.size = CGSize(width: maxWidth, height: frame.size.height * CGFloat(numberOfLines))
            sizeToFit()
        }
    }
}

sizeToFit() in the end will shrink the label's width to the widest line after word break

Babushka answered 21/3, 2021 at 19:47 Comment(0)
C
0

This has worked for me:

  • Set the numberOfLines property of UILabel to 0
  • add this line: yourLabel.sizeToFit() after assigning text to the UILabel
Cellule answered 29/5, 2021 at 17:9 Comment(0)

© 2022 - 2024 — McMap. All rights reserved.