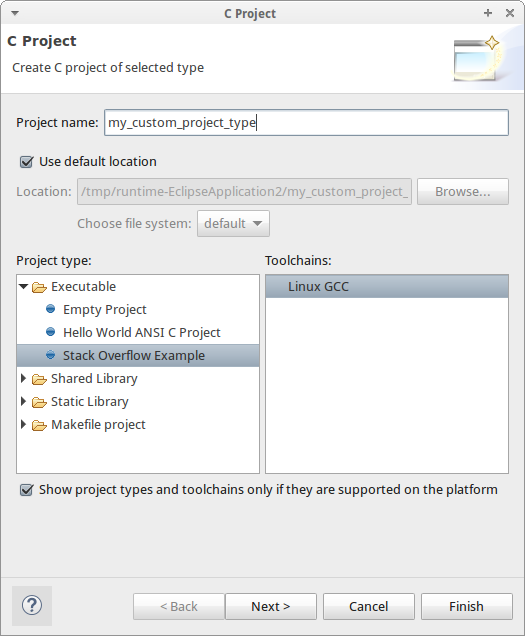
CDT has a complete Templating mechanism for creating new projects.
Basically, you extend the org.eclipse.cdt.core.templates extension point and that points to a template.xml file that has a bunch of commands you can do. You don't need to write any Java code for this, but you do need to create a Plug-in project.
The kinds of things you can do:
- Create folders
- Add files to a project
- Set Managed Build settings (this is the one most relevant because you can set compiler options and add libraries, etc)
- Add extra pages to the New Project Wizard to prompt user for extra information
The Eclipse documentation has a special section giving a run down on how to do it here: http://help.eclipse.org/mars/topic/org.eclipse.cdt.doc.isv/guide/projectTemplateEngine/index.html
The Hello World project that comes with CDT has its template here: https://github.com/eclipse/cdt/blob/master/build/org.eclipse.cdt.managedbuilder.gnu.ui/templates/projecttemplates/HelloWorldCAnsiProject/template.xml
A little note, if you initially create your plug-in to install as a non-packed plug-in, you can edit it in place, adding new templates or editing the one you have already done.
Going further, you can share this template plug-in project with your team and all benefit from having this feature.
Step-by-step
The step by step process to do this (tested on Eclipse Mars.1 with CDT and Plug-in development tools installed plus an XML editor for editing the template.xml)
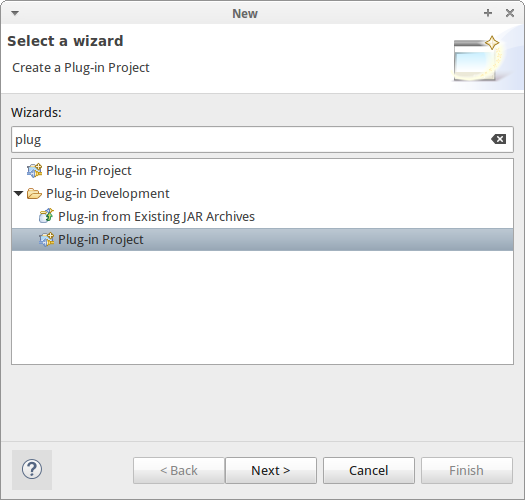
- Create a Plug-in project (
File | New | Other... | Plug-in project)
![step 1]()
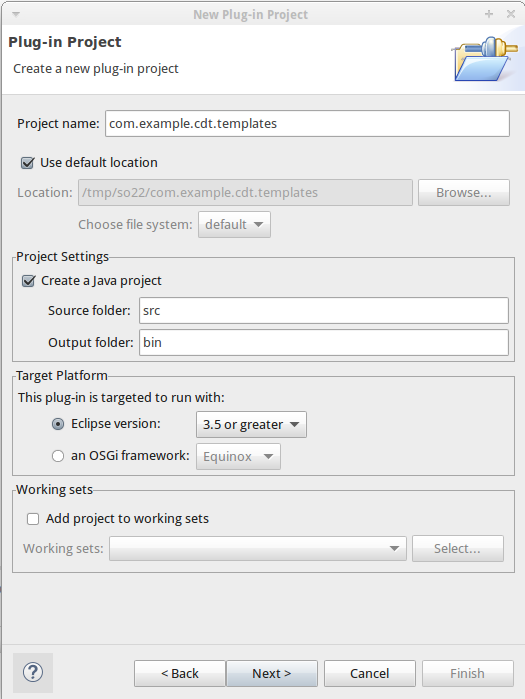
- Fill in a project name and press
Next / Finish until done
![step 2]()
You should now have files on your disk that looks like this in the project you created:
$ find . -type f
./.classpath
./bin/com/example/cdt/templates/Activator.class
./.project
./src/com/example/cdt/templates/Activator.java
./.settings/org.eclipse.jdt.core.prefs
./META-INF/MANIFEST.MF
./build.properties
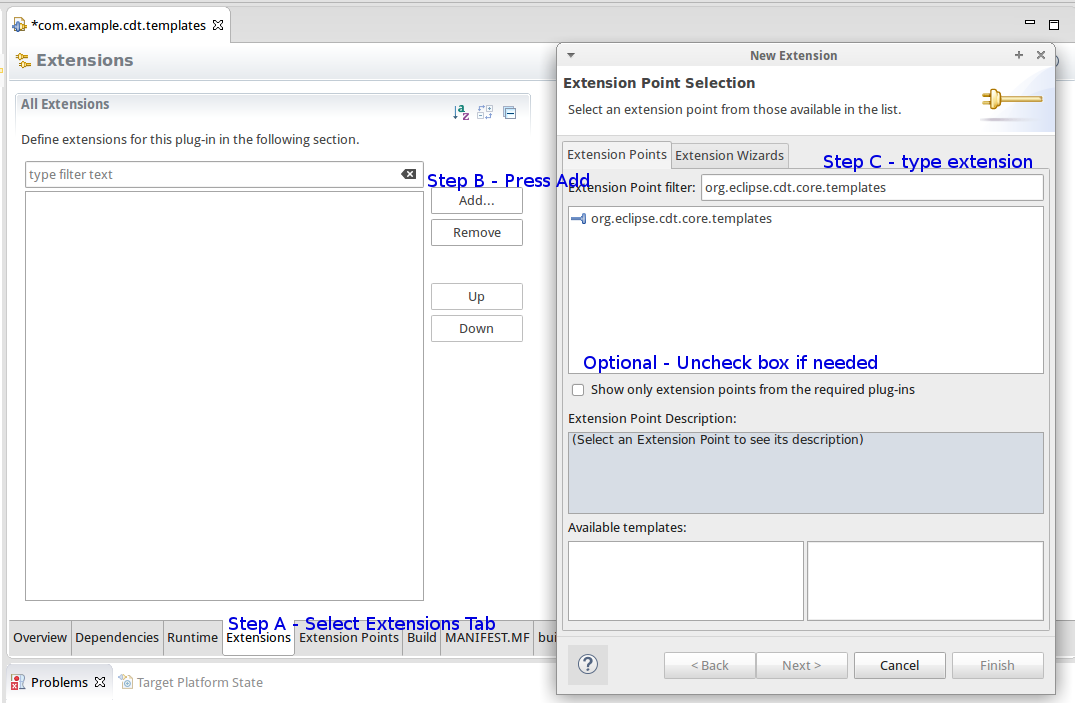
- Open the plug-in.xml and do the following
- Select the
Extensions tab
- Press Add
- Type the extension point
org.eclipse.cdt.core.templates
- Un-check the
Show only extension points [...] checkbox
- Select the
org.eclipse.cdt.core.templates from the list
- Press
Finish
- Say
Yes to adding dependency
![step 3]()
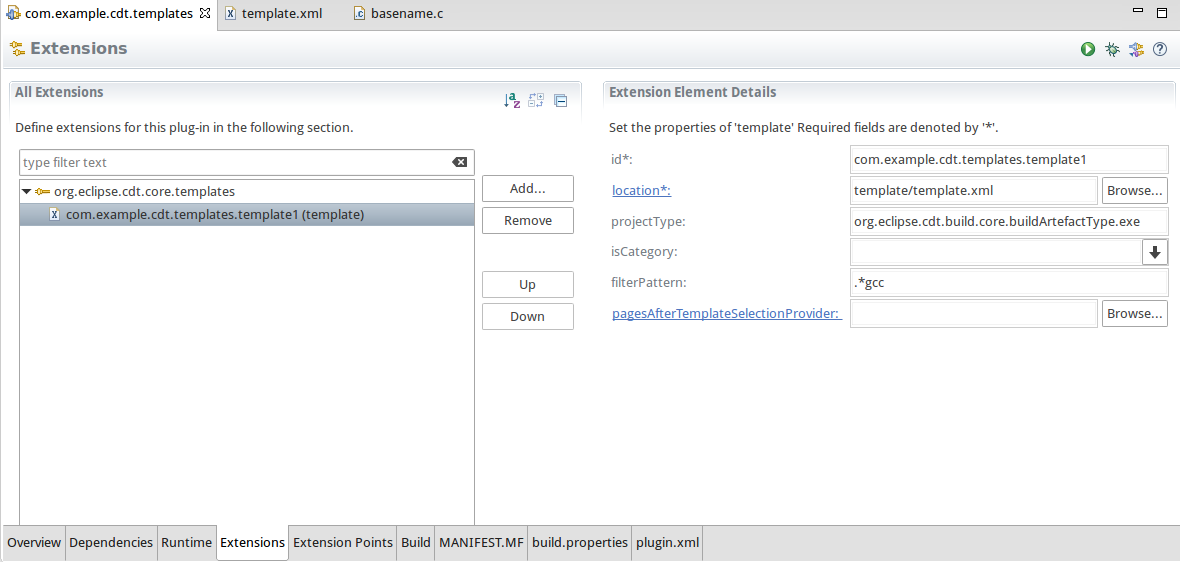
- Add the required settings to the
plugin.xml as shown in the screenshot and given in the plugin.xml code sample after.
![step4]()
<?xml version="1.0" encoding="UTF-8"?>
<?eclipse version="3.4"?>
<plugin>
   <extension
         point="org.eclipse.cdt.core.templates">
      <template
            filterPattern=".*gcc"
            id="com.example.cdt.templates.template1"
            location="template/template.xml"
            projectType="org.eclipse.cdt.build.core.buildArtefactType.exe">
      </template>
   </extension>
</plugin>
- Now create the
template.xml in the location specified in the plugin.xml (template/template.xml) with these contents:
<?xml version="1.0" encoding="ISO-8859-1"?>
<template type="ProjTempl" version="1.0" supplier="Stack Overflow"
    revision="1.0" author="Jonah Graham" id="EXE" label="Stack Overflow Example"
    description="An example for https://mcmap.net/q/1964351/-creating-a-new-c-project-in-eclipse-cdt-with-the-same-settings-as-another-project."
    help="help.html">


    <process type="org.eclipse.cdt.managedbuilder.core.NewManagedProject">
        <simple name="name" value="$(projectName)" />
        <simple name="artifactExtension" value="exe" />
        <simple name="isCProject" value="true" />
    </process>

    <process type="org.eclipse.cdt.core.CreateSourceFolder">
        <simple name="projectName" value="$(projectName)" />
        <simple name="path" value="src" />
    </process>

    <process type="org.eclipse.cdt.core.AddFiles">
        <simple name="projectName" value="$(projectName)" />
        <complex-array name="files">
            <element>
                <simple name="source" value="src/basename.c" />
                <simple name="target" value="src/$(projectName).c" />
                <simple name="replaceable" value="true" />
            </element>
        </complex-array>
    </process>

    <process type="org.eclipse.cdt.ui.OpenFiles">
        <simple name="projectName" value="$(projectName)" />
        <complex-array name="files">
            <element>
                <simple name="target" value="src/$(projectName).c" />
            </element>
        </complex-array>
    </process>

    <!--  Set -Wall by checking the checkbox in the settings -->
    <process
        type="org.eclipse.cdt.managedbuilder.core.SetMBSBooleanOptionValue">
        <simple name="projectName" value="$(projectName)" />
        <complex-array name="resourcePaths">
            <element>
                <simple name="id" value=".*compiler\.option\.warnings\.extrawarn.*" />
                <simple name="value" value="true" />
                <simple name="path" value="" />
            </element>
        </complex-array>
    </process>

    <!--  Set -Werror by adding textual build settings -->
    <process
        type="org.eclipse.cdt.managedbuilder.core.SetMBSStringOptionValue">
        <simple name="projectName" value="$(projectName)" />
        <complex-array name="resourcePaths">
            <element>
                <simple name="id" value=".*compiler\.option\.misc\.other.*" />
                <simple name="value" value="-c -fmessage-length=0 -Werror" />
                <simple name="path" value="" />
            </element>
        </complex-array>
    </process>

    <!--  Add -lmylibname to libraries to link -->
    <process
        type="org.eclipse.cdt.managedbuilder.core.AppendToMBSStringListOptionValues">
        <simple name="projectName" value="$(projectName)" />
        <complex-array name="resourcePaths">
            <element>
                <simple name="id" value=".*link\.option\.libs.*" />
                <simple-array name="values">
                    <element value="mylibname" />
                </simple-array>
                <simple name="path" value="" />
            </element>
        </complex-array>
    </process>
</template>
- Add the source file listed in the template with any content you want in
template/src/basename.c
You should now have a directory structure that looks like this:
$ find . -type f
./.classpath
./template/src/basename.c
./template/template.xml
./bin/com/example/cdt/templates/Activator.class
./.project
./src/com/example/cdt/templates/Activator.java
./.settings/org.eclipse.jdt.core.prefs
./META-INF/MANIFEST.MF
./plugin.xml
./build.properties
Launch the Eclipse Application to test (Run menu | Run As | Eclipse Application). You can also right-click on the project and choose Run As | Eclipse Application.
In the newly running Eclipse, start a new project wizard and select your new C project type:
![new project wizard]()
Running a build shows the new settings (the error is expected as I don't actually have a library called mylibname):
Building file: ../src/hello2.c
Invoking: GCC C Compiler
gcc -O0 -g3 -Wall -Wextra -c -fmessage-length=0 -Werror -MMD -MP -MF"src/hello2.d" -MT"src/hello2.o" -o "src/hello2.o" "../src/hello2.c"
Finished building: ../src/hello2.c

Building target: hello2
Invoking: GCC C Linker
gcc  -o "hello2"  ./src/hello2.o   -lmylibname
/usr/bin/ld: cannot find -lmylibname
collect2: error: ld returned 1 exit status
make: *** [hello2] Error 1
The tricky part?
You may need to examine the .cproject file from your base project to determine the magic strings that go in the id fields. For example, in my .cproject for -Wextra I can see this:
<option id="gnu.c.compiler.option.warnings.extrawarn.176373860" name="Extra warnings (-Wextra)" superClass="gnu.c.compiler.option.warnings.extrawarn" value="true" valueType="boolean"/>
That translates to this command in the template.xml:
<!--  Set -Wall by checking the checkbox in the settings -->
<process
    type="org.eclipse.cdt.managedbuilder.core.SetMBSBooleanOptionValue">
    <simple name="projectName" value="$(projectName)" />
    <complex-array name="resourcePaths">
        <element>
            <simple name="id" value=".*compiler\.option\.warnings\.extrawarn.*" />
            <simple name="value" value="true" />
            <simple name="path" value="" />
        </element>
    </complex-array>
</process>
The id goes from gnu.c.compiler.option.warnings.extrawarn.176373860 to regexp .*compiler\.option\.warnings\.extrawarn.*. The beginning is .* so that this applies to C and C++ compiler options as the C++ id would have started with gnu.cc.compiler[...] and I get rid of the end with .* because the number and suffix is not known to you in the template.xml
Next steps
When you are done, see Launching Eclipse plug in template for how to export the plug-in into your running Eclipse.

