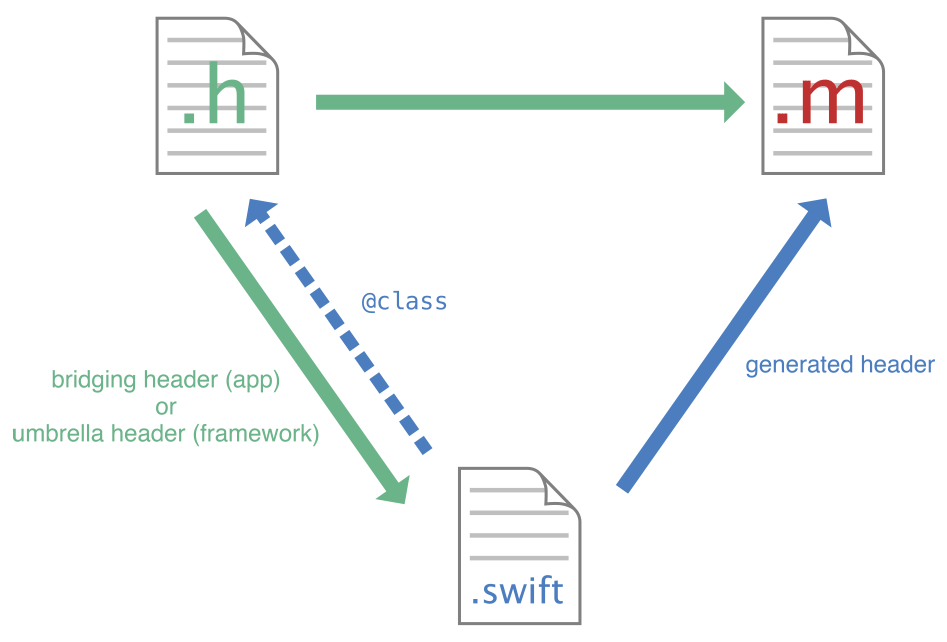
Apple has written a great book that covers this in depth. It can be found here:
https://developer.apple.com/library/ios/documentation/Swift/Conceptual/BuildingCocoaApps/MixandMatch.html
I will quote it to answer your questions:
"What is the use of bridging header?
Is it just for using Objective-C and Swift code in the same project?"
To import a set of Objective-C files in the same app target as your Swift code, you rely on an Objective-C bridging header to expose those files to Swift. Xcode offers to create this header file when you add a Swift file to an existing Objective-C app, or an Objective-C file to an existing Swift app.
The answer to this question is yes. It is just there to make Swift and Objective-C work together in the same project.
"Should we avoid using bridging header? Say, if there are two third party library which are very similar; one of them is in Objective-C and other is in Swift. Should we use the Swift library or use Objective-C library. Are there any downside of using bridging headers?"
There are always tradeoffs. The first answer to this is no you should not avoid using a bridging header; however, as far as third party libraries you have to look at many factors. Which one has more functionality? Is it being maintained and/or added to frequently?
Using an Objective-C library will also add things to be aware of and work around. From the book:
Troubleshooting Tips and Reminders
Treat your Swift and Objective-C files as the same collection of code, and watch out for naming collisions.
If you’re working with frameworks, make sure the Defines Module (DEFINES_MODULE) build setting under Packaging is set to “Yes".
If you’re working with the Objective-C bridging header, make sure the Objective-C Bridging Header (SWIFT_OBJC_BRIDGING_HEADER) build setting under Swift Compiler - Code Generation is set to a path to the bridging header file relative to your project (for example, “MyApp/MyApp-Bridging-Header.h").
Xcode uses your product module name (PRODUCT_MODULE_NAME)—not your target name (TARGET_NAME)—when naming the Objective-C bridging header and the generated header for your Swift code. For information on product module naming, see Naming Your Product Module.
To be accessible and usable in Objective-C, a Swift class must be a descendant of an Objective-C class or it must be marked @objc.
When you bring Swift code into Objective-C, remember that Objective-C won’t be able to translate certain features that are specific to Swift. For a list, see Using Swift from Objective-C.
If you use your own Objective-C types in your Swift code, make sure to import the Objective-C headers for those types before importing the Swift generated header into the Objective-C .m file you want to use your Swift code from.
Swift declarations marked with the private modifier do not appear in the generated header. Private declarations are not exposed to Objective-C unless they are explicitly marked with @IBAction, @IBOutlet, or @objc as well.
For app targets, declarations marked with the internal modifier appear in the generated header if the app target has an Objective-C bridging header.
For framework targets, only declarations with the public modifier appear in the generated header. You can still use Swift methods and properties that are marked with the internal modifier from within the Objective-C part of your framework, as long they are declared within a class that inherits from an Objective-C class. For more information on access-level modifiers, see Access Control in The Swift Programming Language (Swift 2.2).

