Oracle JRE rule failure while installing SQL Server 2017 Developer edition
Asked Answered
R

6

4

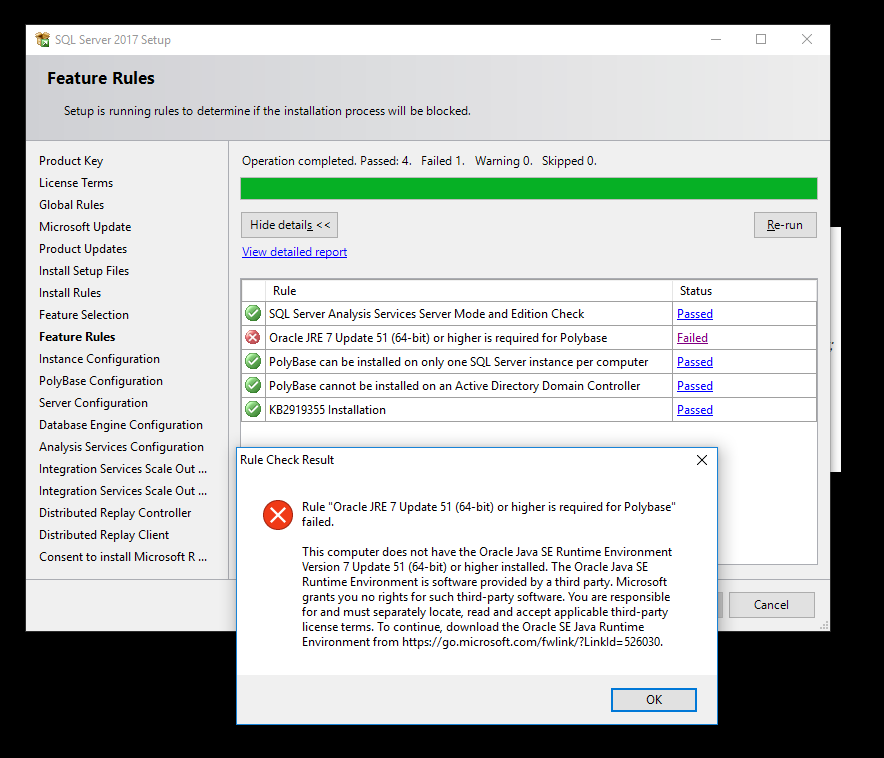
I'm unable to pass below rule while installing SQL Server 2017 Developer edition on windows 10 machine on Feature Rules screen:

  • Oracle JRE 7 Update 51 (64-bit) or higher is required for Polybase

I'm getting below error:

This computer does not have the Oracle Java SE Runtime Environment Version 7 Update 51 (64-bit) or higher installed. The Oracle Java SE Runtime Environment is software provided by a third party. Microsoft grants you no rights for such third-party software. You are responsible for and must separately locate, read and accept applicable third-party license terms. To continue, download the Oracle SE Java Runtime Environment from https://go.microsoft.com/fwlink/?LinkId=526030.

enter image description here

I've sufficiently high Java version (9.x) installed on my machine. I ran the command java -XshowSettings:properties -version which gives below details related to Java installation on my box:

Property settings:
    awt.toolkit = sun.awt.windows.WToolkit
    file.encoding = Cp1252
    file.encoding.pkg = sun.io
    file.separator = \
    java.awt.graphicsenv = sun.awt.Win32GraphicsEnvironment
    java.awt.printerjob = sun.awt.windows.WPrinterJob
    java.class.path =
    java.class.version = 53.0
    java.home = C:\Program Files\Java\jre-9.0.1
    java.io.tmpdir = C:\Users\RASIK~1.BIH\AppData\Local\Temp\
    java.library.path = C:\ProgramData\Oracle\Java\javapath
        C:\Windows\Sun\Java\bin
        C:\Windows\system32
        C:\Windows
        C:\ProgramData\Oracle\Java\javapath
        C:\Program Files (x86)\Intel\iCLS Client\
        C:\Program Files\Intel\iCLS Client\
        C:\Windows\system32
        C:\Windows
        C:\Windows\System32\Wbem
        C:\Windows\System32\WindowsPowerShell\v1.0\
        C:\Program Files (x86)\ATI Technologies\ATI.ACE\Core-Static
        C:\Program Files (x86)\Intel\Intel(R) Management Engine Components\DAL
        C:\Program Files\Intel\Intel(R) Management Engine Components\DAL
        C:\Program Files (x86)\Intel\Intel(R) Management Engine Components\IPT
        C:\Program Files\Intel\Intel(R) Management Engine Components\IPT
        C:\Program Files\Microsoft SQL Server\130\Tools\Binn\
        C:\Program Files\dotnet\
        C:\Program Files\Git\cmd
        C:\Program Files\nodejs\
        C:\Program Files\1E\NomadBranch\
        C:\Program Files\TortoiseSVN\bin
        C:\Users\rasik.bihari\AppData\Local\Microsoft\WindowsApps
        C:\Users\rasik.bihari\AppData\Roaming\npm
        .
    java.runtime.name = Java(TM) SE Runtime Environment
    java.runtime.version = 9.0.1+11
    java.specification.name = Java Platform API Specification
    java.specification.vendor = Oracle Corporation
    java.specification.version = 9
    java.vendor = Oracle Corporation
    java.vendor.url = http://java.oracle.com/
    java.vendor.url.bug = http://bugreport.java.com/bugreport/
    java.version = 9.0.1
    java.vm.compressedOopsMode = Zero based
    java.vm.info = mixed mode
    java.vm.name = Java HotSpot(TM) 64-Bit Server VM
    java.vm.specification.name = Java Virtual Machine Specification
    java.vm.specification.vendor = Oracle Corporation
    java.vm.specification.version = 9
    java.vm.vendor = Oracle Corporation
    java.vm.version = 9.0.1+11
    jdk.debug = release
    line.separator = \r \n
    os.arch = amd64
    os.name = Windows 10
    os.version = 10.0
    path.separator = ;
    sun.arch.data.model = 64
    sun.boot.library.path = C:\Program Files\Java\jre-9.0.1\bin
    sun.cpu.endian = little
    sun.cpu.isalist = amd64
    sun.desktop = windows
    sun.io.unicode.encoding = UnicodeLittle
    sun.java.launcher = SUN_STANDARD
    sun.jnu.encoding = Cp1252
    sun.management.compiler = HotSpot 64-Bit Tiered Compilers
    sun.os.patch.level =
    sun.stderr.encoding = cp850
    sun.stdout.encoding = cp850
    user.country = IN
    user.dir = C:\Users\rasik.bihari
    user.home = C:\Users\rasik.bihari
    user.language = en
    user.name = Rasik.Bihari
    user.script =
    user.timezone =
    user.variant =

java version "9.0.1"
Java(TM) SE Runtime Environment (build 9.0.1+11)
Java HotSpot(TM) 64-Bit Server VM (build 9.0.1+11, mixed mode)

Not sure what else this installer is looking for. Has anyone else faced this error? One obvious solution is to skip PolyBase Query Service for External Data feature i.e. unselect it on Feature Selection screen but I don't want to do that. I want to resolve this issue as to why it is still interrupting the installation when my machine configuration is meeting all the prerequisites?

Reflation answered 20/11, 2017 at 6:11 Comment(0)
B
3

INTRODUCTION:

I had the same exact issue, took me forever to fix it. I started with the latest versions of Java (available here: http://www.oracle.com/technetwork/java/javase/downloads/index.html) and installed JRE, JRE Server, and JDK; first separately and then altogether following the instructions here: https://docs.oracle.com/javase/9/install/installation-jdk-and-jre-microsoft-windows-platforms.htm#JSJIG-GUID-A7E27B90-A28D-4237-9383-A58B416071CA) but kept getting the same error message.

SOLUTION:

  1. Uninstalled all three Java 9s that I had installed on my Windows 10
  2. Deleted all Java paths in the Environment Variables (located in the System Properties, Advanced Tab); find it easily by searching for env after opening the start menu and choose "Edit the System Environment Variable" in the search results
    • In the System Properties/Advanced, select the "Path" variable in the "System Variables" and delete all Java paths within that variable.
  3. Restarted my PC and downloaded JRE 7 (jre-7u80-windows-x64.exe) from this path: http://www.oracle.com/technetwork/java/javase/downloads/java-archive-downloads-javase7-521261.html
  4. Ran the exe file and after finishing the installation, went back to the System Properties and added the new Java location to the path. You should add the location of the bin folder; in my computer, it was: C:\program files\java\jre7\bin
  5. I also enabled the Java Access Bridge. Java Installation Guide: "By default, the Java Access Bridge is disabled. To enable it, run the following command (where %JRE_HOME% is the directory of your JRE): %JRE_HOME%\bin\jabswitch -enable"
  6. Restarted my system again
  7. Easily installed the PolyBase.

Then after that I reupdated my Java to 9. Hope this helps your situation as well!

Burdine answered 21/11, 2017 at 7:2 Comment(3)
This is extremely bad. The prerequisite says JRE 7 (Update 51) or higher but it works ONLY when you've JRE 7 (precisely 7). Shear magic!! I thought 9 is a greater number than 7 :P. Thanks for your findings. I simply uninstalled JRE 9 and installed JRE 7 (Update 80) from the link recommended by you in step 3 and it all worked thereafter very smoothly.Reflation
Haha, I just came back to put a disclaimer that I am not sure if every single step in my post might be needed; I just wanted to fully document what I did, especially after so much frustration of not being able to fix it under Java 9. Happy to see that you were able to fix yours and also happier to see that just uninstalling 9 and installing 7 will fix it. So guys, dont follow all the details on my initial response! just do what RBT did...Burdine
The John Paul Cook Answer below worked and seems the most relevant now in 2019.Philosophy
C
6

I fully explained the root cause and provided a registry edit workaround in an article I published in early December 2017. The problem is the same in SQL Server 2016 and 2017 as mentioned in the article here.

The quick summary is that Oracle changed the registry key structure after version 8 of the JRE. The SQL Server 2016 and 2017 installers look for the JRE version 7 registry key names found at and below: HKEY_LOCAL_MACHINE\SOFTWARE\JavaSoft\Java Runtime Environment

Let's say you want to use JRE version 9 and you don't want to install JRE version 7. You'll have to export the JRE 9 version keys found at HKEY_LOCAL_MACHINE\SOFTWARE\JavaSoft\JRE and edit them to make the key names match the JRE 7. There are three keys to rename. Import the edited keys. That way the installer will find version 7 key names that are pointing to JRE 9 locations.

Quoting from the part of the article about editing key names:

You want to replace all occurrences of JRE with Java Runtime Environment. You must not alter the lowercase jre references.

For example, change HKEY_LOCAL_MACHINE\SOFTWARE\JavaSoft\JRE to HKEY_LOCAL_MACHINE\SOFTWARE\JavaSoft\Java Runtime Environment

Childhood answered 7/3, 2018 at 16:20 Comment(4)
A link to a solution is welcome, but please ensure your answer is useful without it: add context around the link so your fellow users will have some idea what it is and why it’s there, then quote the most relevant part of the page you're linking to in case the target page is unavailable. Answers that are little more than a link may be deleted.Calorimeter
This is certainly the solution if someone is having other softwares installed on his machine which depend upon higher/latest versions of JRE. So they can't afford to continue with v7 of JRE. In my case I had no such restriction so I continued with v7 which isn't the latest version of JRE.Reflation
This should be the accepted answer. This worked with Java 10. Thanks.Fletcherfletcherism
And this solution works in Java 11 - January 2019. - More Details in a comment below as an answer.Philosophy
B
3

INTRODUCTION:

I had the same exact issue, took me forever to fix it. I started with the latest versions of Java (available here: http://www.oracle.com/technetwork/java/javase/downloads/index.html) and installed JRE, JRE Server, and JDK; first separately and then altogether following the instructions here: https://docs.oracle.com/javase/9/install/installation-jdk-and-jre-microsoft-windows-platforms.htm#JSJIG-GUID-A7E27B90-A28D-4237-9383-A58B416071CA) but kept getting the same error message.

SOLUTION:

  1. Uninstalled all three Java 9s that I had installed on my Windows 10
  2. Deleted all Java paths in the Environment Variables (located in the System Properties, Advanced Tab); find it easily by searching for env after opening the start menu and choose "Edit the System Environment Variable" in the search results
    • In the System Properties/Advanced, select the "Path" variable in the "System Variables" and delete all Java paths within that variable.
  3. Restarted my PC and downloaded JRE 7 (jre-7u80-windows-x64.exe) from this path: http://www.oracle.com/technetwork/java/javase/downloads/java-archive-downloads-javase7-521261.html
  4. Ran the exe file and after finishing the installation, went back to the System Properties and added the new Java location to the path. You should add the location of the bin folder; in my computer, it was: C:\program files\java\jre7\bin
  5. I also enabled the Java Access Bridge. Java Installation Guide: "By default, the Java Access Bridge is disabled. To enable it, run the following command (where %JRE_HOME% is the directory of your JRE): %JRE_HOME%\bin\jabswitch -enable"
  6. Restarted my system again
  7. Easily installed the PolyBase.

Then after that I reupdated my Java to 9. Hope this helps your situation as well!

Burdine answered 21/11, 2017 at 7:2 Comment(3)
This is extremely bad. The prerequisite says JRE 7 (Update 51) or higher but it works ONLY when you've JRE 7 (precisely 7). Shear magic!! I thought 9 is a greater number than 7 :P. Thanks for your findings. I simply uninstalled JRE 9 and installed JRE 7 (Update 80) from the link recommended by you in step 3 and it all worked thereafter very smoothly.Reflation
Haha, I just came back to put a disclaimer that I am not sure if every single step in my post might be needed; I just wanted to fully document what I did, especially after so much frustration of not being able to fix it under Java 9. Happy to see that you were able to fix yours and also happier to see that just uninstalling 9 and installing 7 will fix it. So guys, dont follow all the details on my initial response! just do what RBT did...Burdine
The John Paul Cook Answer below worked and seems the most relevant now in 2019.Philosophy
W
1

I tried to install SQL Server 2017, with PolyBase included. No solution worked for me except installing JRE 8.144

JRE 8.144 Download

Watchword answered 14/7, 2018 at 5:18 Comment(0)
M
0

Warning: This is a registry fix so try it at your own risk !

Situation: I already had JDK installed which was much higher that version required in the setup.

Looking at the installation logs I found this:

SQLPolyBase: Could not find registry setting HKEY_LOCAL_MACHINE\SOFTWARE\JavaSoft\Java Runtime Environment\CurrentVersion.

Solution: Go to registry editor. Create the key "Java Runtime Environment" and replicate everything under the following key:

HKEY_LOCAL_MACHINE\SOFTWARE\JavaSoft\JRE

Once that's done, running the scan should succeed.

Maddi answered 30/12, 2017 at 4:25 Comment(0)
R
0

I had this problem just today and I've been looking for a solution for the last 5 hours, but I really did find it here but there is kind of "bad way to give the solution"

Basically the solution is to go to the registery editor (Open run and type regedit) and go to the third choice which is "HKEY_LOCAL_MACHINE" and >SOFTWARE>JAVASOFT>JRE you will find the file named JRE just change the name to "Java Runtime Environment" !! And thats basically it because the SQL server installation problem is that it didnt find the folder with the name "Java Runtime Environment" instead it found JRE which is just a shortcut and that shortcut Came with the last updates 5 and higher thats why u get an error when u download and install the JRE 5 or higher!

Request answered 10/7, 2018 at 14:53 Comment(0)
P
0

John Paul Cooks answer above and backing article worked perfectly for JDK 11 and SQL 2017

I added this comment to show specific JDK 11 values – the process has not changed.

JDK 11 – Simple Registry Trick Works for SQL 2017

1: Export the JDK Key from Registry HKEY_LOCAL_MACHINE\SOFTWARE\JavaSoft\JDK

2: In Text .reg File that was exported Replace the Key Name Part JDK with Java Runtime Environment. Just the Key Name – not anywhere else the text JDK is used like in values.

3: Import to the Registry the .Reg File You just edited. Now you have the real JDK key and a Copy of the JDK key with all its values. This second new JDK Key is named “Java Runtime Environment” instead of JDK.

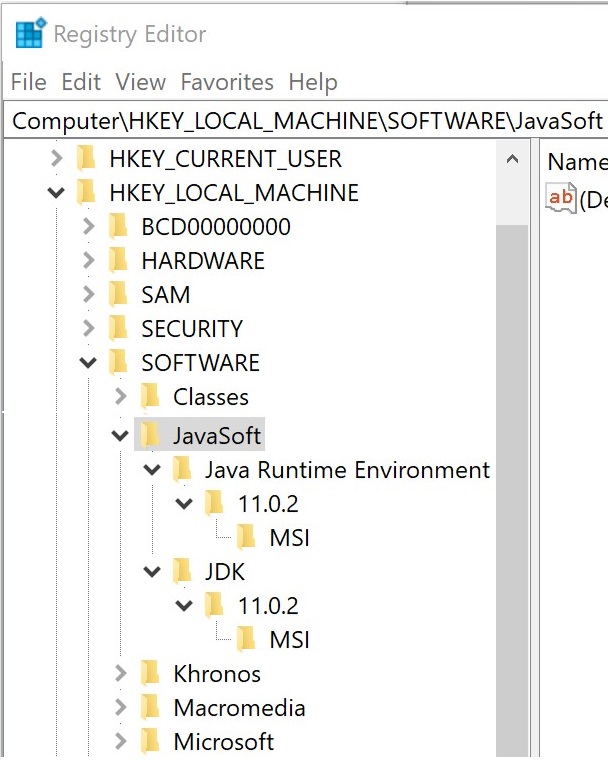
Both Original and New Key for JDK

The real Key JDK is left alone. The second Key called Java Runtime Environment is there to let SQL Server do the Install. The second new key has the exact same item values as the JDK key for each SubKey - it is only the name of the JDK key that changed.

Philosophy answered 3/2, 2019 at 3:20 Comment(0)

© 2022 - 2024 — McMap. All rights reserved.